Hyper-V Nested Virtualization Explained
Hyper-V nested virtualization is a feature that was first released with Windows Server 2016 and Windows 10, and available on workstations as well as servers. The application area for the Microsoft Hyper-V hypervisor was expanded with the introduction of this feature. This blog post explains what nested virtualization is, as well as the use cases, requirements, and limitations of nested virtualization in Microsoft Hyper-V.

What Is Nested Virtualization?
Nested virtualization in Microsoft Hyper-V is a feature that allows you to create virtual machines (VMs) within other Hyper-V VMs running on a Hyper-V host. These VMs running inside VMs are called nested VMs. Note that nested virtualization can also be configured in VMware environments.

Use cases
The following are some of the use cases for nested virtualization in virtual environments:
Creating isolated environments. You can use this feature to create nested virtual machines that are connected to each other via an isolated virtual network. Thus, you can create a fully isolated environment, which has no impact on your regular virtual machines and network.Training/testing/development. Training is useful for familiarizing new users or administrators with software (or for familiarizing existing users or administrators with new software). However, training in production environments can lead to instability or even failure. With nested virtualization, you can simulate the production environment on nested VMs without any impact on the real production environment.Besides training for administrators, QA specialists (testers) and developers may need this type of environment for testing or development purposes. The benefit is that you can use nested VMs in existing virtual environments for these purposes without the need to buy additional dedicated hardware.
Building a private cloud. Deploying a real private cloud with a self-service portal for users can be expensive and labor-intensive. With nested virtualization, you can deploy a pseudo-private cloud with identical functionality to that type of cloud. For example, you could create a VM with Hyper-V Server installed and provision 256 GB of RAM.Users can create and configure nested VMs inside the VM with Hyper-V installed depending on their needs, but they cannot exceed the memory limit and consume more than 256 GB of RAM. You can add memory and virtual network adapters to VMs on which Hyper-V is installed with the hot-add feature without any downtime.
Requirements and Limitations
You should meet the following requirements to implement nested virtualization in Hyper-V:
- The host operating system must be Windows Server 2016 or Windows 10 (Anniversary update) or later.
- The Hyper-V VM must be version 8 or higher.
- The physical server must have a compatible CPU that supports the appropriate virtualization features.
- Only Intel processors with VT-x and EPT technology support nested virtualization in Windows Server 2016, Windows Server 2019, and Windows 10.
- If you have AMD processors with AMD-V virtualization features, you must use Windows Server 2022 or Windows 11 to have support for Hyper-V nested virtualization.
- The newest Windows versions support both AMD and Intel processors.
- There must be enough physical memory to run the VMs.
- The VM should not be using Dynamic Memory.
- While not a requirement, it is recommended that you use SSD disks to improve VM performance, as low disk speeds significantly reduce performance.
Some limitations apply to the VMs hosting nested VMs (nested VMs can be referred to as “innermost guests”):
- Checkpoints cannot be applied to a running VM.
- Live migration fails for the VM.
- Runtime memory resize does not function.
Note: The features associated with these three limitations above can be used for the innermost guests.
What is nested VT-x/AMD-V?
Intel VT-x and AMD-V are instruction sets for processors, which enable hardware virtualization. When you use nested virtualization, you need to enable one of these features for the virtual machine used for nesting. Only then can a VM use the processor’s hardware virtualization features to run nested VMs.
How to Enable Hyper-V Nested Virtualization and Create a Nested VM
This section covers the actions for configuring Hyper-V nested virtualization in Windows Server 2019. The configuration process is the same for Windows Server 2016 and Windows Server 2022.
Configuring the Hyper-V host
First, you need to configure the Hyper-V host:
- Prepare a physical server with a compatible CPU, enough memory, and the appropriate storage capacity.
- Verify that CPU virtualization features such as Intel VT-x are enabled in BIOS.
- Install Hyper-V Server 2019, Windows Server 2019, or the Windows 10 operating system.
- Add the Hyper-V server role if you are using a full-featured Windows operating system (or enable Hyper-V in Windows 10). You can also use the graphical user interface (GUI) and Server Manager.
Deploying a guest VM
Next, you need to create a virtual machine and install a guest operating system:
- Create a Hyper-V VM in Windows Server or create a VM in Windows 10.
- Install an operating system that supports nested virtualization for Hyper-V on the guest VM, that is, install Windows 10 Anniversary Update or later or Windows Server 2016 or later.
Windows Server 2016 is used for the purposes of this walkthrough. You can use newer Windows versions.
Configuring the guest VM
By default, support for hardware virtualization is disabled for a guest VM. The operating system displays an error if you try to add the Hyper-V role for the VM.

You can enable hardware virtualization for a guest hypervisor only by using PowerShell. Note that the guest VM must be powered off in order to apply the following commands.
- First check whether hardware virtualization is enabled for the guest VM. Execute the following command on the host OS (which is installed on the physical machine):
Get-VMProcessor -VMName vm_name | fl *Insert the name of your VM instead of vm_name. The name of the VM is Server2016 in our example. WIN2018 is the computer name representing the physical machine on which Windows is installed along with the Hyper-V role.

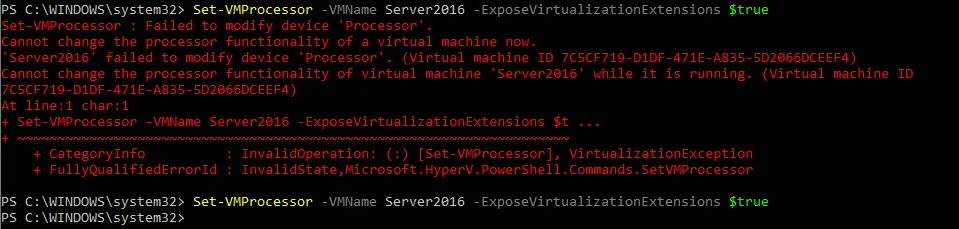
- To enable hardware virtualization inside the guest VM, stop the VM before and apply the following command:
Set-VMProcessor -VMName vm_name -ExposeVirtualizationExtensions $trueIf everything is okay, there should be no message displayed after entering the command. If the VM is running, the following error message is displayed:
VM network connection
Now, you need to configure the network settings for your VM. There are two ways to connect nested VMs to the network: MAC spoofing and NAT.
- If the network for the nested VMs is configured by providing access to a real Local Area Network (LAN), then one network adapter on the host machine would carry multiple MAC addresses – which could potentially cause network issues. That’s why the
MAC address spoofingoption must be activated (this option is disabled by default). - If a pseudo-private cloud is deployed, MAC address spoofing cannot be used for VM networking, and you should configure
NATin this case.
Note: Both methods are covered below, but we will use the NAT method to configure our VM to use Hyper-V nested virtualization.
Configuring MAC address spoofing
If using MAC address spoofing, enable it on the network adapter of the virtual Hyper-V host:
- On the physical machine with Hyper-V Server installed, enter the following command to enable MAC address spoofing:
Get-VMNetworkAdapter -VMname vm_name | Set-VMNetworkAdapter -MacAddressSpoofing OnInsert the name of your VM instead of
vm_name. In our case, it’sServer2016, as mentioned above.
- If you prefer the GUI, go to
VM Settings>Network adapter>Advanced featuresand select theEnable MAC address spoofingcheckbox, and click OK.
Configuring NAT
NAT can be enabled only by using PowerShell. While the previous commands were executed on the host OS, the following commands must be executed on the guest OS.
To enable NAT for VM network connection:
- First, create a new virtual switch.
New-VMSwitch -Name "SwitchName" -SwitchType InternalUse your switch name instead of
SwitchName. We are usingNAT-Switchin this walkthrough.
- Define the subnet behind NAT and enable NAT. The network address must not coincide with IP addresses in your existing network. In this example, the network name is
NAT-netand the network address is192.168.2.0/24New-NetNat -Name "network_name" -InternalIPInterfaceAddressPrefix 'ip-address/netmask'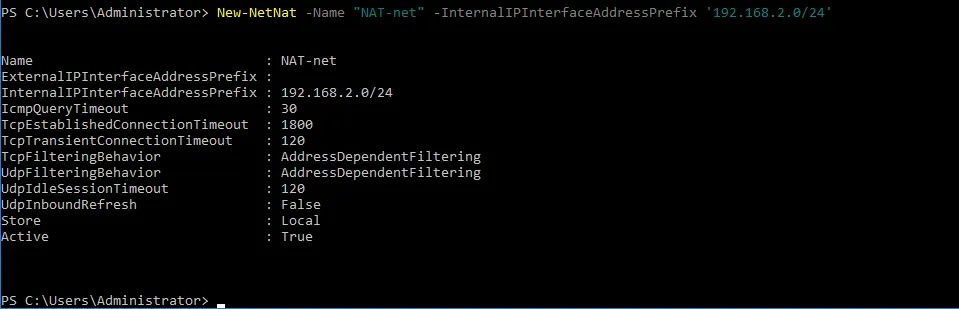
- Then assign the IP address for the interface on which NAT is enabled.
Generate a list of the available adapters to check their names with the following command:
Get-NetAdapter | ft -Autosize
In this example, the name of the virtual network adapter that is connected to the virtual switch created earlier is
vEthernet (NAT-Switch).
- You should now define the IP address for this virtual network adapter, which must belong to the created network. Nested VMs will use the IP address of this network interface as a gateway. In our example, this IP address is 192.168.2.1 – it belongs to the network 192.168.2.0/24
Get-NetAdapter "adapter_name" | New-NetIPAddress -IPAddress ip_address -AddressFamily IPv4 -PrefixLength mask_number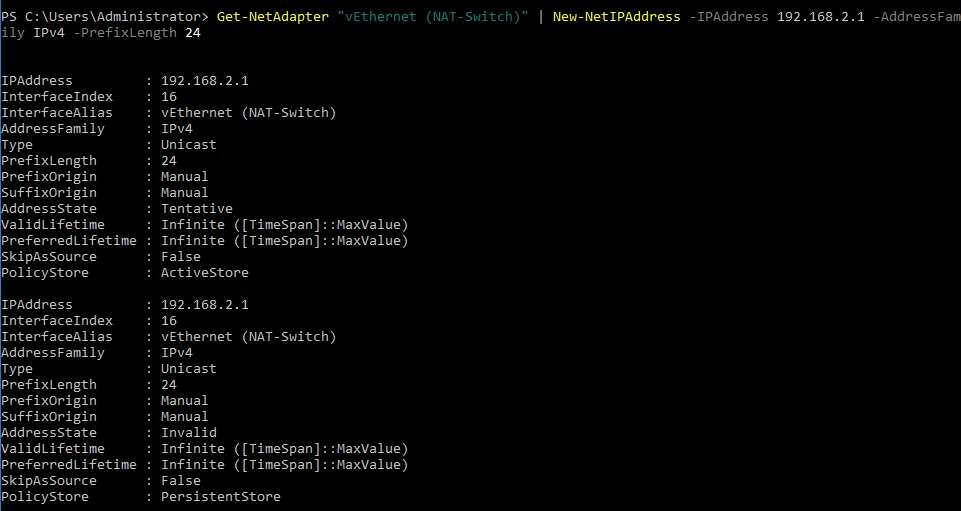
Configuring a nested VM
You can now create and configure a nested VM. In this walkthrough, a VM with Windows Server 2016 is used as the nested VM.
- Select the virtual switch (which you have recently created) in the network settings of the VM in Hyper-V Manager.
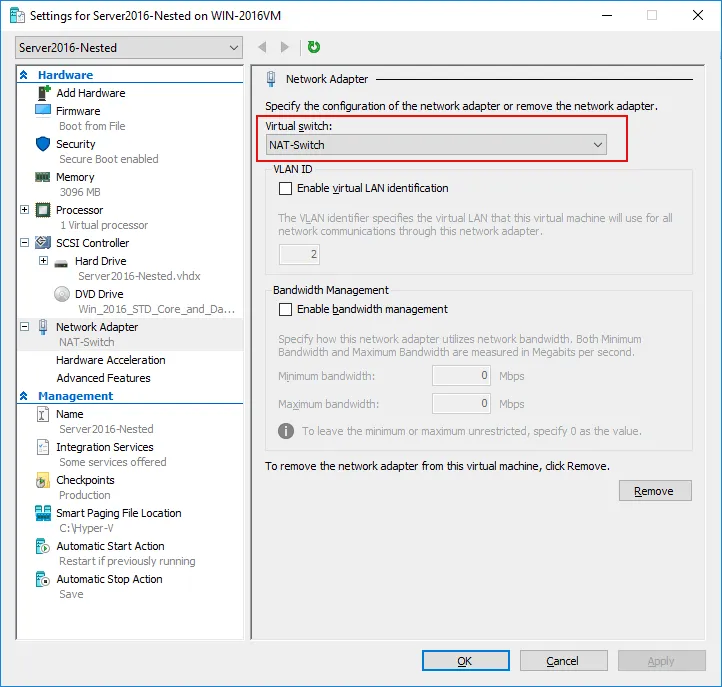
- Configure the TCP/IP settings in the
Network Adapter Propertiesof the nested VM. If there are no DHCP servers in the virtual network, assign the IP address, subnet mask, default gateway, and DNS server manually.

Note: Check your firewall settings, because firewalls can block network connections.
Your nested VM now has a configured network and is ready to run.

Protection of VMs with NAKIVO Backup & Replication
All VMs, including nested VMs, should be backed up to ensure the reliability of your Hyper-V virtual environment. NAKIVO Backup & Replication delivers reliable Hyper-V backup with fast image-based incremental backups that leverage the native Hyper-V Resilient Change Tracking (RCT) technology. Using backups, you can recover application objects/files, instantly boot VMs or recover Hyper-V VMs as VMware vSphere VMs, among other recovery options.