How to Check and Modify Proxmox Backup Locations
Virtual machines running on Proxmox usually contain critical data that organizations cannot afford to lose. Therefore, it is essential to ensure that Proxmox backups are stored in a safe location. Moreover, workloads can change over time, as can storage configuration and production requirements.
That said, you may need to change the backup location for Proxmox virtual machines. This blog post explains how to check the default backup location and how to change the Proxmox backup location.

Where Does Proxmox Save Backups?
The default Proxmox backup location is a preselected target where Proxmox backups are stored, and this location depends on the Proxmox version and installation. Although there is no universal backup location, we will consider the most typical case.
When you back up a virtual machine (VM) using native Proxmox tools, the VM backups are typically stored in a pre-configured storage pool (during the Proxmox installation process), which is designed for this purpose. The most common location is the local directory on the Proxmox host, but an NFS or SMB share can also be used alternatively.
Checking the Current Proxmox Backup Path
The easiest way to check your Proxmox backup location is by using the Proxmox web interface:
- Enter the IP address of the Proxmox host in the address bar of your web browser and log in to Proxmox VE.
- Click
Datacenterin the Navigation pane and clickStorageto display the storage configuration for Proxmox VE. - Locate the line that says
VZDump backup filein the Content column orvzin the Path/Target column.
- Double-click the storage considered as Proxmox backup storage to see the details. As you can see in the screenshot below, the Proxmox backup location is
/var/lib/vzin this example.
In addition, some commands help you identify the Proxmox backup storage in the command line:
- The command to display storage locations configured in Proxmox with their types:
pvesm status - To view storage details, including the storage path and content type, use the command:
cat /etc/pve/storage.cfgFind the item with the description, such as
content backup.

How to Modify the Backup Location in Proxmox
You can change the default Proxmox VM backup location, if needed, to a custom backup location. This new location can be a local directory or network share.
Why modify the backup location?
You may need to modify the Proxmox backup location for several reasons, depending on the requirements of your environment. Below are the most popular reasons to change the Proxmox VM backup location:
Insufficient storage space. A virtual environment typically grows and virtual machines consume more disk space as the size of existing VMs grows and new VMs are added. As source VMs consume more disk space, more disk space is required to store VM backups. If VM backups are stored at the same disk (volume) as VMs (which is not recommended), then insufficient storage space occurs early on. Reconfiguring a Proxmox backup file location and moving Proxmox backups to another storage helps resolve this storage space issue.Performance optimization. If running virtual machines are backed up to the same storage, it negatively impacts overall disk performance and VM performance because they compete for the same disk I/O resources. When you configure another storage location for Proxmox backups, you offload storage, distribute disk load, and improve storage performance.Data redundancy and protection. Storing VM backups on the same host as the original VMs is not recommended because the risk of data loss increases. If a disk fails, both VMs and VM backups will be lost. Storing VMs and VM backups on the same host but on different disks doesn’t significantly improve the situation from a data protection perspective. In case of a Proxmox server failure, you may have a long downtime or even lose all data on that host. Storing Proxmox backups and backup copies in different locations improves the reliability of your backup strategy and increases the probability of recovery. NFS or SMB shares are good options to store backups or backup copies.Improved backup management. Using a dedicated Proxmox backup location can simplify backup management. NAS storage and special backup storage solutions may have additional features such as compression, deduplication, snapshot management, etc.Regulatory and compliance requirements. Some industries must comply with the regulations that declare the minimum requirements for how data must be stored and protected against data loss. These regulations may require the way how backups are stored and protected. To meet the compliance requirements, you may need to change the default Proxmox backup location.Backup strategy and rotation. The codeest backup strategy presumes using multiple backup locations, configuring retention policies, and rotating backup storage locations (for example, daily, weekly, and monthly backups are stored on different storage devices). This approach can reduce the risk of data corruption and data loss because multiple data copies are stored in different locations.Cost optimization. Local storage on Proxmox typically uses high-performance SSD and HDD devices, usually with a SAS interface. This high-grade and high-performance storage costs more and is limited on a server. Backup servers can use SATA disks in the middle price range with performance just enough to transfer backup data (not the highest I/O performance). As an alternative to a backup server, you can use a NAS device. Using storage tiering optimizes costs.The convenience of data restoration. Reconfiguring the default Proxmox backup location to a shared storage located on a backup server or NAS makes data recovery more convenient, especially in multi-host or clustered Proxmox virtual environments. Backups and recovery points of VMs running on different hosts are stored and categorized in a centralized location. As a result, finding and restoring VMs to different hosts can be done more quickly.
Modifying the backup location
Complete the following steps to modify the backup location in Proxmox:
- In the Proxmox web interface, select a
Datacenterin the left pane and go toStorage. - Click the
Addbutton and select the storage type to add a new backup location. You can select a local directory, LVM, SMB or NFS share, Proxmox Backup Server, etc.NOTE: You must configure the new storage before adding it to the Proxmox configuration as a backup storage. If you add an NFS share, you must configure a file server or a file share on NAS with the needed access permissions. If you add an SMB share you also need to create a directory to be used as a mount point on the Proxmox host and make the necessary configuration. If you add a Proxmox Backup Server, you must configure the backup server first.

- Enter the configuration details to connect to the destination backup location and add this backup location to the Proxmox configuration. The required parameters differ depending on the selected storage type to add (that you selected in the previous step). Finally, click
Add.
- Create a new Proxmox backup job or edit the existing backup job and modify the Proxmox VM backup location.
VM backup job
- To create a backup job for a VM, select a virtual machine in the Navigator pane, go to
Backup, and clickBackup now. - Specify the Proxmox Backup location in the
Storagedrop-down list, edit other settings if needed,and hitBackup.

Globally scheduled backup job
- Go to
Datacenter>Backupand clickAdd. - Select what to back up, set the new Proxmox backup location, and configure schedule and retention. Click
Createto save the settings, close the window, and wait for a scheduled backup job to start.
Read the detailed step-by-step guide on how to configure NAS as a Proxmox backup location and run Proxmox backup to NAS.
Selecting a New Backup Location: Best Practices
Keep in mind the best practices when selecting a new backup location for Proxmox virtual machines.
Assess storage requirements. Estimate how much storage space virtual machines consume on your Proxmox host, taking into account the backup frequency and retention policy of VM backups. Consider a backup method to be used because the size of storage space consumed by backups depends on a backup type – full backups consume the maximum storage space and incremental backups consume less space. Plan how storage usage can grow while writing VM backups to that backup storage and how you can expand the destination storage size. For example, you can consider adding disk devices on a backup server or NAS for expansion.Performance and security. It is recommended that you don’t use the same storage for running VMs and storing backups. This approach causes performance degradation and puts both VMs and their backups at risk in case of hardware failure or other disasters such as ransomware attacks.Remember about data redundancy. Consider using RAID (RAID 1 or RAID 10) on the destination backup server. NAS devices support soft RAID configurations, including RAID 1 and RAID 10. Follow the 3-2-1 backup rule – this is the best practice in terms of backup and disaster recovery strategies. Store at least one backup copy offsite (at another physical location) – this approach significantly increases the chances to recover data if a disaster strikes.Security requirements. To increase the security level when transferring data to a Proxmox backup location, consider the transport mode and destination storage that supports encryption (encryption at rest and in transit). Encrypted backups protect your data from being intercepted and read by third parties. This is especially important for sensitive and regulated data. Ensure that only authorized users from your organization can access backup storage, and you can configure the needed access permissions.Compatibility. Use storage compatible with Proxmox and backup applications. Using NFS, SMB, and iSCSI protocols is widely supported. If you use storage in the public cloud, ensure that it can be integrated seamlessly.Costs. You can find a balance between storage costs and performance when choosing storage to be used as a Proxmox backup location. Backups usually don’t require storage with the maximum performance such as for running virtual machines. The storage space is the main concern when setting up backup storage. Take into account that cloud storage requires monthly payments, while in the case of using NAS or a physical backup server, you need to pay only for the hard disk drives you buy (and for the electricity). Calculate the total cost of ownership, which also includes the licensing price for software and network infrastructure.
Manage Proxmox Backups with NAKIVO
NAKIVO Backup & Replication is a dedicated data protection solution that supports Proxmox VM backup to different locations. With the NAKIVO solution, you can back up VMs to local storage of a backup server, SMB and NFS shares, public clouds such as Amazon S3, and other supported storage types.
The following data protection features are available for Proxmox backup:
- Agentless Proxmox VM backup and backup copy
- Native changed block tracking
- Application-aware backup
- Source-side backup encryption
- Backup immutability
- Backup to NAS
- Direct backup to cloud
- Exclusion of swap and unused blocks
After adding a Proxmox host or cluster to the inventory and adding backup repositories in the needed backup locations, you can select a Proxmox VM backup location when creating a backup job. In the screenshot below, you can see multiple backup repositories created on a local machine, remote machine, on NAS and in the Amazon S3 cloud. You can store backups and backup copies in different locations and follow the 3-2-1 backup rule.

You can create and run a Proxmox backup job in a few steps:
- In the web interface of the NAKIVO solution, go to
Data Protection, click+and hitBackup for Proxmox VE.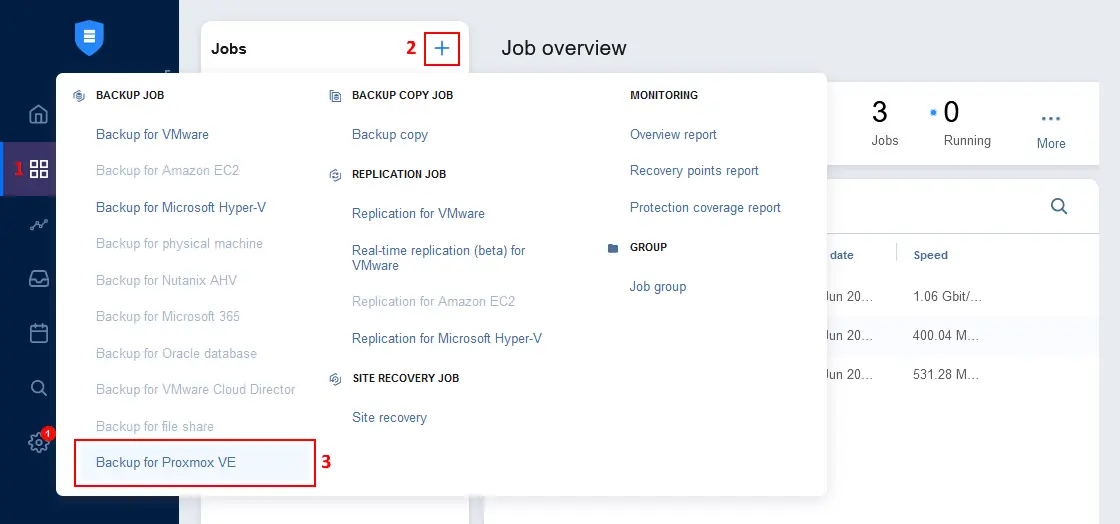
- At the
Sourcestep, select the Proxmox virtual machines to back up.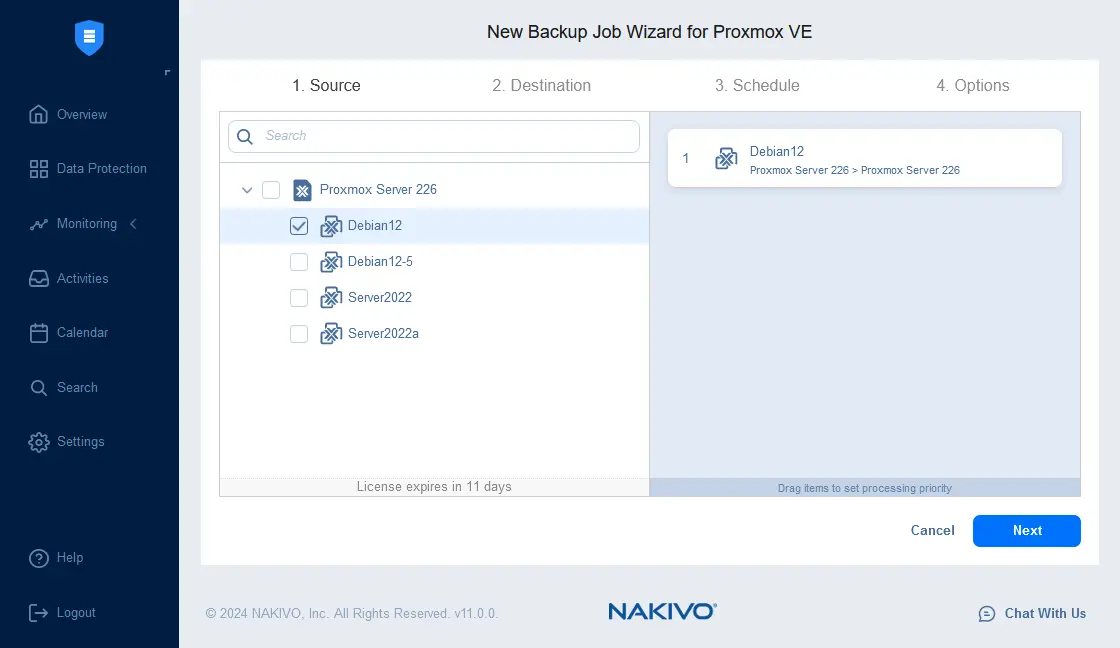
- Select a Proxmox backup location. You can select any backup repository listed in
Settings>Repositories.
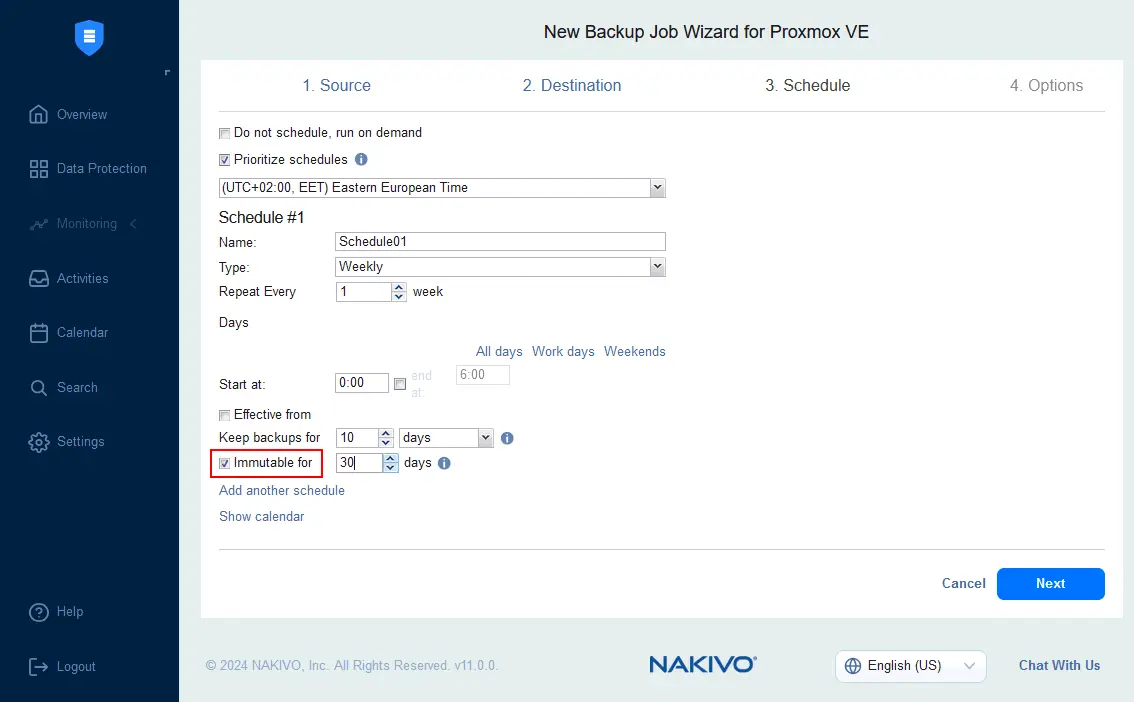
- Configure a backup schedule. You can set multiple schedules, such as daily, weekly, and monthly ones, and configure retention settings. Flexible settings allow you to use the GFS retention policy. You can enable backup immutability if a backup repository is deployed on a machine with an assigned Linux Transporter or in Amazon S3.
- Configure Proxmox backup job options, such as name, changed block tracking, and other options. You can enable source backup encryption to secure your backup data – select
Enabledfor thebackup encryptionoption in the appropriate drop-down list. HitFinish & Runto run a Proxmox VM backup to the Proxmox backup location selected before.
Conclusion
Following the best practices for setting up a Proxmox backup location can enhance your backup strategy, reduce the risk of data loss, and improve the speed of data recovery. When it comes to data protection, using the default backup location on the same storage as VMs is not the optimal choice. Consider using a backup server or NAS to store Proxmox backups and follow the 3-2-1 backup rule. As an alternative to configuring a backup location in the native Proxmox backup tool, you can use NAKIVO Backup & Replication, which includes multiple backup location options and a large set of data protection features.


