How to Back Up Proxmox to NAS: A Complete Guide
Proxmox virtual machine backup is essential for environments running Proxmox virtual machines (VMs). There are different approaches to back up Proxmox data and you can store backups in different destination locations. One of the most effective and reliable ways is backup to NAS (Network Attached Storage). This blog post explains how to configure Proxmox backup to NAS using 2 methods.
Benefits of Backing Up Proxmox to NAS
Using NAS devices for Proxmox backup provides multiple benefits, as listed below:
- Centralized and scalable storage. NAS devices are considered centralized storage systems that can be accessed over the network, which is optimal for storing backups. Using a centralized storage system simplifies backup management and allows administrators to consolidate backups in one location. NAS devices are scalable, allowing you to add more hard disk drives and increase the overall storage amount on NAS as backup size increases.
- Enhanced data protection and redundancy. Most NAS devices support software RAID (Redundant Array of Independent Disks) that makes it possible to provide storage redundancy and protect backups against data loss caused by hard disk failure on a NAS device. When you back up Proxmox virtual machines to NAS with RAID 1 or RAID 10, you enhance the resilience of your Proxmox backups and minimize the risk of data loss. For example, if a failure of one disk happens, the copy of data is available on the mirrored disk to restore data from a backup and restore the array.
- Offloading backup storage. Storing VM backups on the same Proxmox server where VMs are running increases storage requirements for a Proxmox host. Moreover, storing VMs and VM backups on the same machine is not reliable because the server can fail. Backing up VMs to NAS offloads a Proxmox storage subsystem and disk space is not occupied by backups on the Proxmox host. Performance can be improved when offloading backups to a NAS device.
- Cost-effective backup solution. NAS devices are cost-effective for storing backups, especially if you compare NAS solutions with other backup solutions such as public clouds. Public cloud storage requires monthly payments and costs increase when the amount of data increases. NAS systems are more affordable and price-friendly – you need to buy additional hard disk drives when you need more disk space and there are no additional fees. Cost efficiency makes NAS devices an optimal solution, especially for small and medium-sized businesses due to a balance between cost, capacity, and performance.
Prerequisites for Backing Up Proxmox to NAS
There are only a few prerequisites to configure Proxmox backup to NAS:
- Purchase a NAS device with the optimal configuration including CPU, memory, maximum disk number, and storage amount.
- Prepare enough free space on the NAS.
- Configure a file share on the NAS.
- Set the right read-write permissions for the file share.
There are multiple methods to configure Proxmox backup to NAS:
- Configuring a backup using native Proxmox backup features
- Configuring a dedicated backup solution that supports Proxmox backup
In both cases, the common point is configuring a file share on NAS to make NAS backup storage accessible for the backup solution.
Configuring NAS
First, you should configure the NAS and set up a file share with the appropriate permissions. You can configure any NAS device that supports NFS and SMB file shares. The configuration principle is the same for all devices but the user interface is different. In this example, we are configuring Proxmox backup to QNAP NAS.
Configuring a file share
Perform the following actions to configure a file share on QNAP NAS.
- Log in to the web interface of the QNAP NAS and open the Control Panel.

- Click Shared Folders.

- Click Create > Shared Folder.

- Specify the shared folder settings.
- Enter the folder name, using the allowed characters, for example, Proxmox_backup.
- Optionally, you can enter a description, for example, Proxmox backup to NAS.
- Select a disk volume to create a shared folder in the drop-down list (Volume1 in our case).
- You can select the path automatically, or enter the path manually.
- In this example, we don’t use folder encryption with NAS built-in tools. SMB encryption can be used with the SMB 3.0 protocol.
Click Next to continue.

- Configure user permissions to access the shared folder. We set the full read/write access for admin (administrator) for more simplicity in this example. However, it is recommended that you create a dedicated user to access shared folders to write and read backup data. For instance, you can create a user called backup-user and set full permissions for this user to access the Proxmox backup folder on NAS.
NOTE: The default admin user is vulnerable to brute force attacks. This is another reason why it is better to create another user account for administrative access, especially if there is access to the NAS from the internet.

- Configure guest access rights. You can select a policy (Deny access, Read-only, Read-Write). When done, click Finish to save settings and finish the shared folder creation wizard.

- A shared folder has been created. Next, we should enable file sharing services with the needed network sharing protocol.

Configuring file sharing services
- Go to the Control Panel and open Network & File Services.

- You can enable one or multiple file sharing services to access shared folders on NAS. For example, we can enable SMB and NFS.
- To enable SMB, select the Microsoft Networking (SMB) tab and configure the needed options. Click Apply to save settings.

- To enable file sharing via NFS, go to the NFS Service tab and select the checkbox to enable Network File System (NFS) service. Select the NFS versions to use for file sharing. Read the notes about NFS configuration and follow these recommendations. Click Apply to save settings.

- Go to Control Panel > Shared Folders, select a Proxmox backup shared folder and click Edit Shared Folder Permission.

- Select NFS host access in the Select permission type drop-down list. Select the Access right checkbox.
- Hostname or IP address: Enter * (asterisk) to allow access for all hosts or list specific allowed IP addresses. For security reasons, it is recommended that you enter specific IP addresses that are allowed to access the NFS share.
- Squash: Read/Write
- Squash options: Squash all users
Click Apply to save settings.

- Check the path of the shared folder. Select the shared folder, click the Edit (pencil) icon and check the disk volume and path. In our case, the path is /Datavol1/Proxmox_backup. We will need to use this path later in the configuration.

Note the UNC path to start with when accessing shared folders on NAS, such as \\NAS-IP-Address\SharedFolderName
We have configured the network access to the Proxmox backup shared folder on NAS via NFS and SMB. Next, we can configure Proxmox backup.
Native Proxmox Backup
The first available method to configure a Proxmox backup to NAS is using the native Proxmox backup feature that supports a VM backup to an NFS share.
Connecting shared storage to Proxmox
Perform the following steps to connect the NFS share configured on NAS to a Proxmox host.
- Log in to the web interface of Proxmox VE.
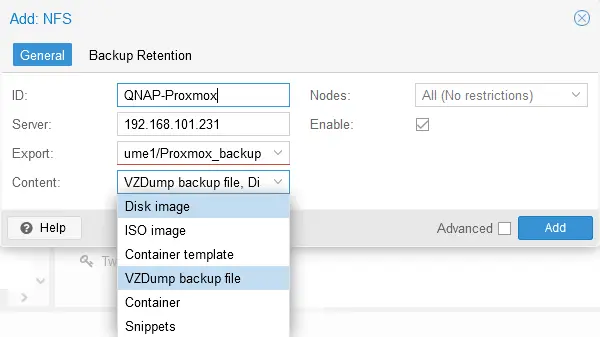
- In the Navigator pane, select a datacenter, click Storage, click Add, and hit NFS.

- Specify the parameters to connect Proxmox VE to an NFS share.
- ID: Enter the displayed name, such as QNAP-Proxmox
- Server: Enter the IP address of your NAS device
- Export: Enter the mount path on the NAS device that we noted before. Our path is /Volume1/Proxmox_backup
- Content: Select Disk Image and VZDump backup file in the drop-down menu.
- Optionally, you can click the Backup Retention tab and edit retention settings.
Hit Add.
- The QNAP-Proxmox NFS file share has been added as a Proxmox backup location.

- You can check the Proxmox_backup folder on NAS. You will see the dump and images subfolders created by Proxmox to store VM backup files.

Running a Proxmox backup job
The backup environment has been prepared and we can now run a Proxmox VM backup to NAS using native Proxmox tools.
- Select a virtual machine in the Navigator pane of the Proxmox web interface, click Backup and hit Backup now.

- Define the Proxmox VM backup parameters.
- Storage: Select the NFS file share on NAS that was added to the Proxmox configuration before. This is a QNAP-Proxmox item in our case.
- Mode: Snapshot.
- Compression: Select the Proxmox backup compression level. We use the default (fast and good) compression.
- Notes: Proxmox backup to QNAP NAS
Click Backup to start the Proxmox VM backup job to NAS.

- You can monitor the backup job status in the Output tab of the Task viewer window.

Proxmox VM recovery
- To restore a virtual machine from a backup, select a VM in the navigation pane (a diskette icon means that this VM is backed up with the native Proxmox backup feature), click Backup, select a backup name (recovery point), and hit Restore.
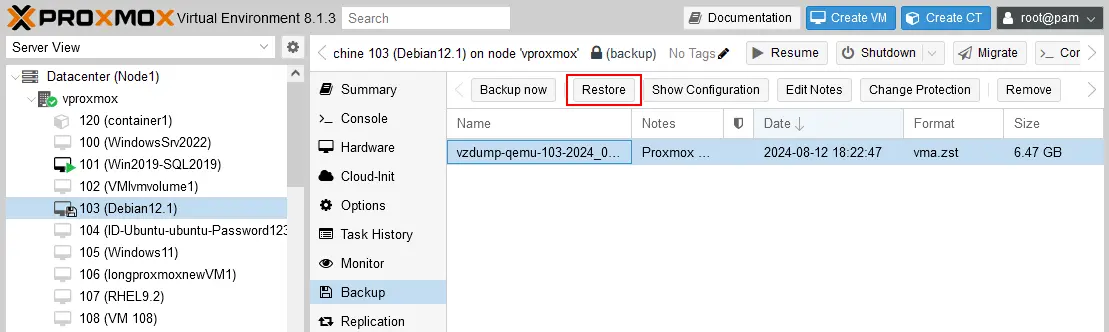
- Check the restore settings and click Restore.

Configuring backup scheduling
The native Proxmox backup tool has scheduling functionality. Perform the following steps to configure a scheduled Proxmox backup to NAS.
- Select a datacenter in the Navigation pane, click Backup, and hit Add.

- Specify the needed parameters in the General tab of the Create Job window.
- Storage: QNAP-Proxmox
- Schedule: Select a schedule, such as monthly, weekly, etc.
- Selection mode: Include selected VMs
- Mode: Snapshot
- Enabled: Select this checkbox
- Select the VMs to back up in the list below.

- Click the Retention tab and set how many recovery points to keep for the appropriate time periods.
- Hit Create to create a backup schedule for Proxmox VM backup to NAS.

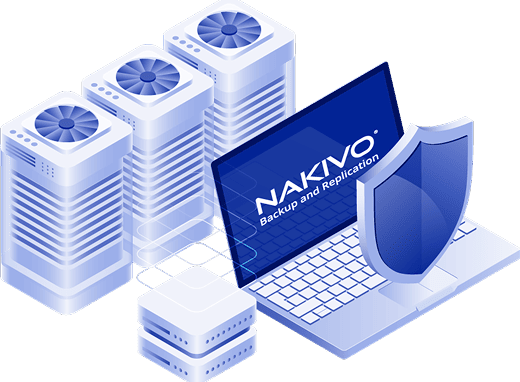
Proxmox Backup with NAKIVO
The alternative method to run Proxmox backup to NAS is using a special data protection solution called NAKIVO Backup & Replication. The NAKIVO solution supports different backup locations for Proxmox VMs, including:
- Local storage
- NFS and SMB shares on NAS and file servers
- Cloud storage: Amazon EC2, S3-compatible storage, other configured storage in the cloud
- Tape cartridges
- Deduplication appliances
There are useful features, such as incremental backup, native changed block tracking, flexible retention policies, backup encryption, and backup immutability (for local backup repositories assigned to Linux Transporters and in Amazon S3). NAKIVO Backup & Replication 11.0 supports agentless backup of Proxmox virtual machines. You can install the backup solution on a Linux or Windows virtual machine running on a Proxmox host, or any other physical computer or virtual machine running Windows or Linux, as well as deploy a Linux-based virtual appliance in Proxmox.
The main approach to back up Proxmox VMs to NAS with NAKIVO Backup & Replication involves configuring a file share on NAS and adding the file share to a backup repository configuration of the NAKIVO solution. This approach is universal and can be used for any NAS device supporting NFS and/or SMB shares.
You have to add the Proxmox virtual environment to the NAKIVO Backup & Replication inventory, add a file share located on NAS as a backup repository before creating a backup job.
Adding Proxmox VE to the inventory
As Proxmox VMs are what we want to back up, the first stage is adding the Proxmox host (or cluster) to the NAKIVO inventory.
- Log in to the NAKIVO Backup & Replication web interface.
- Go to Settings > Inventory and click the + button to add a new item.

- Select Virtual at the Platform step. Click Next at each step to continue.

- Select the Proxmox host or cluster as the virtual platform type.

- Define the options for adding a Proxmox host or cluster.
- Display name: Enter a friendly name displayed in the inventory (Proxmox Server 226 in this example).
- Type: Select a Standalone Proxmox host or Proxmox cluster based on your Proxmox VE configuration.
- Hostname or IP: Enter the IP address of your standalone Proxmox host or cluster node.
- Username: Enter the name of a user with administrative permissions such as root (by default).
- Password: Enter the password for the specified administrative user account.
- Web interface port: The default port is 8006 if you didn’t change the configuration.
- SSH port: Enter the SSH port for connecting to a Proxmox server (22 by default).
- Temporary file location: /tmp
Hit Finish to add a Proxmox host or cluster to the NAKIVO inventory.

The Proxmox host has been added successfully to the inventory in our case. The number of hosts and VMs from the added Proxmox VE item is displayed in the Details column.

The NAKIVO Transporter has been deployed to a Proxmox host automatically while adding the host to the NAKIVO inventory. You can check the Transporters in Settings > Nodes.

Adding a backup repository on NAS
The next stage requires creating a NAKIVO backup repository on the NAS file share created before. Let’s use the file share created on QNAP NAS in the beginning.
- Go to Settings > Repositories, click +, and hit Create new backup repository.

- Select a network share configured on NAS. Click CIFS Share if you configured an SMB share for a folder on NAS. Alternatively, you can select the NFS Share option for the appropriate file share type. We have enabled both SMB and NFS file sharing protocols on our NAS. We will use an SMB file share in this workflow, but you can also use NFS. Hit Next to continue.
NOTE: If you have a NAKIVO Backup & Replication Transporter running on NAS, you can use a repository created in a local folder on this NAS. This backup repository supports immutability to help you protect backup data against ransomware encryption and accidental deletions. Immutability is not available with regular repositories created on an SMB or NFS share. Moreover, with a Transporter installed on NAS, you can achieve higher backup and recovery speeds.

- Define the name and location of a backup repository on a shared folder.
- Name: QNAP NAS File Share
- Assigned transporter: You can select the Onboard Transporter. Alternatively, you can install a Transporter on NAS (if your NAS model supports installing the NAKIVO packages) and select that Transporter.
- Path to the share: Enter the UNC path to the file share configured on NAS. In our case, the path is \\192.168.101.231\Proxmox_backup (the Windows-based format is \\HostNameOrIP\SharedFolderName in general).
- Username: Enter the name of the user account who has access to read and write data on the specified NAS file share.
- Password: Enter the password for this user.
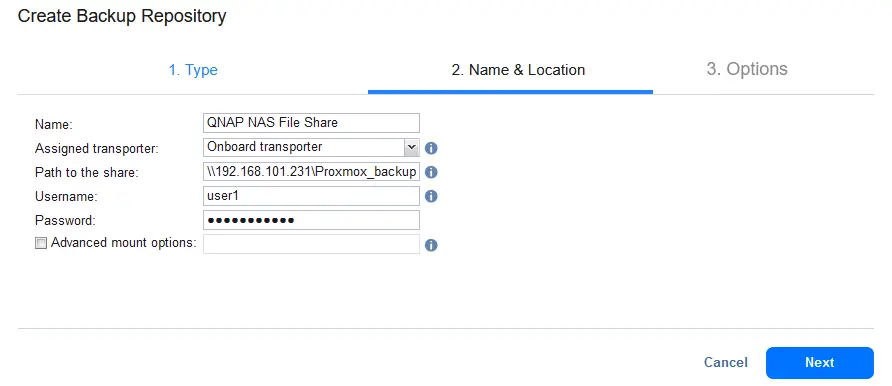
- Set the backup repository options and click Finish.

A backup repository has been created on the QNAP NAS file share.

Creating a Proxmox backup job
Once we have added a Proxmox host to the NAKIVO inventory and created a backup repository in a shared folder located on NAS, we can create a Proxmox VM backup job.
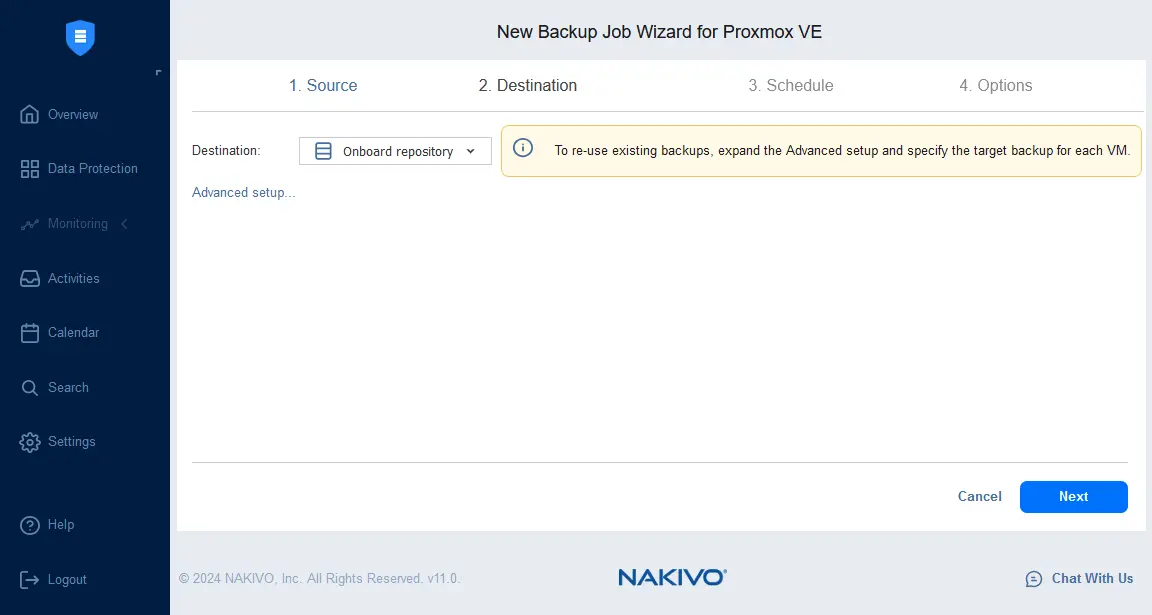
- Go to Data Protection, click + and hit Backup for Proxmox VE.

- Select Proxmox virtual machines to back up at the Source step of the new backup job wizard. We select Debian12 in this example. Click Next to continue.

- Select the destination location to store a backup. Select a backup repository created on the NAS file share.

- Configure scheduling and retention settings for a Proxmox VM backup.

- Configure VM backup job options:
- Enter a backup job name, such as Agentless Proxmox backup to NAS.
- Enable backup encryption (at the source side) and select other options if needed.
Click Finish & Run to save settings and run the job right now.

Installing the NAKIVO Solution on NAS
There is one more way to configure a Proxmox backup to NAS with NAKIVO Backup & Replication. You can install NAKIVO Backup & Replication (the full solution with the Director, Transporter, and Backup Repository) on supported NAS models produced by Synology, QNAP, ASUSTOR, NETGEAR, and Western Digital. By installing the NAKIVO solution on NAS, you transform a NAS device into a NAS backup appliance.
To configure Proxmox backup using this method, follow the workflow as explained below:
- We use QNAP NAS for this example. In the web interface of QNAP NAS (QTS), open the App Center.
- Select All Apps in the left pane and enter NAKIVO in the search bar and press Enter. As a result, you should find NAKIVO Backup & Replication (Full solution) and NAKIVO Transporter.
- Locate NAKIVO Backup and Replication and click Install.
- Follow the user-friendly installation wizard and finish the product installation.

- Once you have installed the NAKIVO solution, log in to the web interface and ensure that the onboard backup repository is created on NAS. Go to Settings > Repositories and check the backup repository configuration. In the screenshot below, you can see the Onboard repository located on NAS, where we installed the NAKIVO solution.

This backup repository is created in the NAKIVO_Repository/NakivoBackup folder on the NAS volume (Volume1 in our case). You can see this folder in the web interface of QTS (for QNAP NAS).

- In the NAKIVO web interface, add the Proxmox host to the inventory. Go to Settings > Inventory, click the + button, and add the Proxmox host or cluster, as explained above in this post.

- Once the backup repository is created on the NAS and the Proxmox virtual environment has been added to the NAKIVO Backup & Replication configuration, create a backup job for Proxmox backup to NAS.
- Go to Data Protection, click + and hit Backup for Proxmox VE.
- Follow the new backup job wizard for Proxmox VE, as explained in the previous method of backing up to a NAS file share. Select the onboard repository located on the NAS for this installation configuration. Complete the wizard and run the backup job.
Conclusion
Proxmox backup to NAS is a necessary part of a data protection strategy for organizations, including small and medium businesses. The configuration process for most scenarios requires configuring an NFS or SMB file share on NAS to store backups in the shared folder. NAKIVO Backup & Replication supports backup to NAS for Proxmox VMs and other protected items and allows you to configure a backup to NAS by using a file share and installing the NAKIVO solution directly on NAS with all needed components.