A Complete Guide to Instant VM Recovery on VMware vSphere
Unexpected downtime can disrupt your workflows in an instant. Virtual machines (VMs) power critical workloads, and when one fails, every second counts. The time needed for a full VM recovery depends on multiple factors, such as the size of virtual disks, storage performance, network speed and the recovery method.
When using an agentless, image-based VM backup solution, you can perform instant VM recovery from backup in a VMware vSphere environment to quickly resume operations while you proceed with a standard full VM recovery process.
This blog post explains how to use instant VM recovery in VMware vSphere and how NAKIVO Backup & Replication can help you quickly restore VMs.

What Is Instant VM Recovery on VMware vSphere?
Instant VM recovery in VMware vSphere is a recovery method that allows you to near-instantly run a VM by using data directly from a backup without permanently recovering it to your production host. This VM recovery method can be contrasted with the lengthier process of extracting and copying all VM data from a backup to a target ESXi host or cluster. Instant VM recovery usually takes just a few minutes while the standard full VM recovery can take hours or even days.
In NAKIVO Backup & Replication, the instant VM recovery feature is called Flash VM Boot. NAKIVO Backup & Replication is a comprehensive data protection solution for VMware vSphere delivering backup, instant recovery, ransomware protection, replication and Site Recovery.
How Instant VM Recovery Works in VMware vSphere
After starting an instant VM recovery, a VM is created on the target ESXi host or cluster. Virtual disks are mounted to this VM directly from backups as iSCSI targets. A software iSCSI adapter is used on the ESXi host to apply this VM configuration.
When the recovered VM is created, a VM snapshot is taken to ensure that no changes are saved to this VM when you discard the Flash VM Boot job and the VM is removed from the ESXi host or cluster. Basically, the VM backup is used in read-only state. The target VM is powered on automatically by default. The VM configuration is identical to that of the original backed-up VM in terms of CPU, memory, etc.
When the Flash VM Boot job is stopped and the VM created for instant recovery is discarded, then all the data written to this VM while it was running is deleted. The virtual machine created for instant VM recovery is deleted from the ESXi host or cluster. Data cleanup is done.
Instant VM Recovery vs. Traditional Recovery Methods
Instant VM recovery can be used to recover virtual machines as quickly as possible and to test backups by recovering and running a VM in a temporary environment. Testing backup integrity allows administrators to ensure that backups are consistent and VMs can be recovered from these backups when needed. Instant recovery can also be used for granular recovery by booting a VM and restoring files from this VM.
Traditional full VM recovery is used to recover a VM permanently for long-term usage. An ESXi host or cluster with the appropriate datastore is used to recover and run the VM. This recovery process may take a long time to complete.
Flash VM Boot is not designed for long-term VM recovery; this feature is designed for instant recovery when you need to run a VM right now and there is no time to wait until the full recovery process is completed. Use cases include:
- You need to run a VM with critical services after a VM failure during business hours to avoid disrupting operations. After the working day is over, you can perform the full VM recovery outside of business hours.
- The recovery Time Objective (RTO) for a critical VM is too short and there is no time to wait until full recovery from a backup is performed.
The optimal period to run a VM created with the instant VM recovery feature is up to 24 hours. At any point, you can choose to discard the VM or to permanently recover it for long-term use.
VMs recovered with the instant VM recovery feature have limited input/output performance compared with VMs recovered using the traditional full recovery method. The performance of local storage attached to an ESXi host is higher in a traditional full VM recovery when compared with the performance of backup storage. The virtual disks of a VM booted from a backup are attached as iSCSI targets from backup storage via the network, and backup storage is usually not of the highest storage tier in terms of performance.
Consider the following workflow if you need to perform instant VM recovery immediately after a failure, but you would also need to perform full VM recovery smoothly later. You can run an instant VM recovery and then replicate or clone the new temporary VM created with the Flash VM Boot feature:
- If your ESXi hosts are managed by vCenter Server, use VMware Storage vMotion to create a permanently recovered VM by migrating the VM to permanent storage. This involves setting a permanent datastore for recovered virtual disks instead of using temporary iSCSI targets exposed from a backup repository.
If changes were made to the VM, including files and running applications, vMotion migrates the latest state of the VM during the live VM migration. Thus, the recovery process is instant during the first stage and smooth during the second stage while retaining all the changes made to the VM. Note that VMware vMotion requires a VMware Enterprise Plus license for cross-vCenter migration.
- If your ESXi hosts are not managed by vCenter, you can use VM replication in NAKIVO Backup & Replication to replicate a temporary VM (in running state) created using Flash VM Boot to an ESXi host for long-term use. The target ESXi host (to which you want to replicate a recovered VM) must be added to the NAKIVO solution inventory first. This method can be used for cross-vCenter VM migration without installing the top-tier VMware editions.
NOTE: NAKIVO Backup & Replication supports file and object recovery as well as Universal Object Recovery. These features allow for granular recovery, which provides more flexibility for fast data recovery.
Step-by-Step Guide to Instant VM Recovery on VMware vSphere with NAKIVO
NAKIVO Backup & Replication supports instant VM recovery with the Flash VM Boot feature for VMware and Microsoft Hyper-V environments. Below, we go over all the steps to instantly boot a VM from a backup in the NAKIVO solution.
Requirements
Keep in mind the following requirements before starting the instant VM recovery in VMware vSphere with the NAKIVO solution:
- There must be connectivity between the NAKIVO Transporter to which a backup repository is attached and the ESXi host.
- At least one ESXi host or cluster must be added to the NAKIVO solution inventory.
- Software iSCSI must be enabled on the target ESXi host.
- At least one VMware VM backup job must have been completed successfully. You can watch this video to learn how to create backup jobs for VMware VMs with NAKIVO Backup & Replication.
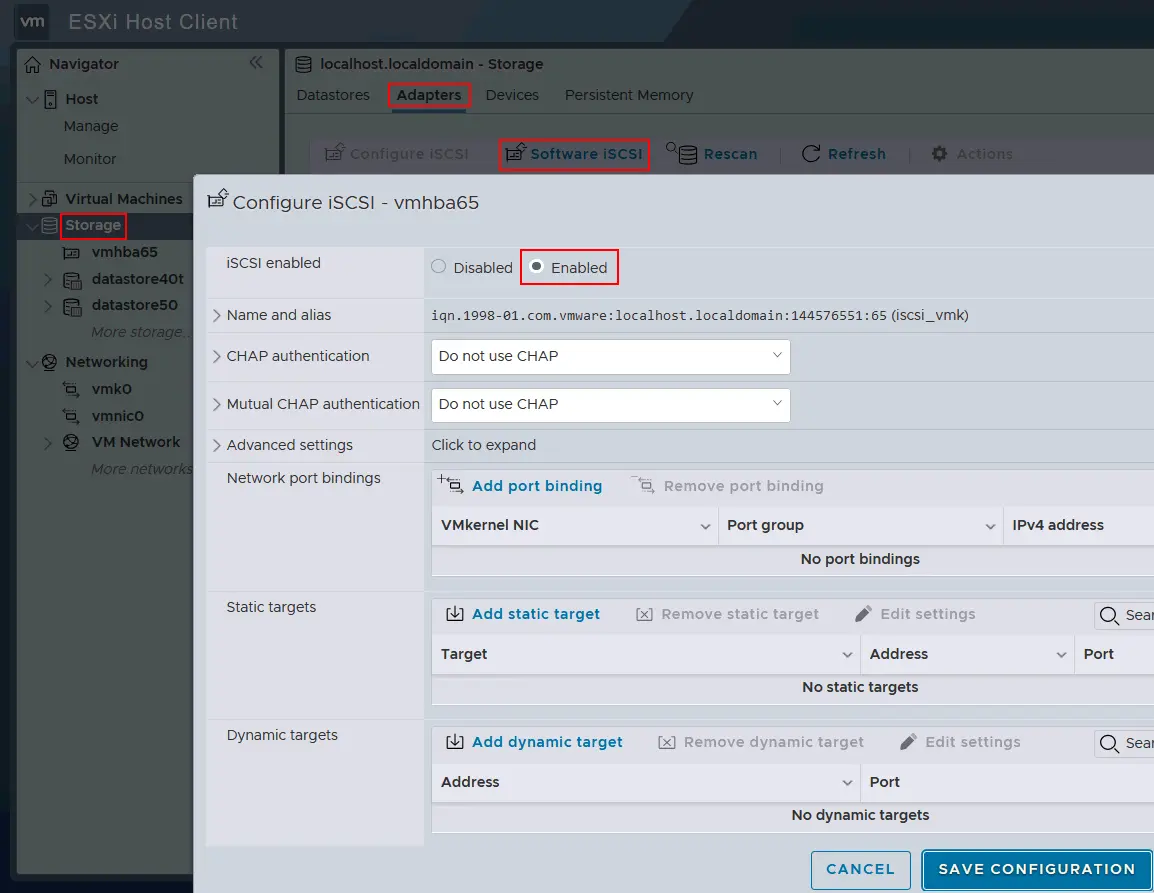
To enable software iSCSI on ESXi, for example, using VMware Host Client, go to Storage, click the Adapters tab, click Software iSCSI and select Enabled. Hit Save configuration.
If you want to check storage adapters in VMware vSphere Client, you should select an ESXi host and go to Configure > Storage > Storage Adapters.
To learn more about connecting storage via iSCSI, read about ESXi storage networks in one of our previous posts.
Configuring recovery settings using NAKIVO
To start instant VM recovery in VMware vSphere, log in to the web interface of NAKIVO Backup & Replication and then:
- Go to
Data Protection, clickRecoverand clickFlash boot for VMware.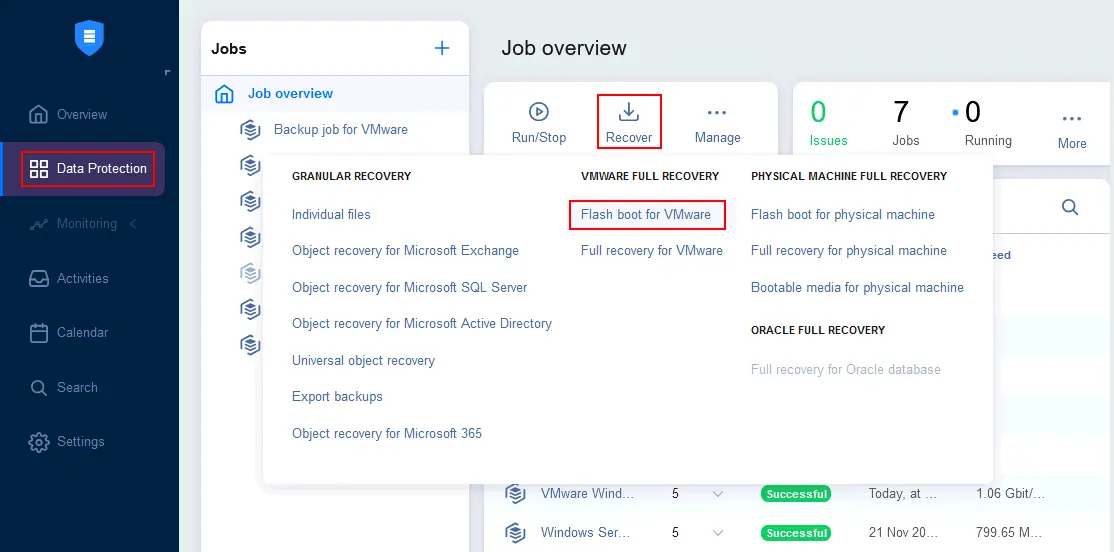
- At the Backups step of the New Flash Boot Job Wizard for VMware, select the VMware backup, the virtual machine and the recovery point. You can select multiple VMs to recover if needed. In this example, we select a Windows VM and the latest recovery point. Hit
Nextto continue.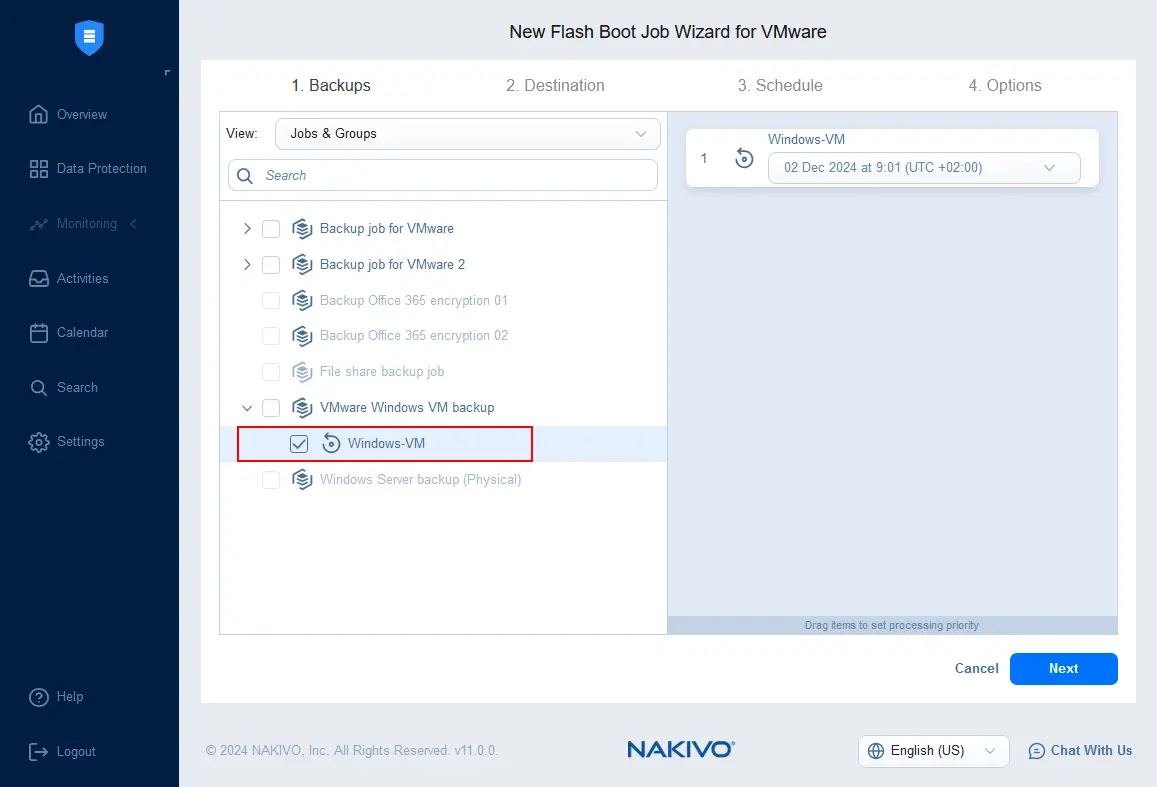
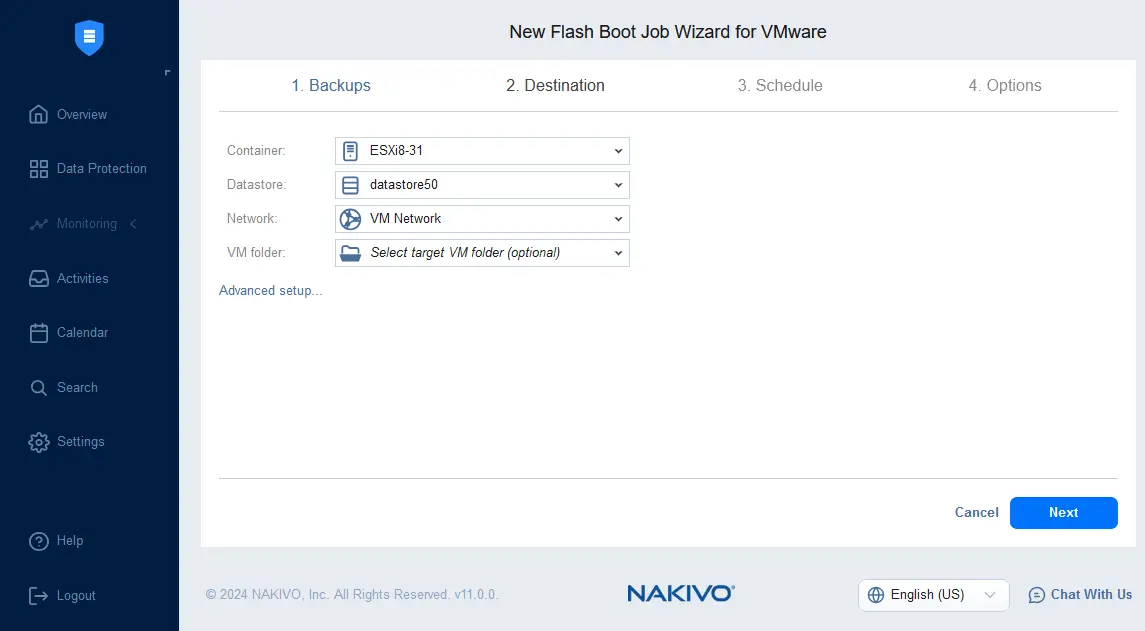
- At the Destinations step, specify the destination options for instant VM recovery:
- Select a container, which can be an ESXi host or cluster. This is the resource to which the VM will be recovered (the CPU, memory and network of the selected host or cluster will be used to run the VM).
- Select the datastore attached to the selected ESXi host or cluster. VM configuration files will be stored there during VM operation (until you stop the booted VM and discard changes).
- Select the virtual network that is available for the selected ESXi host or cluster. This network will be used for network connectivity for the recovered VM.
- Optionally, you can select a VM folder if you use VM folders in your VMware vSphere environment.
- At the Schedule step, you can set a schedule to run the Flash VM Boot job or set the option to run the job on demand. As we are going to run the Flash VM Boot job for instant VM recovery, we select the
Do not schedule, run on demand option. Configuring scheduling for Flash VM Boot is useful when you need to run periodic tests of VM backups to ensure that VMs can be recovered successfully.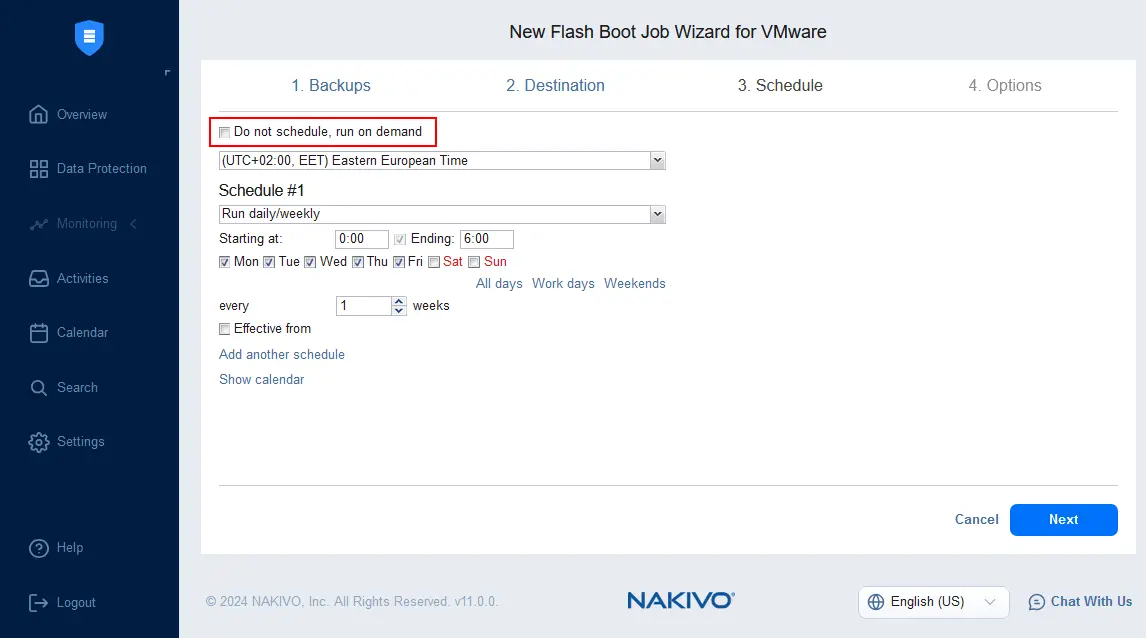
- Specify Flash VM Boot job options. Enter the job name, specify the recovered VM options, such as VM name, MAC address and power status, etc. Click
Finish & Runto save settings and run instant VM recovery.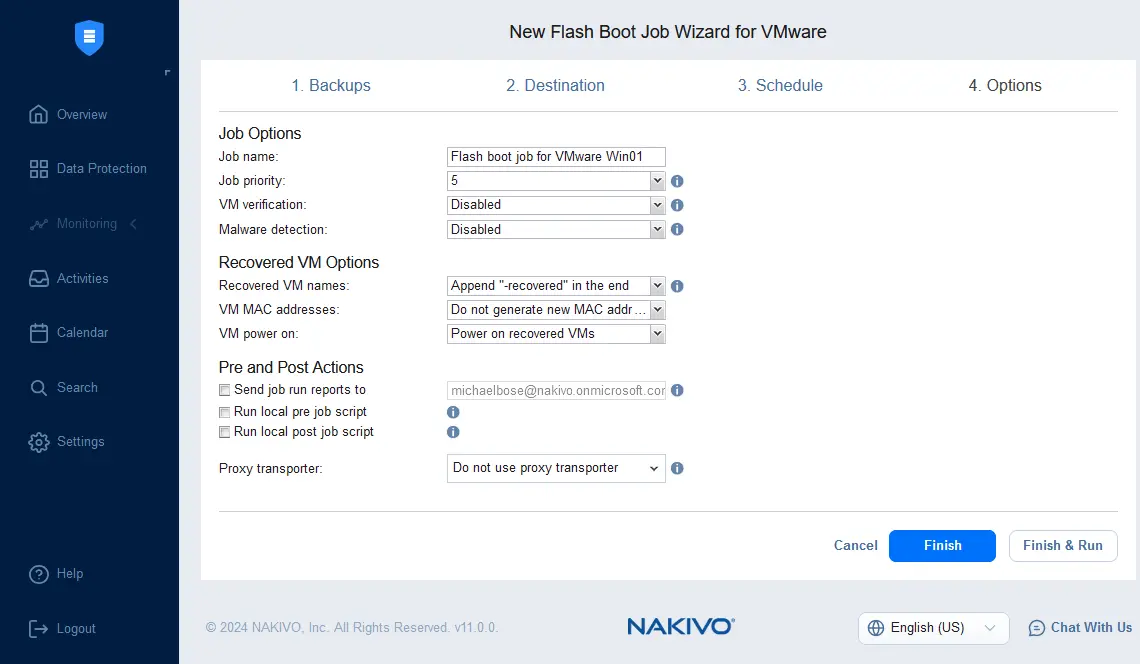
- Select the job run scope in the dialog window and hit
Run.
You can also check out the video for the Flash VM Boot steps in NAKIVO Backup & Replication:
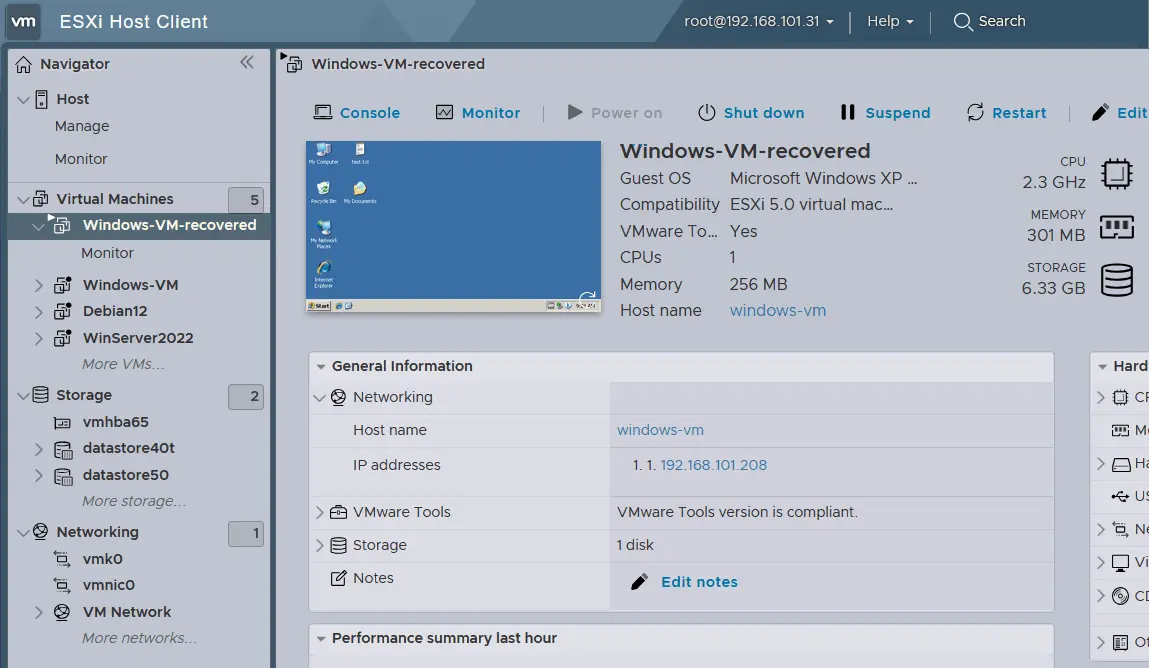
Wait for the VM to be recovered. Then, you can check the VM in the web interface of VMware vSphere Client or VMware Host Client. In our case, the VM has been recovered successfully using the instant VM recovery method. We can see the running VM in the list of VMs and the VM name has the -recovered suffix as specified at the Options step of the Flash VM Boot recovery wizard. The guest operating system was booted successfully.
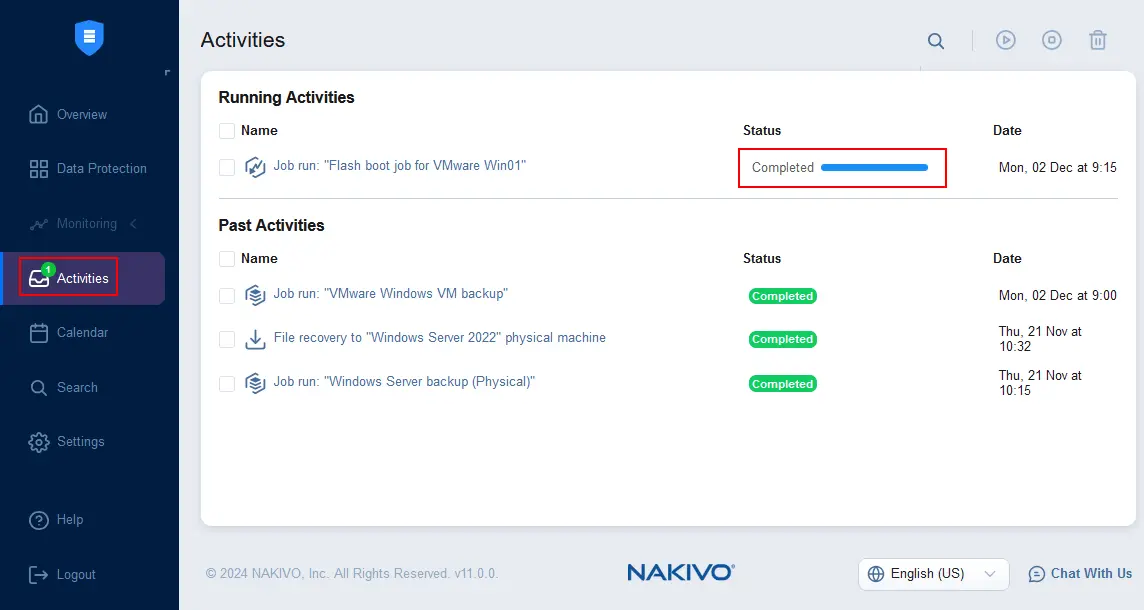
At the same time, you can see the Flash VM Boot job status on the Activities page of the NAKIVO Backup & Replication web interface. The job status is completed, but the green icon indicates that the job is running. This is the normal behavior for instant VM recovery with the Flash VM Boot feature. If you stop the job, the VM changes will be discarded, and the VM will be deleted from the ESXi host or cluster.
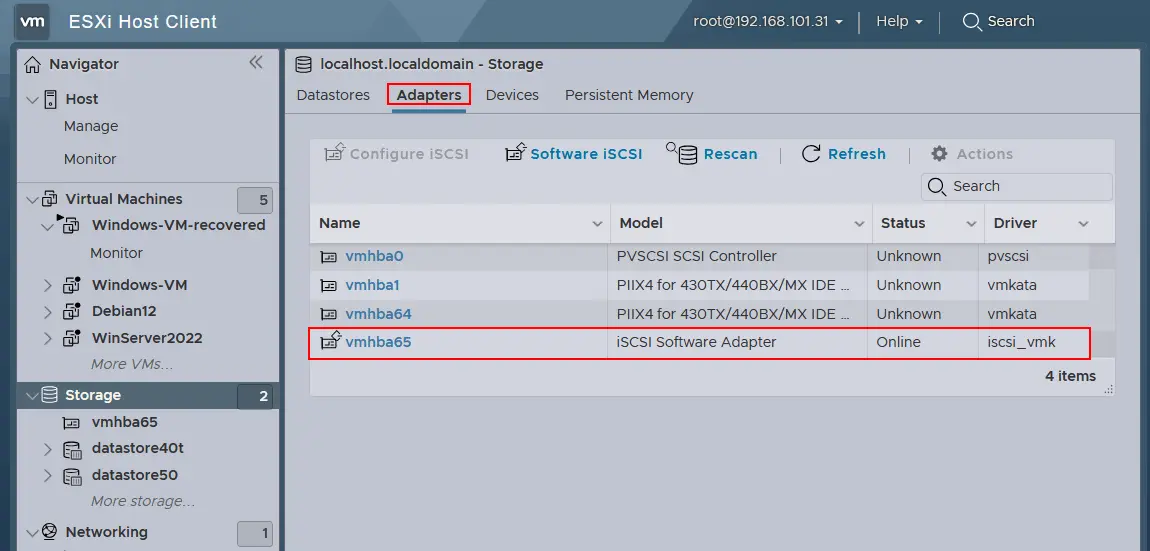
A software iSCSI adapter was created on the ESXi host to attach VM virtual disks directly from the backup for instant VM recovery. You can check this in Storage > Adapters for the selected ESXi host. The vmhba65 iSCSI software adapter was created to mount the virtual disks of our VM when we ran the Flash VM Boot job.
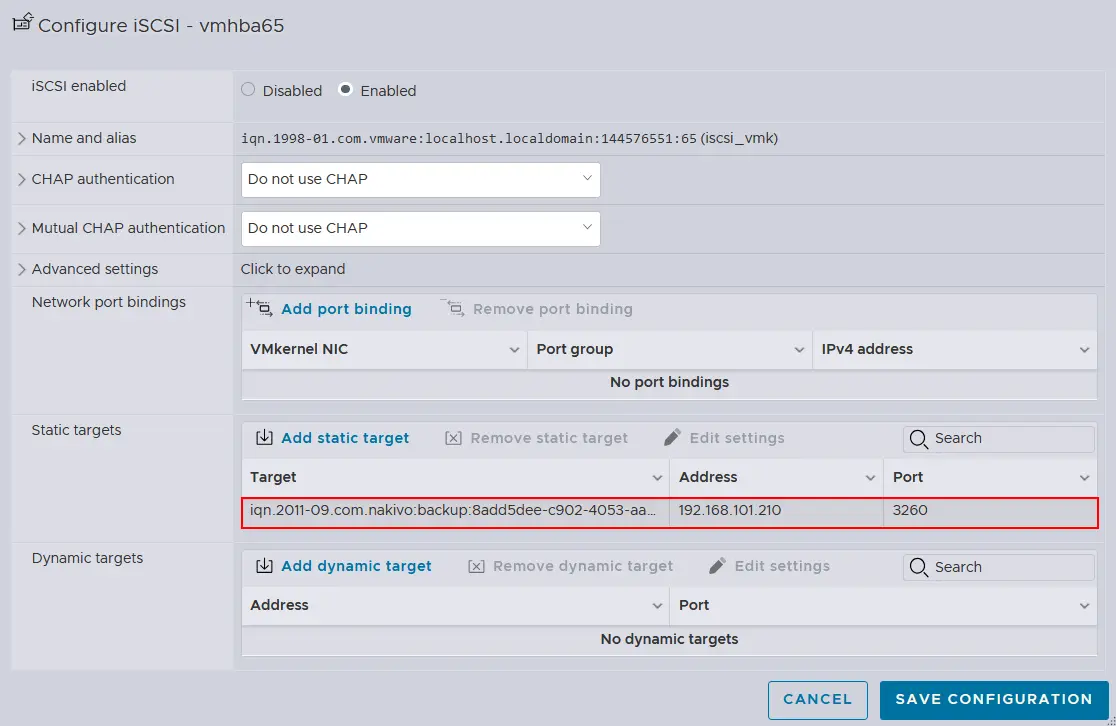
If you click the software iSCSI adapter to see the details, you can view the iSCSI target associated with NAKIVO.
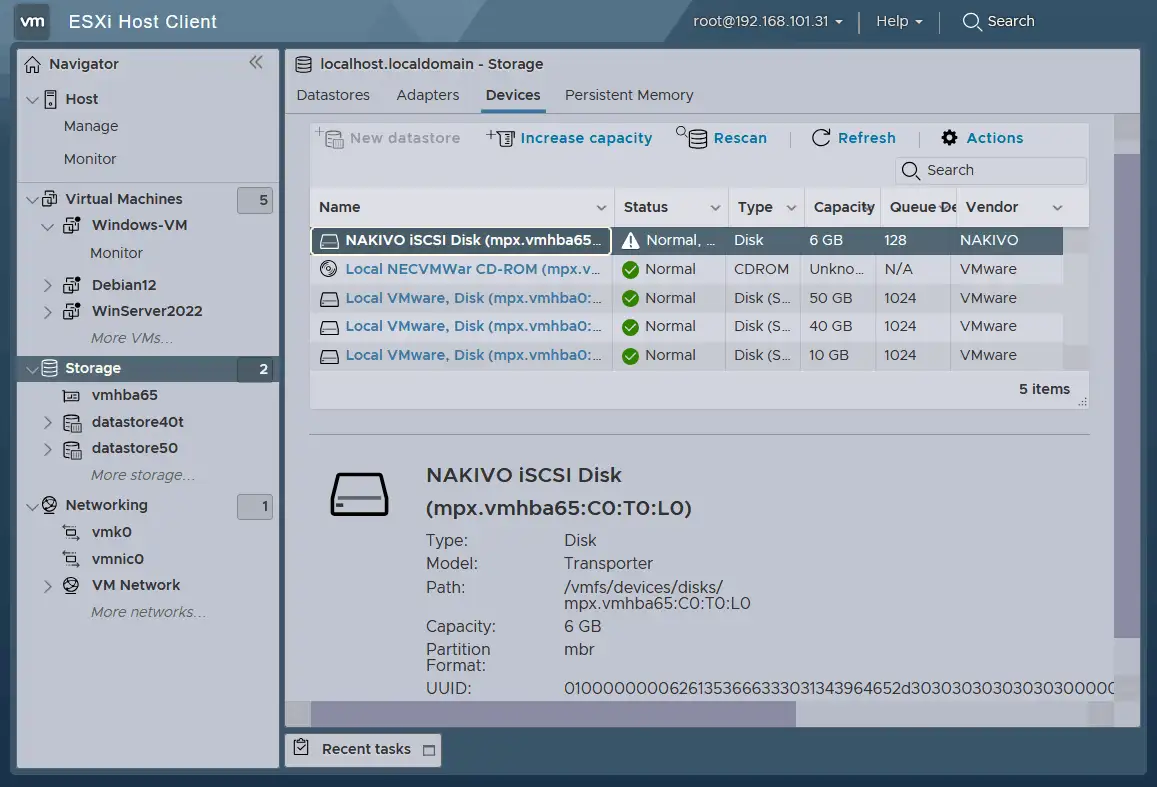
You can find the corresponding virtual disk(s) attached to the recovered VM in the Devices tab in storage configuration.
You can stop the VM and finish the instant VM recovery or continue using the current temporary VM.
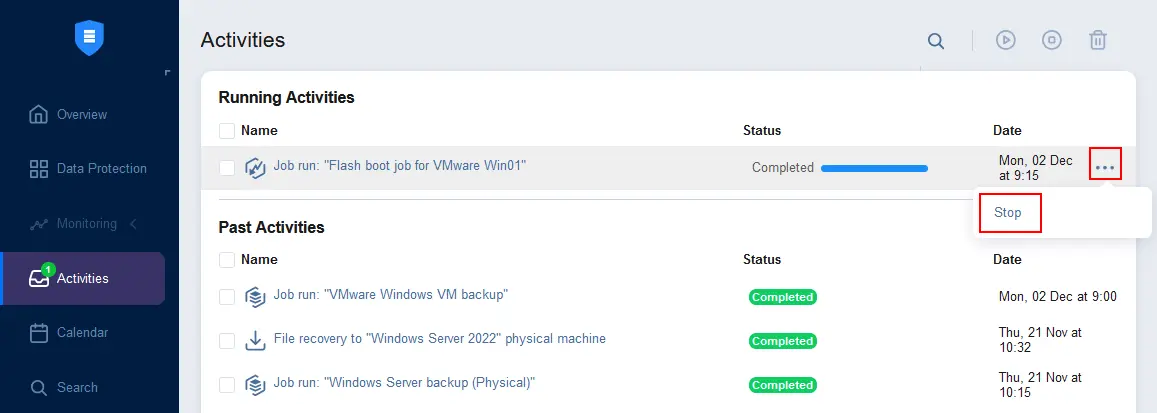
When you no longer need to run the VM recovered with the Flash VM Boot job, you can stop the job. The VM will be deleted from the ESXi host, and all changes will be discarded. To stop the Flash VM Boot job, go to Activities, hover over the running Flash VM Boot job, click the … (three dots) icon and hit Stop.
Otherwise, you can continue using a running VM (which was recovered with Flash VM Boot) by performing a full recovery without service interruption and while retaining all new data. Read the following section for details on how to do that.
Combining Instant and Regular VM Recoveries with NAKIVO
Instant VM recovery can be used to recover a VM with its data and running services as quickly as possible. However, if you need to perform full VM recovery and copy VM data from the backup to an ESXi host or cluster with a high-speed datastore, you can replicate the temporary VM recovered with the Flash VM Boot feature to that ESXi host or cluster. Let’s look at how you can replicate this VM with the NAKIVO solution.
- While the Flash VM Boot job for a VMware VM is running, go to
Data Protection, click+and hitReplication for VMwareto create a new VM replication job.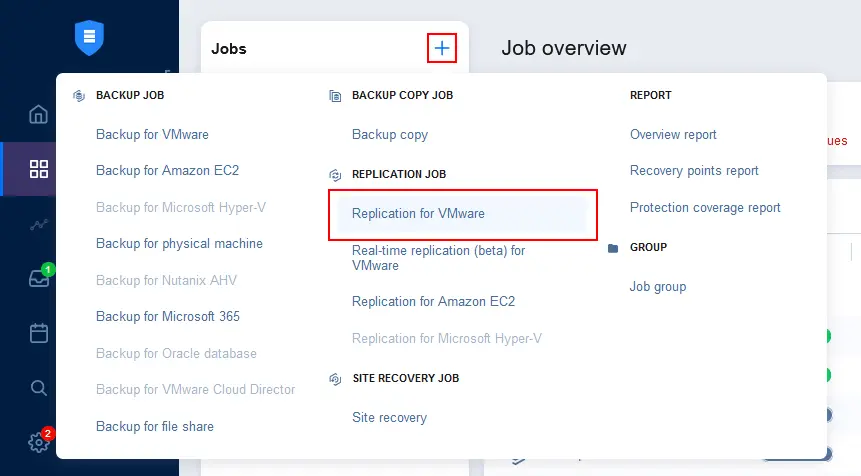
- Select the VM(s) running on the ESXi host or cluster after starting the instant VM recovery. This VM is Windows-VM-recovered in our example. The green icon in the web interface indicates that this VM is in a running state. Hit
Nextto continue.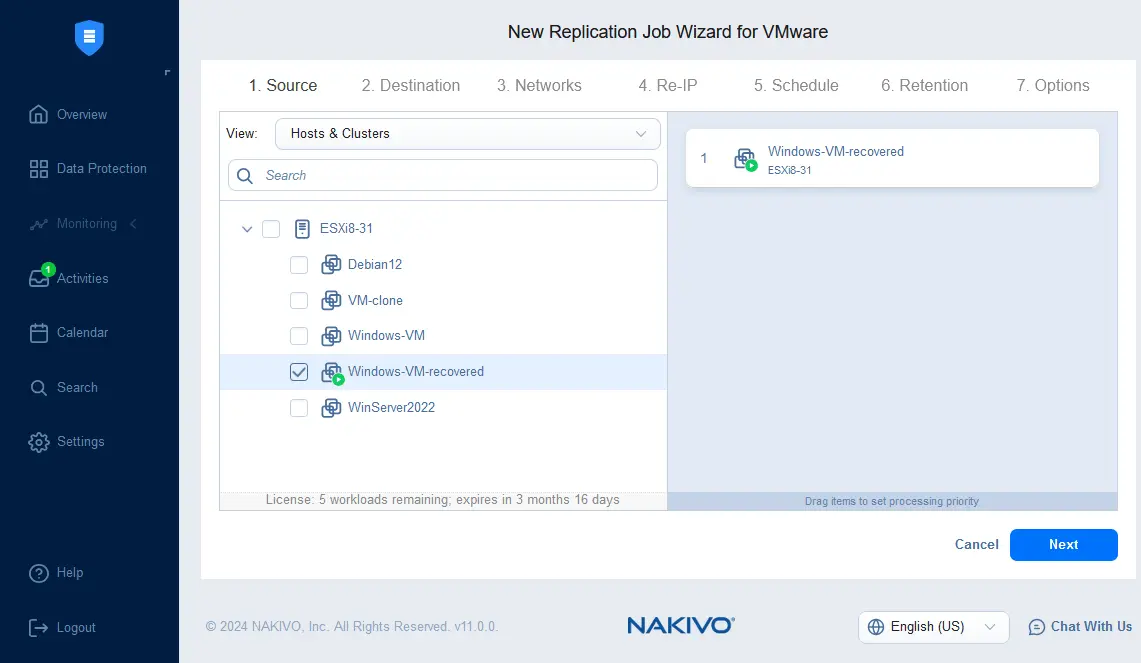
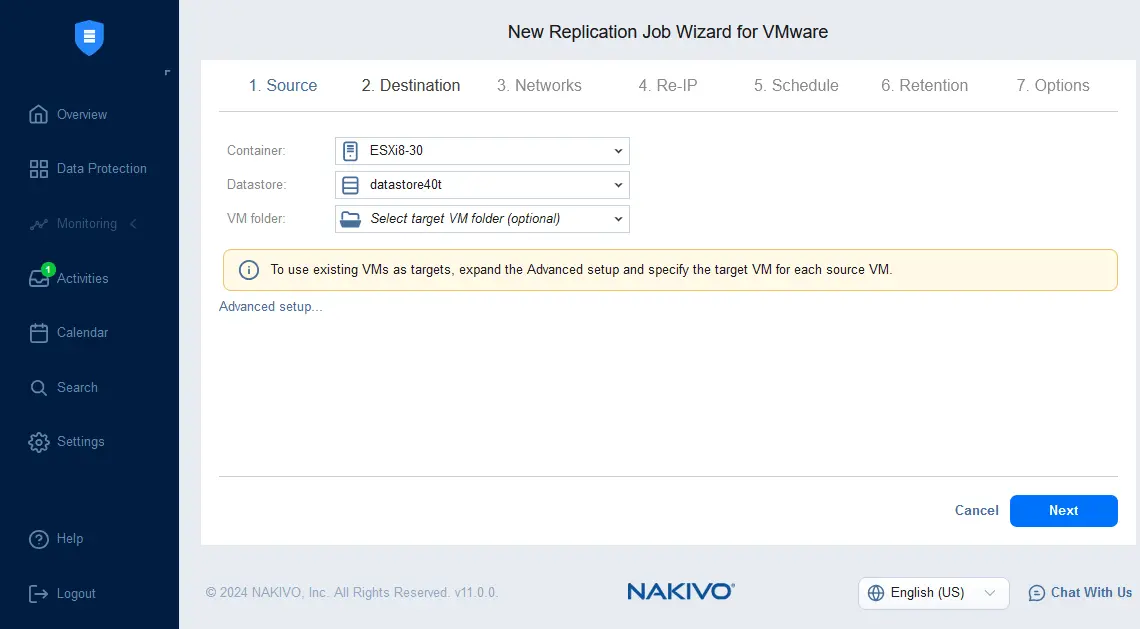
- Select the destination, including the ESXi host or cluster and datastore where to replicate the VM for the full VM recovery. Optionally, you can select a VM folder.
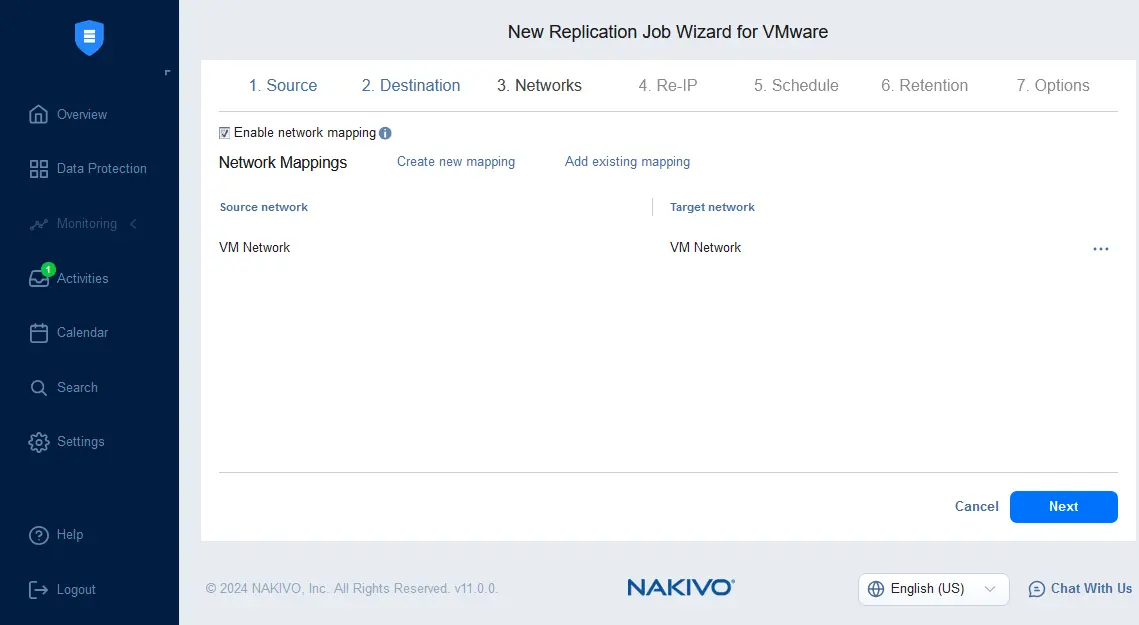
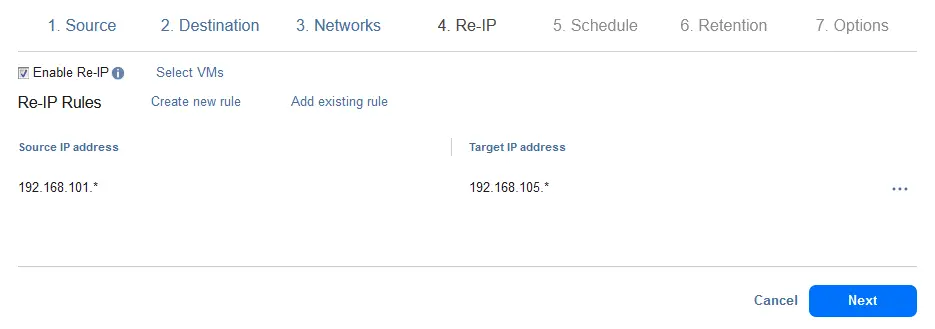
- If the networks differ for the source and destination virtual machines in your environment, you can configure network mapping.
- If you need to use different IP addresses for the source and destination VMs, you can configure Re-IP.
- As we need to run this replication job once, we do not schedule it and run it on demand.

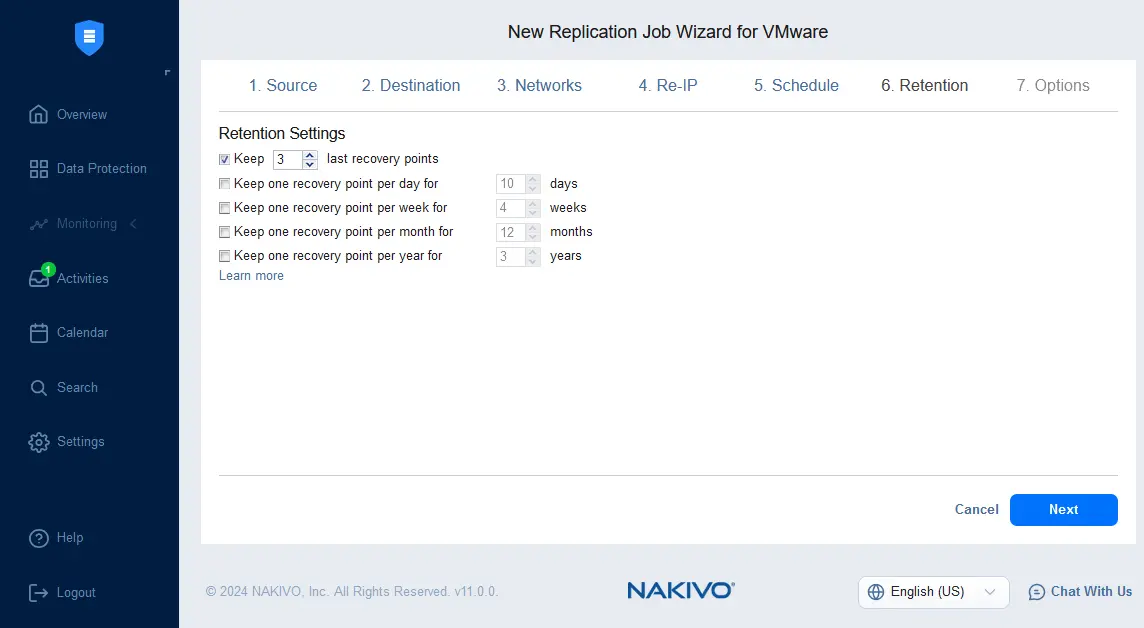
- You can configure retention settings for the replication job.
- Configure the replication job options. Enter a job name, specify the application-aware mode and configure the change tracking, encryption and other options. Click
Finish & Runto save settings and run the job.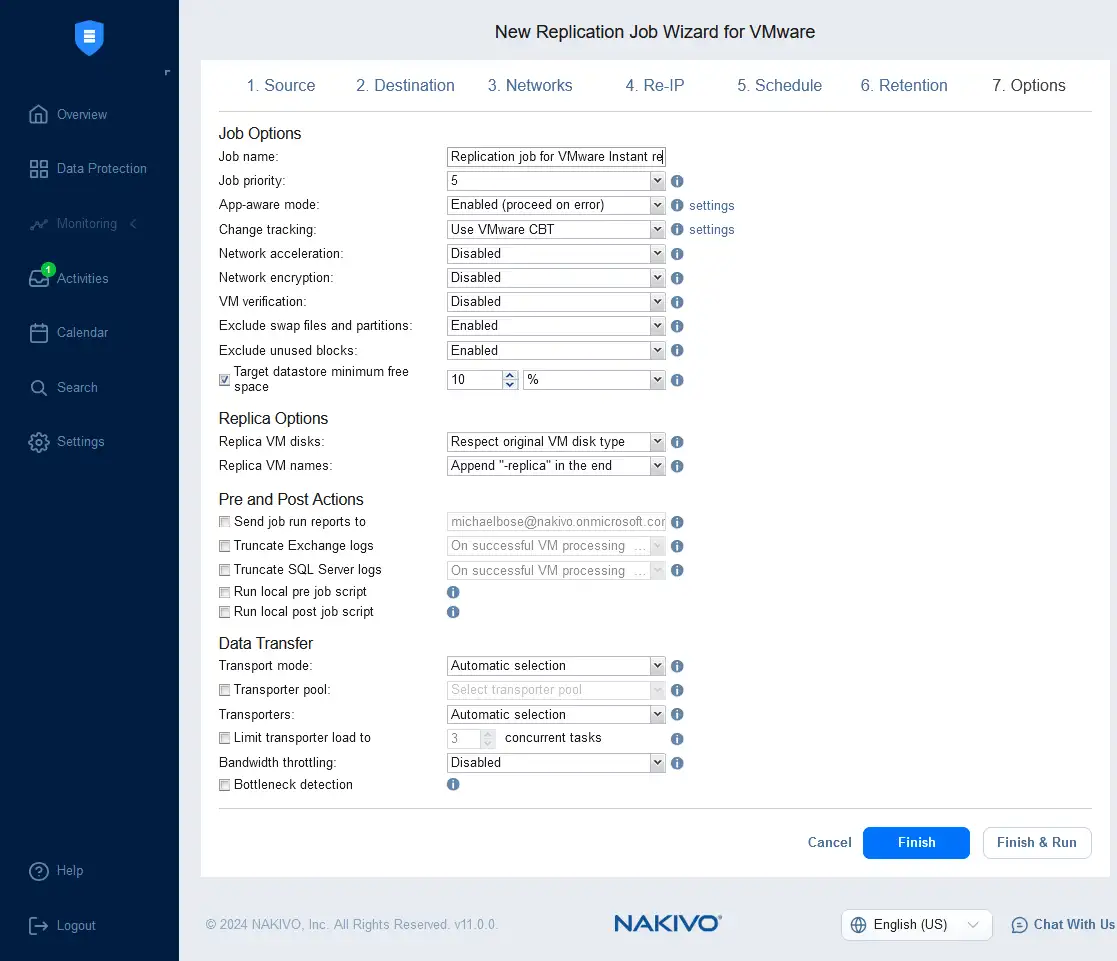
Wait until the VM is replicated from the temporary VM running with the Flash Boot feature for instant VM recovery to the target VM in full recovery mode. After finishing VM replication, you can stop the Flash VM Boot job and use the VM replica for normal operations.
You can also use real-time replication in NAKIVO Backup & Replication for your VMware VMs for the shortest RPOs and RTOs.
Storage vMotion after Instant VM Recovery for Full VM Recovery
Another method to permanently recover a VM after running a Flash VM Boot job is using Storage vMotion. If you use VMware vCenter and your vSphere license allows you to use vMotion and Storage vMotion, you can migrate a running virtual machine that was recovered directly from a backup (which virtual disks are connected to the VM from a backup repository as iSCSI targets) to ESXi with high-performance persistent storage. This recovery solution/approach allows you to perform instant VM recovery and then continue the full VM recovery process smoothly without downtime and data loss.
- After completing a Flash VM Boot job in NAKIVO Backup & Replication and while the instantly recovered VM is running, open VMware vSphere Client and select this instantly recovered VM in the Navigation pane. This VM is running on the ESXi host or cluster selected as the destination when configuring a Flash VM Boot job.
- Right-click the recovered VM and click
Migratein the context menu.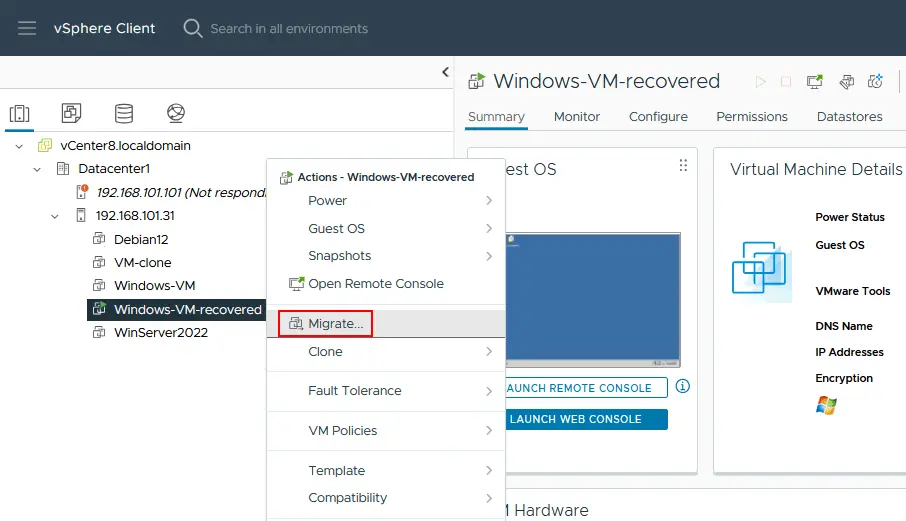
- Select
Change storage onlyas the migration type at the first step of the migration wizard. VMware Storage vMotion will be used in this case. HitNextto continue.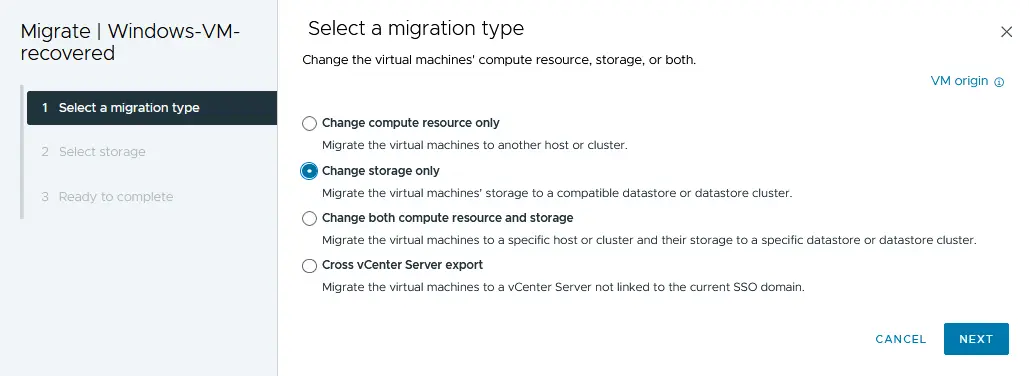
- Select the datastore attached to the ESXi host or cluster where the current VM is running. This is where VM files, including virtual disks, will be copied for normal use after finishing full VM recovery.

- Check the configuration and click
Finishwhen you are ready to complete VM storage migration in the live mode.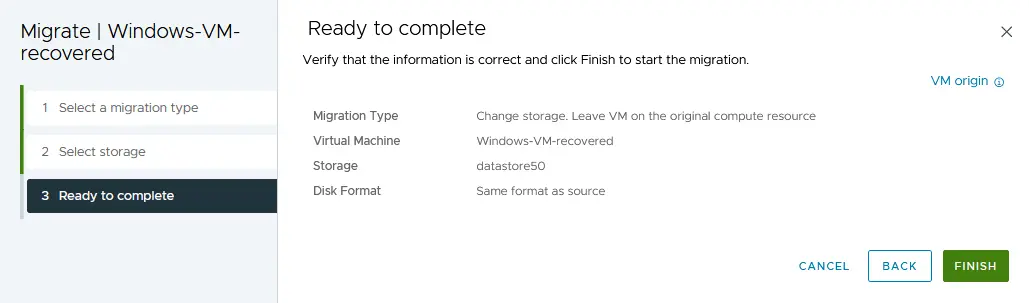
Wait until the VM files are migrated to the permanent datastore in the live migration mode with Storage vMotion. When migration is completed, you can stop the Flash VM Boot job in NAKIVO Backup & Replication. The latest changes are saved to the migrated VM. All changes are discarded for the temporary virtual machine used for instant VM recovery in VMware vSphere. No changes are written to the VM backup of the original VM stored in the backup repository.
Conclusion
Instant VM recovery allows you to perform fast VM recovery for critical workloads and data. You can also use this recovery method for granular recovery and recovery testing. If you need to meet tight RTOs, you can run instant VM recovery and then continue to recover the virtual machine normally using VM replication or VMware Storage vMotion for full VM recovery. Use NAKIVO Backup & Replication as the backup and recovery solution with the Flash VM boot feature for instant recovery of virtual machines in VMware vSphere and Hyper-V environments. The NAKIVO solution also supports physical to virtual recovery and granular recovery for different scenarios.