Jak skonfigurować laboratorium VMware ESXi – kompletny przewodnik
VMware to jedna z najlepszych platform wirtualizacyjnych na świecie, ciesząca się popularnością wśród specjalistów IT dzięki zapewnianiu wysokiej szybkości działania, niezawodności, skalowalności, bezpieczeństwa i wygody.
Serwer VMware ESXi to hiperwizor typu 1 przeznaczony do instalacji bezpośrednio na serwerach fizycznych, czyli hiperwizor typu „bare metal”. Z kolei hiperwizory typu 2 firmy VMware (VMware Player, stacja robocza i Fusion) można instalować na istniejących systemach operacyjnych działających na komputerach stacjonarnych i laptopach.
Wielu użytkowników może nie dysponować w swoich zasobach darmowym serwerem fizycznym lub serwerami, które mogliby wykorzystać do wypróbowania rozwiązania do wirtualizacji klasy Enterprise ESXi i VMware vSphere. Z technicznego punktu widzenia system ESXi można zainstalować na komputerze fizycznym. Może jednak zaistnieć konieczność zintegrowania pakietu VIB z obrazem dysku instalacyjnego ESXi, jeśli instalator ESXi nie wykryje niektórych urządzeń (pakiety VIB zawierają sterowniki urządzeń dla ESXi).
Przyjrzyjmy się wymaganiom dotyczącym konfiguracji VMware ESXi na komputerze oraz wszystkim krokom niezbędnym do pomyślnej instalacji.

Konfiguracja sprzętowa domowego laboratorium VMware
W tym wpisie na blogu wykorzystujemy program VMware Workstation do wdrażania hostów ESXi jako maszyn wirtualnych. Korzystając z funkcji VMware wirtualizacja zagnieżdżona można utworzyć maszynę wirtualną działającą wewnątrz innej maszyny wirtualnej. W tym konkretnym przypadku można wdrożyć maszynę wirtualną na hoście ESXi działającym na maszynie wirtualnej. Aby zapewnić wygodę pracy z domowym laboratorium VMware, potrzebny jest komputer spełniający minimalne wymagania sprzętowe dla domowego laboratorium VMware:
- Wielordzeniowy Procesor x64 o częstotliwości rdzenia 1,3 GHz lub wyższej (wyprodukowany w 2011 r. lub później), obsługujący sprzętowe rozszerzenia wirtualizacyjne Intel VT-x lub AMD-V
- 32 GB pamięci RAM
- Dysk twardy (HDD) z około 200 GB wolnego miejsca. Preferowane są dyski SSD ze względu na wyższą prędkość odczytu i zapisu, zwłaszcza w przypadku operacji losowego odczytu i zapisu, które są powszechne w przypadku pamięci masowej maszyn wirtualnych.
- Karta sieciowa Ethernet
- System operacyjny Linux lub Windows x64 (z interfejsem graficznym) zainstalowany na komputerze fizycznym
Przykłady konfiguracji sprzętowej
Example 1: Komputer stacjonarny
- Procesor AMD Ryzen 7 7800X3D (100-100000910WOF) 4,2 GHz, gniazdo AM5
- Płyta główna Gigabyte B650E Aorus Master AMD B650 4xDDR5 6600 MHz, do 192 GB pamięci RAM
- Dysk SSD Kingston KC600 2 TB – zestaw do rozbudowy (SKC600B/2048G) SATA
- Dysk twardy 3,5″ WD Ultrastar DC HC320 8 TB (HUS728T8TALE6L4/0B36404) SATA
- Pamięć RAM Kingston FURY 16 GB DDR5 6400 MHz Renegade Silver RGB (KF564C32RSA-16) – 4 moduły (łącznie 64 GB pamięci RAM)
- Zasilacz Be Quiet! Straight Power 11 Platinum 850 W (BN308)
- Karta graficzna AMD Radeon RX 7900 XT (100-300000071) Częstotliwość procesora graficznego: 2400 (Boost) MHz GDDR6 20 GB; Częstotliwość pamięci: 20000 MHz; Magistrala: 320-bitowa PCI-Express 4.0 x16
Example 2: Komputer stacjonarny
- Procesor Intel Core i7-14700K (BX8071514700K) 3,4 GHz, gniazdo 1700
- Płyta główna ASUS Prime Z690-A Intel Z690 4xDDR5 6000 MHz, do 192 GB pamięci RAM
- Dysk SSD Intel D3-S4620 1,92 TB (SSDSC2KG019TZ01) SATA
- Dysk twardy 3,5″ WD Gold Enterprise Class 6 TB (WD6003FRYZ) SATA
- Pamięć RAM Kingston FURY 32 GB DDR5 6000 MHz Beast EXPO White (KF560C36BWE-32) – 4 moduły (łącznie 64 GB pamięci RAM)
- Zasilacz Chieftec 1000 W Proton (BDF-1000C)
- Karta graficzna GIGABYTE GeForce RTX 4090 WINDFORCE 24G (GV-N4090WF3-24GD)
Example 3: Laptop Laptop gamingowy Acer Predator Helios 16 – GeForce RTX™ 4080 – PH16-71-948L
- Procesor Intel® Core™ i9-13900HX 2,20 GHz
- Karta graficzna NVIDIA® GeForce RTX™ 4080 z 12 GB dedykowanej pamięci
- 16″ WQXGA (2560 x 1600) 16:10 IPS 240 Hz
- 32 GB, DDR5 SDRAM
- dysk SSD o pojemności 1 TB
Example 4: laptop ASUS ProArt Studiobook 16 (H7600, procesor Intel 12. generacji)
- Intel® Core™ i9-12900H
- NVIDIA® GeForce RTX™ 3080 Ti
- 64 GB pamięci RAM 4800 MHz DDR5, 2 gniazda SO-DIMM
- Do 4 TB, dwa gniazda M.2 dla dysków SSD PCIe®
UWAGA: Do skonfigurowania laboratorium VMware nie potrzebujesz najpotężniejszej karty graficznej. Najważniejsze komponenty to Procesor, pamięć i magazyn. W przeciwieństwie do procesorów AMD, procesory Intel technicznie umożliwiają uruchamiać maszyny wirtualne z systemem macOS w środowisku VMware hiperwizorów.
Wymagane oprogramowanie
W niniejszym poście do skonfigurowania domowego laboratorium VMware wykorzystano następujące oprogramowanie:
- VMware Workstation 17 jako hiperwizor na komputerze stacjonarnym
- Hiperwizor VMware ESXi 8.0 jako maszyna wirtualna (łącznie 2 maszyny wirtualne)
- VMware vCenter Server 8.0 (1 maszyna wirtualna, przeprowadzane jest wdrażanie jako urządzenie wirtualne)
- FreeNAS 11.3 do utworzenia współdzielonej pamięci masowej iSCSI (1 maszyna wirtualna)
- Lubuntu 22 Linux lub dowolny inny obsługiwany system operacyjny do zainstalowania na zagnieżdżonej maszynie wirtualnej
Aby dowiedzieć się, jak zbudować domowe laboratorium VMware, należy zrozumieć jego strukturę. Poniżej znajduje się schemat głównej struktury domowego laboratorium VMware, które ma zostać wdrożone.

Uzasadnienie wymagań
Łączne wymagania sprzętowe i programowe domowego laboratorium VMware opierają się na następujących wymaganiach minimalnych:
- VMware ESXi wymaga co najmniej 4 GB pamięci RAM do instalacji (zalecane jest 8 GB lub więcej do uruchamiania maszyn wirtualnych); 2 rdzenie Procesora.
- VMware vCenter Server 8.0 wymaga co najmniej 14 GB pamięci RAM; 2 rdzenie Procesora.
- FreeNAS: zalecane jest 8 GB pamięci RAM.
- System operacyjny hosta wymaga co najmniej 4 GB pamięci RAM do prawidłowego działania.
- VMware Workstation wymaga co najmniej 2 GB pamięci RAM (zalecane jest 4 GB lub więcej).
Licencjonowanie i ceny
Możesz bezpłatnie skonfigurować laboratorium VMware w domu na czas trwania okresów próbnych. Zaleca się skonfigurowanie wszystkich elementów laboratorium w krótkim czasie (na przykład w ciągu kilku dni), aby w pełni wykorzystać 60-dniowe bezpłatne wersje próbne dla ESXi i vCenter. Na przykład, jeśli zainstalujesz vCenter miesiąc po zainstalowaniu ESXi, pozostanie ci tylko jeden miesiąc na testowanie vSphere w swoim laboratorium, biorąc pod uwagę, że 30 dni bezpłatnej wersji próbnej ESXi już upłynęło.
- VMware Workstation jest dostępny z 30-dniową bezpłatną wersją próbną dla nowych użytkowników. Po upływie okresu próbnego firma VMware zaleca zakup licencji. Jeśli nie kupisz licencji, nie będziesz mógł uruchamiać maszyn wirtualnych. Po upływie tego okresu możesz korzystać z programu VMware Player do uruchamiania maszyn wirtualnych za darmo, ale VMware Player ma mniej funkcji – brakuje na przykład edytora sieci wirtualnych.
UWAGA: VMware Workstation i VMware Player można zainstalować na całkowicie darmowym systemie operacyjnym Linux. Nie musisz kupować systemu operacyjnego Windows do domowej konfiguracji laboratorium VMware. Oczywiście, jeśli masz już komputer z systemem Windows, możesz go użyć do instalacji programu VMware Workstation.
- Program VMware vCenter Server dla vSphere 8.0 można bezpłatnie używać przez 60-dniowy okres próbny z pełnym zestawem funkcji, w tym interfejsami API do ochrony danych.
- FreeNAS to całkowicie bezpłatne oprogramowanie oparte na systemie operacyjnym FreeBSD, które pozwala skonfigurować serwer plików (podobnie jak w przypadku NAS) na dowolnym komputerze.
Instalacja programu VMware Workstation
Teraz, gdy sprzęt jest już przygotowany, a system operacyjny zainstalowany, możesz pobrać i zainstalować program VMware Workstation na swoim komputerze fizycznym. Aby pobrać program VMware Workstation dla systemu Linux lub Windows, zajrzyj na stronę ta strona na witrynie VMware.
Instalacja programu VMware Workstation w systemie Linux
Aby zainstalować program VMware Workstation w systemie Linux, wykonaj następujące czynności:
- Przejdź do katalogu, w którym zapisałeś pobrany plik instalatora. W tym przykładzie instalator programu VMware Workstation znajduje się w katalogu ~/ Pobrane :
cd /home/user1/Downloads/ - Nadaj plikowi instalatora uprawnienia do uruchamiania:
sudo chmod +x ./VMware-Workstation-Full-17.0.0-20800274.x86_64.bundle - Uruchom instalator programu VMware Workstation dla systemu Linux:
sudo ./VMware-Workstation-Full-17.0.0-20800274.x86_64.bundle - Pojawi się okno kreatora instalacji. Odpowiedz na pytania w kreatorze i kliknij
Next, aby przejść do następnego kroku.- Zaakceptuj umowę licencyjną.
- Czy chcesz sprawdzać dostępność aktualizacji produktu podczas uruchamiania? Wybierz opcję Tak lub
No. - Czy chcesz dołączyć do programu poprawy jakości obsługi klienta VMware? Wybierz opcję Tak lub
No. - Wprowadź nazwę użytkownika, który jako pierwszy połączy się z serwerem stacji roboczej. Wpisz nazwę użytkownika konta, z którego korzystasz w systemie Linux.
- Wybierz katalog dla współdzielonych maszyn wirtualnych, na przykład: /var/lib/VMware/SharedVMs
- Wprowadź port, który ma być używany do dostępu HTTPS do serwera stacji roboczej (domyślnie 443).
- Wprowadź klucz licencyjny. W trybie bezpłatnej wersji próbnej pozostaw to pole puste.
- Produkt jest gotowy do instalacji.
- Kompilator GNU C musi zostać zainstalowany przed uruchomieniem programu VMware Workstation. Aby zainstalować ten kompilator, wykonaj następujące polecenie:
sudo apt-get -y install gcc make linux-headers-$(uname -r) dkms
Interfejsy użytkownika programu VMware Workstation dla systemów Linux i Windows są identyczne. Poniżej znajduje się zrzut ekranu przedstawiający interfejs programu VMware Workstation 17 działającego w systemie Linux.

Podczas instalacji programu VMware Workstation domyślnie instalowany jest również program VMware Player.
Instalacja programu VMware Workstation w systemie Windows
Przejdź do katalogu, w którym zapisałeś pobrany instalator, i uruchom plik instalacyjny. Nazwa pliku to VMware-workstation-full-17.0.0-20800274.exe w tym przypadku. Podobnie jak podczas instalacji w systemie Linux, otworzy się przyjazny dla użytkownika kreator. Po skonfigurowaniu opcji kliknij Next , aby kontynuować.
- Na ekranie powitalnym kliknij
Next. - Zaakceptuj umowę licencyjną.
- Wybierz miejsce instalacji.
- Zaznacz pola wyboru, jeśli chcesz sprawdzać dostępność aktualizacji podczas uruchamiania oraz dołączyć do programu VMware Customer Experience Improvement Program.
- Wybierz skróty, które chcesz umieścić w systemie.
- Kliknij
Install, aby rozpocząć instalację. - Ostatni ekran instalacji umożliwia wprowadzenie licencji (nie jest to konieczne w przypadku bezpłatnej wersji próbnej).
Teraz masz zainstalowaną instancję programu VMware Workstation na swoim komputerze fizycznym.
Wdrażanie maszyny wirtualnej z systemem ESXi w programie VMware Workstation
Do dalszych eksperymentów przeprowadzanych w domowym laboratorium VMware, wykorzystanym do napisania tego wpisu na blogu, należy użyć komputera z programem VMware Workstation 17 zainstalowanym w systemie Windows 10 (na dysku znajdują się partycje C: i D:). Wszystkie opisane czynności można odtworzyć na komputerze z systemem Linux, ponieważ VMware Stacja robocza jest wieloplatformowym rozwiązaniem do wirtualizacji (należy pamiętać, że ścieżki na komputerze z systemem Linux będą inne). Następnym krokiem jest zainstalowanie ESXi na maszynie wirtualnej.
Tworzenie maszyny wirtualnej
- Pobierz instalator ESXi 8.0 w formacie ISO ze strony Strona internetowa VMware.
Być może konieczne będzie utworzenie konta VMware w celu pobrania obrazu instalacyjnego (bezpłatnie).
- Utwórz katalog do przechowywania maszyn wirtualnych, na przykład: D: VMware Home Lab
- Utwórz podkatalog D: VMware Home Lab ESXi8a do przechowywania plików pierwszej maszyny wirtualnej ESXi.
- Utwórz nową maszynę wirtualną w programie VMware Stacja robocza. Kliknij
File>New Virtual Machine. Pojawi się Kreator nowej maszyny wirtualnej .- Na ekranie Powitanie wybierz
Custom (advanced). - Określ zgodność sprzętową maszyny wirtualnej.
Select Workstation 17.x.
- Instalacja systemu operacyjnego gościa . Wybierz
Installer disk image file (iso)i wybierz plik ISO instalatora ESXi . KliknijNext. - Wybierz system operacyjny gościa . Wybierz
VMware ESX, następnie wybierzVMware ESXi 7z menu rozwijanego i kliknijNext.
- Nadaj nazwę maszynie wirtualnej . Wprowadź nazwę maszyny wirtualnej, na przykład: ESXi8a . Wybierz katalog D: VMware Home Lab ESXi8a , który utworzyłeś wcześniej, jako lokalizację maszyny wirtualnej.
- Konfiguracja procesora . Określ następujące parametry:
- Liczba procesorów: 2
- Liczba rdzeni na procesor: 1
Jeśli użyjesz 1 procesora z 1 rdzeniem, instalator ESXi wyświetli błąd podczas instalacji.

- Pamięć dla maszyny wirtualnej . Określ ilość pamięci równą
4096MB. Później możesz edytować ustawienia i zwiększyć ilość pamięci. - Typ sieci . Wybierz
Use network address translation (NAT).
- Wybierz typy kontrolerów we/wy . Wybierz
Paravirtualized SCSI (Recommended). - Wybierz typ dysku . Wybierz
SCSI (Recommended)jako typ dysku.
- Wybierz dysk . Kliknij
Create a new virtual disk. - Określ pojemność dysku . Ustaw
maximum disk sizena15 GB. ESXi nie zajmuje dużo miejsca na dysku, a do instalacji ESXi wystarczy dysk o pojemności 15 GB. WybierzStore virtual disk as a single file.
- Określ plik dysku . Umieść dysk wirtualny w katalogu określonym jako lokalizacja maszyny wirtualnej. W tym przykładzie używany jest D: VMware Home Lab ESXi8aESXi8a.vmdk .
- Gotowy do utworzenia maszyny wirtualnej . Sprawdź ustawienia maszyny wirtualnej i kliknij
Finish, aby utworzyć maszynę wirtualną.
- Na ekranie Powitanie wybierz
Instalacja ESXi na maszynie wirtualnej
Po zakończeniu konfiguracji w kreatorze uruchom nową maszynę wirtualną, klikając przycisk „play” w programie VMware Workstation. Maszyna wirtualna uruchomi się z obrazu ISO i pojawi się interfejs instalatora ESXi.
- Na ekranie powitalnym naciśnij
Enter. - Zapoznaj się z umową licencyjną użytkownika końcowego (EULA) i zaakceptuj ją. Naciśnij
F11, aby kontynuować. - Wybierz dysk do instalacji lub aktualizacji. Wybierz utworzony wcześniej dysk wirtualny o pojemności 15 GB.

- Wybierz układ klawiatury.
US Defaultjest wybrany w tym przykładzie. - Wprowadź hasło użytkownika root. Potwierdź hasło użytkownika root.
- Na ekranie
Confirm InstallnaciśnijF11, aby rozpocząć instalację.
UWAGA: Zapoznaj się z naszym wpisem na blogu, aby uzyskać szczegółowa, interaktywna instalacja ESXi wraz ze zrzutami ekranu.
Edytowanie ustawień maszyny wirtualnej i konfiguracja sieci
Po zainstalowaniu ESXi wyłącz maszynę wirtualną z uruchomionym ESXi (kliknij VM > Power > Shut Down Guest lub naciśnij Ctrl+E w interfejsie VMware Workstation) i przygotuj ją do dalszej konfiguracji sieci i pamięci masowej.
Utwórzmy drugi dysk wirtualny, który posłuży jako magazyn danych maszyny wirtualnej (później na tej przestrzeni dyskowej będzie można umieścić zagnieżdżone maszyny wirtualne). Należy również utworzyć drugą wirtualną kartę sieciową (NIC – kontroler interfejsu sieciowego), która może służyć do tworzenia zespołów kart sieciowych lub do łączenia się ze współdzieloną pamięcią masową. Należy pamiętać, że zalecamy użycie oddzielnej sieci pamięci masowej do podłączania współdzielonej pamięci masowej do hostów ESXi.
Dodawanie dysku wirtualnego
- Aby dodać nowy dysk wirtualny do maszyny wirtualnej, kliknij
VM>Settingsi w oknie Ustawienia maszyny wirtualnej kliknijAdd>Hard Disk.
- Wybierz typ dysku wirtualnego: SCSI (zalecane).
- Utwórz nowy dysk wirtualny.
- Ustaw rozmiar dysku na 40 GB i wybierz opcję
Store virtual disk as a single file. Jeśli nie chcesz korzystać z opcji przydzielanie zasobów o dużej przepustowości, nie zaznaczaj pola wyboru Przydziel całą przestrzeń dyskową teraz . Możesz ustawić maksymalny rozmiar dysku na więcej niż 40 GB, jeśli masz wystarczającą ilość miejsca na dysku fizycznym komputera. - Określ lokalizację pliku dysku wirtualnego. D: VMware Home Lab ESXi8aESXi8a-0.vmdk jest używany w tym przykładzie, ponieważ przechowywanie wszystkich plików maszyn wirtualnych w jednym katalogu jest wygodne.
Dodawanie karty sieciowej
Aby dodać drugą kartę sieciową, kliknij Add > Network Adapter. Wybierzmy różne sieci do łączenia hostów ESXi między sobą (sieć NAT) oraz do łączenia hostów ESXi ze wspólną pamięcią masową (sieć dostępna tylko dla hosta).
- Sieć
NAT networkumożliwia maszynom wirtualnym łączenie się między sobą oraz z maszyną hosta, a także umożliwia hostowi łączenie się z maszynami wirtualnymi. Maszyny wirtualne mogą uzyskać dostęp do sieci zewnętrznej, do której dostęp ma host. - Sieć
host-only networkumożliwia maszynom wirtualnym komunikację między sobą oraz z hostem. Komputer hosta może komunikować się z maszynami wirtualnymi. Maszyny wirtualne nie mają dostępu do sieci zewnętrznych ani do Internetu.
Program VMware Workstation udostępnia edytor sieci wirtualnych służący do konfigurowania sieci wirtualnych, takich jak sieci NAT i sieci tylko dla hosta. Ponadto można tworzyć więcej sieci NAT i sieci tylko dla hosta oraz przypisywać do nich adresy sieciowe, wirtualne bramy i wirtualne serwery DHCP.
Poniższy schemat połączeń można wykorzystać w domowym laboratorium VMware ESXi utworzonym w tym poście:

Edytowanie konfiguracji sieci wirtualnej
- Otwórz Edytor sieci wirtualnych klikając
Edit>Virtual Network Editor. Zdefiniujmy następującą konfigurację sieci:VMnet8 (NAT network)- Adres sieciowy: 192.168.101.0/24
- Adres IP bramy: 192.168.101.2
- Ustawienia DHCP: zakres adresów IP to 192.168.101.201 – 192.168.101.254; domyślne ustawienia czasu dzierżawy.
VMnet1 (Host-only)- Adres sieciowy 192.168.105.0/24
- Ustawienia DHCP: zakres adresów IP to 192.168.105.201 – 192.168.105.254
- Aby edytować ustawienia, wybierz sieć
VMnet8i naciśnij przyciskNAT Settings.
- Ustaw adres IP bramy oraz zaawansowane ustawienia sieciowe. Kliknij
OK, aby zapisać zmiany.
- Podobnie, naciśnij przycisk
DHCP settings, aby edytować konfigurację DHCP.
W podobny sposób możesz edytować ustawienia DHCP dla
VMnet1i innych sieci.
UWAGA: W domowych laboratoriach VMware możesz używać innych adresów IP. Jeśli chcesz odtworzyć środowisko opisane w tym poście, dla wygody możesz skorzystać z tej samej konfiguracji.
Wdrażanie drugiego hosta ESXi poprzez skopiowanie maszyny wirtualnej
Właśnie utworzyliśmy maszynę wirtualną, zainstalowaliśmy system ESXi 8.0 oraz skonfigurowaliśmy maszynę wirtualną i sieci. Utwórzmy jeszcze jedną maszynę wirtualną ESXi. Drugą maszynę wirtualną ( ESXi8b ) można utworzyć od podstaw, tak samo jak utworzyliśmy pierwszą maszynę wirtualną ESXi (ESXi8a), lub można sklonować pierwszą maszynę wirtualną.
Aby sklonować maszynę wirtualną, wykonaj następujące czynności:
- Otwórz menedżera plików, na przykład Eksploratora Windows, i przejdź do katalogu, w którym znajduje się Twoja pierwsza maszyna wirtualna. W tym przykładzie jest to katalog D: VMware Home Lab . Katalog pierwszej maszyny wirtualnej to D: VMware home lab ESXi8a .
- Utwórz katalog o nazwie ESXi8b w D: VMware Home Lab .
- Wyłącz maszynę wirtualną z systemem ESXi ( ESXi8a ) i skopiuj wszystkie pliki z katalogu ESXi8a do katalogu ESXi8b .
Teraz można zobaczyć w praktyce jedną z zalet wirtualizacji sprzętowej – nie trzeba przeprowadzać wdrażania nowej maszyny wirtualnej od podstaw; zamiast tego można skopiować istniejącą maszynę wirtualną, aby zwiększyć liczbę maszyn wirtualnych.
- Aby uniknąć nieporozumień, można zmienić nazwy dysków wirtualnych i pliku konfiguracyjnego maszyny wirtualnej w katalogu ESXi8b:
ESXi8a.vmdk -> ESXi8b.vmdk
ESXi8a-0.vmdk -> ESXi8b-0.vmdk
ESXi8a.vmx -> ESXi8b.vmx
- Otwórz sklonowany plik VMX (którego nazwę zmieniono z ESXi8a.vmx na ESXi8b.vmx). Znajdź wszystkie wartości „ESXi8a” i zastąp je wartością „ESXi8b” w tym pliku konfiguracyjnym VMX. Następnie zapisz plik konfiguracyjny klonu maszyny wirtualnej (sklonowanej maszyny wirtualnej).
- Otwórz sklonowaną maszynę wirtualną w stacji roboczej VMware Workstation. Kliknij „
File>Open” i wybierz plik „ ” D: „VMware Home Lab” „ESXi8bESXi8b.vmx” . Przejdź do „VM>Settings>Options” i upewnij się, że nazwa maszyny wirtualnej została zmieniona na „ ” „ESXi8b” . - Włącz drugą maszynę wirtualną ESXi (
VM>Power>Power On). - Program VMware Workstation wyświetli ostrzeżenie, że nie znaleziono pliku dysku wirtualnego. Wybierz
Browsei plik D: VMware Home Lab ESXi8bESXi8b.vmdk . KliknijOpen. Ponownie pojawi się ostrzeżenie dotyczące drugiego dysku wirtualnego. Wybierz plik ESXi8b-0.vmdk . - Następnie stacja robocza VMware wyświetli ostrzeżenie, że ta maszyna wirtualna mogła zostać usunięta lub skopiowana. Kliknij
I Copied It, a druga maszyna wirtualna powinna zostać załadowana.To ostrzeżenie pojawia się, ponieważ skopiowana maszyna wirtualna ma ten sam identyfikator UUID (Universal Unique Identifier, czyli 128-bitową liczbę całkowitą) co maszyna źródłowa. Identyfikator UUID jest generowany w zależności od lokalizacji maszyny wirtualnej i służy do generowania adresu MAC (Media Access Control) maszyny wirtualnej dla wirtualnej karty sieciowej. Jeśli wybierzesz
I Moved It, identyfikator UUID zostanie zachowany. Jeśli wybierzeszI Copied It, zostanie wygenerowany nowy identyfikator UUID. Każda maszyna musi posiadać unikalny identyfikator UUID, który stanowi jej cyfrowy odcisk palca. Przykładem identyfikatora UUID jest 34 5e cb fa fd d4 a1 e1 72 3b 05 62 4d 3a 52 85 .
Masz teraz dwie maszyny wirtualne, na których zainstalowano serwery ESXi.
Podstawowa konfiguracja ESXi
Włącz pierwszą maszynę wirtualną, na której zainstalowano ESXi ( ESXi8a ) i naciśnij F2 w celu dostosowania systemu. Jak widać na zrzucie ekranu, wirtualny serwer DHCP dla sieci wirtualnej VMnet8 działa poprawnie, a adres IP jest uzyskiwany automatycznie ( 192.168.101.202 ). Zalecamy jednak ręczne skonfigurowanie adresów IP dla serwerów; poniżej przedstawiono instrukcję, jak to zrobić:
- W menu Dostosowanie systemu wybierz opcję
Configure Management Networki naciśnij przyciskEnter.
- W menu Konfiguruj sieć zarządzania wybierz opcję
Network Adapters.
- Zobaczysz drugą kartę sieciową, którą niedawno dodałeś do maszyny wirtualnej. Drugą kartę lepiej włączyć później w interfejsie internetowym. Naciśnij przycisk
Esc, aby powrócić do menuConfigure Management Network.
- W menu Configure Management Network wybierz
IPv4 Configuration. W tym menuSet static IPv4 address and network configuration.- Adres IPv4: 192.168.101.101
- Maska podsieci: 255.255.255.0
- Brama domyślna: 192.168.101.2
- Naciśnij
Enter, aby zastosować zmiany (może być konieczne ponowne uruchomienie hosta).
UWAGA: Ustawienia IP dla drugiej karty sieciowej można skonfigurować później, podczas przygotowań do konfiguracji współdzielonego magazynu. Wyłącz IPv6, jeśli nie zamierzasz korzystać z tego typu sieci.
- Po skonfigurowaniu ustawień sieciowych uruchom ponownie maszynę wirtualną ESXi, aby zastosować zmiany.
Nazwę hosta można zmienić w System Customization > Configure Management Network > DNS Configuration. W bieżącym przykładzie ESXi01 to nazwa pierwszego wirtualnego hosta ESXi w domowym laboratorium ESXi (domyślna nazwa hosta to localhost ).
Konfiguracja dostępu do zdalnego zarządzania
Teraz przejdź do menu System Customization , wprowadź Troubleshooting Options, a następnie włącz opcje ESXi Shell i SSH. Włączenie tych opcji umożliwia zarządzanie hostem ESXi za pomocą konsoli lokalnej lub zdalnie przez SSH.
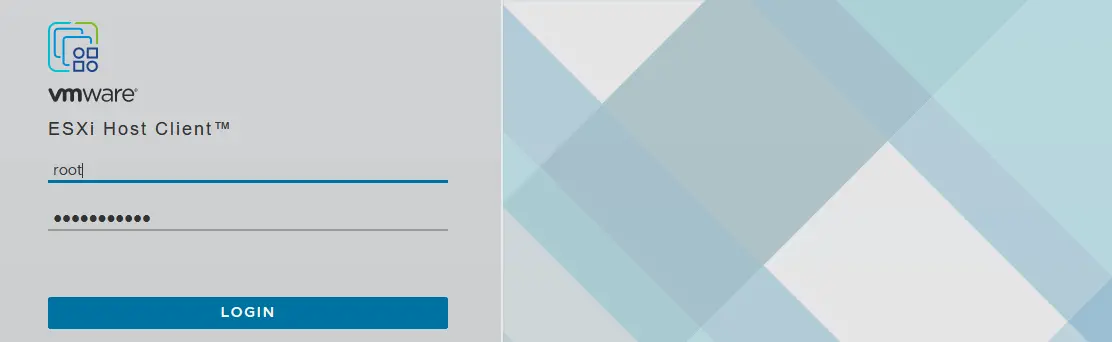
Otwórz przeglądarkę internetową i wpisz adres https://192.168.101.101 w pasku adresu. Potwierdź wyjątek bezpieczeństwa, a wyświetli się strona logowania do programu VMware Host Client, za pomocą którego możesz zarządzać hostem ESXi. Wprowadź nazwę użytkownika i hasło podane podczas instalacji ESXi.
Tworzenie nowego magazynu danych
Po zalogowaniu się program VMware zapyta, czy chcesz pomóc w ulepszaniu aplikacji VMware Host Client. Zaznacz pole wyboru, jeśli chcesz, a następnie kliknij OK.
Utwórzmy nowy magazyn danych, który będzie korzystał z drugiego dysku wirtualnego o pojemności 40 GB. Ten typ magazynu danych nazywany jest pamięcią masową podłączoną bezpośrednio (DAS).Aby utworzyć nowy magazyn danych, wybierz opcję „ Storage ” w panelu nawigacyjnym „ ” ( ) (znajdującym się w lewym panelu okna), a następnie kliknij przycisk „ New Datastore ”.

Otworzy się kreator „ ” „New datastore” ( ):
Select creation type. Wybierz sposób utworzenia magazynu danych. Kliknij „Create new VMFS datastore”.
Select device. Wybierz urządzenie, na którym chcesz utworzyć nowy magazyn danych ( Partcja VMFS). W tym celu wybrano dysk wirtualny o pojemności 40 GB. Wprowadź nazwę magazynu danych, na przykładdatastore40.
- Wybierz opcje partycjonowania –
Use full diskorazVMFS6. Ready to complete. Sprawdź podsumowanie konfiguracji magazynu danych i kliknij przyciskFinish, aby zakończyć tworzenie magazynu danych.
Magazyn danych został utworzony.
Konfiguracja sieci wykorzystywanej do współdzielonej pamięci masowej
Jak pamiętasz, dla maszyny wirtualnej ESXi utworzono drugą kartę sieciową (NIC), ale nie została ona skonfigurowana. Skonfigurujmy drugą kartę sieciową, która będzie używana przez host ESXi do łączenia się ze współdzieloną pamięcią masową podłączoną do sieci.
Aby ustanowić to połączenie, musisz utworzyć nowy przełącznik wirtualny oraz nową kartę sieciową VMkernel. Karta sieciowa VMkernel służy do łączenia ESXi z określoną siecią za pomocą przełącznika vSwitch, do którego jest podłączona.
- Otwórz program VMware Host Client i przejdź do
Networking>Virtual switches, a następnie wybierzAdd standard virtual switch. Należy pamiętać, że istnieje vSwitch0 , który jest tworzony automatycznie podczas instalacji ESXi.
- Pojawi się okno Dodaj standardowy przełącznik wirtualny . Wprowadź
vSwitch name, na przykład vSwitch1 . W menu rozwijanym wybierzvmnic1jako Uplink 1 . W razie potrzeby edytuj pozostałe ustawienia, a następnie kliknij przyciskAdd, aby dodać nowy przełącznik wirtualny.
- Po utworzeniu nowego przełącznika vSwitch przejdź do
Networking>VMkernel NICs>Add VMkernel NIC, aby utworzyć nową kartę sieciową VMkernel.
- W oknie Dodaj kartę sieciową VMkernel zdefiniuj następujące parametry:
- Grupa portów: Nowa grupa portów
- Nowa grupa portów: Magazyn
- Przełącznik wirtualny: vSwitch1
- Konfiguracja IPv4: Adres statyczny
- Adres: 192.168.105.101
- Maska podsieci: 255.255.255.0
- Zaznacz pola wyboru obok usług, które chcesz zezwolić dla tej karty sieciowej VMkernel. Można ustawić wartość MTU (maksymalnej jednostki transmisji) na 9000 bajtów, aby korzystać z ramek typu Jumbo w sieci pamięci masowej.
Kliknij przycisk
Create.
Teraz możesz wykonać polecenie ping na adres IP karty VMkernel (192.168.105.101) z hosta, na którym zainstalowano program VMware Stacja robocza. Pierwszy host ESXi został skonfigurowany. Włącz drugą maszynę wirtualną, na której zainstalowano serwer ESXi (ta maszyna wirtualna została niedawno sklonowana), i skonfiguruj drugi host ESXi w podobny sposób, jak skonfigurowano pierwszy host ESXi, z wyjątkiem nazwy hosta i adresów IP.
W tym przykładzie dla drugiego serwera ESXi zastosowano następujące parametry sieciowe:
- Karta sieciowa 1 (sieć NAT): adres IP 192.168.101.102, maska 255.255.255.0, brama 192.168.101.2
- Karta sieciowa 2 (sieć tylko dla hosta): adres IP 192.168.105.102, maska 255.255.255.0
- Nazwa hosta: ESXi02
Wdrażanie serwera vCenter Server
Po skonfigurowaniu dwóch maszyn wirtualnych jako hostów ESXi można przystąpić do wdrażania serwera VMware vCenter Server w celu scentralizowanego zarządzania domowym laboratorium ESXi. Pobierz vCenter Server ze strony internetowej VMware. Nazwa pobranego pliku to VMware-VCSA-all-8.0.1-22088981.iso w tym przykładzie.
Otwórz ten plik ISO lub zamontuj go w wirtualnym napędzie CD/DVD, a następnie skopiuj plik VMware-vCenter-Server-Appliance-8.0.1.00300-22088981_OVF10.ova z katalogu vcsa obrazu ISO do własnego katalogu na komputerze fizycznym (urządzenie vCenter Server to częściowo skonfigurowana dystrybucja oparta na systemie Linux, zwana Photon OS).
Wdrażanie szablonu OVA
- W graficznym interfejsie użytkownika programu VMware Workstation kliknij
File>Openi wybierz wyodrębniony plik VMware-vCenter-Server-Urządzenie-8.0.1.00300-22088981_OVF10.ova .UWAGA: W rzeczywistym scenariuszu wdrażania (nie w wirtualnym laboratorium) vCenter Server Appliance jest wdrażany jako maszyna wirtualna na hoście ESXi. Zasada instalacji jest podobna.

- Wyświetla się okno wyskakujące z umową EULA (End User License Agreement) (otwiera się kreator importu pliku OVA). Zaznacz pole wyboru „
I accept the terms of the license agreement”. - Utwórz katalog „ ” na komputerze, na którym działa stacja robocza VMware Workstation, i zdefiniuj ten katalog jako ścieżkę przechowywania dla nowej maszyny wirtualnej. VMware Home Lab vCenter8 Wprowadź nazwę nowej maszyny wirtualnej, np. vCenter8.
- Podaj nazwę i logiczną ścieżkę przechowywania dla nowej maszyny wirtualnej. Podana nazwa maszyny wirtualnej to vCenter8 , a lokalizacja maszyny wirtualnej jest taka sama jak lokalizacja wcześniej utworzonych maszyn wirtualnych – D: VMware Home Lab vCenter8 .

- Wybierz opcje wdrażania. Wybierz opcję
Tiny vCenter Server with Embedded PSC, która jest wystarczająca dla małego domowego laboratorium ESXi.
- Ustaw dodatkowe właściwości tej maszyny wirtualnej. Ten ekran zawiera wiele pozycji menu, które należy skonfigurować. Po skonfigurowaniu jednej pozycji menu kliknij kolejną, aby skonfigurować pozostałe parametry. Najedź kursorem myszy na ikonę
i, aby wyświetlić podpowiedzi.Networking Configuration.- Rodzina adresów IP sieci hosta: IPv4
- Tryb sieci hosta: statyczny
- Adres IP sieci hosta: 192.168.101.103
- Prefiks sieci hosta: 24. W formacie binarnym maska /24 to 11111111.11111111.11111111.00000000 (24 jedynki), co odpowiada wartości 255.255.255.0 w formacie dziesiętnym.
- Brama domyślna sieci hosta: 192.168.101.2
- Serwery DNS sieci hosta: 192.168.101.2
- Tożsamość sieci hosta:
vcenter8.localdomain(wprowadź FQDN – w pełni kwalifikowaną nazwę domeny).

SSO Configuration. Wprowadź i potwierdź hasło, które będzie używane do logowania jednokrotnego (Single Sign On).
System Configuration. Wprowadź hasło administratora i potwierdź je. To hasło będzie używane do logowania się do konsoli.Upgrade Configuration. Należy skonfigurować parametry tego podmenu, jeśli chcesz zaktualizować istniejący serwer VMware vCenter. Pomiń konfigurację tej kategorii parametrów, jeśli przeprowadzasz wdrażanie nowej instancji vCenter.Miscellaneous. Możesz pominąć konfigurację tej kategorii parametrów.Networking Properties. Wprowadź nazwę domeny (tę samą, której używa wdrożony host ESXi). W tym przykładzie używana jest domyślna nazwa domeny lokalnej .
- Naciśnij przycisk
Import, aby rozpocząć wdrażanie maszyny wirtualnej vCenter z szablonu OVA. Po zakończeniu wdrażania maszyna wirtualna uruchamia się automatycznie. Niebiesko-szary interfejs zarządzania jest podobny do żółto-szarego interfejsu zarządzania ESXi (patrz zrzut ekranu poniżej). - Konfiguracja statycznego adresu IP została już wykonana przez użytkownika za pomocą kreatora wdrażania OVA. Możesz sprawdzić konfigurację adresu IP w vCenter DCUI, aby upewnić się, że ustawienia sieciowe w maszynie wirtualnej są skonfigurowane poprawnie.

Domyślnie wirtualna karta sieciowa maszyny wirtualnej z uruchomionym vCenter może być podłączona do sieci innej niż sieć NAT (na przykład maszyna wirtualna vCenter może być podłączona do sieci mostkowej VMnet0 która nie jest używana przez żadną z Twoich maszyn wirtualnych). Sprawdź ustawienia sieciowe.
W interfejsie stacji roboczej VMware Workstation kliknij VM > Settings. Na karcie Hardware wybierz swoją kartę sieciową i opcję NAT (tak jak skonfigurowałeś to dla pierwszej i drugiej maszyny wirtualnej z systemem ESXi). Następnie otwórz konsolę na komputerze fizycznym i wyślij polecenie ping do adresu IP serwera vCenter (ping 192.168.101.103), aby upewnić się, że sieć działa poprawnie dla maszyny wirtualnej z uruchomionym vCenter. 
Zakończenie wdrażania vCenter
Po wdrożeniu serwera vCenter należy przeprowadzić pozostałą część konfiguracji VCSA (vCenter Server Urządzenie) w domowym laboratorium ESXi. Upewnij się, że maszyny wirtualne z uruchomionym vCenter oraz hosty ESXi są włączone i działają poprawnie. Wpisz adres IP serwera vCenter w pasku adresu przeglądarki (w tym przypadku https://192.168.101.103:5480), aby kontynuować konfigurację vCenter.
Na ekranie „ Getting Started ” (Wybierz serwer vCenter) naciśnij ikonę „ Setup ” (Ustaw jako serwer vCenter), aby skonfigurować to urządzenie jako nowy serwer vCenter. Otworzy się kreator instalacji etapu 2:

Introduction. Kliknij „Next” (Dalej) na każdym kroku, aby kontynuować.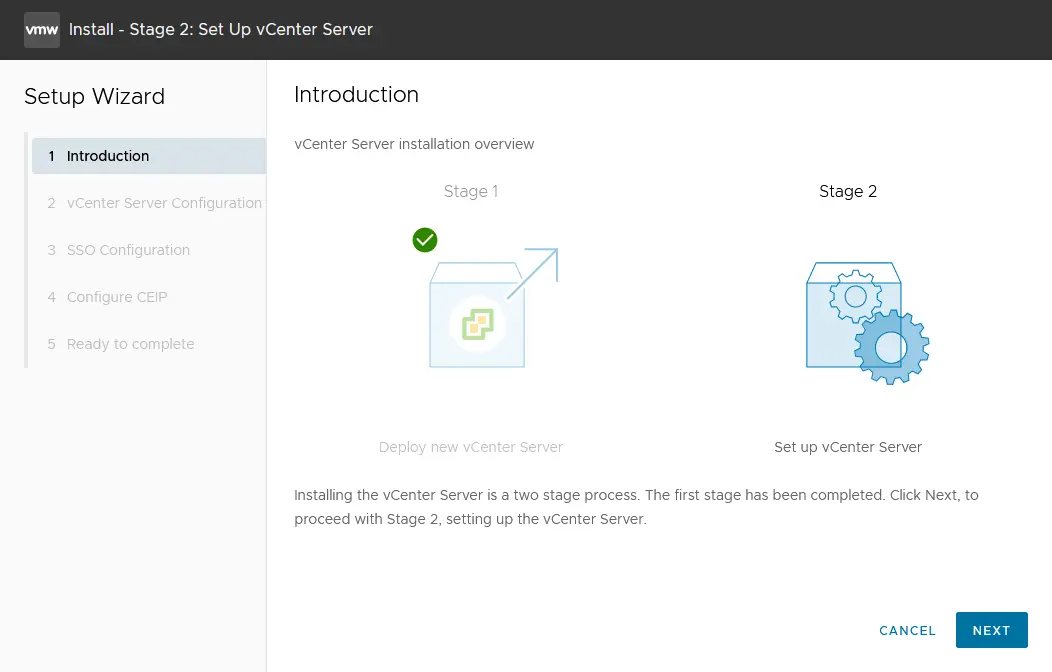
Appliance configuration. Ustaw konfigurację sieciową (patrz zrzut ekranu poniżej). Możesz zobaczyć konfigurację sieciową, którą ustawiłeś podczas wdrażania szablonu OVA. W razie potrzeby edytuj ustawienia.- Konfiguracja sieci: Przypisz statyczny adres IP
- Wersja IP: IPv4
- Nazwa systemu: vcenter8.localdomain
- Adres IP: 192.168.101.103
- Maska podsieci lub długość prefiksu: 255.255.255.0
- Brama domyślna: 192.168.101.2
- Serwery DNS: 192.168.101.2
- Tryb synchronizacji czasu: Synchronizuj czas z hostem ESXi
- Dostęp SSH: Włączony

Jeśli wystąpi pętla bez końca i instalacja się zawiesi, spróbuj wpisać adres IP zamiast nazwy FQDN w polu nazwy systemu. Lepiej jednak zadbać o prawidłowe rozpoznawanie nazw hostów.
SSO configuration. KliknijCreate a new SSO domain. Możesz użyć domyślnejvsphere.localnazwy domeny. Ustaw hasło Single Sign On dla administratora i potwierdź hasło.Configure CEIP. Opcjonalnie zaznacz pole wyboru, aby dołączyć do programu VMware Customer Experience Program.Ready to complete. Sprawdź ustawienia i kliknijFinish, aby zakończyć wdrażanie vCenter. Obserwuj pasek postępu i poczekaj, aż proces instalacji się zakończy.
UWAGA: Podczas instalacji vCenter mogą wystąpić błędy. Zapoznaj się z niektórymi z najczęstsze błędy błędów, które mogą się pojawić, oraz sposobami ich rozwiązywania.
Wygasanie hasła
Ustaw datę wygaśnięcia hasła administratora dla vCenter Server Management. Ustawiliśmy, aby hasło nie wygasało. Wynika to z faktu, że jeśli zapomnisz zmienić hasło lub zmodyfikować te ustawienia przed upływem terminu ważności hasła, mogą pojawić się problemy podczas logowania się do interfejsu internetowego vCenter Server Management i zmiany wygasłego hasła.
Aby ustawić datę wygaśnięcia:
- Otwórz interfejs internetowy vCenter Server Management. W przeglądarce internetowej otwieramy adres 192.168.101.103:5480.
- Przejdź do
Administration, a następnie w sekcji Ustawienia wygaśnięcia hasła kliknijEdit. - Kliknij
Now sekcji Ustawienia wygaśnięcia hasła i kliknijSave.
Scentralizowane zarządzanie vSphere za pomocą vCenter
Teraz możesz zalogować się do vCenter za pomocą klienta VMware vSphere. Wpisz adres IP serwera vCenter w pasku adresu przeglądarki internetowej (https:// 192.168.101.103 w tym przypadku). Załaduje się strona wprowadzająca, na której należy kliknąć tę opcję: Launch vSphere Client (HTML5)
Skorzystajmy z klienta vSphere w HTML5. Na stronie Jednokrotne logowanie VMware wprowadź nazwę użytkownika ( administrator@vsphere.local ) oraz hasło, które wcześniej ustaliłeś.
Utwórz nowe centrum danych
Po zalogowaniu się do klienta VMware vSphere w zasobach vCenter nie będzie widoczne nic. Najpierw należy dodać nowe centrum danych, które będzie logicznym kontenerem (katalogiem), w którym umieszczone zostaną hosty i klastry. Aby dodać nowe centrum danych, kliknij Actions > New Datacenter. Wprowadź nazwę centrum danych, na przykład Datacenter1 .

Dodawanie hostów ESXi do wykazu
Dodaj swój pierwszy host ESXi do centrum danych. Kliknij prawym przyciskiem myszy nazwę centrum danych, a następnie w menu kontekstowym wybierz opcję Add Host . Maszyna wirtualna z systemem ESXi musi być włączona.

Otworzy się kreator dodawania hosta.
Name and location. Wprowadź adres IP hosta ESXi, który chcesz dodać. W naszym przykładzie adres IP dodawanego hosta to 192.168.101.101 .
Connection settings. Wybierz nazwę użytkownika i hasło określone podczas instalacji ESXi (w tym przypadku używany jest użytkownik główny). KliknijYes, jeśli wyświetli się alert dotyczący certyfikatu.Host summary. Przejrzyj podsumowanie hosta.Host lifecycle. W vSphere 8.0 wprowadzono zmiany w podejściu do aktualizacji hostów ESXi. Zamiast linii bazowych vSphere Lifecycle Manager należy używać obrazów VMware vSphere Lifecycle Manager. Narzędzie VMware vSphere Update Manager zostało wycofane i może zostać usunięte w przyszłych wersjach vSphere. Jeśli chcesz skorzystać ze starego, tradycyjnego podejścia, pozostaw to pole wyboru niezaznaczone.
Assign the license. W domowym laboratorium ESXi opisanym w tym poście dla wszystkich produktów VMware vSphere wykorzystywana jest 60-dniowa licencja próbna. W związku z tym nie musisz niczego zmieniać na tym ekranie.
Lockdown Mode. Wybierz opcję „Disabled”, aby móc zarządzać hostem ESXi bez serwera vCenter.
VM location. Wybierz centrum danych, w którym po utworzeniu będą przechowywane Twoje maszyny wirtualne. Ponieważ w tej chwili istnieje tylko jedno centrum danych, nie należy niczego zmieniać na tym ekranie.
Ready to complete. Sprawdź podsumowanie konfiguracji i kliknijFinish, aby dodać hosta.
Poczekaj kilka sekund, aż host ESXi połączy się z vCenter Server. ESXi01 został właśnie dodany do zasobów vCenter Server. Powtórz te kroki i dodaj drugiego hosta ESXi ( ESXi02 ) do swojego vCenter.

Utwórzmy nową maszynę wirtualną na wirtualnym hoście ESXi dla domowego laboratorium VMware. Ta maszyna wirtualna będzie maszyną zagnieżdżoną.
UWAGA: Istnieją trzy metody tworzenia nowej maszyny wirtualnej:
- w vCenter za pomocą klienta VMware vSphere
- za pomocą klienta VMware Host (tworzenie nowej maszyny wirtualnej przy użyciu samodzielnych narzędzi do zarządzania hostem ESXi)
- poprzez połączenie z vCenter lub hostem ESXi w interfejsie stacji roboczej VMware Workstation
Wdrażanie zagnieżdżonej maszyny wirtualnej na wirtualnym hoście ESXi
Włóż obraz instalacyjny ISO systemu operacyjnego, który chcesz zainstalować na swoim wirtualnym hoście ESXi, do wirtualnego napędu CD/DVD maszyny wirtualnej z systemem ESXi. W tym przykładzie można użyć instalatora Lubuntu 22.04 64-bitowego, ponieważ ta oparta na Ubuntu dystrybucja Linuksa jest lekka (ma to znaczenie, gdy zasoby sprzętowe domowego laboratorium VMware są ograniczone).
Aby włożyć obraz instalacyjny ISO do wirtualnego napędu optycznego:
- Wybierz maszynę wirtualną z uruchomionym systemem ESXi ( ESXi8a w tym przypadku) i kliknij
VM>Settingsw interfejsie VMware stacji roboczej.
- W oknie ustawienia Virtual Machine wybierz opcję CD/DVD, wybierz opcję
Use ISO image filei wybierz rozruchowy obraz instalacyjny ISO (kliknijBrowse, aby przejść do systemu plików i wybrać plik ISO).
Po włożeniu nośnika instalacyjnego ISO do napędu optycznego wirtualnego hosta ESXi otwórz program VMware vSphere Client i wybierz swój host ESXi w zasobach vCenter. Right-click the ESXi host, a następnie w menu Actions wybierz opcję New Virtual Machine.

Otworzy się kreator New Virtual Machine :
Select a creation type. Wybierz opcjęCreate a new virtual machine.Select a name and folder. Wprowadź nazwę maszyny wirtualnej, na przykład Lubuntu , wybierz centrum danych (w tym przykładzie jedynym dostępnym centrum danych jest Datacenter1 ).Select a compute resource. Wybierz pierwszy host ESXi (w tym przykładzie wybrano ESXi01 o adresie IP192.168.101.101).Select storage. Wybierz magazyn danych utworzony podczas konfiguracji hosta ESXi. W naszym przykładzie wybrano datastore40 .
Select compatibility. Jeśli posiadasz hosty ESXi w wersjach starszych niż 8.0 (7.0, 6.7, 6.5 itp.), powinieneś wybrać zgodność z najstarszą wersją ESXi obecną w Twoim środowisku wirtualnym. W tym przykładzie wybierzmy zgodność z ESXi 7.0 i nowszymi wersjami.Select a guest OS. Ponieważ jako system operacyjny gościa dla wdrażanej maszyny wirtualnej używany jest Lubuntu 22 64-bit, rodzina systemu operacyjnego gościa musi być Linux, a wersja systemu operacyjnego gościa musi to być Ubuntu Linux (64-bit).Customize hardware. Ten krok obejmuje kilka ustawień. Edytuj ustawienia w następujący sposób:- Procesor: 1
- Pamięć: 2 GB
- Nowy dysk twardy: 25 GB, Alokacja dynamiczna (kliknij nowy dysk twardy, aby rozwinąć listę ustawień).
- Nowy napęd CD/DVD: Urządzenie hosta, Podłączaj przy uruchomieniu.

Ready to complete. Sprawdź konfigurację nowej maszyny wirtualnej i kliknijFinish.
Twoja maszyna wirtualna została utworzona. Aby zainstalować system operacyjny gościa, wybierz maszynę wirtualną i uruchom ją (Actions > Power > Power On). Wybierz Launch Web Console , aby wyświetlić obraz z „wirtualnego monitora” podłączonego do maszyny wirtualnej. Zainstaluj system Lubuntu Linux na maszynie wirtualnej w zwykły sposób. Po zainstalowaniu systemu Linux zainstaluj VMware Tools w systemie operacyjnym gościa. Otwórz terminal i sprawdź, czy system Linux ma dostęp do Internetu, wykonując następujące polecenia:
ifconfig
ping vmware.com

Widać, że wirtualna karta sieciowa, która uzyskała adres IP za pośrednictwem protokołu DHCP, oraz połączenie internetowe działają poprawnie dla tej zagnieżdżonej maszyny wirtualnej działającej w laboratorium VMware ESXi. Zainstaluj VMware Tools z repozytoriów internetowych, używając następujących poleceń. W systemie Linux z interfejsem wiersza poleceń należy użyć polecenia:
apt-get install open-vm-tools
Aby zainstalować VMware Tools w systemie Linux z interfejsem graficznym, należy użyć polecenia:
apt-get install open-vm-tools-desktop
Polecenie należy wykonać z uprawnieniami administratora. Aby zakończyć instalację, należy odpowiedzieć na pytania wyświetlane przez kreatora instalatora VMware Tools. Czasami może być konieczne ponowne uruchomienie maszyny wirtualnej po wykonaniu polecenia ` instalacja narzędzi VMware Tools`. Odśwież stronę internetową klienta VMware vSphere w przeglądarce — powinna wyświetlić się wersja VMware Tools oraz informacja o stanie działania.
UWAGA: Oprócz konsoli internetowej można połączyć się z maszyną wirtualną za pomocą stacji roboczej VMware Workstation. Zaletą korzystania z stacji roboczej VMware Workstation jest możliwość ustawienia wyższej rozdzielczości obrazu wyświetlanego przez maszynę wirtualną działającą zdalnie na hoście ESXi (maksymalna rozdzielczość wyświetlana w konsoli internetowej klienta VMware vSphere wynosi 1152 × 864). Aby połączyć się ze zdalną maszyną wirtualną działającą na hoście ESXi, należy połączyć się z serwerem ESXi lub vCenter zarządzającym tym konkretnym serwerem ESXi, klikając File > Connect to server w interfejsie stacji roboczej VMware Workstation.
Teraz większość komponentów domowego laboratorium VMware została skonfigurowana:
- Sieci wirtualne
- ESXi01
- ESXi02
- vCenter
- Gościnna maszyna wirtualna z systemem Linux (maszyna zagnieżdżona) działająca na ESXi01
UWAGA: Możesz zapoznać się z tym wpisem na blogu, aby dowiedzieć się, jak przenieść maszynę wirtualną przenieść maszynę wirtualną z jednego hosta ESXi na drugi za pomocą vCenter Server.
Podłączanie współdzielonej pamięci masowej iSCSI do hosta ESXi
Podłączenie współdzielonej pamięci masowej iSCSI stanowi ostatni etap konfiguracji domowego laboratorium VMware. Protokół iSCSI zapewnia dostęp na poziomie bloków do współdzielonej pamięci masowej poprzez przesyłanie instrukcji SCSI przez sieć TCP/IP. Host ESXi może uzyskiwać dostęp do danych na poziomie bloków w podobny sposób, jak w przypadku pamięci masowej podłączonej bezpośrednio. Protokół iSCSI jest szeroko stosowany, ponieważ jest niedrogi (wiele Urządzenia NAS obsługuje iSCSI) i łatwy w konfiguracji w porównaniu z systemami SAN typu Fibre Channel. Magazyn danych iSCSI można podłączyć do hosta ESXi, gdy pamięć masowa podłączona bezpośrednio jest pełna lub gdy konieczne jest wdrażanie klastra.
Instalacja TrueNAS
Na tym etapie należy zainstalować TrueNAS na maszynie wirtualnej i użyć go do utworzenia urządzenia docelowego iSCSI, które należy podłączyć jako współdzielony magazyn danych do hosta ESXi. Zapoznaj się z tym wpisem na blogu, aby dowiedzieć się, jak zainstaluj i skonfiguruj TrueNAS podczas tworzenia domowego laboratorium VMware.
Dodawanie nowego magazynu danych iSCSI do hosta ESXi
- Otwórz aplikację VMware Host Client i zaloguj się do jednego ze swoich hostów ESXi, na których działają maszyny wirtualne (na przykład ESXi02 – https://192.168.101.102 ). W tym celu wpisz adres IP swojego hosta ESXi w pasku adresu przeglądarki internetowej.
- W panelu
Navigatorprzejdź doStorage, a następnie kliknij kartęAdaptersw głównej części okna. Powinieneś zobaczyć istniejące adaptery pamięci masowej (kontrolery dyskowe).Najpierw musisz dodać programowy adapter iSCSI.

- Kliknij
Software iSCSIw zakładceAdapters. W oknie konfiguracji iSCSI ustaw następujące parametry zgodnie z poniższym przykładem:iSCSI enabled: WłączoneStatic targets. Cel: iqn.2005-10.org.freenas.ctl (nazwa, którą zapamiętałeś po skonfigurowaniu celu iSCSI w systemie FreeNAS). Adres: 192.168.105.105 (adres IP urządzenia z systemem FreeNAS). Port 3260 (domyślny numer portu TCP używany do połączenia iSCSI).Dynamic targets. Adres 192.168.105.105 . Port 3260 .Kliknij
Save configurationw celu utworzenia nowej karty iSCSI.UWAGA: Jak zapewne pamiętasz, w sekcji poświęconej konfiguracji hostów ESXi (na początku tego wpisu) dla każdego hosta ESXi skonfigurowano sieć typu „host-only” o adresie 192.168.105.0/24 w celu połączenia z magazynem współdzielonym.

- W zakładce
AdapterskliknijRescanorazRefresh. Następnie zobaczysz nową kartę iSCSI, którą właśnie utworzyłeś.
Teraz dodajmy współdzielony magazyn danych iSCSI do hosta ESXi. Otwórz kartę Datastores i kliknij New datastore (podobnie jak podczas dodawania lokalnego magazynu danych o pojemności 40 GB do hostów ESXi). Pojawi się okno kreatora.
Select creation type. KliknijCreate a new VMFS datastore.Select device. Wybierz urządzenie, na którym chcesz utworzyć nową partycję VMFS. Wprowadź nazwę, na przykład: datastore-iscsi . Wybierz dysk iSCSI FreeNAS z listy nieprzypisanych urządzeń. Następnie kliknijNext.
Select partitioning options. Wybierz opcjęUse full diskoraz system plikówVMFS6. KliknijNext.Ready to complete. Sprawdź ustawienia magazynu danych i wybierzFinish, aby utworzyć magazyn danych.
Teraz drugi host ESXi jest skonfigurowany do korzystania ze współdzielonego magazynu danych iSCSI. Ten magazyn danych jest wyświetlany w zakładce „ ” → „Datastores” → „ ” w sekcji „ ” → „Storage” → „ ” w interfejsie programu VMware Host Client (patrz zrzut ekranu poniżej). Z tego magazynu danych można korzystać tak samo, jak z magazynu podłączonego bezpośrednio. Przed włączeniem hostów ESXi należy upewnić się, że urządzenie NAS, na którym skonfigurowano cel iSCSI (w tym przypadku maszyna wirtualna z systemem FreeNAS), jest uruchomione.

Powtórz te kroki i dodaj współdzielony magazyn danych utworzony w systemie FreeNAS do drugiego hosta ESXi. Następnie konfiguracja vSphere będzie już prawie gotowa do wdrażania klastra.
Inne eksperymenty, które możesz przeprowadzić w swoim domowym laboratorium VMware
W tym momencie dysponujesz w pełni działającym domowym laboratorium VMware z dwoma hostami ESX (z których jeden obsługuje zagnieżdżoną maszynę wirtualną z systemem Linux), serwerem vCenter oraz systemem FreeNAS (używanym jako cel iSCSI).
Nie omówiliśmy powyżej wszystkich funkcji i możliwości, ponieważ można wykonać wiele innych operacji, które mogą znaleźć zastosowanie w środowisku produkcyjnym, na przykład:
- Przenieś swoją zagnieżdżoną maszynę wirtualną ( Lubuntu22 w tym przypadku) z pamięci masowej podłączonej bezpośrednio do pamięci masowej współdzielonej ( datastore40-2 > datastore-iscsi ) za pomocą funkcji Storage vMotion oraz migrować maszyny wirtualne między hostami za pomocą vMotion.
- Wdrażanie rozwiązania zapewniającego wysoką dostępność (HA) oraz System planowania zasobów rozproszonych (DRS).
- Zainstaluj VMware PowerCLI , aby w pełni wykorzystać zalety skryptów i automatyzacji oferowanych przez VMware.
- Skonfiguruj VMware vSAN.
- Utwórz szablony maszyn wirtualnych; wdrażaj maszyny wirtualne z szablonów.
Przed wdrażaniem VMware vSphere w środowisku produkcyjnym należy również zwrócić szczególną uwagę na ochronę danych maszyn wirtualnych. Można wdrożyć NAKIVO Backup & Replication na maszynie wirtualnej działającej w domowym laboratorium ESXi i przetestować, w jaki sposób produkt wykonuje tworzenie kopii zapasowej, replikację i odzyskiwanie maszyn wirtualnych VMware działających na hostach ESXi. NAKIVO Backup & Replication to rozwiązanie do ochrony danych zaprojektowane z myślą o wykorzystaniu natywnych technologii VMware w celu szybszego i bardziej wydajnego tworzenia kopii zapasowych. Rozwiązanie oferuje kilka opcji odzyskiwania: natychmiastowe pełne uruchomienie maszyny wirtualnej z kopii zapasowej, odzyskiwanie maszyn wirtualnych między platformami, natychmiastowe odzyskiwanie obiektów aplikacji itp.