Real-Time Data Replication: All You Need to Know
Protecting your most critical services in a datacenter requires more than just regular backups — this demands replication to ensure minimal data loss and downtime in case of a failure. Virtual machines offer a significant advantage over physical servers by simplifying this process. In this blog post, we’ll explore the benefits of real-time replication for virtual machines, covering its principles, key use cases, and how to configure it effectively, with a focus on VMware vSphere.

What Is Real-Time Replication?
Real-time data replication is the process of data duplication and synchronization in real time across multiple systems (VMs, databases, etc.) for the purposes of high availability and disaster recovery. The time lag or data latency between original data changes and data replication can be measured in seconds or less, depending on the settings and topology used in the infrastructure.
Real-time replication is usually used to protect critical data. In the case of virtual machines, real-time replication is used to protect the most critical VMs that require the strictest recovery point objective and recovery time objective metrics (RPO and RTO). If traditional backup and replication cannot meet your RPO and RTO requirements, consider configuring real-time replication.
Key Benefits of Real-Time Data Replication
Real-time replication provides the following benefits:
- Minimized downtime. As data changes are replicated from the source system to the target system in real time, a VM failover can be done quickly to the VM replica, which contains the latest changes. This allows organizations to restore VM operation and services quickly, reducing downtime and improving business continuity.
- Business continuity. A VM replica that contains the latest set of data can be used to recover a VM quickly and resume business operations.
- Data consistency. A VM replica made with real-time replication contains the same data set as the original VM. After conducting a failover and restoring workloads with a VM replica, there is no need to identify which data should be re-created after the last replication job, as is the case with traditional VM replication.
- Scalability and performance. VM replicas updated in real time can be used to make resources continuously and consistently accessible for multiple offices/datacenters/sites in different geographical locations.
How Real-Time Data Replication Works
Real-time replication is a feature available when using high-end storage systems and the working principle can vary depending on the implementation. The following components are generally used to perform real-time data replication for VMs:
- Primary VM: The active virtual machine that processes workloads.
- Replica VM: A continuously updated copy of the primary VM, typically residing on a different host or data center.
- Replication manager: A tool or service in the data protection solution that coordinates the replication process.
- Change tracking: Tracks and logs changes in the primary VM, ensuring only modified data is replicated.
Synchronous vs asynchronous replication: Key differences
There are two types of data replication based on their working principle: synchronous and asynchronous. Each data replication type has its own characteristics, advantages and use cases and can be chosen depending on the scenario.
Synchronous replication involves data copied from the source VM to the VM replica as it is being written. It is the most effective replication type for critical workloads. Data is replicated from the primary VM to the secondary VM instantly or near-instantly and as a result, both copies are always consistent. This type of data replication allows you to achieve zero RPO.
- When a write operation occurs on the primary VM, the change is sent to the replica.
- The primary VM waits for an acknowledgment from the replica before completing the write operation.
The requirements to configure synchronous replication are high: high-speed and low-latency network connections are required to avoid delays.
Drawbacks:
- The performance of the primary VM may be impacted because it takes time for the replica to acknowledge changes.
- Due to latency requirements, synchronous replication is usually limited to geographically close locations.
Asynchronous replication (point-in-time replication) copies the changes afterwards. Data changes made on the source VM are sent to the VM replica at regular intervals configured in schedule rules. As a result, there is a delay between replica updates. Asynchronous replication can be near real-time with intervals of one or several minutes.
- Write operations on the primary VM are completed immediately without waiting for acknowledgment from the replica.
- The replica updates are done periodically based on the queued or batched changes.
The requirements to configure asynchronous replication are affordable for most users and organizations. A network connection between virtualization hosts and components of the data protection solution is needed.
The replica may lag behind the primary VM (a VM replica may not contain the latest data set), leading to potential data loss in a failure scenario and providing eventual consistency. This is the drawback of asynchronous data replication. For example, if replication is performed every hour and a disaster occurs at 10:30 AM, then data written during the last 30 minutes would be missing on the VM replica.
|
Aspect |
Synchronous replication |
Asynchronous replication |
|
Data consistency |
Immediate and consistent |
Eventual with possible lag |
|
Network requirements |
High bandwidth, low latency |
Can work with slower networks |
|
RPO (data loss) |
Near-zero |
Variable, based on the replication interval |
|
Performance impact |
Higher, due to write acknowledgment |
Lower, as writes are independent |
|
Geographic location |
Short distances |
Suitable for long distances |
|
Costs for hardware |
High |
Low to medium |
|
Use case examples (industries) |
Banking, healthcare |
Disaster recovery, analytics |
Using real-time replication for all VMs might not be necessary, as that would require a high budget. Not all data has the same importance for an organization, and real-time replication should be used for the most critical data. You can choose the optimal replication method for each VM depending on specific factors and scenarios. When selecting a replication method to protect your VMs, set accurate objectives and consider the following points:
- Risk assessment. Analyze potential disruptions and estimate the negative consequences for your organization in case of a VM failure.
- Data criticality. Create a list of all systems running on virtual machines and estimate the significance of each VM depending on data loss and downtime tolerance.
- Resource requirements. Figure out how many resources a real-time replica consumes for the appropriate system.
Choosing the Right Solution for Real-Time Data Replication
It is important to choose an effective and reliable data protection solution that supports real-time data replication for virtual machines and can meet your requirements.
Key features to look for in a data replication tool
It is recommended that data protection software with data replication tools include the following features:
- Support for multiple replication types. Consider a data protection solution that supports real-time replication and asynchronous replication of virtual machines. In this case, you can use continuous or real-time data replication that requires high-end hardware with low latency for critical VMs. At the same time, you can save costs and replicate regular VMs with lower RPO requirements using asynchronous replication.
- User-friendly interface. A user-friendly solution is more convenient to configure and may take less time. Flexible configuration provides more advantages for administrators for different use cases.
- Multiple replication locations. It is recommended that the data protection solution supports replication to the same site and to another site. In case of VMware VM replication, it is better when replication to the same vCenter and to another vCenter is supported. Check VM failover and failback options.
- Application-awareness. Check whether the preferred solution supports application awareness to ensure that data written by applications is consistent in VM replicas.
- Requirements. A solution with user-friendly requirements can reduce the time needed for configuration.
- Costs. Check pricing and licensing. Choose the solution that best fits your budget.
Reliable real-time data replication with NAKIVO
NAKIVO Backup & Replication is a universal data protection solution that supports replication for VMware VMs, including traditional replication and real-time replication. The solution provides the following real-time VM replication benefits:
- RPO and RTO. You can configure an RPO as low as 1 second to ensure that the latest changes are synchronized with the VM replica and you don’t lose data in case of the VM failure. VM recovery (failover) can be done in a few seconds to minutes. You can achieve near-zero downtime and near-zero data loss.
- Failover to replica. Downtime is near zero due to quick VM failover to the replica for resuming workloads. Automated failover allows you to quickly launch VM replicas.
- Network mapping and Re-IP. When restoring a VM replica to another location, you may need to use another VM network and IP configuration for the VM’s network connection. Network mapping allows you to select a new network easily without editing the VM configuration in the VMware user interface. You can create network mapping rules. Re-IP allows you to set the new IP configuration for the VM replica without editing network settings in the guest operating system.
- User interface. The NAKIVO solution provides a user-friendly web interface that makes the configuration of VMware real-time replication fast and convenient.
- Affordable price. NAKIVO Backup & Replication offers perpetual and subscription licenses with a flexible licensing policy. You can check the full list of pricing and editions on the feature page.
The NAKIVO solution uses a VMware I/O filter in a cluster to ensure real-time replication for VMware VMs. VMware I/O filters enhance VMware storage capabilities for virtual environments. Input/Output operations between virtual machines and storage devices are intercepted and manipulated by the filters. In addition, the performance of real-time replication is optimized.
The I/O filter is responsible for data encryption to improve security and data integrity checks for real-time VM replication. Thus, the I/O filter is required for the source ESXi host and the Journal Service is required for the destination host. The Journal Service is responsible for change tracking and is installed on a machine where the target Transporter is running. The journal is created for each VM disk to track changes and record I/O operations to keep reference recovery points.
Setting Up Real-Time Data Replication with NAKIVO
Let’s explain how to configure real-time replication for virtual machines in VMware vSphere with NAKIVO Backup & Replication.
Requirements
Before you begin configuring real-time replication, ensure that your environment meets the main requirements, including:
- The source must be a cluster managed by vCenter, and the target can be a standalone ESXi server or the ESXi host can be added to the same vCenter.
- The target datastore should have a minimum of 5 GB.
- The source ESXi host should have at least 16 GB RAM.
- Time must be synchronized on ESXi hosts and Transporters.
See the full list of requirements.
Our vSphere environment has a vCenter Server with two data centers (source and target).
DC_1is the source datacenter with a cluster of two hosts along with a source Transporter.DC_2is the target datacenter with a single ESXi server and a target Transporter.- The target datacenter can be managed under one or two vCenters or even operate as a standalone ESXi server, depending on the specific needs of your infrastructure.
Configuring the vSphere environment
This is the vSphere environment used in the walkthrough. It has a vCenter Server with two data centers (source and target).
- The primary data center with the source virtual appliance transporter is already installed.
- The secondary data center with the target virtual appliance transporter is installed.
- The target datacenter can be managed with one or two vCenter servers or even operated as a standalone ESXi server, depending on the specific needs of your infrastructure.
- The NAKIVO Director is installed in the target data center, which is the secondary data center. This configuration allows you to access the Director if a disaster strikes and the primary data center is unavailable.

Change the acceptance level of the source ESXi server to the Community supported level. We have to change the host image profile acceptance level on each ESXi server on the source to the Community supported level.
- Open VMware vSphere Client, click the
Configuretab, and go toSecurity Profile. Then, navigate toHost Image Profile Acceptance Leveland clickEdit.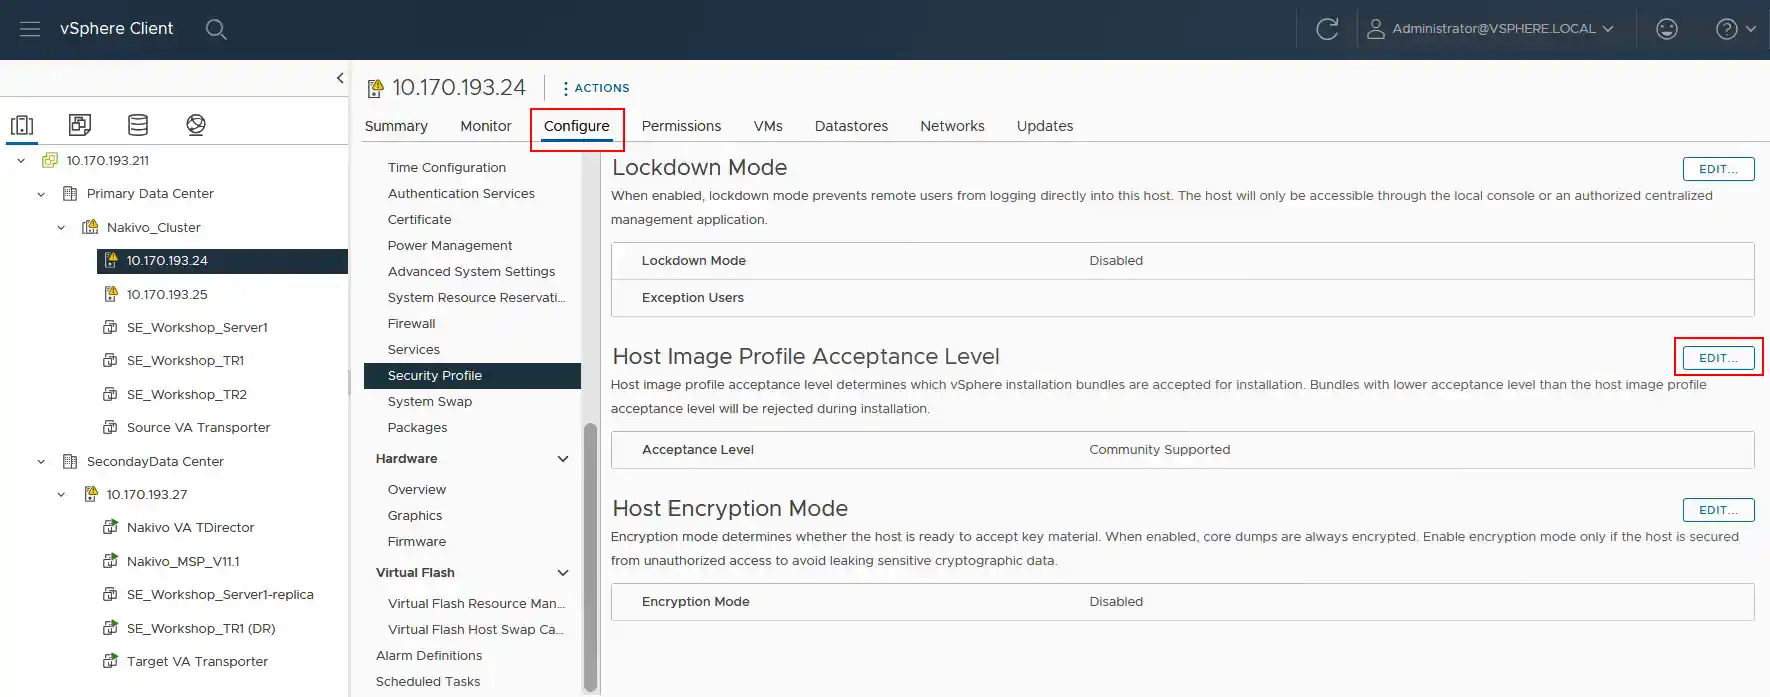
- Change the acceptance level to <
strong>Community Supported. ClickOKto save settings.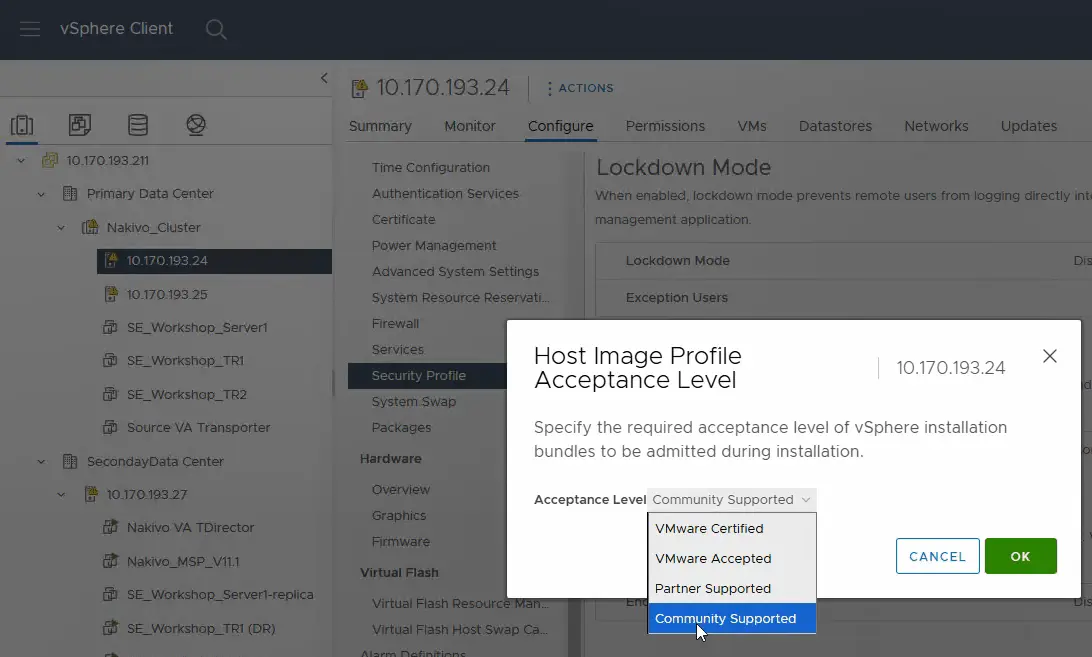
- Do the same on the second ESXi host on the source data center and set the acceptance level to
Community Supported.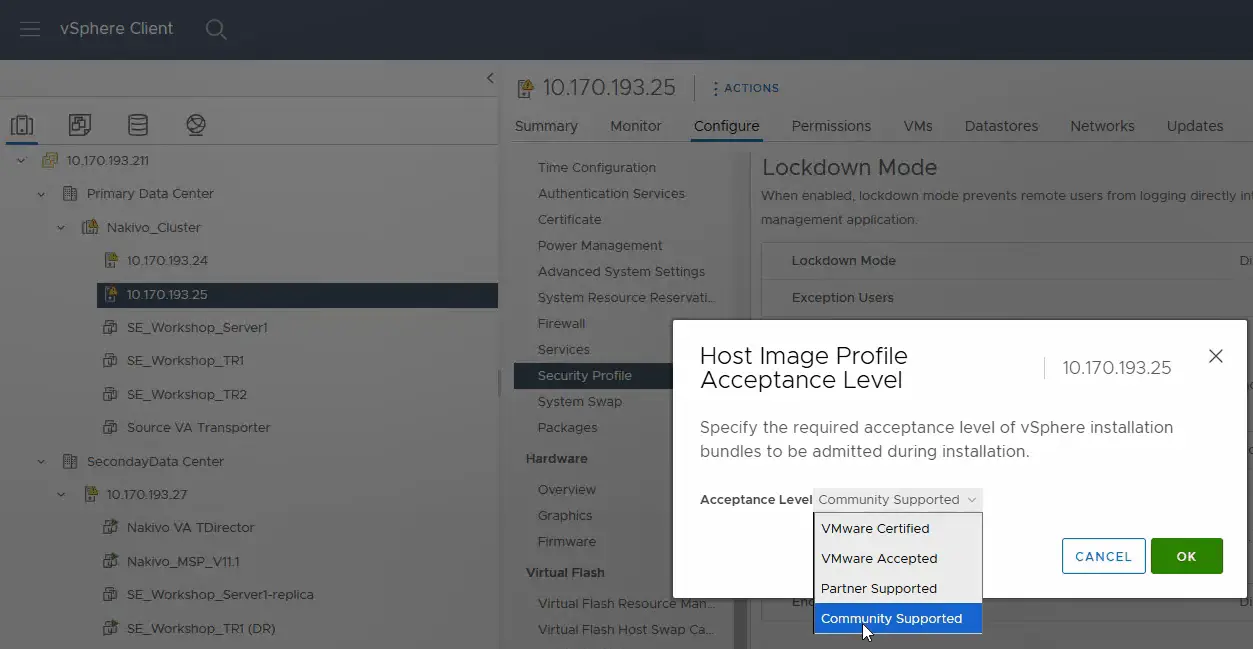
Configuring the Inventory
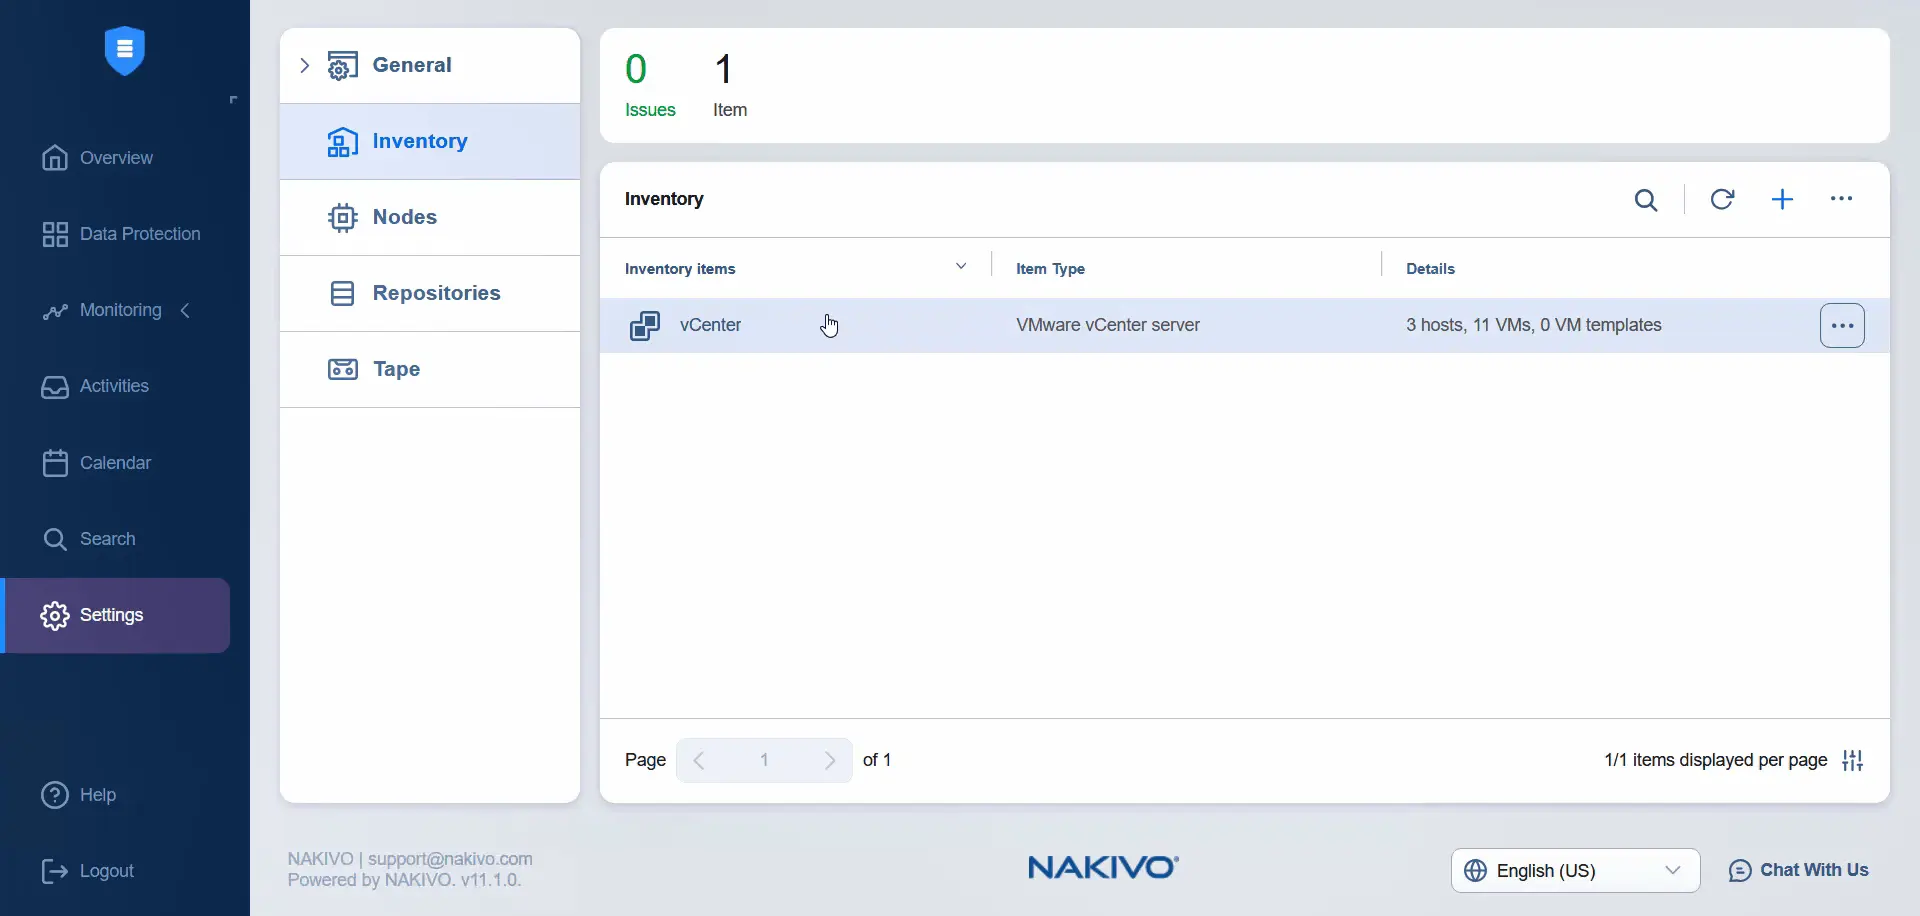
- After editing the host image profile acceptance level, open the NAKIVO Backup & Replication web interface and go to
Settings > Inventoryin order to add the source vCenter to the inventory. Click thePlusicon to add a new item to the inventory.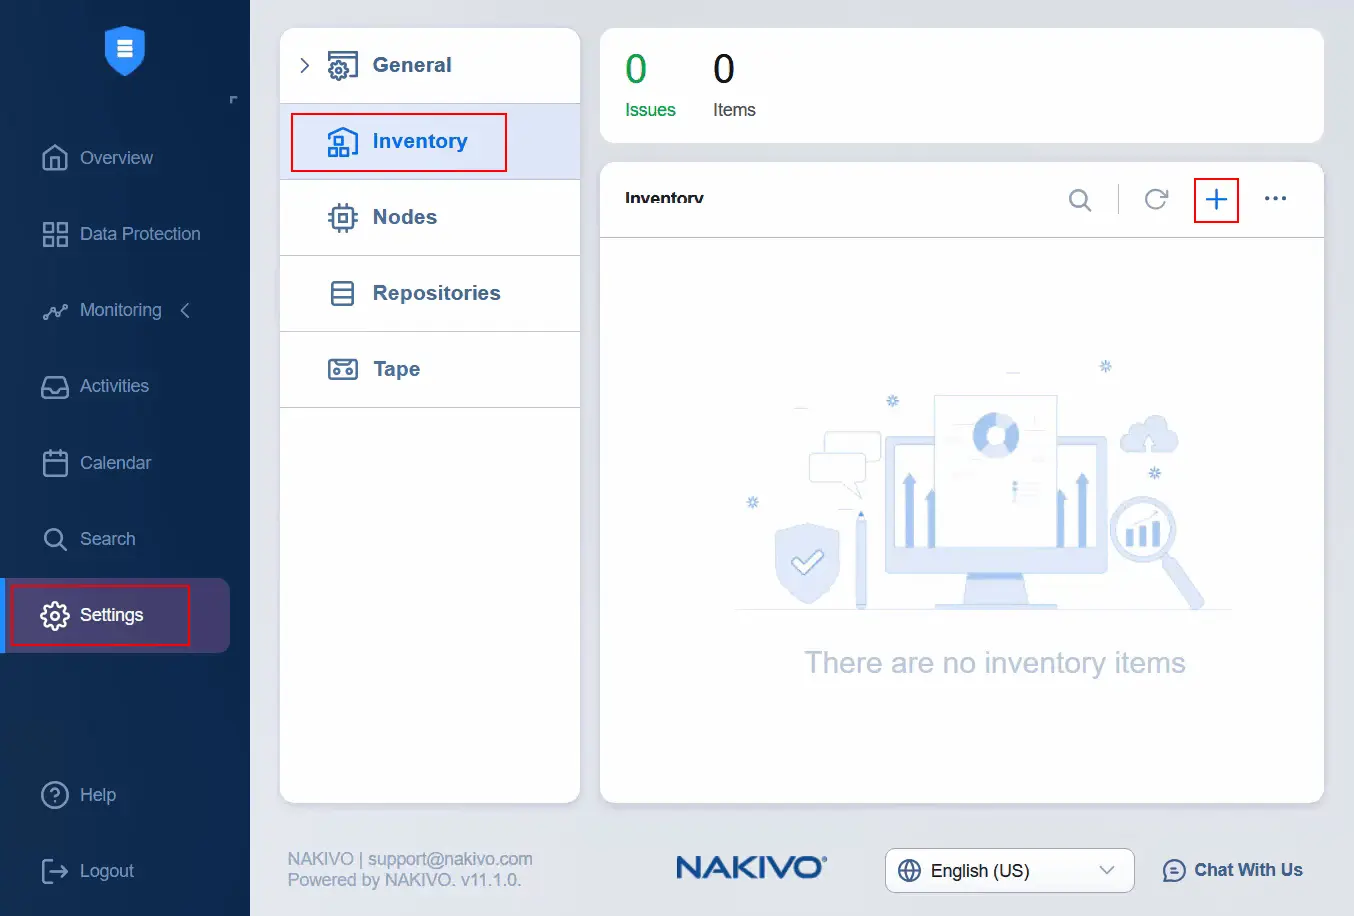
- Select
Virtualas the platform and clickNext.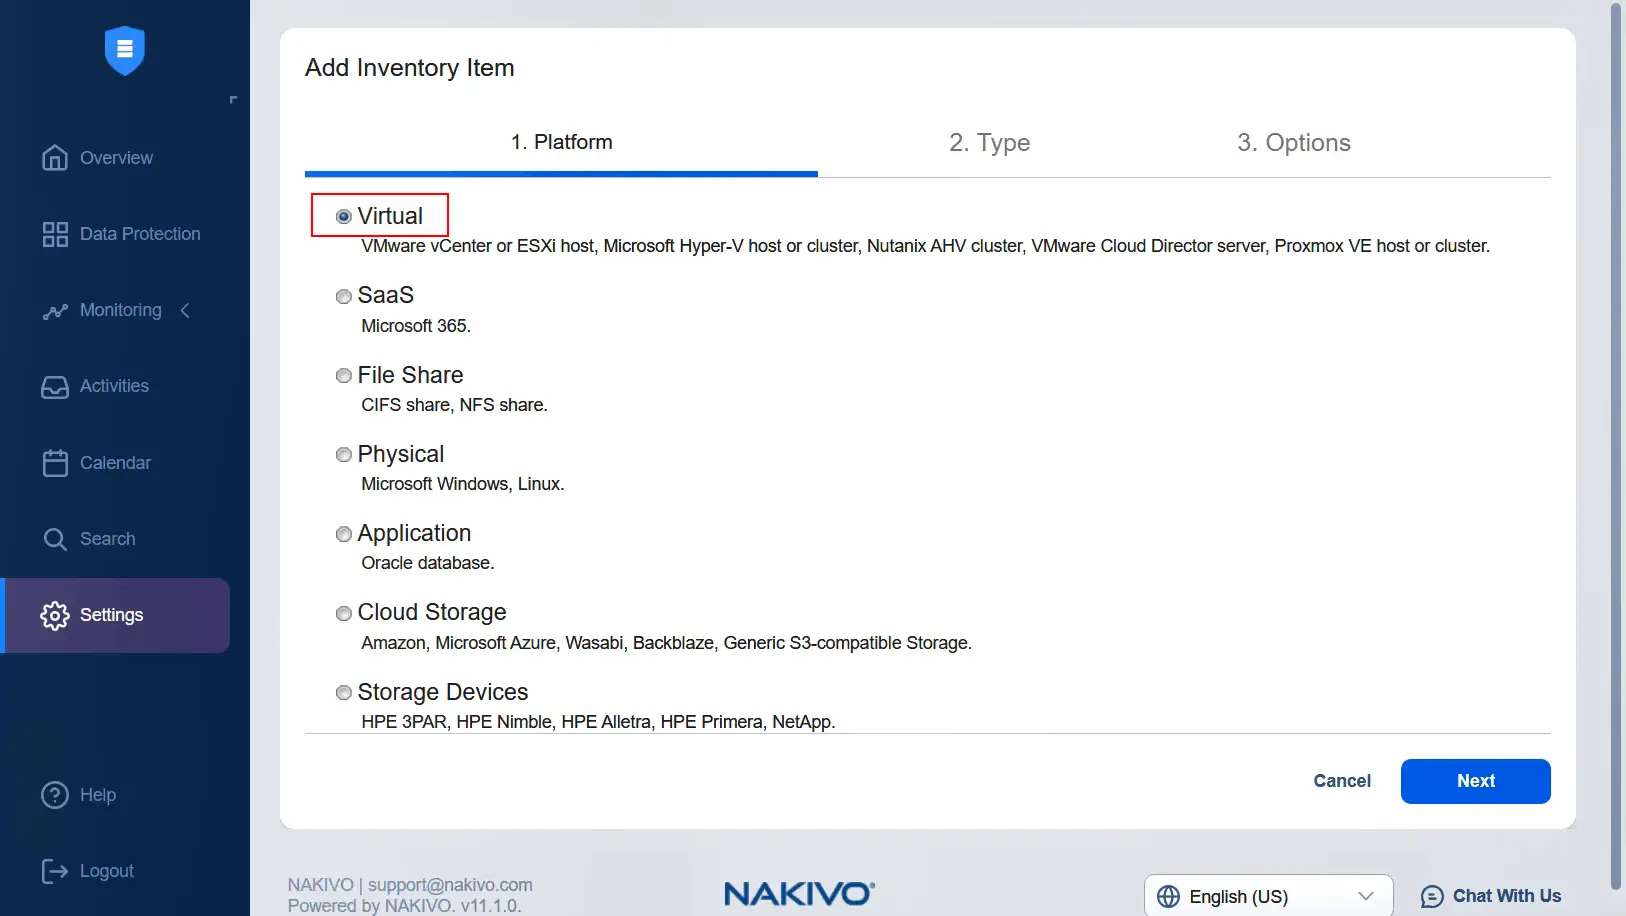
- Select
VMware vCenterorESXi hostas the type. Then, go to the next step.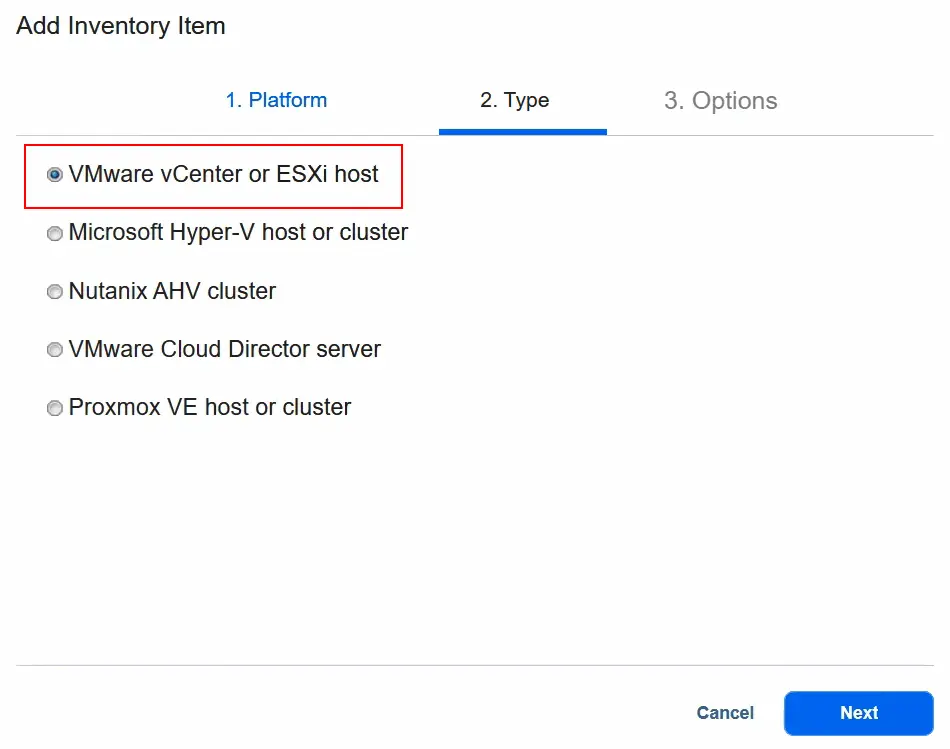
- At the
Optionsstep, enter the display name, for example,vCenter. Then, enter the IP address of this vCenter Server, as well as the username and password, to access it. ClickFinishto save settings and add the selected vCenter to the NAKIVO inventory.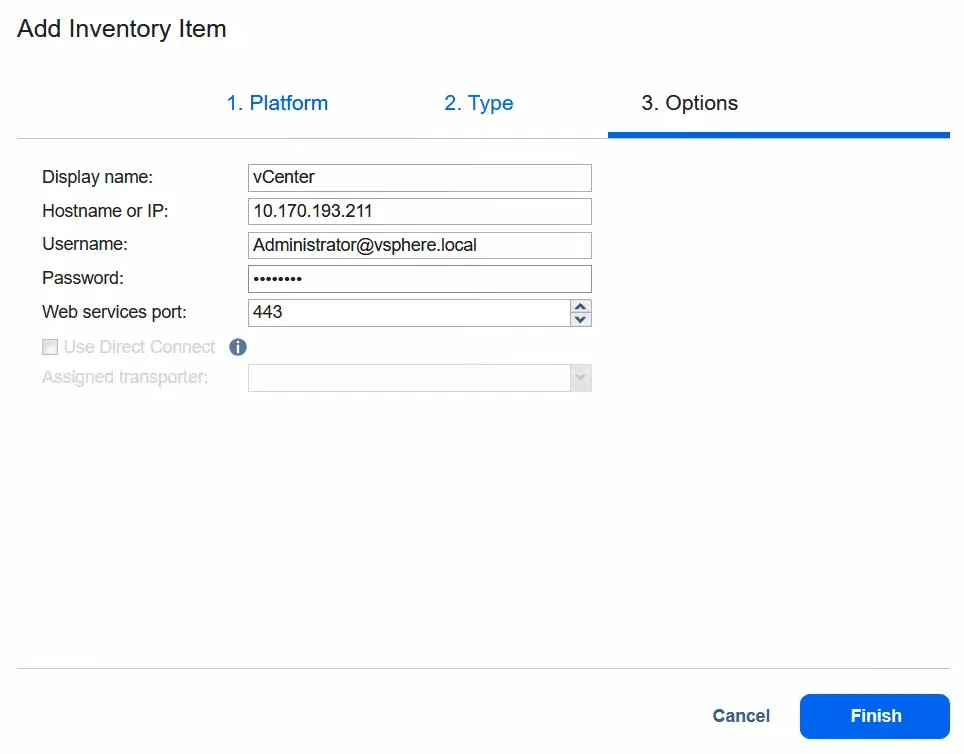
- Wait until vCenter is added to the inventory. Once added, we can see the primary and secondary data centers on the same vCenter in the NAKIVO inventory if we click the vCenter item.
Installing the I/O filter
Next, we need to install the I/O filter on each ESXi host on the source side. The I/O filter must be installed in a cluster for real-time data replication. There is no need to install the I/O filter on the target side.
- Click
Nodes, clickGot It(if you are visiting this section for the first time), clickPlusand hitReal-Time Replication Service.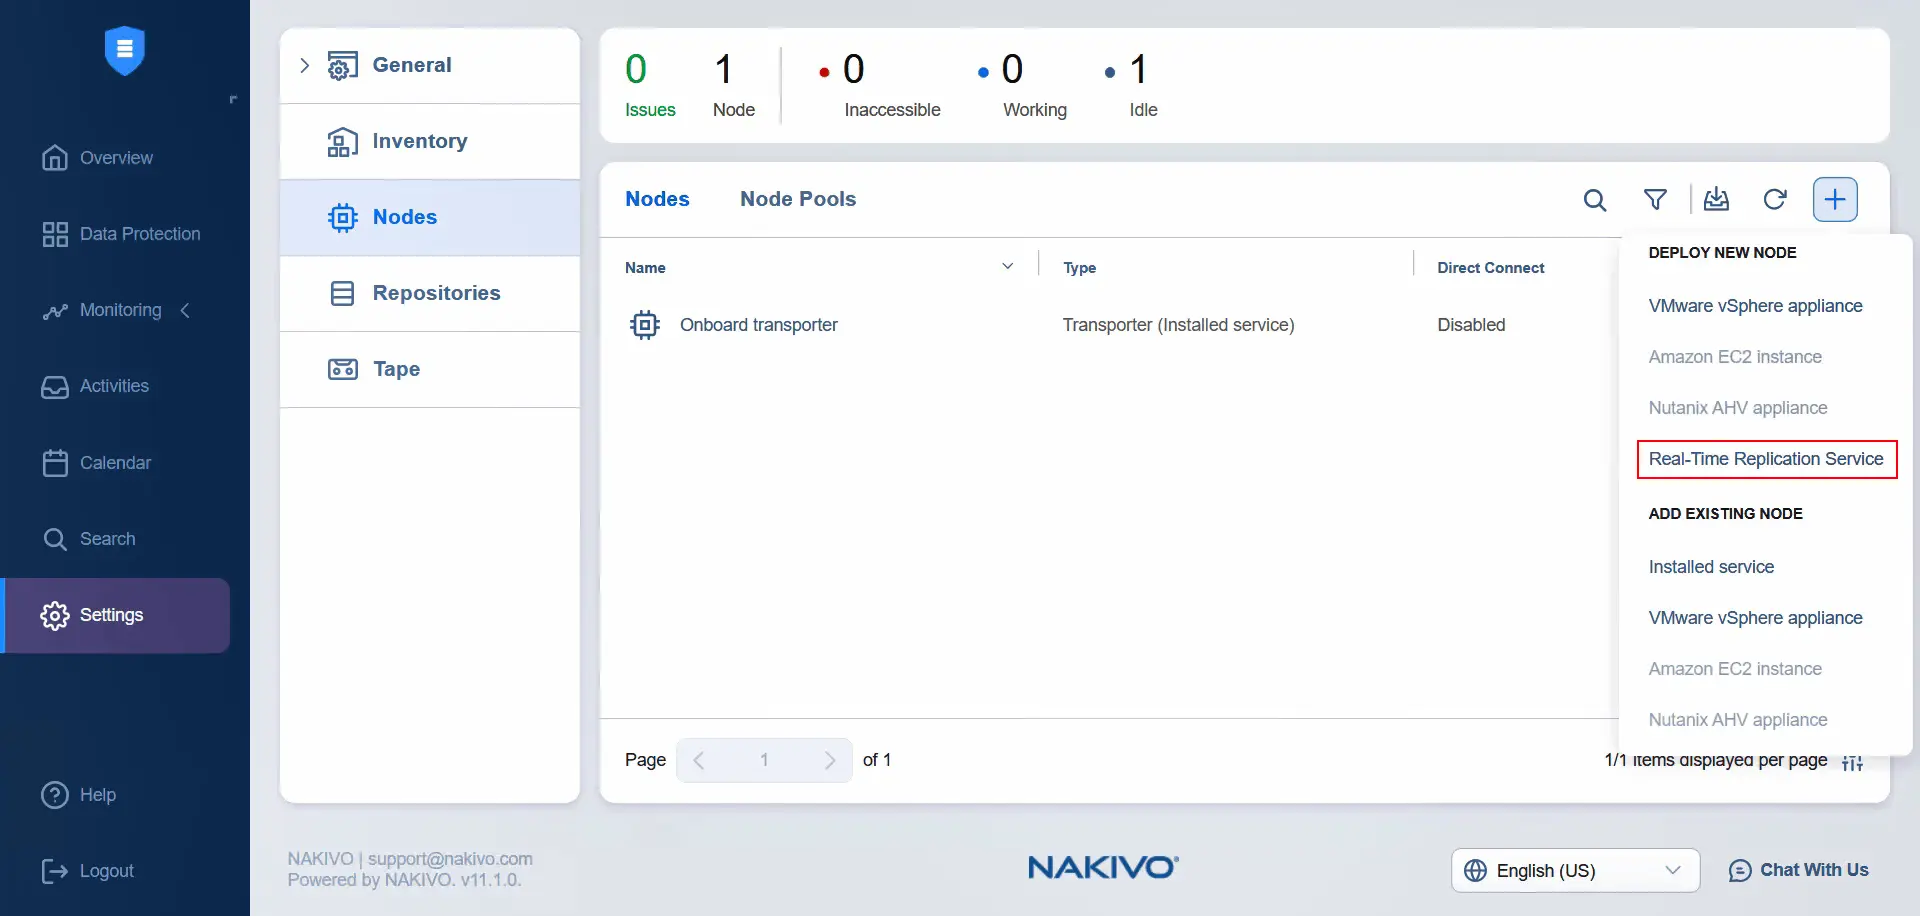
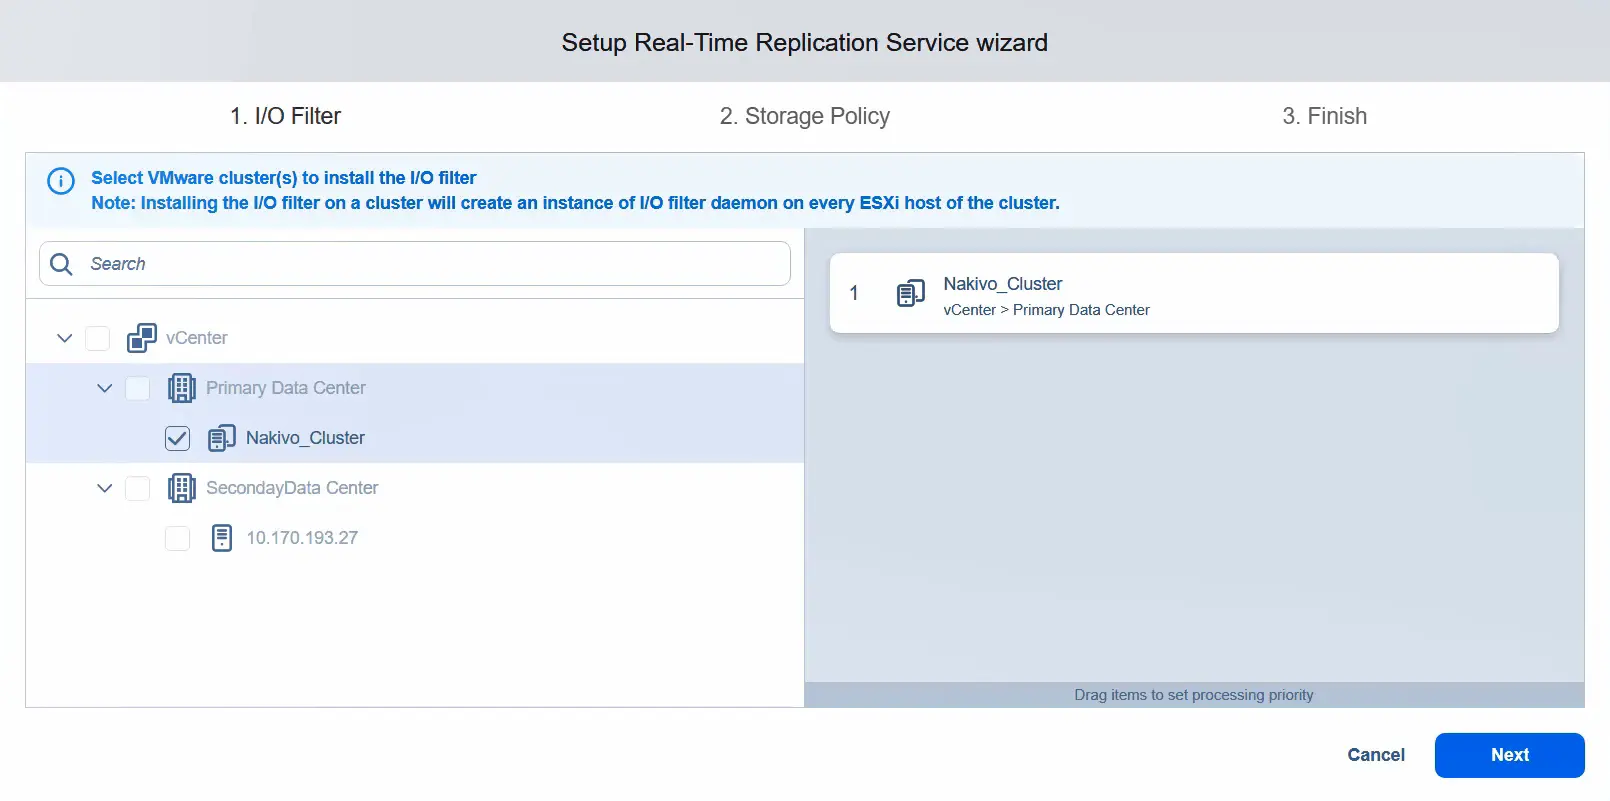
- Install the I/O filter only on the primary data center, which is the source data center. Once a cluster in the data center is selected, proceed to the next step.
- Apply the storage policy and assign it to the virtual machines that you want to use for real-time replication. In this example, we apply the storage policy only to one virtual machine. Click
Next.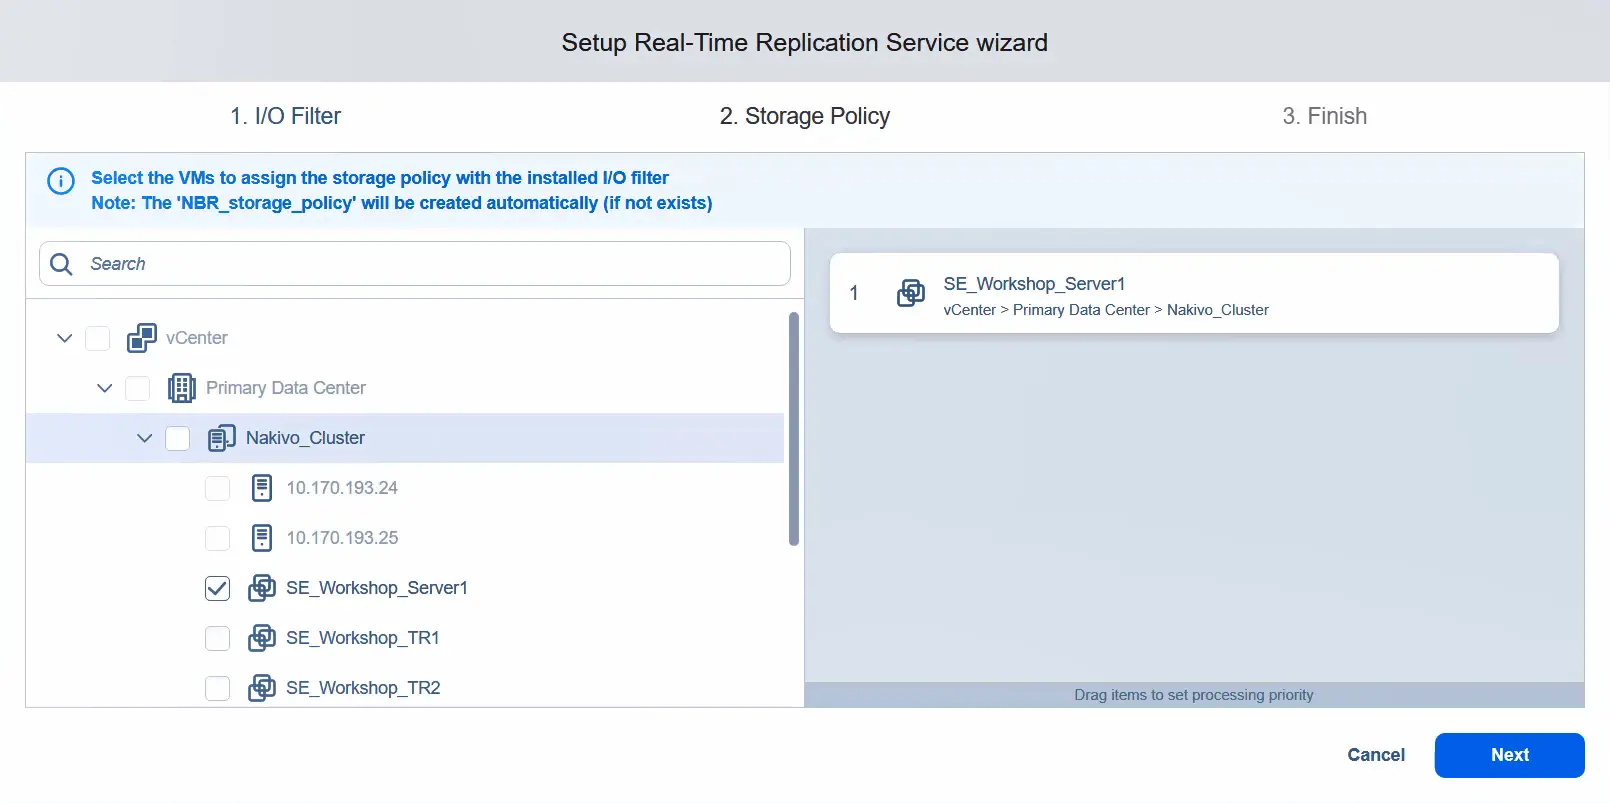
- Real-time replication services will be installed now.
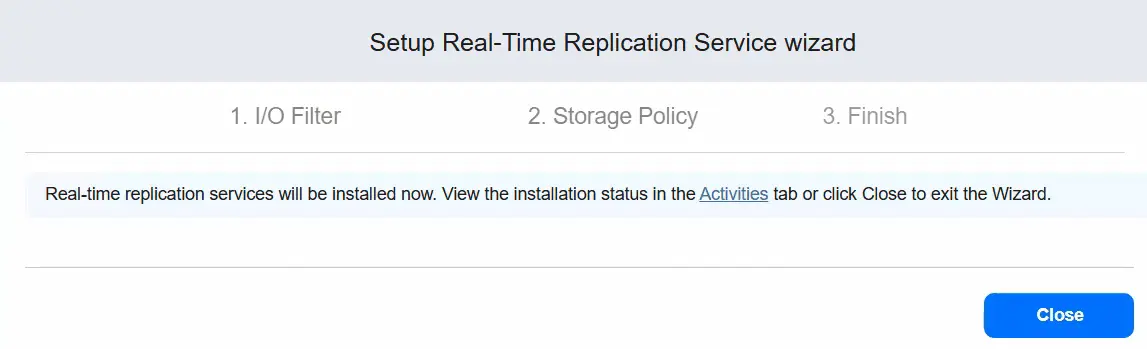
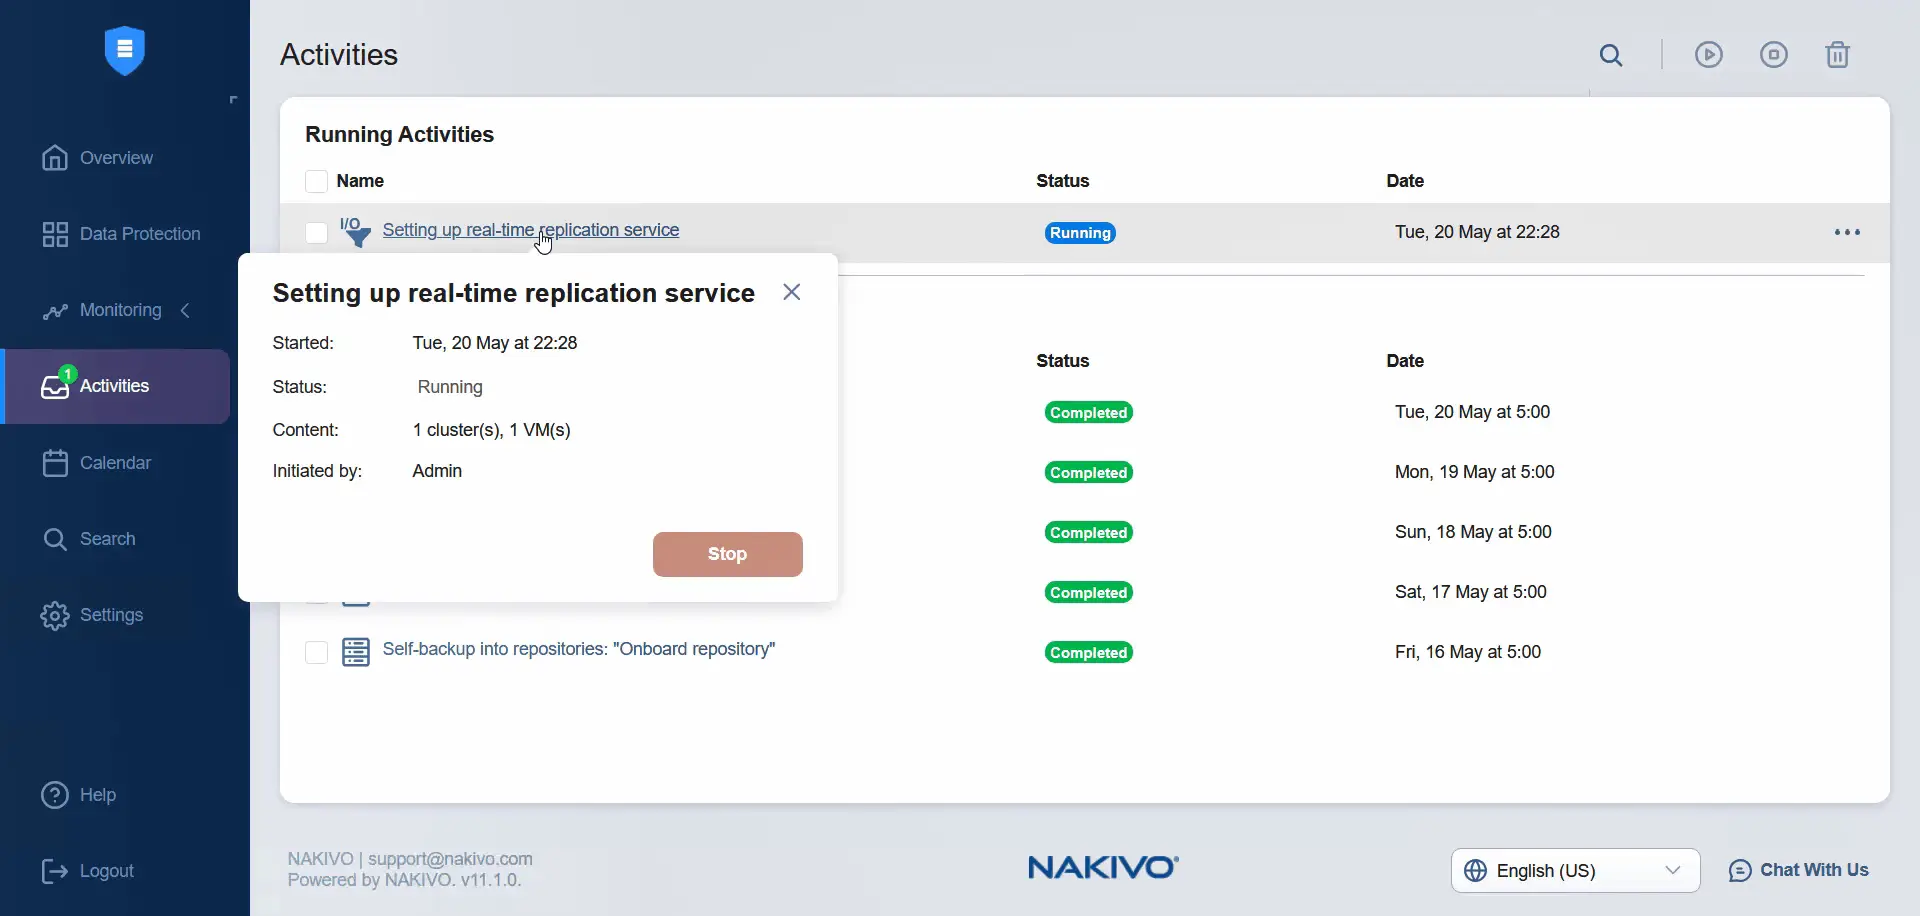
We can see the activity status while the installation is running.
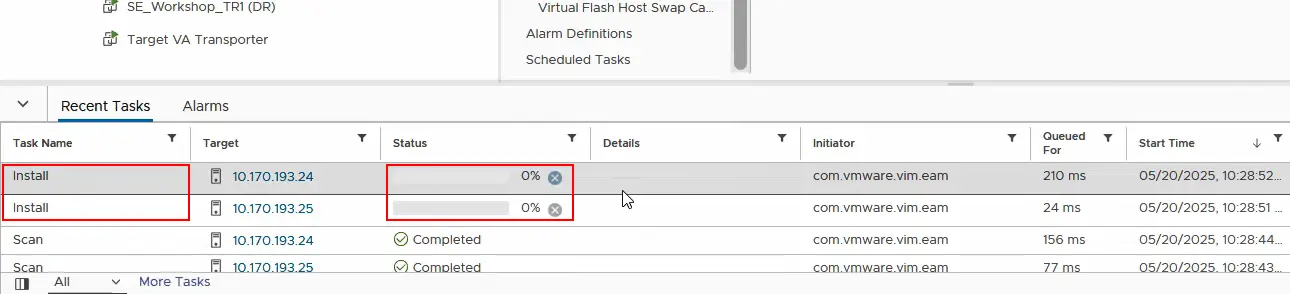
We can check the progress in VMware vCenter. The task of installing the I/O filter has started. We have to wait until the I/O filter is installed on both ESXi servers.
- Now, we have to check whether the I/O filter has already been installed on each ESXi server on the source cluster. Select the ESXi host and click
Configure > I/O Filters. We can see thenakfilteralready installed. Similarly, ensure the I/O filter is installed on the second ESXi host in the cluster.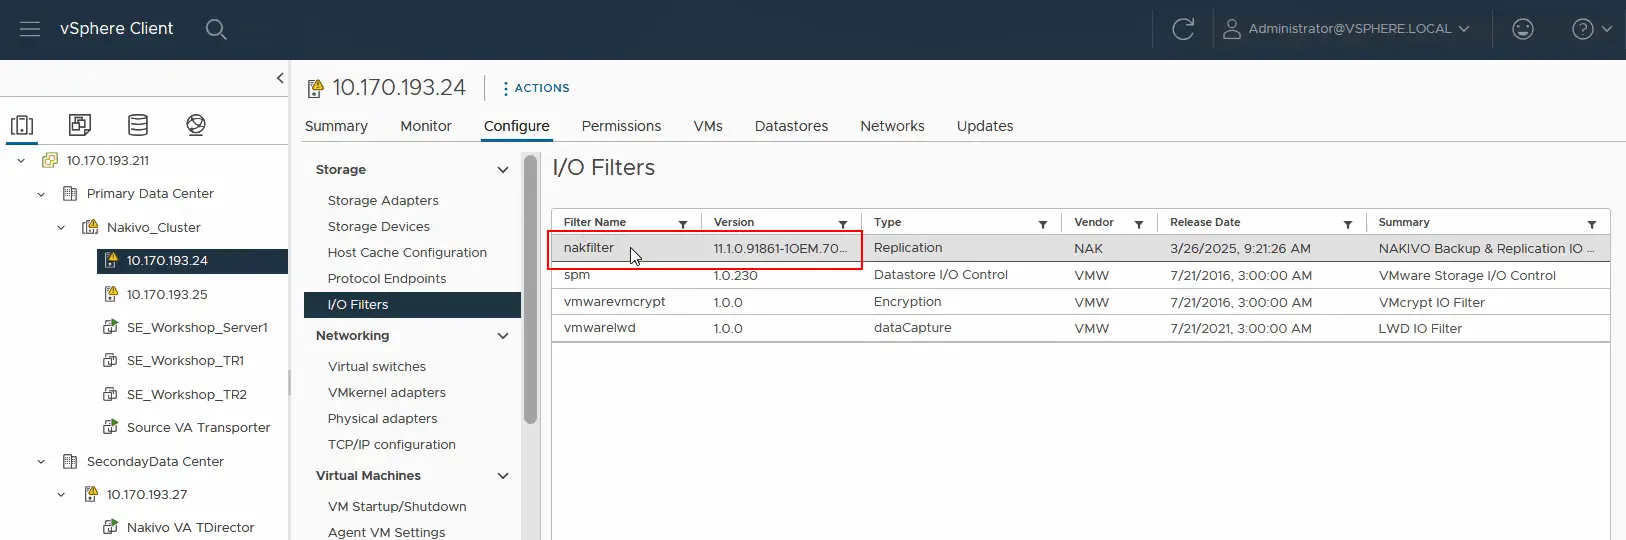
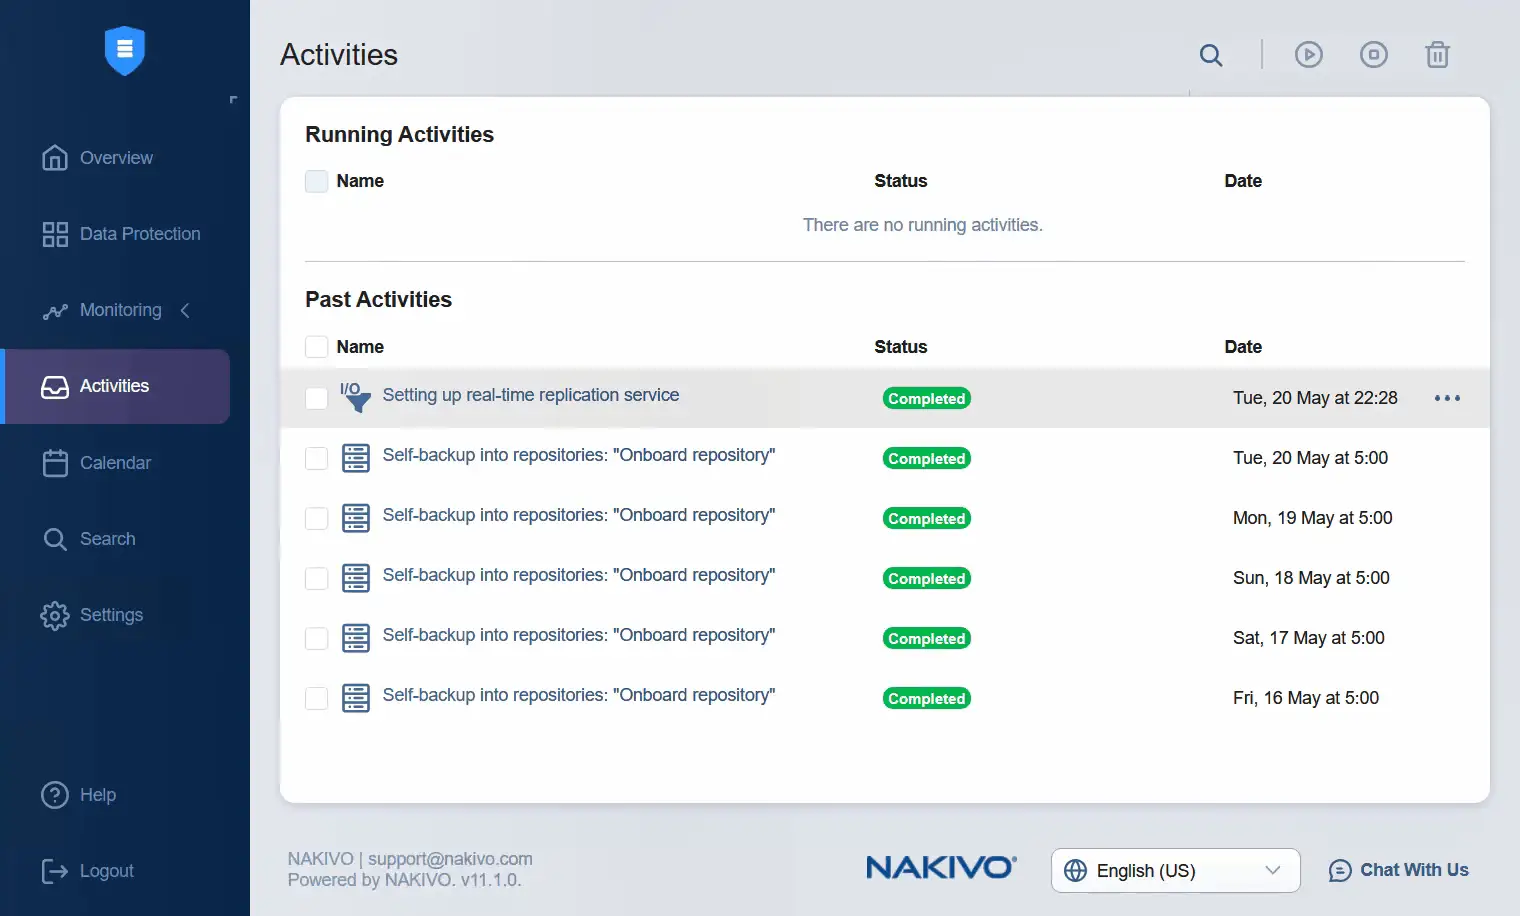
- Switch to the NAKIVO Backup & Replication web interface, where you can check the activities. Setting up the real-time replication service has been completed successfully in this case.
Adding the Transporter
- Go back to
Settingsin order to add the target transporter toNodes. Before we continue, we can check the status of the I/O filter displayed for the nodes. The status is good in this case.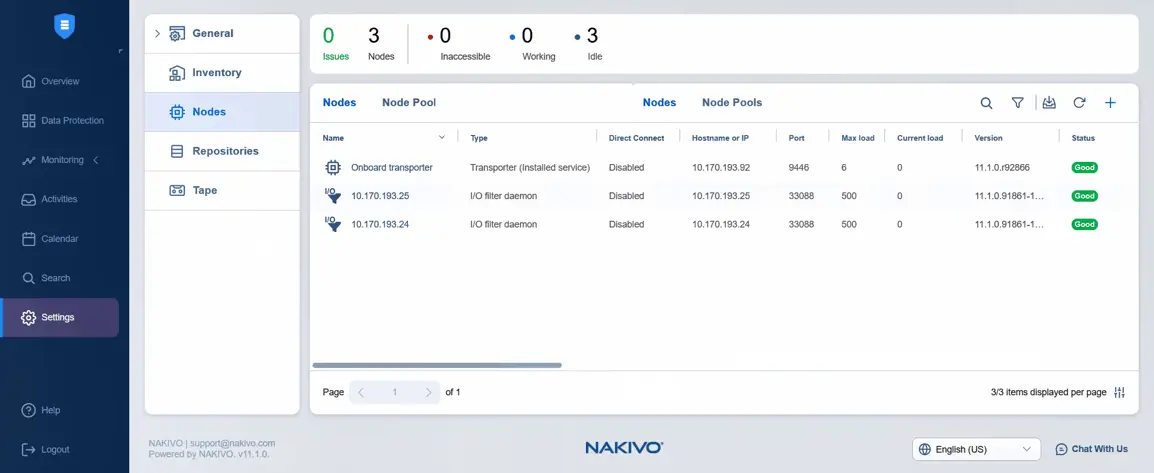
- Under
Settings, selectNodes, clickPlusand hitVMware vSphere applianceunderAdd Existing Node. We have already installed the virtual appliance when the I/O service was installed (automatically).
- Select the target ESXi host and select the target virtual appliance Transporter. Enter the username of the Transporter virtual appliance and password for this user. You can enter the transporter name in the appropriate field. Click
Add.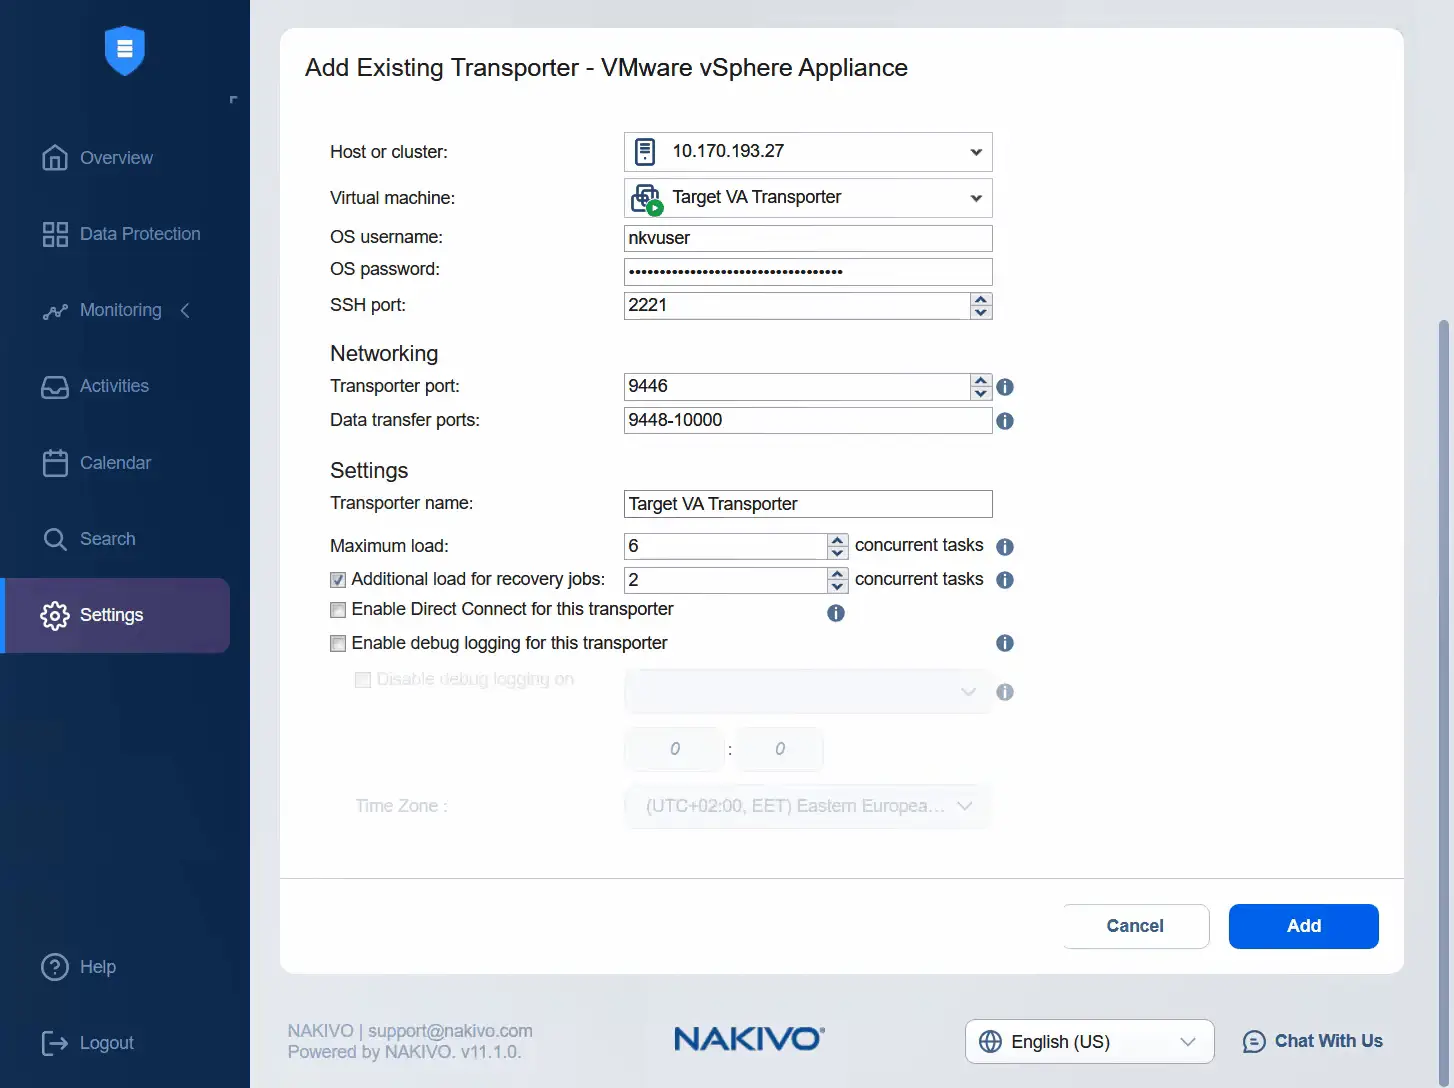
- Adding the target transporter is in progress. You can check the progress here or monitor the status in the list of nodes. Now, we can see that the target virtual appliance Transporter is added successfully and its state is good.

- It’s time to add the source virtual appliance transporter to the nodes. Click
Plusand hitVMware vSphere ApplianceunderAdd Existing Node.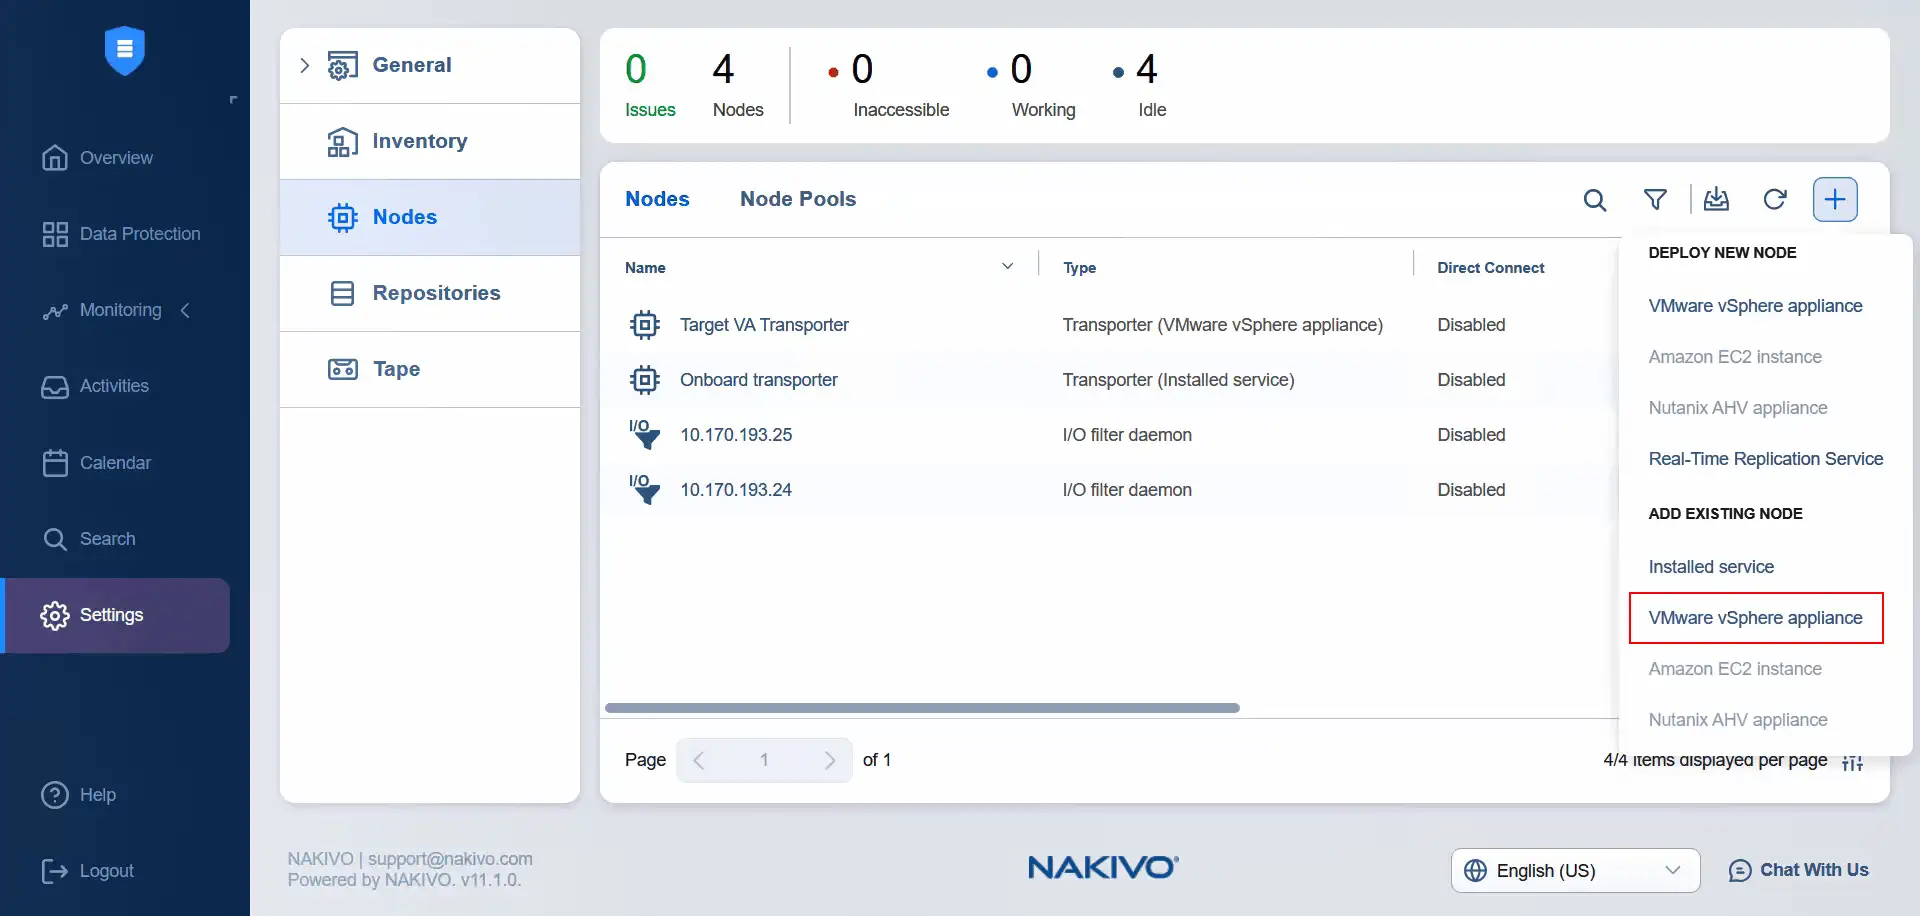
- Select a cluster as the source. Select the source virtual appliance transporter. Enter the username and password of the selected transporter appliance. If you expand more options, you can enter the Transporter name. Click
Add.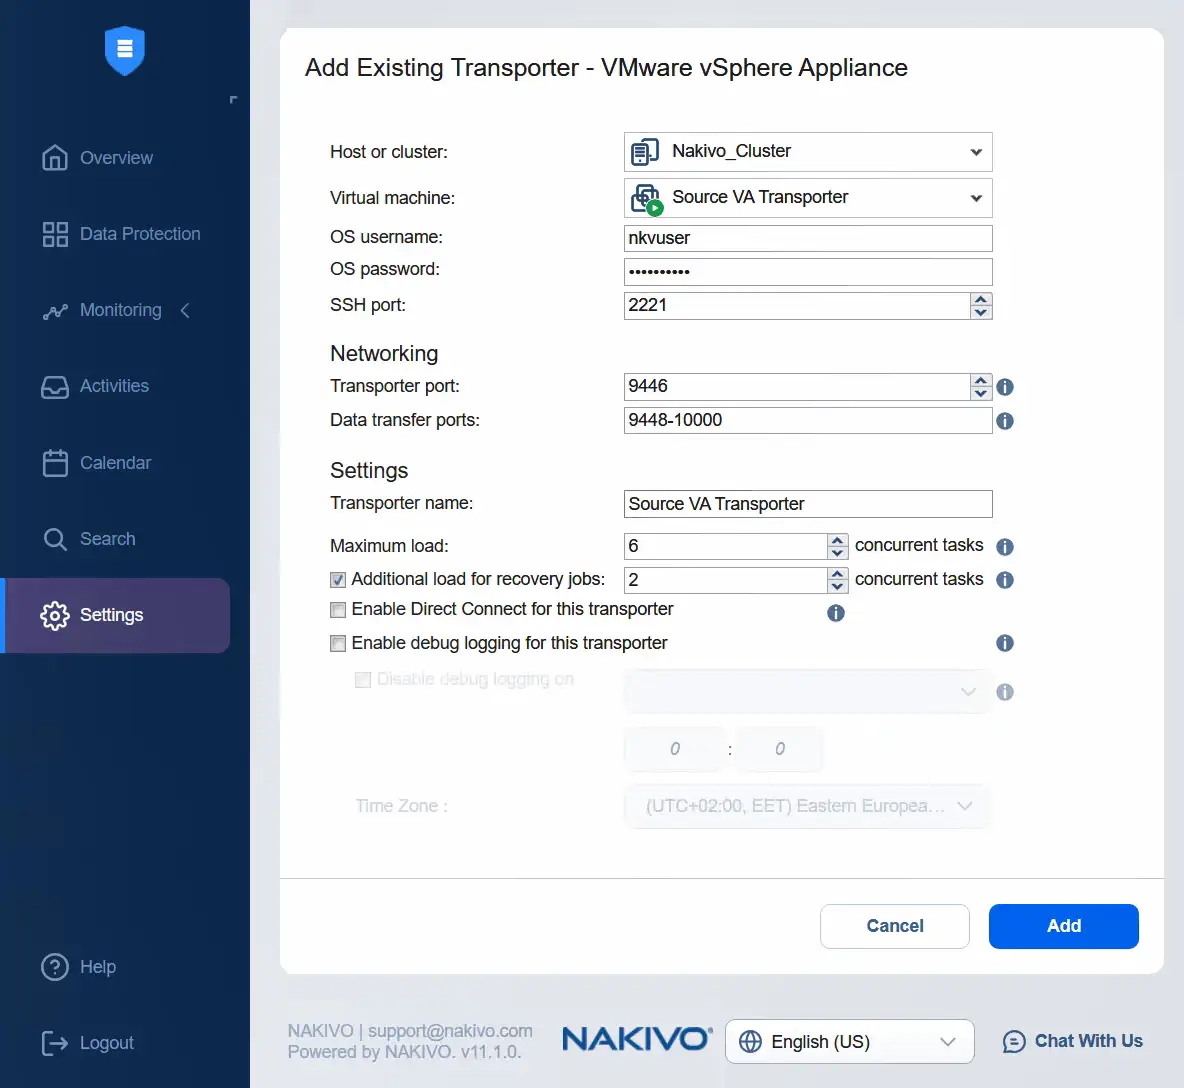
- After some time, the source virtual appliance Transporter is added successfully to the nodes.
Creating a real-time replication job
Go to Data Protection to create a real-time replication job for the VM. Click Plus and hit Real-time replication for VMware.

- At the
Sourcestep, using theHosts & Clustersview in the primary data center, select the virtual machine with the applied VM storage policy. Note that we cannot select other virtual machines because the VM storage policy is not applied to them. ClickNextto continue.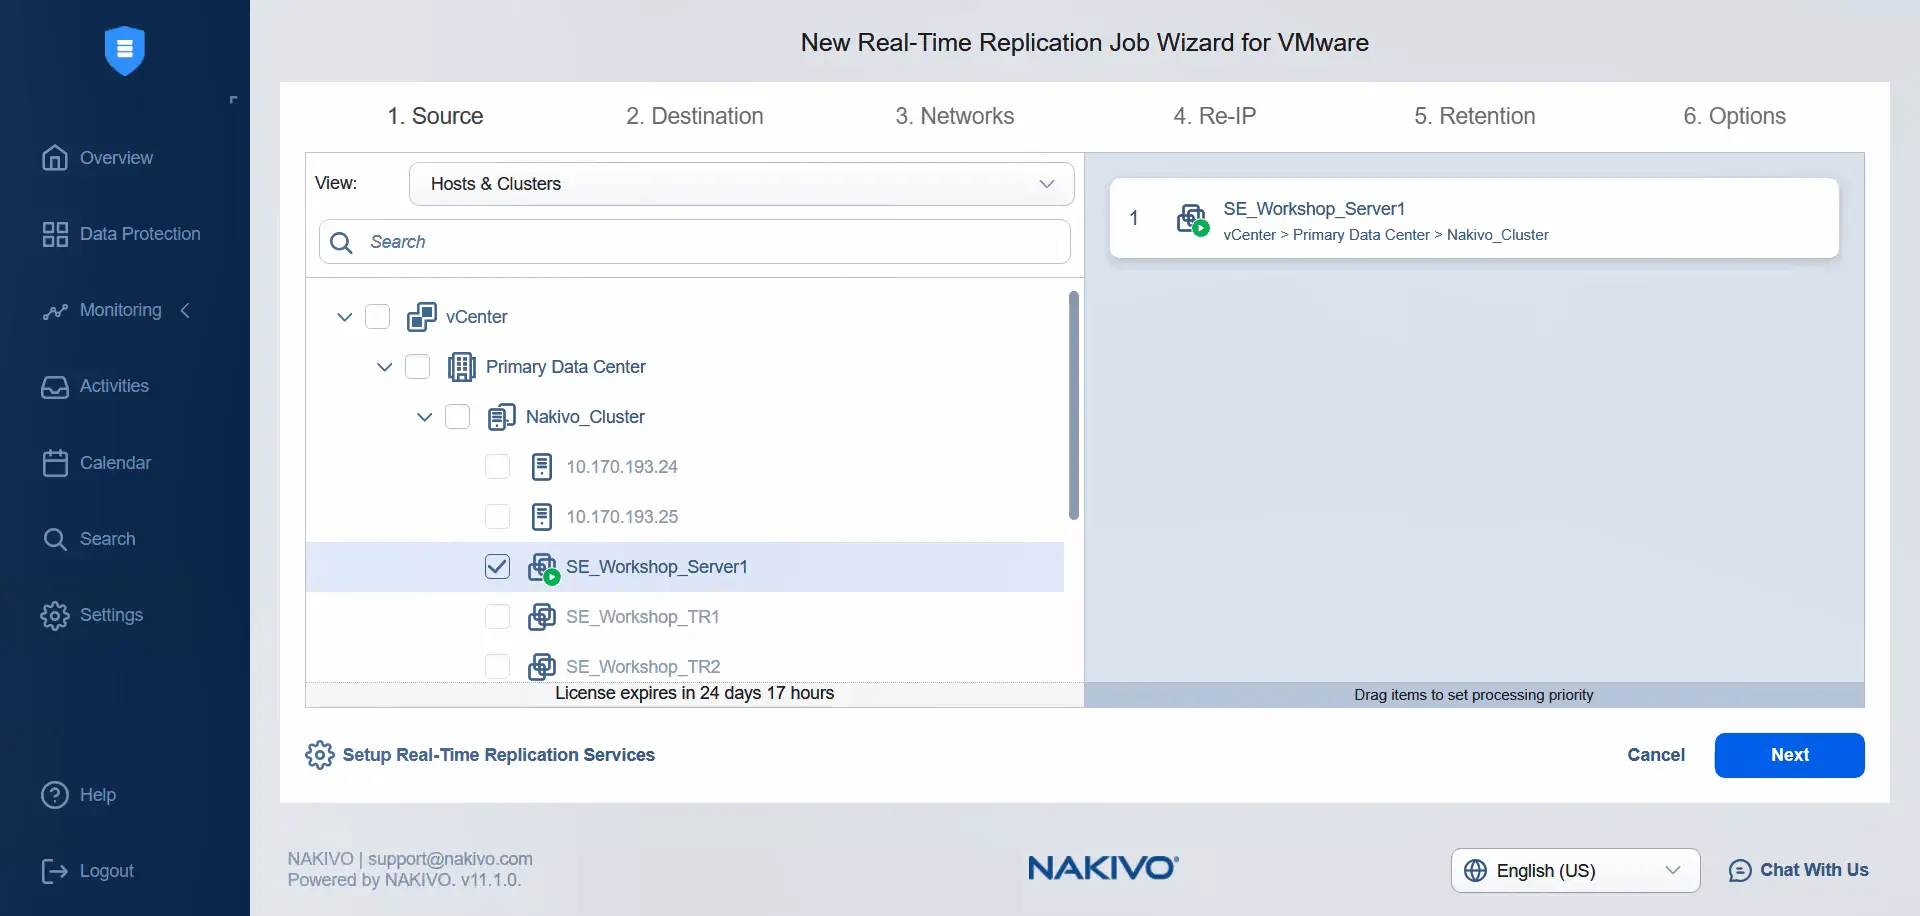
- At the
Destinationstep, we can select a standalone ESXi host as the destination container. Select a datastore attached to this ESXi host. Go to the next step.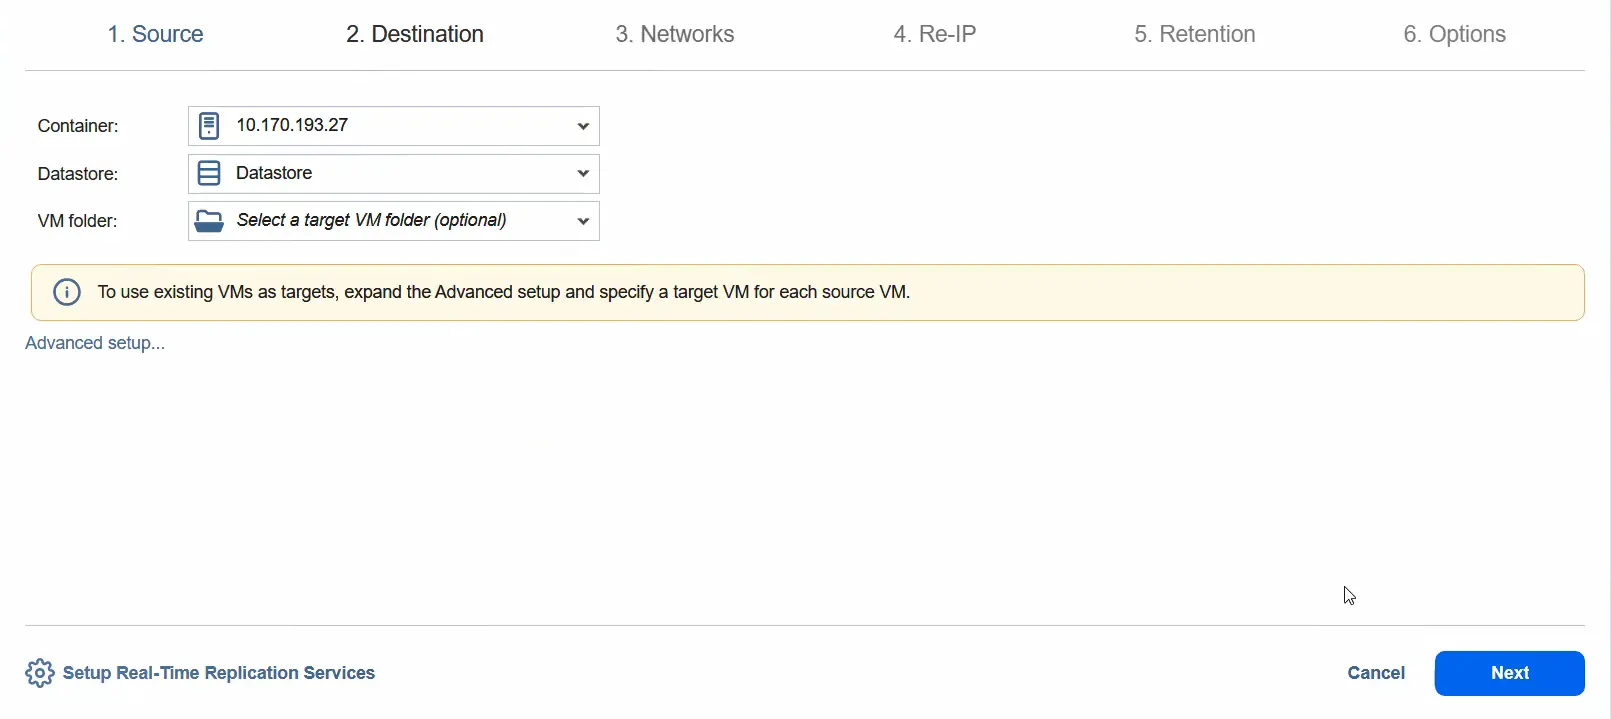
- You can enable network mapping by selecting the source network and target network. Click
Next.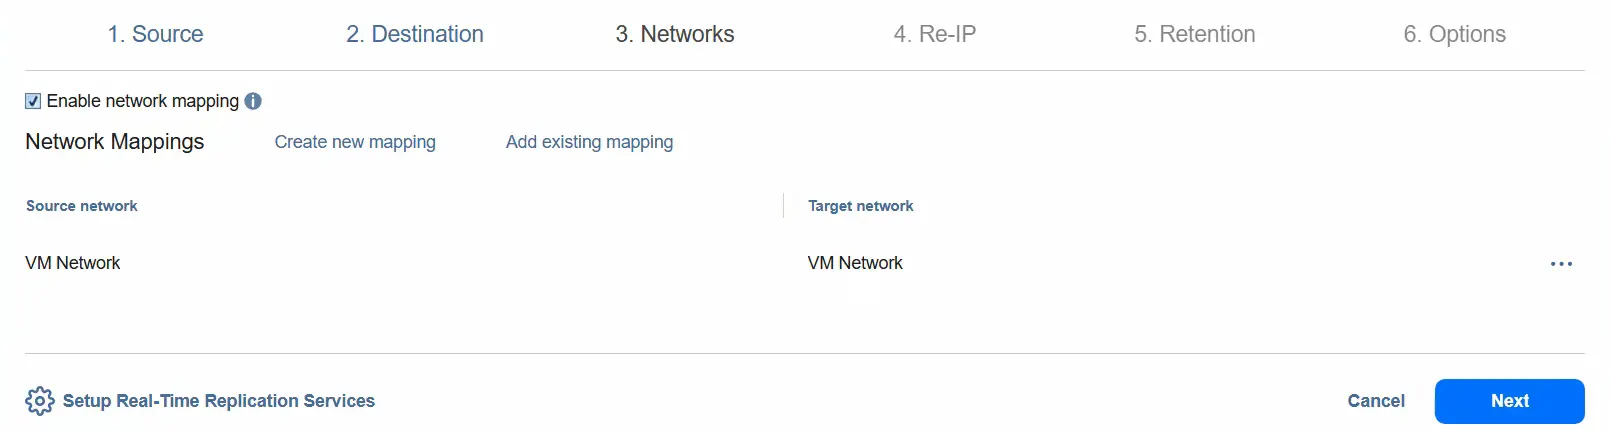
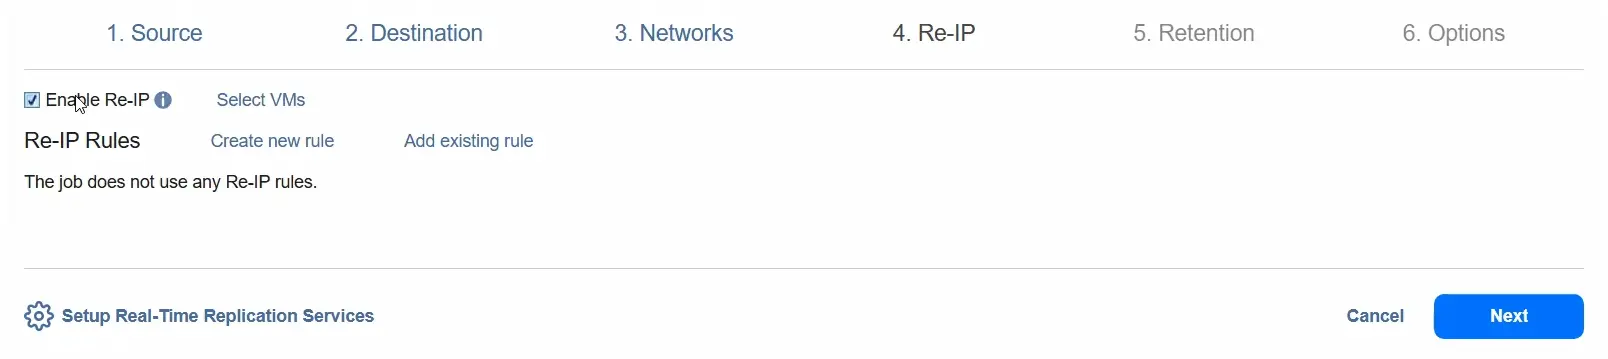
- You can enable Re-IP to change the IP address configuration for the destination VM.
- At the
Retentionstep, select the Recovery Point Objective (RPO). By default, it is 1 minute. We can decrease the RPO to 1 second or increase it to 60 minutes (this is the maximum value). You can select the Fail VM replication if RPO exceeds the specified time option.You can select the journal mode:
Roll forward journalorRollback journal.With the
Rollback journaloption, new data changes are saved directly to the VM replica and all data in the replica is saved in the journal. Old data in the journal is removed based on the journal settings.With the
Roll forward journaloption, the new data changes are saved to the journal, and the old data is merged into the replica based on the journal settings. For now, we keep the setting as it is and use theRoll forward journal.You can select the
Journal history limitoption to set a limit for journal history between 1 hour and 30 days.The
Journal size limitoption sets a limit for the journal size. The value can be between 1 Gigabyte and 20 Terabytes. For now, we keep this option unchecked and go to the next step.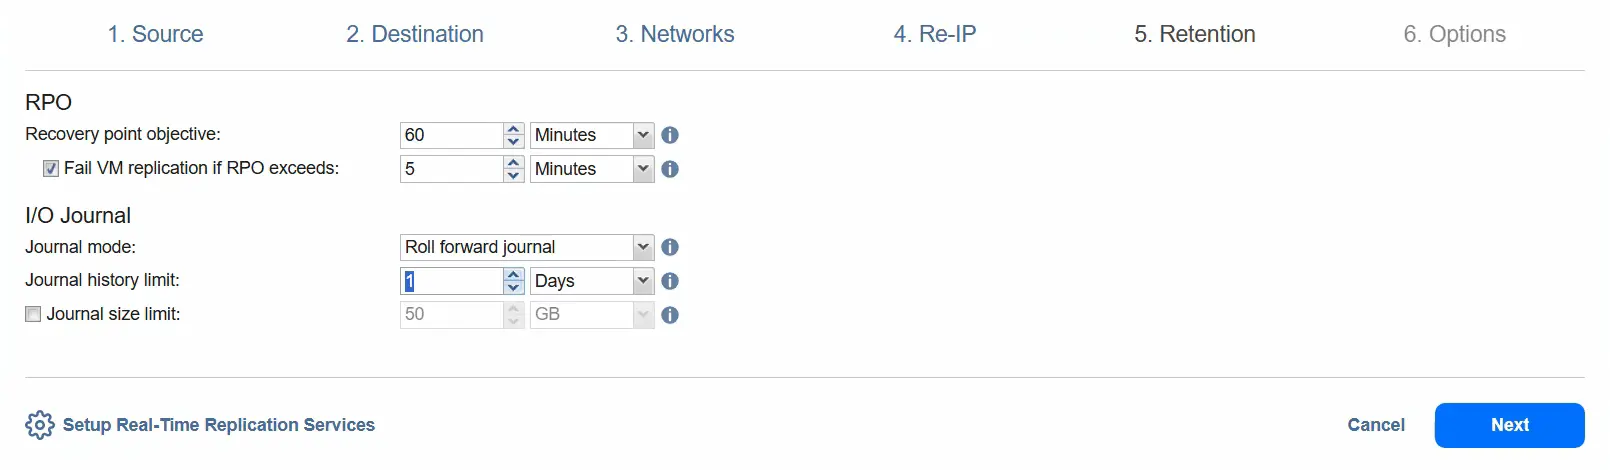
- At the
Optionsstep, define the job name for real-time replication. In this example, we keep the job name as it is and keep the job priority as 5. We can enable network encryption to encrypt traffic between the I/O filter daemon and journal service over port 63092. Encryption uses a certificate on the transporter, which establishes a secure connection to the journal service.We can limit data storage on the source host per VM to 10 Gigabytes and exclude unused blocks. We can keep the default values for the next options.
For the source host, we need to select the source transporter, which is Source VA Transporter. Then, we select the same transporter for ESXi host 24.
For the target host, we need to select the target transporter, which is the appropriate target virtual appliance transporter.
Click
Finish & Runto save job settings and run the real-time VMware replication job. ClickRunand then clickRunonce again when you see the confirmation message.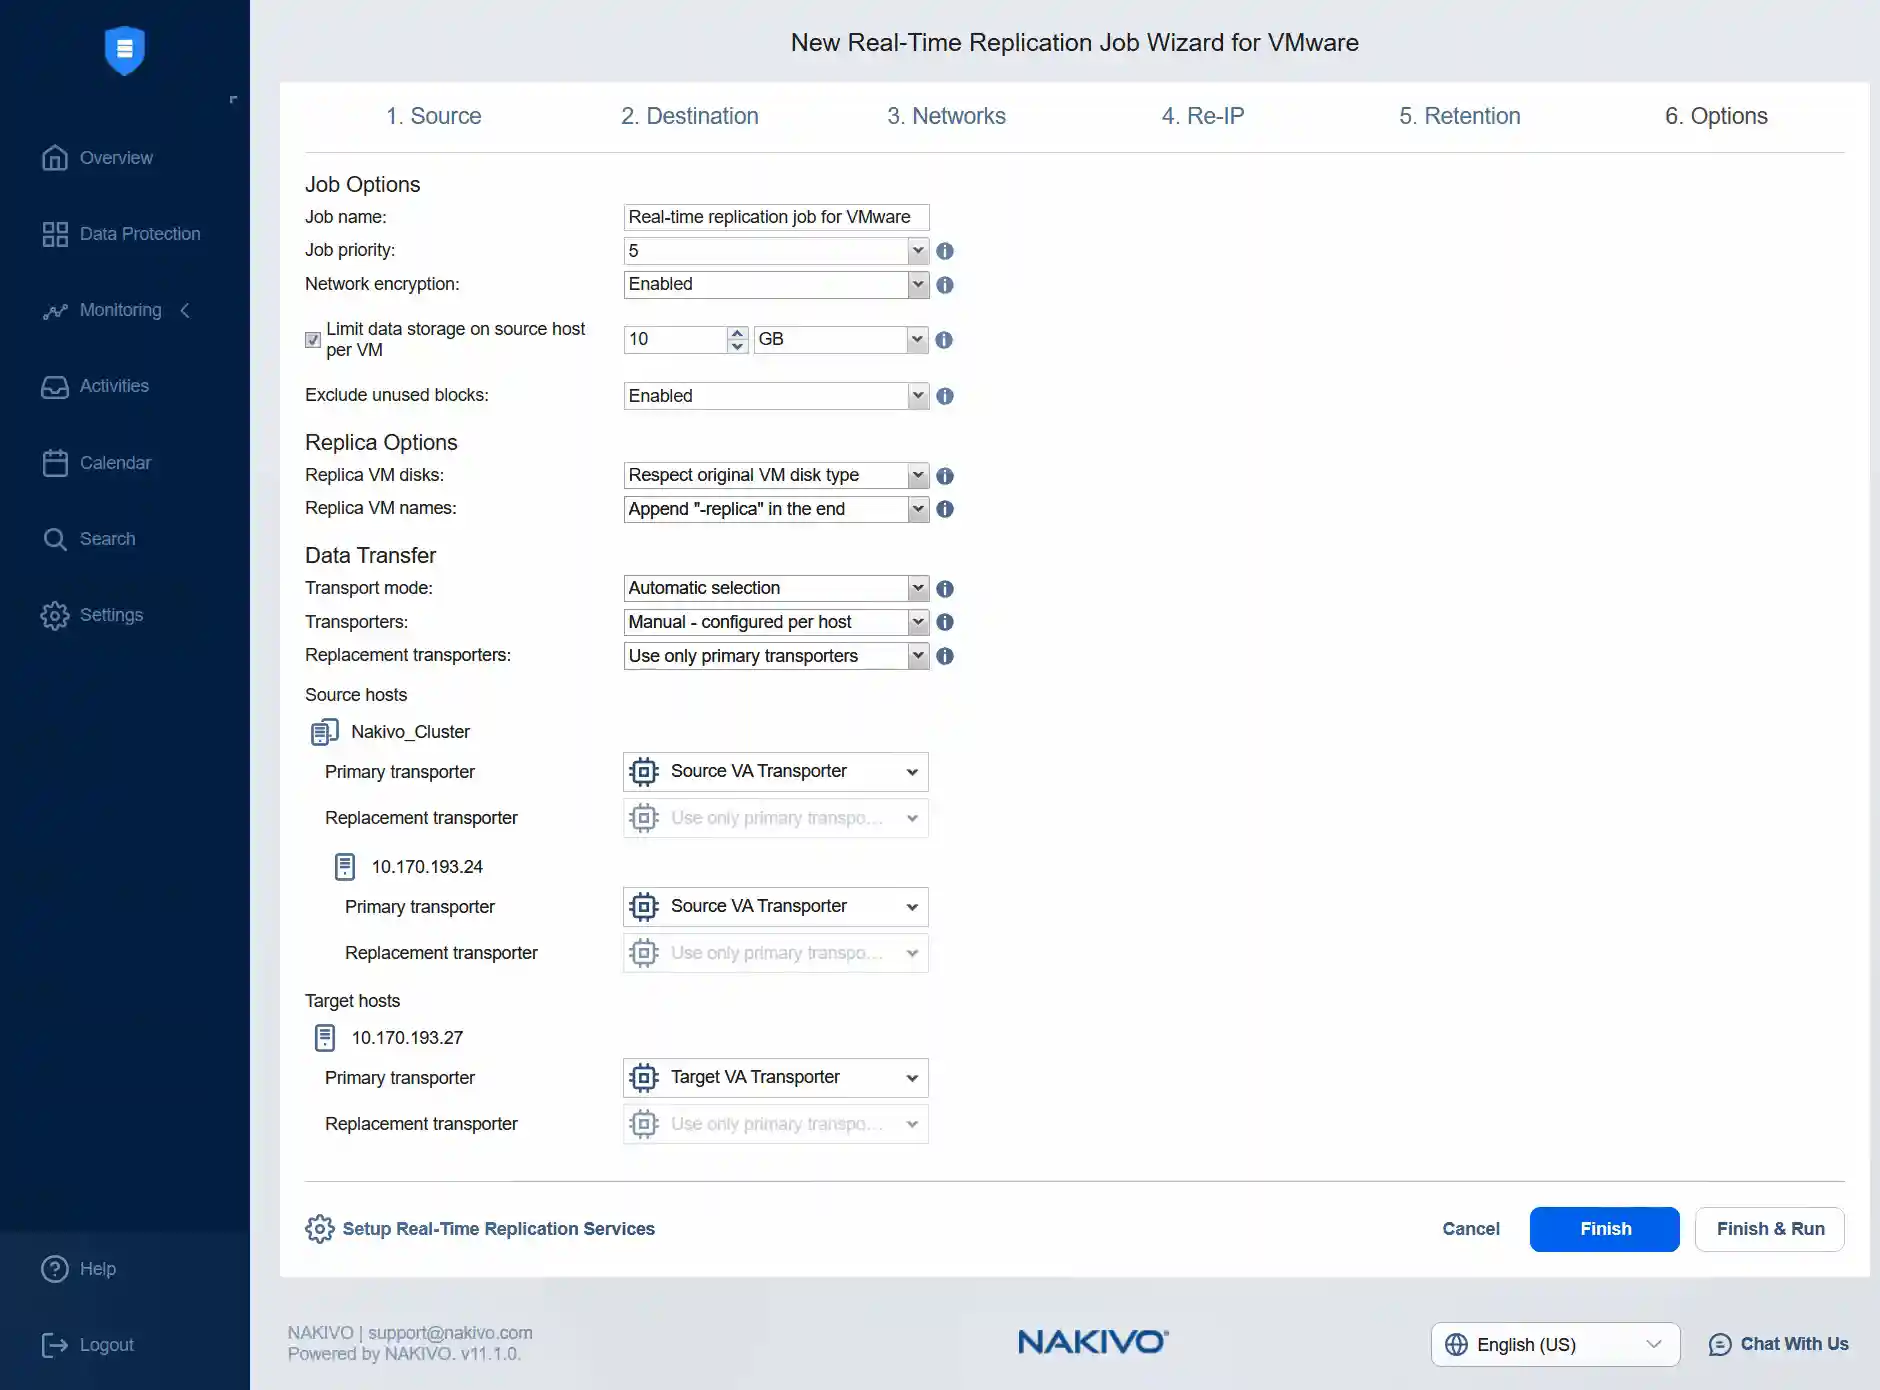
Conclusion
Real-time data replication for virtual machines significantly improves business continuity by reducing downtime and providing the ability to perform VM recovery as fast as possible. This feature should be used for the most critical VMs with the most important data, while traditional asynchronous replication can be more cost-effective for less critical data. Use NAKIVO Backup & Replication for real-time replication and asynchronous replication of virtual machines in VMware vSphere.