How to Increase Disk Size in Hyper-V: The Ultimate Approach
Virtual machines require high storage capacity for proper performance and smooth operation. One way to increase capacity when a VM is about to run out of disk space is to add another drive. In Microsoft Hyper-V environments, increasing the disk size for a VM only takes a few clicks.
In this walkthrough, learn all the steps for increasing disk size in Microsoft Hyper-V and how to protect your virtual machine data with a data protection solution like NAKIVO Backup & Replication.

Why Increase VM Disk Size in Hyper-V?
When creating a virtual machine, you specify the maximum size of the virtual disk. Similarly, you specify the virtual disk size when creating additional virtual disks for Hyper-V VMs. Sometimes, the size you set for a new virtual disk may seem sufficient initially. When you start working with the virtual machine, the amount of data on virtual disks grows, and there’s no longer enough space on the virtual disk. Insufficient disk space means that you can’t store any additional files, and, more importantly, applications can crash, especially on a system partition.
Key Considerations Before Increasing Disk Size in Hyper-V
It is recommended that you take into account some key considerations before increasing the virtual disk size for Hyper-V VMs.
- Back up the virtual machine whose virtual disk you are increasing. If the data gets corrupted after increasing the virtual disk size, you can restore it from this backup.
- Check whether the guest operating system (OS) on the Hyper-V VM supports resizing partitions. This operation is needed after resizing the virtual disk. Otherwise, you will need to boot from another media to resize the partition. Windows 7, Windows Server 2008 and newer Windows and Linux versions support resizing partitions with built-in tools.
- Ensure that there is enough storage space on the Hyper-V host to increase the virtual disk size. Note that if you use dynamic disks, you can provision a virtual disk larger than the amount of storage space but if storage space on the Hyper-V host is consumed, VM issues can occur.
- Plan VM downtime to make resizing virtual disks more seamless for users working with the designated VM. Schedule the operation during maintenance windows to minimize impact on users.
How to Increase Disk Size in Hyper-V
Before you can start the process of expanding a Hyper-V disk, you should note the following:
- If your VM is running, shut it down. As you may already know, some settings cannot be modified when the VM is in the running or saved state (including changing the configuration of IDE virtual hard disks and virtual disks of VHD formats).
- The VM should not have any snapshots. After modifying virtual hard disks, the associated snapshots might become invalid.
- In Hyper-V, you cannot expand disks belonging to a differencing disk chain. Such virtual hard disks have child virtual hard disks associated with them, and any attempt to edit them might result in data loss. Using Hyper-V functionality, you can increase the disk size of only dynamically expanding or fixed virtual hard disks.
If everything is fine, you are ready to start expanding the disks. As mentioned above, this process includes two main steps:
- Expand the virtual hard disk using the Edit Virtual Hard Disk Wizard.
- Extend the volume size by launching the Disk Management utility inside the VM.
Below, we are going to break down each step separately to avoid confusion.
How to Expand a Hyper-V VM Hard Disk
The first main step of the process is conducted in the following way:
- Open Hyper-V Manager. Right-click the VM and select
Settings.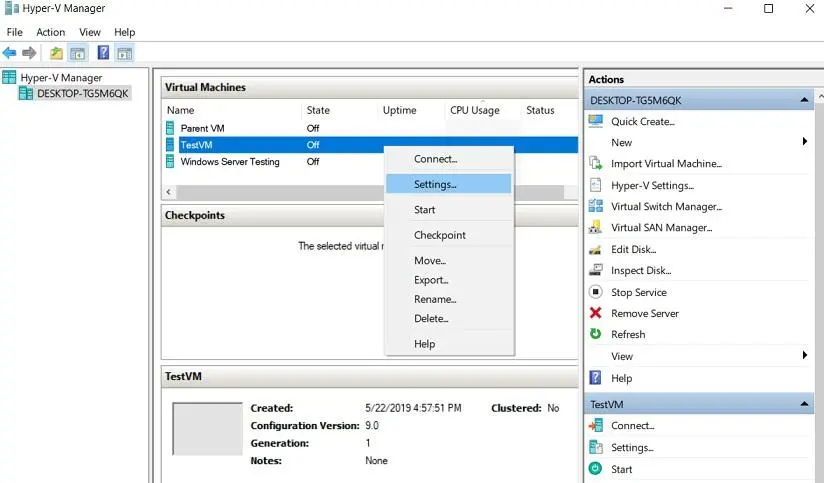
- Select
Hard Drivein the Hardware pane and clickEdit. This action will automatically launch the Edit Virtual Hard Disk wizard.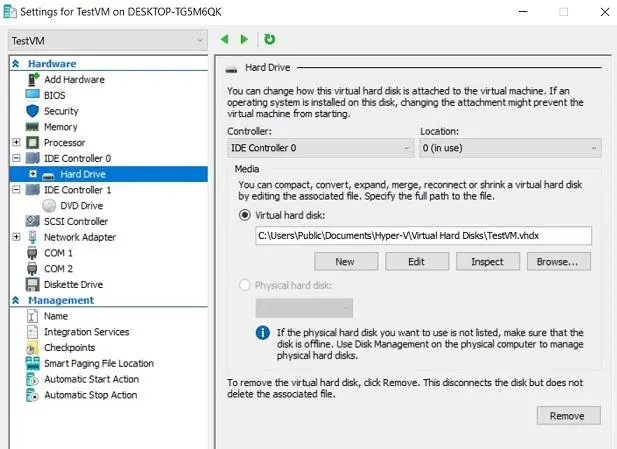
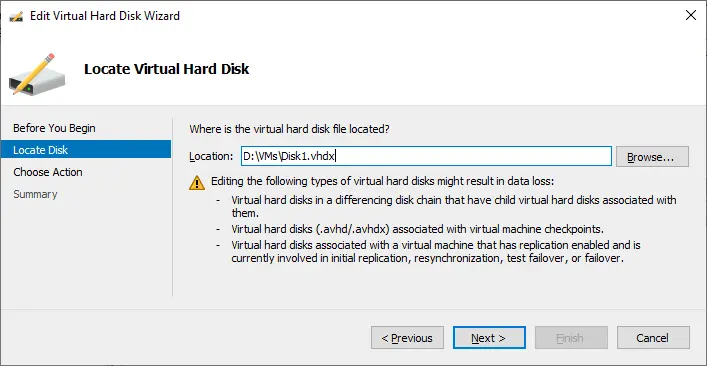
- This action automatically launches the Edit Virtual Hard Disk wizard. Click
Nextto skip the Locate Disk step.
- In the Choose Action step, select
Expandto expand the storage capacity of the virtual hard disk. ClickNext.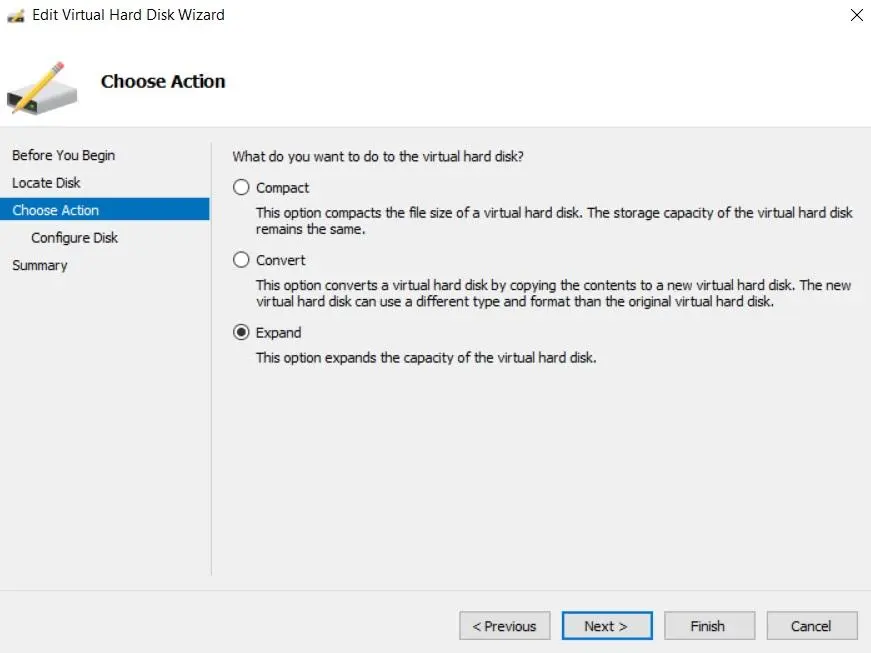
- In the Configure Disk step, you can specify by how much you wish to expand the disk.

- The next step is to look through the changes you are about to implement. Click
Finishto complete the action and close the wizard.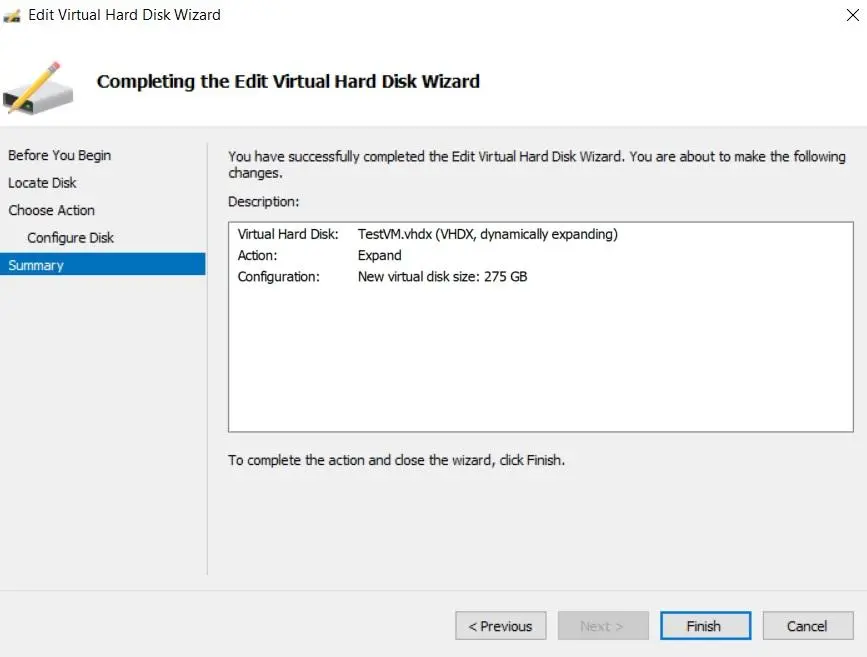
- To verify that you have succeeded in expanding the capacity of the virtual hard disk, right-click the VM, select
Settings,findHard Drive, and press theInspectbutton. This way, you can get access to the virtual hard disk properties and check whether the maximum disk size has actually increased.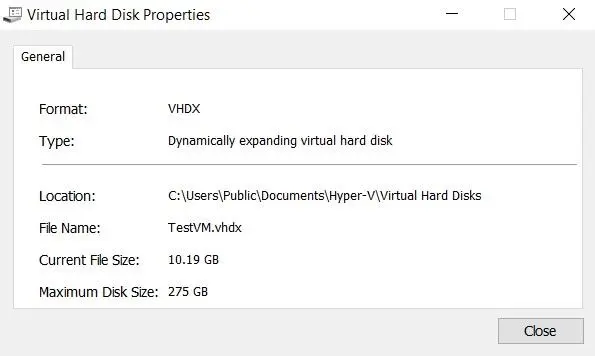
How to expand VHDX that is not connected to a VM
Let’s now look at how to expand the virtual hard disk in Hyper-V Manager if this virtual disk is not attached to any VMs. This method also works for VHDX and VHD virtual disks attached to VMs.
- In Hyper-V Manager, go to
Actionand clickEdit Disk.
- Find the needed VHD or VHDX virtual disk or enter the path manually.
- Choose the action (
Expand/Compact/Convert) similar to what was explained previously.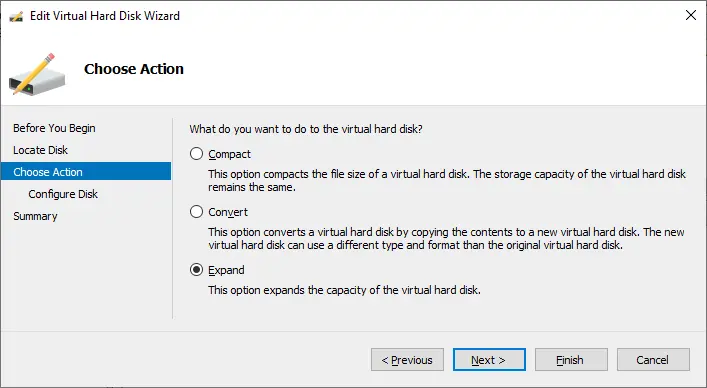
How to expand VHDX in PowerShell
You can perform similar operations to expand VHDX virtual disks for Hyper-V VMs in PowerShell.
- Open
PowerShellas Administrator. - Go to the directory where the needed virtual disk is located, for example:
cd D:Hyper-VVirtual_Hard_DisksMyDisk.vhdx - Use the Resize-VHD cmdlet to resize the virtual disk.
Resize-VHD -Path "VHDX_File_Path" -SizeBytes New_SizeFor example, to resize the VHDX disk to 100 GB, use the command:
Resize-VHD -Path "D:Hyper-VVirtual_Hard_DisksMyDisk.vhdx" -SizeBytes 100GB - To check the size of the virtual disk after resizing the disk, use the command:
Get-VHD -Path "D:Hyper-VVirtual_Hard_DisksMyDisk.vhdx"
With this method, you can also increase the size of virtual disks that are not attached to any VM (disks not owned by a VM).
How to Extend the Volume Inside a VM
The next step is to extend the volume (partition) that resides on the virtual hard disk. This operation is performed in the following way:
- Right-click the VM and select
Connect.Start the virtual machine and log in.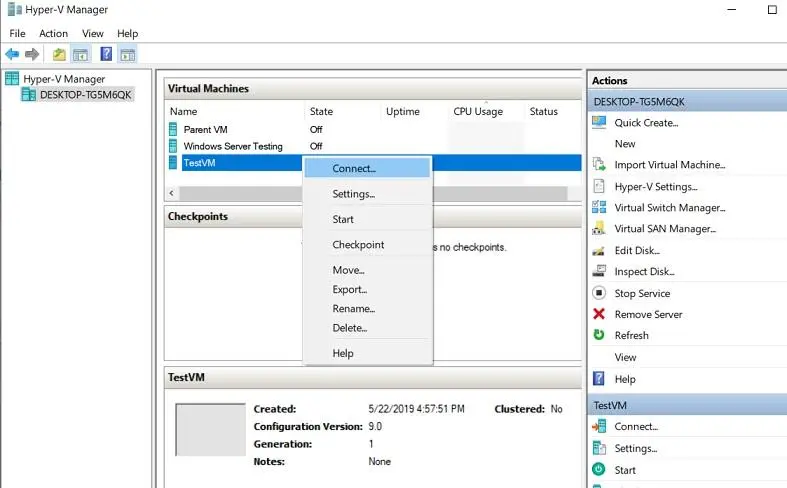
- Enter
diskmgmt.mscin the search bar to open the Disk Management Utility on your VM. Disk Management demonstrates the existing volumes and the amount of unallocated space we would use to extend theC:drive.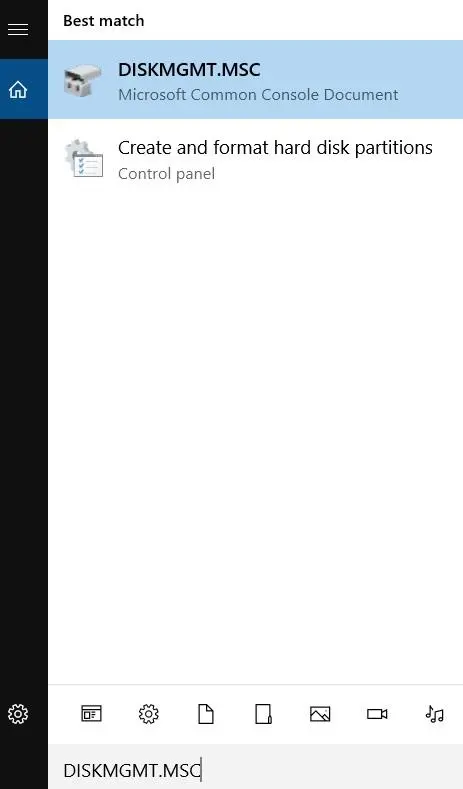
- Right-click the
C:drive and selectExtend Volume.This action launches the Extend Volume wizard.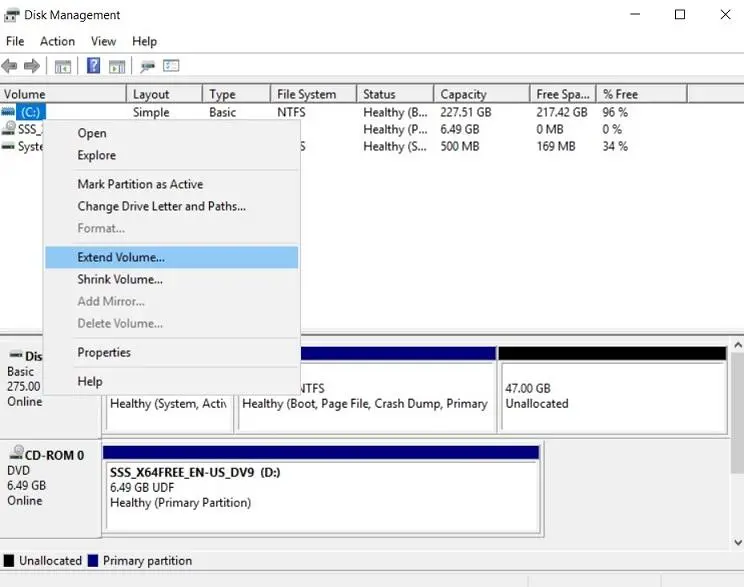
- Select the available amount of space by which you want to extend the volume. Click
Next.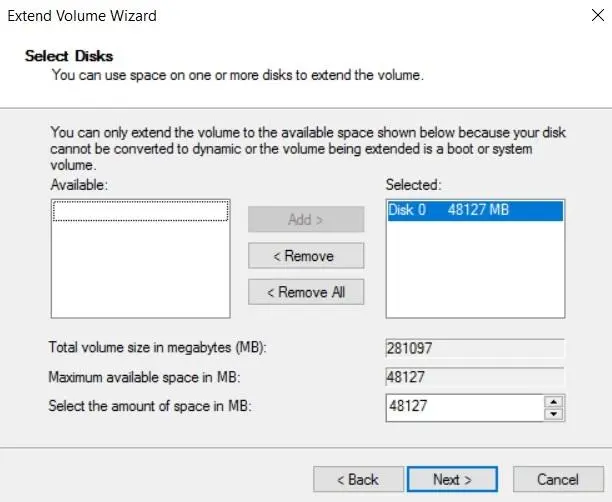
- Check that you have selected the correct settings. Then, click
Finishto close the wizard.
- As you can see from the screenshot below, the size of the
C:drive has successfully increased after the volume was extended.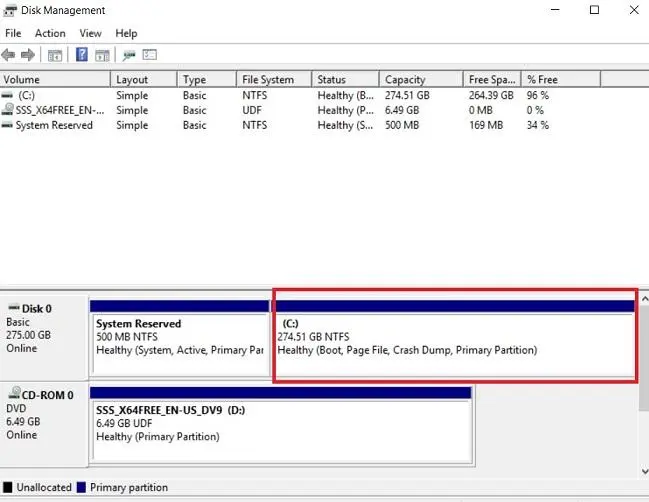
Hyper-V Data Protection in NAKIVO Backup & Replication
NAKIVO Backup & Replication is a reliable and powerful data protection solution for Microsoft Hyper-V environments. Using the NAKIVO solution, you can:
- Create image-based, agentless, incremental and application-aware VM backups.
- Store backup copies onsite, offsite, in the cloud or on tape.
- Protect backup data from ransomware with backup encryption and immutable backups.
- Automate backup and recovery workflows by scheduling them using the intuitive Calendar dashboard and Policy-Based Data Protection.
- Create Hyper-V replicas of source VMs and store them on a target host.
- Create and automate disaster recovery scenarios, including emergency failover, failback or planned migration. Test your recovery workflows without disrupting the production environment.
Alternatives to Increasing Disk Size in Hyper-V
If you cannot increase VM disk size in Hyper-V, you can consider alternatives to address VM storage needs. The main alternatives are adding new storage resources and optimizing existing storage for VMs.
Adding a new virtual disk. You can add a new virtual hard disk to the VM, create a partition table in the guest OS, format the partitions and store VM data on this new disk. This method can be used when new data can be stored separately from an existing virtual hard disk (not in situations when a system disk is full and there is nothing to delete). If you are using a database, you may need to move it to a new larger virtual disk.Optimization of existing virtual disks. You can optimize storage space on existing virtual disks. Delete unneeded logs or unnecessary and temporary files on the virtual disks of your Hyper-V VMs to free up space. This method works when storage is utilized inefficiently.Move data to external storage. If there is not enough space for VM data on a Hyper-V host, you can migrate data, such as infrequently accessed files to external storage servers or NAS (Network Attached Storage). You can move backups and archive data from a Hyper-V host to a NAS.Use dynamic disks. The size of dynamic disks grows as new data is written. Dynamic disks are useful when a VM doesn’t utilize all the allocated space of the virtual disk. It is possible to convert a fixed virtual disk to a dynamic virtual disk with built-in Hyper-V tools.Implement storage tiering. Configure a storage tiering system in your infrastructure. Move frequently used data to fast storage and less frequently used data to slower storage, which is cheaper to use storage rationally.
Conclusion
Increasing a Hyper-V virtual disk for virtual machines is relatively easy and can be done with built-in Hyper-V tools. The second important step is extending a partition inside the guest operating system of the virtual machine. It is highly recommended that you back up your VMs before making any operations with disks. Use NAKIVO Backup & Replication for fast and effective VM backup.


