Effortless NAS Data Recovery: A Complete Guide
For many users, Network attached storage (NAS) quietly stores years of important data in the background, until a single failure puts it all at risk. Whether it is accidental deletion, hardware failure or a ransomware attack, one misstep can wipe out critical files in seconds.
This post explains how to efficiently protect your devices to quickly restore NAS data in any disruptive scenario.

Key Methods to Restore NAS Data
There are a few methods to restore NAS data, some of which are available out of the box. However, you might need to perform basic configuration to use some of these methods.
Restoring from NAS Snapshots
A snapshot is a point-in-time, read-only data copy stored on a NAS system. Instead of duplicating the entire data set, it records the state of the file system and only saves the changes made after that point. Snapshots can be used to roll back data to a previous version, which was fixed when the snapshot was created. You can use them in case of accidental deletion or after writing unwanted file changes. Testing is another use case of snapshots.
When you restore data from a snapshot, you effectively restore blocks, files or folders to their original state. This process is relatively quick.
Snapshots store only data changes, and the storage space overhead is minimal. Depending on the storage device and configuration, they can work at the volume and block levels. When creating multiple snapshots, you can roll back to the needed version of the data set—versioning functionality is present.
You should keep in mind that snapshots are not backups since they are stored on the same device (NAS device in this case) as the original data. If a disk drive failure occurs, you can lose your data if you don’t have backups. Combining snapshots with traditional backups or replication is vital for complete NAS data protection.
Rebuilding a RAID configuration
RAID (Redundant Array of Independent Disks) increases the reliability of NAS as a storage device because there is redundant data in the disk array (except RAID 0). If an array member fails, data is available on another drive. An array rebuild can be done after replacing the failed drive with a healthy one. There are five main RAID types:
- RAID 0 – There is no redundancy (zero redundancy), and the striping principle is used to increase storage performance for read and write operations. Data blocks are split across multiple disks in the array. If any disk fails, it is impossible to read data from another disk. At least two disks are required for RAID 0.
- RAID 1 – Provides mirroring and 100% redundancy. Two disks are required for RAID 1. Both disks contain the same data set because the data is duplicated when changed or written to the array. If one disk fails, the data is available on the second disk, and you can read this data and rebuild the array (RAID 1). Read performance in RAID 1 is better compared to a single drive.
- RAID 10 – Combines RAID 1 and RAID 0 (mirroring and striping). This array can survive if one disk fails or if one disk in each mirrored pair fails. Four drives are required to build RAID 10.
- RAID 5 – Uses striping with parity. It requires at least three disk drives and supports up to 16 disks. The parity data is spread across all devices and is used to rebuild the array. The amount of parity data is equal to one disk drive. RAID 5 can survive in case of one disk failure.
- RAID 6 – Uses striping with double parity. This array type is similar to RAID 5, but parity data is written on two drives and spread across all array members.
Due to their high reliability, RAID 1 and RAID 10 are recommended for storing important data. RAID 5 and RAID 6 have disadvantages in terms of performance and reliability in case of drive failure. Rebuild time is long, and the probability of rebuild failure is high, especially for high-capacity drives. Performance degradation is high during the array rebuild process for RAID 5 and RAID 6.
RAID can be hardware, software and fake:
- Hardware RAID is used with a physical RAID controller, and this implementation is the most reliable but costly. A RAID controller with caching and battery provides higher reliability, but at a higher price.
- Software RAID can be configured with special software on different operating systems and NAS. It is a flexible and budget-friendly option for configuring data redundancy.
- Fake RAID is another implementation of RAID available as a built-in option in the BIOS/UEFI settings of motherboards with SATA connectors. It is similar to software RAID, but issues often occur when installing and booting Linux-based operating systems on fake RAID.
NAS devices have a software RAID implementation in most cases.
Recovering from a backup solution
You can recover data from a backup if a data loss event occurs. You should perform regular backups to ensure that the needed state of data can be recovered. Backups are usually data copies stored in a separate location, unlike snapshots. The state of backup is usually fixed, and multiple recovery points can be saved for multiple time points, unlike RAID. Backups are a reliable method to avoid data loss and recover data even if all storage devices and the entire NAS device are damaged.
Using data recovery software
If data is deleted on a disk drive with no snapshots and backups, the only way to restore NAS data is to use a recovery software. Mirroring RAID does not help because all unwanted changes and file deletions are replicated on the mirrored drive in the disk array. However, RAID can help keep data if one of the hard disk drives fails. Data recovery software requires manual effort and time. Not all data can be restored with this method because parts of files can be erased by newer files and the disk partitions with the deleted files are fragmented.
If a disk drive failure occurs at the hardware level and you don’t have RAID and/or backups, the only way to try to recover data is by contacting a data recovery company. These companies use disk donors to reassemble disk drives, fix firmware issues and retrieve data, when possible. Special data recovery suites are used for this purpose. Keep in mind that this data recovery method is costly and some data might be unrecoverable.
Best Practices for Preventing NAS Data Loss
To prevent data loss, consider the NAS data protection best practices below. These practices include hardware and software configurations for optimal results.
Implementing the 3-2-1 backup strategy
Follow the 3-2-1 backup rule: Have at least three copies of data, two of which are stored on different media and one copy is stored offsite. This approach allows you to eliminate a single point of failure and recover data in different failure scenarios. If the main (original) data copy is corrupted (some files are deleted or altered), you can recover data from another medium. If both the original and backup media at the main site are damaged after a disaster, you can recover data from the offsite storage.
Create backups regularly and schedule them to run periodically. Implement the Grandfather-Father-Son retention policy to ensure you can recover data from older recovery points without overusing backup storage space. The GFS retention policy presumes keeping a higher number of recent recovery points and a lower number of older recovery points.
Enabling RAID for data protection
NAS devices allow you to configure software RAID using arrays with data redundancy, especially disk mirroring. Configure RAID 1 or RAID 10 on your NAS device to reduce the risk of data loss if a disk drive fails. It is not recommended that you use RAID 5 and RAID 6.
It is possible to face some issues or array failure when rebuilding RAID 5 after one disk failure (in the most critical situation when you cannot afford to lose another disk in RAID 5)..
The Unrecoverable Read Error (URE) parameter describes the probability of failure when reading the sector of a drive that cannot be fixed.
A storage controller periodically performs service actions by trying to identify whether blocks are dead or not on the disks (this process is also called scrubbing). When rebuilding RAID 5 or RAID 6, all disks with parity data are read simultaneously to rebuild the array after one disk failure. The probability that a storage controller did not check at least one disk for bad blocks before the disk failure and rebuild start is high. Bad blocks that were not identified on another drive can cause RAID 5 failure and data loss during rebuild
It is highly recommended that you use RAID 1 or RAID 10 for the highest probability and reliability to avoid NAS data loss and data loss on other servers.
Using automated monitoring and alerts
Monitor disk status, used space, drive temperature and other necessary parameters. Configure automated alerts that are sent when the specific trigger activates. For example, an alert can be sent when free space on a disk/volume is less than 100 GB or 5%. Another example is a temperature higher than 50°C.
Automated alerts notify administrators in time before a major issue occurs. Early reaction allows administrators to fix possible upcoming issues and avoid data loss and downtime. Make sure you implement the best practices for infrastructure monitoring.
Protect and Restore NAS Data Effortlessly with NAKIVO
NAKIVO Backup & Replication is a data protection solution that supports multiple physical and virtual platforms, including file shares on NAS devices. With the NAKIVO solution, you can backup NAS shares, implement the 3-2-1 backup strategy and utilize a wide range of data protection features.
- Multiple backup locations. Backup to local storage, SMB/NFS file shares, tape and cloud storage (Azure Blob storage, AWS S3, AWS S3-compatible object storage, etc.). You can also back up data from one NAS data storage to another.
- Incremental backups. Reduce backup storage space consumption by using incremental backups. Incremental with periodic full backup chains increase reliability.
- Flexible retention settings. You can configure a complex retention policy and implement the GFS backup policy.
- Immutable backups. Enable backup immutability to protect NAS backups from unwanted changes and deletions caused by ransomware.
- Encryption. Encrypt NAS backup data during transfer over the network and at rest. Encrypted backups are highly protected against unauthorized access and increase overall security.
- Fast and convenient recovery. You can easily restore NAS data, either the entire data set or specific files and objects.
Below, we explain how to perform NAS data recovery to restore files and folders.
NAS Data Restoration with NAKIVO
Perform the following actions to restore NAS data with the NAKIVO solution.
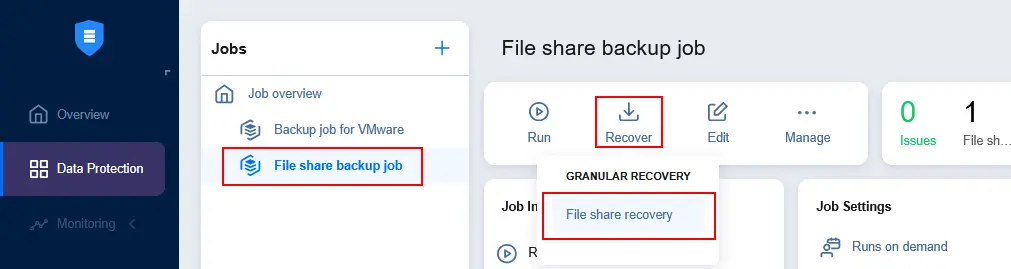
- Go to Data Protection, select a backup job, such as a file share backup job, click Recover and hit File share recovery.
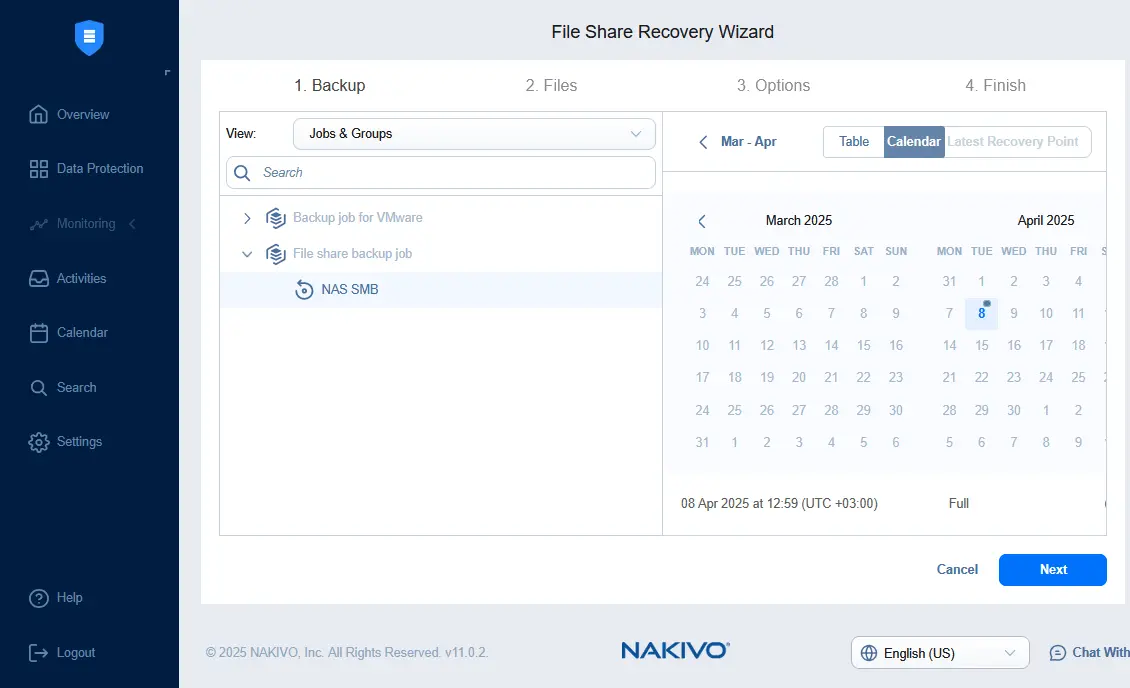
- Select a backup job if not selected. Then, select a recovery point in the Calendar or Table view. You can choose the latest recovery point by clicking the appropriate button. Click Next at each step to continue.
- Select files and folders to recover from the list of items discovered in the chosen backup. Click the appropriate checkboxes to select or deselect files and folders.
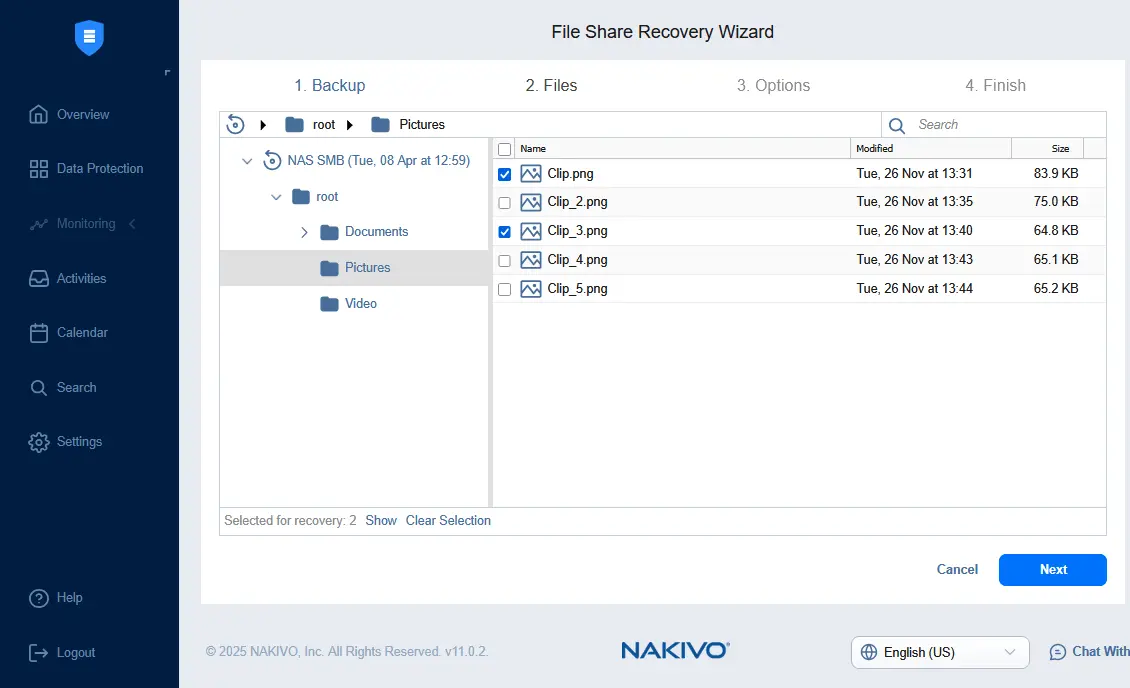
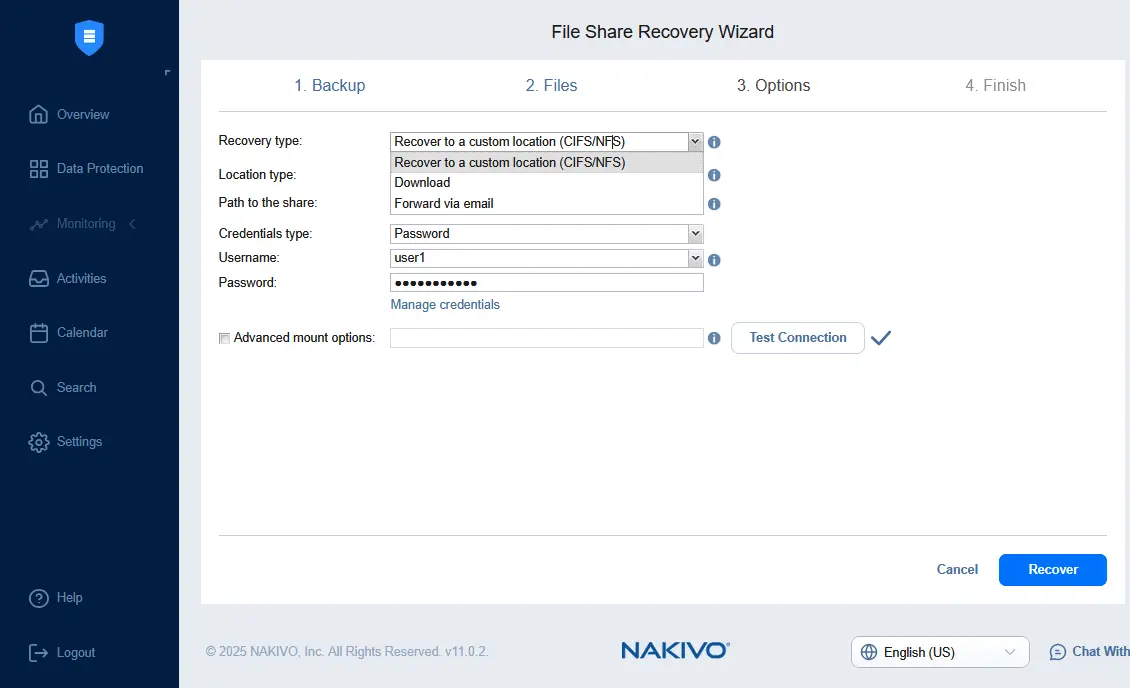
- Select a recovery type:
- Recover to a custom location. Data recovery to an SMB or NFS file share. You must specify the path and credentials.
- Download. Download the selected files and save them to a computer.
- Forward via email. Sending selected files via email.
Click Recover to proceed and finish the NAS data recovery process.
Conclusion
NAS data backup is a vital element of a broader NAS data protection strategy that reduces the risk of data loss in case of software errors, hardware failures, natural disasters and ransomware attacks. It is highly recommended that you configure RAID 1 or RAID 10 to enable disk mirroring. Use NAKIVO Backup & Replication to back up NAS file shares to different locations and recover all data or specific files when needed.