What Is Hyper-V Manager and How Does It Work?
Hyper-V is a virtualization platform used to run virtual machines (VMs) in Windows-based environments, and it is available starting from Windows Server 2008 and Windows 7. A user interface is required to manage virtual machines residing on physical machines where Hyper-V is installed. Hyper-V Manager has an intuitive user interface and offers powerful functionality, which makes it an ideal option for VM management in small and medium-sized enterprises.

What Is Hyper-V Manager?
Hyper-V Manager is an administration tool, allowing you to manage Hyper-V hosts and virtual machines (VMs) both locally and remotely. Hyper-V Manager provides a graphical user interface (GUI) for centralized management of Hyper-V virtual environments. Basically, Hyper-V Manager is Microsoft’s Management Console snap-in (.msc file), which is used by Microsoft Windows to simplify the configuration and administration of Hyper-V systems.
Using Hyper-V Manager, you can create, configure and delete VMs, VM checkpoints, virtual disks, virtual switches, and network adapters, as well as modify various Hyper-V settings. To see a full list of actions and operations available in Hyper-V Manager, you can check our blog post on how to install and configure Hyper-V Manager.
Hyper-V Manager Requirements and Capabilities
Microsoft Hyper-V Manager was first introduced with Windows Server 2008. Currently, it can be enabled on any Windows operating system (OS), including Windows Server 2008 and later which has the Hyper-V role running on it. Moreover, you can open Hyper-V Manager in Windows 7 where it functions as one of the Remote Server Administration Tools (RSAT). Note that RSAT needs to be installed in order to use Hyper-V Tools.
Hyper-V Manager is free of charge — you only have to pay when purchasing a fully licensed copy of Windows OS. It can be enabled on any Windows OS, including Windows Server 2008 and later versions that have the Hyper-V role running on them. When you install the Hyper-V role on a Windows machine, Hyper-V Manager is enabled by default.
With Hyper-V Manager, you can remotely manage Windows Server Core or Hyper-V Server, which don’t have a GUI. When you manage a Hyper-V host remotely, sometimes the versions of Hyper-V Manager and the Hyper-V host do not match and are not compatible. In such cases, you can only use the feature set available for the Hyper-V host version that you’re managing. When it comes to Hyper-V remote management, it is generally recommended that you manage a Hyper-V host with the same OS or at least with one that runs a similar Windows Server version.
Note, however, that in Windows Server 2016 / 2019 / 2022 and Windows 10 / 11, you can manage computers running earlier Windows Server versions (Windows Server 2012, Windows 8, Windows Server 2012 R2 and Windows 8.1). When you connect to another Windows Server 2016 or Windows 10 host remotely, you can also provide an alternate set of credentials in Hyper-V Manager and save them for later to simplify logging in.
How Does Hyper-V Manager Work?
Hyper-V Manager interacts with the Hyper-V hypervisor, Virtual Machine Management Service (VMMS), Windows Management Instrumentation (WMI) and other system components to perform virtualization-related tasks. When you create a virtual machine, Hyper-V Manager sends a request to VMMS to create a new VM. VMMS allocates virtual CPUs (vCPUs), RAM and virtual storage for the VM.
A Virtual Machine Worker Process (VMWP.exe) is created to manage the VM. When you start a VM, Hyper-V Manager sends a command to VMMS, which interacts with the hypervisor.
Hyper-V Manager is also used to:
- Configure virtual network adapters and select virtual switches
- Manage VM snapshots (create, delete and go to a specific snapshot)
Hyper-V Manager can be controlled in PowerShell in addition to the graphical user interface and supports Live Migration to migrate virtual machines between hosts without downtime. It also supports managing multiple hosts. Windows Management Instrumentation and Hyper-V APIs allow automation and integration with enterprise environments.
NOTE: To manage Hyper-V clusters and cluster nodes, you need to use Failover Cluster Manager.
Hyper-V Manager vs. System Center Virtual Machine Manager: Which One to Choose?
When describing how Hyper-V Manager works, it is also important to mention the System Center Virtual Machine Manager (SCVMM), which is another popular administrative tool used for managing Hyper-V environments. The table below shows how Hyper-V Manager differs from SCVMM and what benefits each of them offer.
Hyper-V Manager |
System Center Virtual Machine Manager |
Hyper-V Manager is a part of Windows OS |
SCVMM is a stand-alone product |
Hyper-V Manager can be used for free – no licensing is required |
SCVMM must be purchased — core-based licensing |
| Suitable for small and medium-sized enterprises | Suitable for large enterprises |
| Provides a limited feature set | Has a rich feature set and more advanced functionality |
| Stable performance | May experience fluctuations in performance |
| Easy-to-use and has an intuitive interface | Difficult to install and use due to complex functionality |
Tracks changes within seconds due to the use of native WMI event tracing |
Takes a lot of time to track changes because it relies on the agent component to gather the required information from hosts and VMs |
| When you delete VMs, virtual hard disks are not deleted automatically | When you delete VMs, all of the associated components are deleted |
| Allows you to manage and monitor Hyper-V hosts only | Allows you to manage and monitor not only Hyper-V hosts but also Hyper-V clusters, VMware ESXi hosts and Citrix XenServer hosts |
Hyper-V Manager allows you to manage a limited number of infrastructure components, namely Hyper-V hosts and VMs, in addition to virtual hard disks, virtual switches and VM checkpoints |
SCVMM allows you to manage a large number of infrastructure components including hosts, VMs, and storage spaces, and hosts features like Hyper-V Network Virtualization, Live Migration, Hot Add/Hot Remove, etc. |
| Automated VM creation is not possible | Automated VM creation is enabled with the help of VM templates |
As you can see, Hyper-V Manager has fewer features than SCVMM, but it is lightweight, free (only host Windows OS is licensed) and available in the latest Windows versions without the need for complex configurations for installation.
How to Open Hyper-V Manager
You can open Hyper-V Manager in multiple ways.
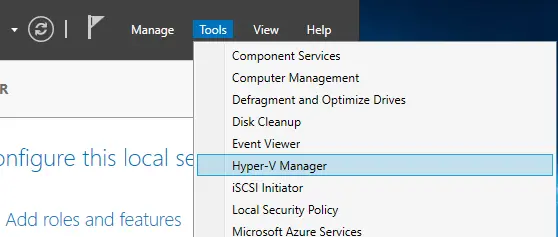
In Windows Server 2016/2019/2022: Open Server Manager and click Tools > Hyper-V Manager. You can also go to Start > Administrative Tools and click Hyper-V Manager.
In Windows 10/11: Open the Start menu, type Hyper-V Manager and click the Hyper-V Manager item that appears.
To launch Hyper-V Manager from the command line, run the command:
virtmgmt.msc
If you don’t see the option to open Hyper-V Manager, it could mean that Hyper-V Manager is not installed.
Below, we discuss how to enable Hyper-V Manager. This process can be done in one of the following ways:
- Enabling Windows Features (for Windows 10/11)
- Running PowerShell
cmdlets - Using
Server Manager(forWindows Server 2016/2019/2022)
Let’s look at each approach in more detail.
Enabling Windows Features
This approach is most suitable for any client Windows OS that includes a Hyper-V component (for example, Windows 10). In this case, we are going to demonstrate how to open Hyper-V Manager on Windows 10. For this purpose, follow the steps below:
- Type
Turn Windows features on or offin the search bar below and pressEnter. - Expand the
Hyper-Vline. - Check the
Hyper-V Management Toolsbox to installHyper-V Manager. - Click
OKto start the installation operation.
- Click
Restart Nowto implement all required changes or clickDon’t Restartto postpone the restart of your computer. After restart, you can openHyper-V Manager.
Running PowerShell cmdlets
Running PowerShell commands allows you to enable Hyper-V Manager even more quickly and easily. To enable Hyper-V Manager on Windows 10, run PowerShell as Administrator and run the following command:
Enable-WindowsOptionalFeature -Online -FeatureName Microsoft-Hyper-V -All
The installation should start automatically, and you should see the following screen.

After the installation operation is complete, reboot the system to adopt all changes.
If you want to open Hyper-V Manager on Windows Server 2016/2019/2022, run the following PowerShell command as Administrator:
Add-WindowsFeature rsat-Hyper-V-Tools
If the installation operation has been successfully completed, you should see the following:

After running the command successfully and the host reboots, you can open Hyper-V Manager.
Using Server Manager
If you want to install Hyper-V Manager, you can also use Server Manager, which is an administration console available in Windows Server. For this purpose, take the following steps:
- Open
Server Manager. - Click
Manageand then selectAdd Roles and Features. - Click
Nextuntil you reachServer Roles. Ensure that Hyper-V is installed.
- Go to the next step to configure
Features. - Expand
Remote Server Administration Tools. - Expand
Role Administration Tools. - Check the
Hyper-V Management Tools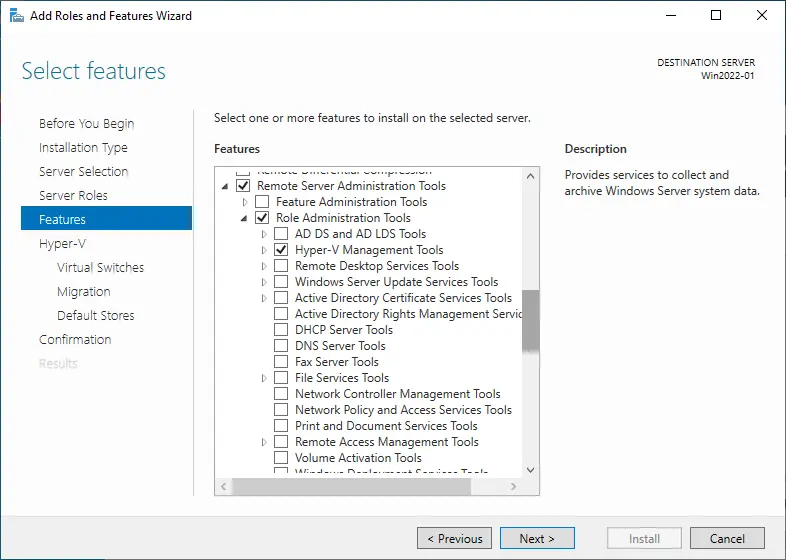
- Click
Next. Configure the required Hyper-V options suggested by the wizard until you finish the installation/configuration process. If you are installingHyper-V Managerfor the first time, you need to clickInstalland confirm the changes at the final (confirmation) step. - Finally, the wizard suggests rebooting the host to apply changes. After enabling the needed Hyper-V features and rebooting the Hyper-V host, you can open
Hyper-V Manager.
Using Hyper-V Manager to Create, Configure and Manage Virtual Machines and Hosts
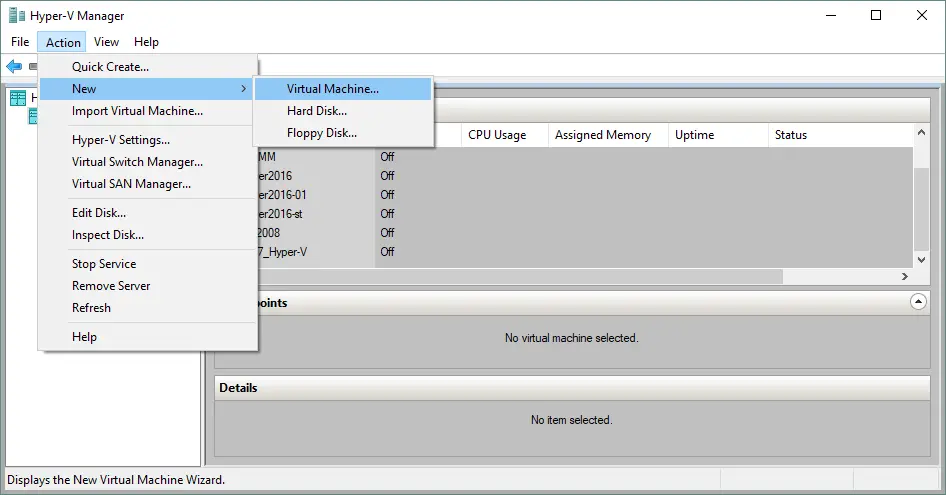
After you install Hyper-V and open Hyper-V Manager, you can create new virtual machines and manage them. In the screenshot below, you can see that to create a new VM, we should click Action > New > Virtual Machine.
You can edit Hyper-V settings in Action > Hyper-V Settings. The menu opens, and you can choose to import a virtual machine and edit virtual switch settings in the Hyper-V Virtual Switch Manager.
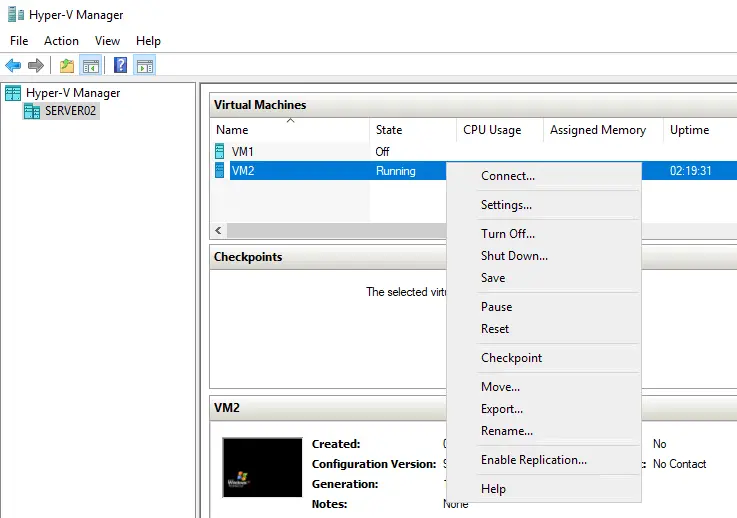
When you have existing VMs, you can start them and connect to a VM virtual monitor with the VMConnect tool. This tool allows you to use your mouse and keyboard to manage a guest operating system of a VM. To connect to a VM, right-click the VM and hit Connect in the context menu. There is also an enhanced session mode for the VMConnect tool.
Other available options such as creating a VM checkpoint, VM export and Hyper-V VM replication are shown in the screenshot below.
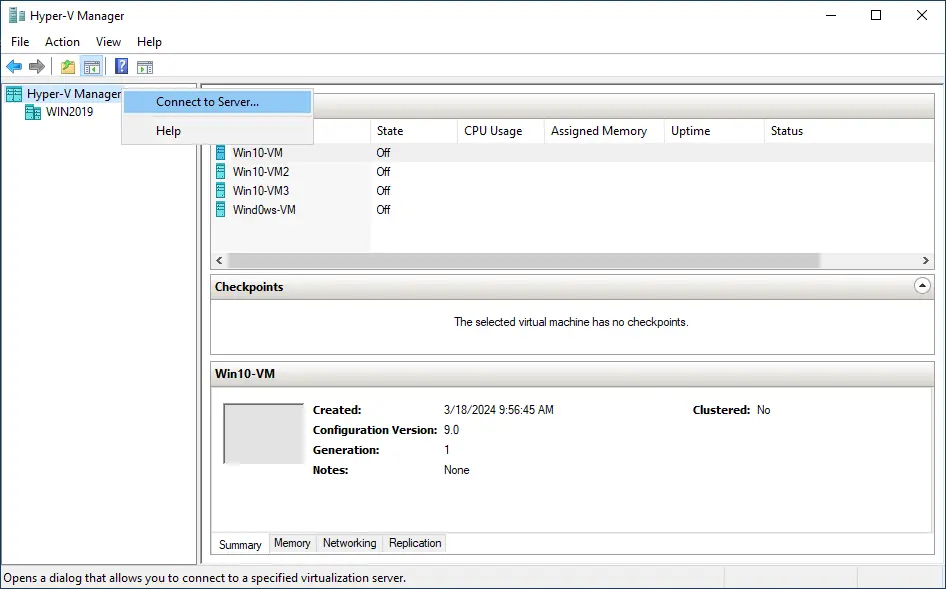
To connect to a remote Hyper-V host, right-click Hyper-V Manager in the left pane and hit Connect to Server.
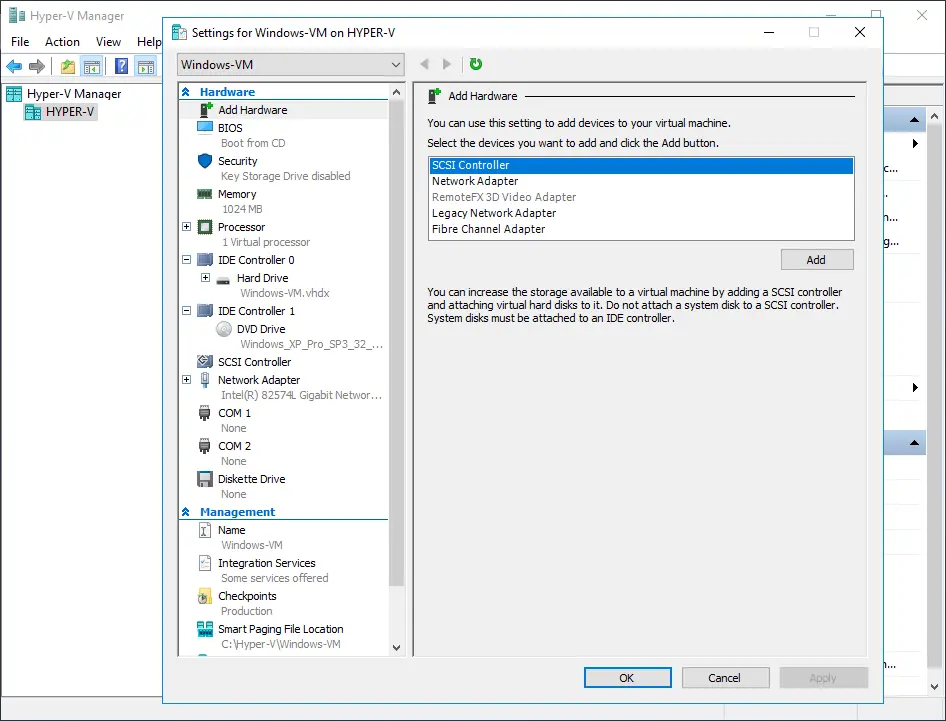
If you right-click a VM and click Settings, you can see the Settings window where you can configure virtual devices for the VM.
If you go to Options > Hyper-V Settings, you can see the Hyper-V Settings window.

Protect your Virtual Environment with NAKIVO Backup & Replication
The main goal of NAKIVO Backup & Replication software is to ensure that your virtual environment is constantly protected and can be rapidly recovered in case of a system crash or disaster. The product provides multiple data protection options and various features that can help organizations achieve a high level of preparedness for disaster recovery (DR) and ensure 24×7 delivery of business services.
NAKIVO Backup & Replication allows you to create image-based, application-aware and incremental VM backups to protect Microsoft Hyper-V, VMware vSphere, Proxmox VE and Amazon EC2 environments. Those VM backups can be copied and then sent offsite or to a cloud. Thus, you can rest assured that even if the original VM backups get damaged or deleted, you can easily restore critical data in a few clicks.
You can also create and maintain replicas of source Hyper-V VMs. These replicas are stored in a powered-off state in a remote location and can be used for failover during a DR event.
Another exclusive functionality of NAKIVO Backup & Replication is Site Recovery, which allows you to create site recovery workflows by combining various actions and conditions into an automated algorithm. You can create multiple site recovery workflows, which address various DR scenarios (power outage, ransomware attack, failed update, etc.) and serve specific purposes (disaster recovery, disaster avoidance, planned migration, etc.). Therefore, you can orchestrate the entire DR process from start to finish as well as verify the efficiency of site recovery jobs by performing non-disruptive recovery testing at any time.
Conclusion
Hyper-V Manager is an affordable tool with a graphical user interface that allows you to manage a Hyper-V virtual environment with ease. If Hyper-V Manager is not available, you can install Hyper-V with the Hyper-V Manager feature. You can configure virtual hardware, take VM snapshots, replicate VMs and perform a large number of other administrative actions. Don’t forget to protect your Hyper-V environment and data using NAKIVO Backup & Replication to effectively back up, replicate and recover your virtual machines.


