How to Migrate VMs from Hyper-V to Proxmox: A Step-by-Step Guide
Proxmox VE is a reliable virtual environment for organizations of all sizes, and moving virtual machines from another virtualization solution to Proxmox VE can be challenging. In the latest versions, Proxmox added a wizard to partly automate migrations from VMware ESXi to Proxmox VE. However, migration from Hyper-V to Proxmox requires manual steps. This blog post shows the detailed steps for migrating VMs from Hyper-V to Proxmox and how to configure the migration.

Preparing the Microsoft Hyper-V VM for Migration
To prepare your environment for a migration to Proxmox VE, you should first install VirtIO drivers on the guest OS of the Hyper-V VM that you are planning to migrate. VirtIO drivers are a set of drivers for virtual devices of Proxmox VMs that improve performance and user experience, similar to VMware Tools. Installing VirtIO drivers before starting the migration process is needed to avoid issues after launching the VM on a Proxmox host.
To install VirtIO drivers:
- Download the latest stable VirtIO drivers or the most recent ISO build from the official resource. This ISO image is also needed to install QEMU Guest Agent.
- Insert the downloaded ISO image with VirtIO drivers to the virtual CD/DVD drive of the source Hyper-V VM. The name of our source VM in this example is Win10test (Windows 10 is the guest operating system). This is a Generation2 VM that has one 20-GB VHDX virtual disk (dynamic, not pre-allocated – the analog of a thin provisioned disk) with an operating system (OS) and data.
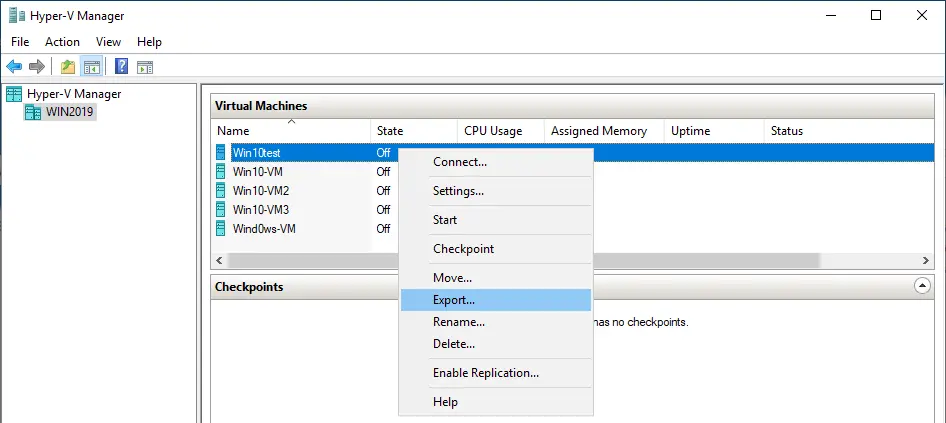
- Open Hyper-V Manager. Right-click the VM that you want to migrate from Hyper-V to Proxmox VE, and in the context menu, click Settings.

- In the left pane of the VM settings window, click the DVD Drive option. In the right pane, click Image file, hit Browse and select the VirtIO drivers image file. In this example, the file name is virtio-win-0.1.240.iso
Click OK to save settings.

- Start the source VM and connect to the VM using the native Hyper-V VMConnect tool. Right-click the VM and click Connect.
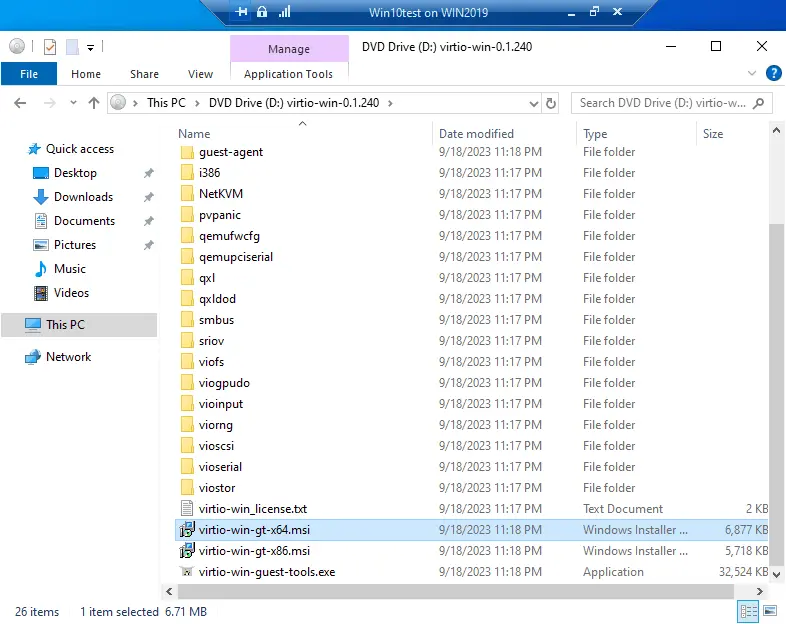
- Open Windows Explorer (This PC) in the guest OS and go to the DVD drive to which the ISO image was inserted. Find the VirtIO drivers installation file for Windows in the root folder of the DVD image. Select the installer file in the .msi format depending on your Windows version (virtio-win-gt-x64.msi or virtio-win-gt-x86.msi).
- Run the executable file for your Windows version (64-bit or 32-bit) and follow the installation wizard to install VirtIO drivers.
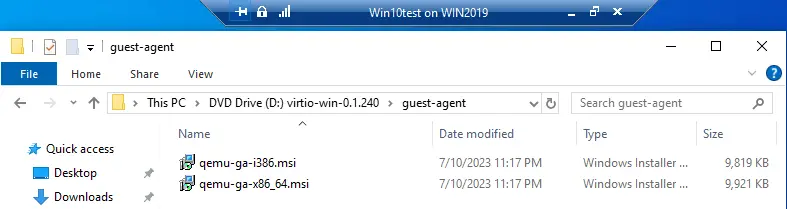
- Install QEMU Guest Agent. The installer is located in the ISO image with VirtIO drivers in the guest-agent directory. Run the installer file for your Windows version (we run qemu-ga-x84_64.msi because we use Windows 10 64-bit as the guest OS).
- Verify that the guest agent is running in a guest OS of the source Hyper-V VM using the following PowerShell command:
Get-Service QEMU-GA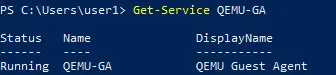
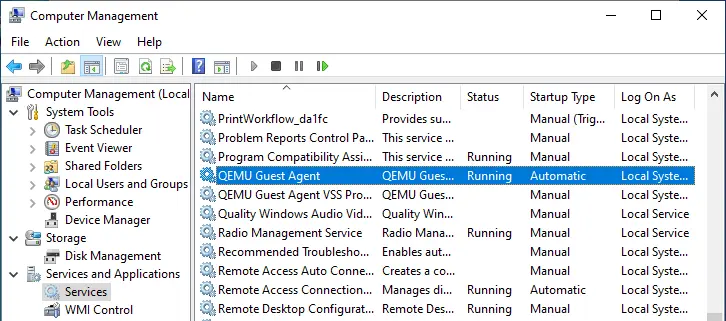
You can also check the QEMU Guest Agent service status in the Windows graphical user interface in the services.msc snap-in. Right-click the My Computer or This PC icon, click Manage and, in the Computer Management window, go to Services and Applications > Services. Check the QEMU Guest Agent service – this service must be running with the automatic startup type.
- Shut down the source VM on the Hyper-V host.
- If the VM has checkpoints (snapshots), remove them. The VM in our example doesn’t have checkpoints.
Exporting the Hyper-V Virtual Machine
To export the source Hyper-V VM that you want to migrate from Hyper-V to Proxmox VE, right-click the VM and hit Export in the context menu.
Specify the location where you want to save the files of the exported VM and click Export.
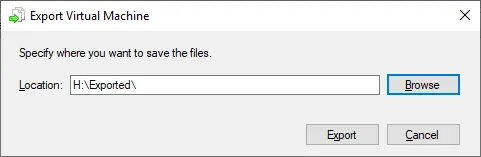
The files are exported to H:\Exported on the Hyper-V host in this example.
Transferring the VM Files to the Proxmox Server
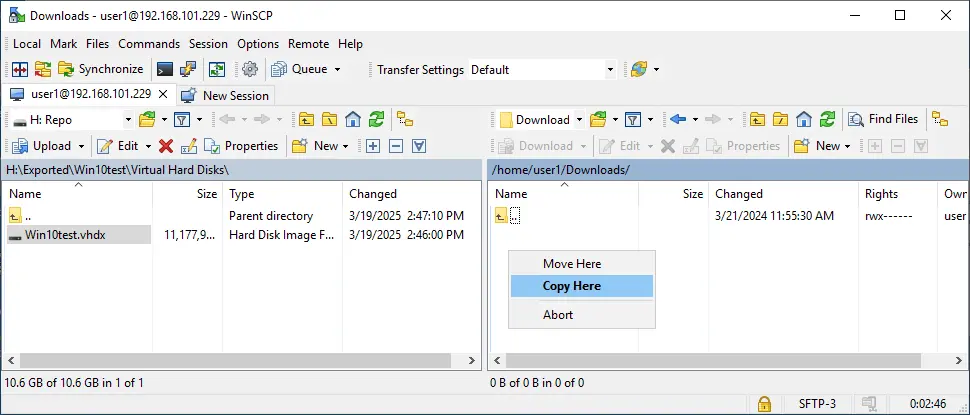
Copy the virtual disks of the exported Hyper-V VM (VHD or VHDX) to the Proxmox host. The virtual disks are located in the Virtual Hard Disks subdirectory of the exported VM, in the directory specified for the VM export. Using WinSCP, the SCP and SFTP client working via SSH, is convenient to copy files from a Windows to a Linux machine, including a Proxmox host.
- Create a new session in WinSCP and log in to your Proxmox host.
- Copy the VHD or VHDX virtual disks of the exported Hyper-V VM to the Proxmox host. You can just drag & drop files in WinSCP.
- Check the copied virtual disk(s) of the Hyper-V VM on the Proxmox host to ensure that the file is consistent and not corrupted. Open the console (terminal) on the Proxmox host and run this command:
qemu-img check -r all /home/user1/Downloads/Win10test.vhdx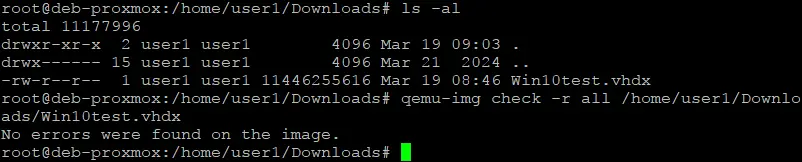
Creating a New Virtual Machine in Proxmox
Create a new VM in Proxmox. You can do it using the Proxmox VE web interface.
- Select the Proxmox host in the Datacenter, right-click it and hit Create VM in the context menu. We will configure this new VM to use the imported virtual disk(s) for the migration process.

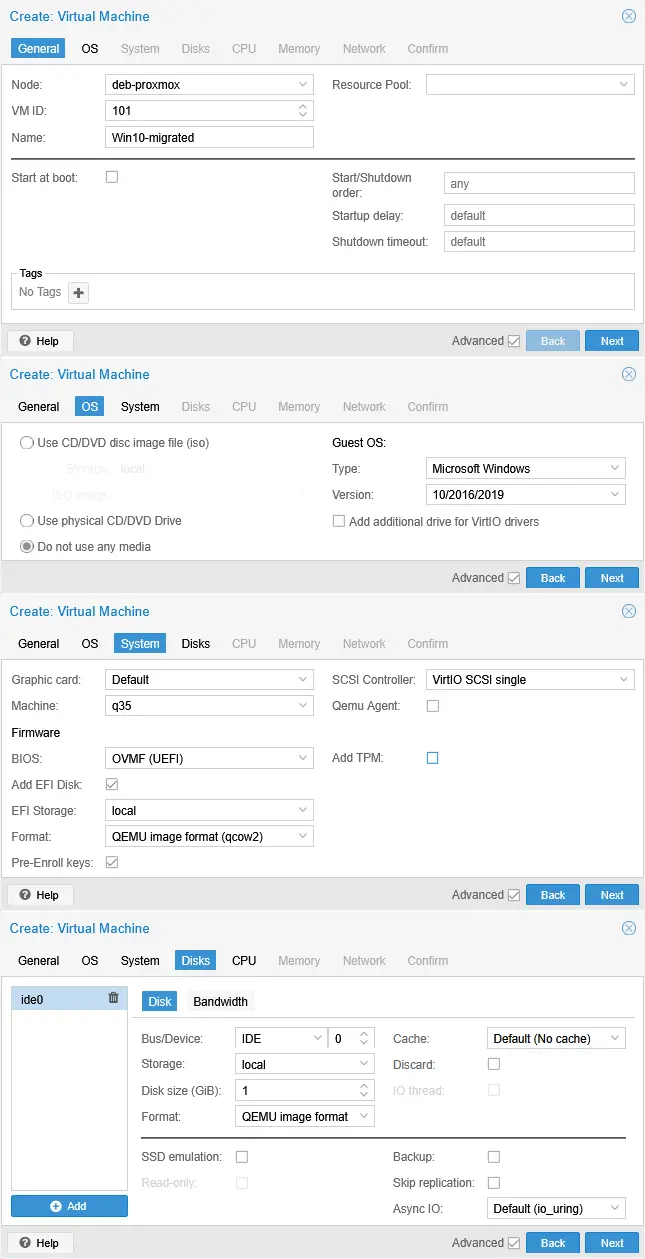
- The Proxmox VM creation wizard opens.
- General. Enter the VM name (for example Win10-migrated). You can leave the default free VM ID value. In our case, the VM ID is 101.
- OS. Select Do not use any media. Guest OS type: Microsoft Windows; version: 10/2016/2019.
- System. In the Firmware section, select OVMF (UEFI) BIOS. In this case, you need to add an EFI disk based on the device q35 and without a virtual TPM (as on the source VM). Leave the VirtIO SCSI single as the SCSI controller, as suggested by the wizard. We selected UEFI because we are migrating a Gen-2 Hyper-V VM.
- Disks. Leave the default parameters, but set the virtual disk size to 1 GB (this is a temporary virtual disk used to create a new VM; we will delete it later).
- CPU, Memory, Network: Select any desired values. You can set the same CPU and memory as the source VM.
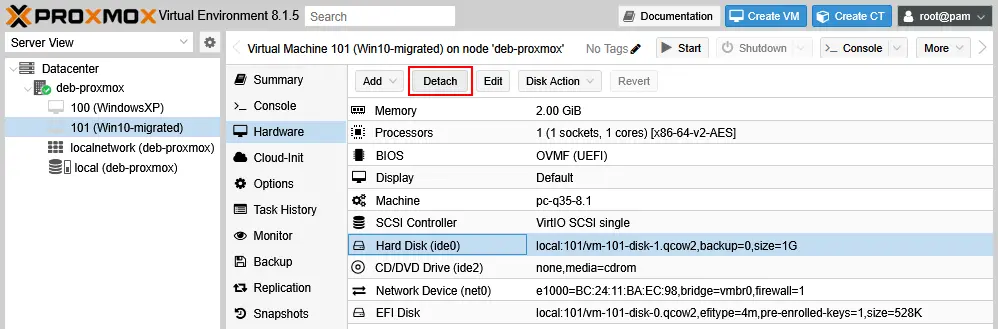
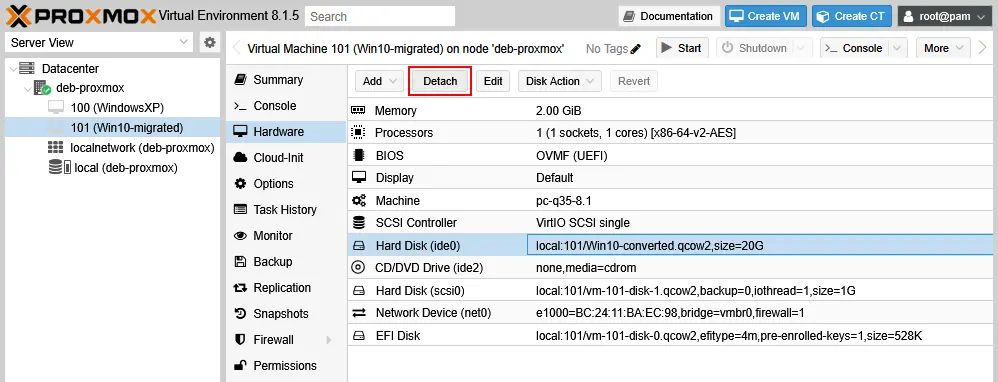
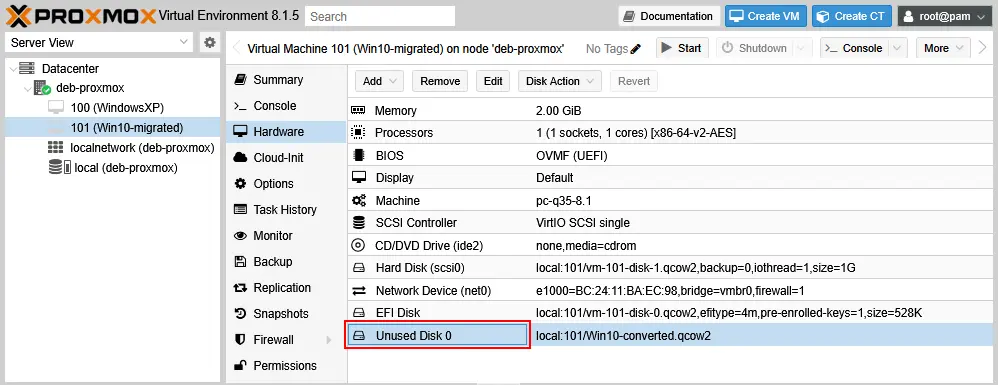
- Once the new Proxmox VM is created, go to the VM Hardware settings, select the temporary 1-GB virtual hard disk that was recently created, Hard Disk (ide0) in this case, and click Detach. After detaching the virtual disk, the disk name is changed to Unused Disk 0 in our case.
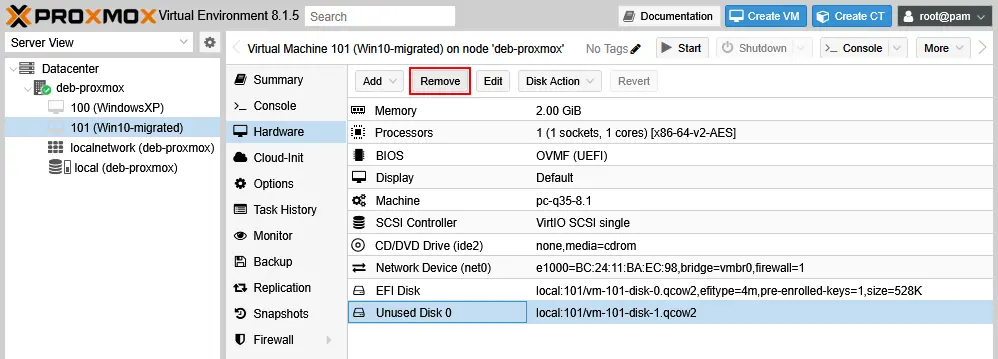
- Delete the temporary 1-GB virtual disk. Select the Unused Disk 0 and click Remove.
Converting the VHDX File(s) to QCOW2
Convert the Hyper-V virtual disk (VHD or VHDX) on the Proxmox host to the native Proxmox (KVM) format to use more features (thin provisioning). Open the console (terminal) on the Proxmox host and execute the following command with root privileges:
qemu-img convert -f vhdx -O qcow2 -o preallocation=off /var/lib/vz/dump/disk.vhdx /var/lib/vz/images/VMID/disk.qcow2
Where:
-f vhdx is used to specify the input format (VHDX).
-O qcow2 is used to specify the output format (QCOW2).
-o preallocation=off – enabling thin provisioning for the destination virtual disk file (the disk only occupies space based on actual data).
/var/lib/vz/dump/disk.vhdx is the source VHDX file.
/var/lib/vz/images/VMID/disk.qcow2 is the target location (replace VMID with your actual VM ID in Proxmox).
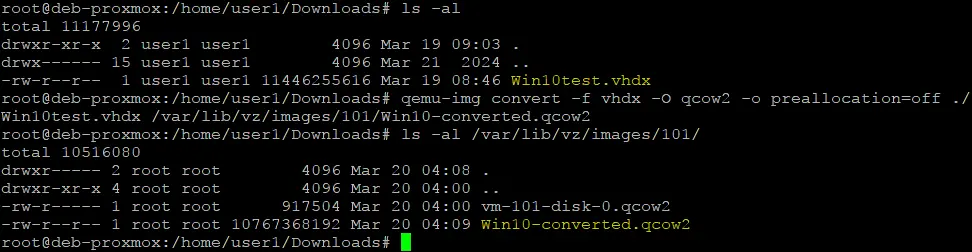
In our example, the exact command to convert Hyper-V to Proxmox virtual disk format (VHDX to QCOW2) is the following:
qemu-img convert -f vhdx -O qcow2 -o preallocation=off ./Win10test.vhdx /var/lib/vz/images/101/Win10-converted.qcow2
Wait until the virtual disk is converted. As a result, a new file is created. We have converted Win10test.vhdx to Win10-converted.qcow2
Rescan Proxmox storage to recognize new virtual disks:
qm rescan

After rescanning virtual disks, the converted virtual disk is displayed in the Proxmox web interface.
Attaching the virtual disks to the Proxmox VM
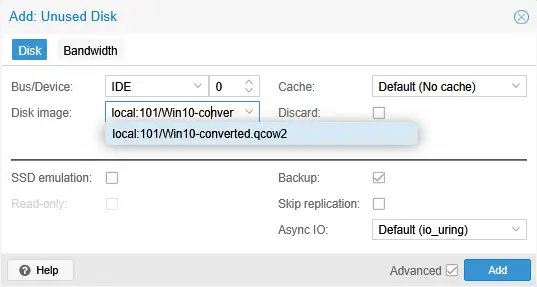
Add the converted disk with the Unused Disk status to the previously created virtual machine (we add Win10-converted.qcow2 to the Win10-migrated VM in our case). You can do this in the Proxmox web interface.
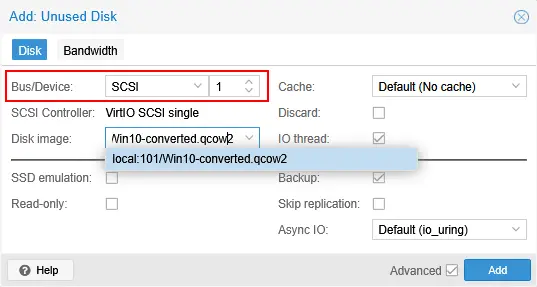
- Double-click the unused disk (Unused Disk 0) to attach it to the VM.

- Select IDE (or SATA). If you attach the imported and converted virtual disk to a SCSI controller, BSOD (blue screen of death in Windows) will be displayed during the guest OS boot for this VM. After booting from the IDE or SATA disk, Windows installs drivers for the virtual hardware of the Proxmox VM. Then, we can reconfigure the virtual disk to use the SCSI disk controller.
- Add the new temporary 1-GB SCSI disk that was recently created. Creating a temporary disk attached to a SCSI controller is required to install the required drivers to work with SCSI controllers. Select the VM created during the Hyper-V to Proxmox migration (Win10-migrated), go to the Hardware section, click Add and hit Hard Disk.
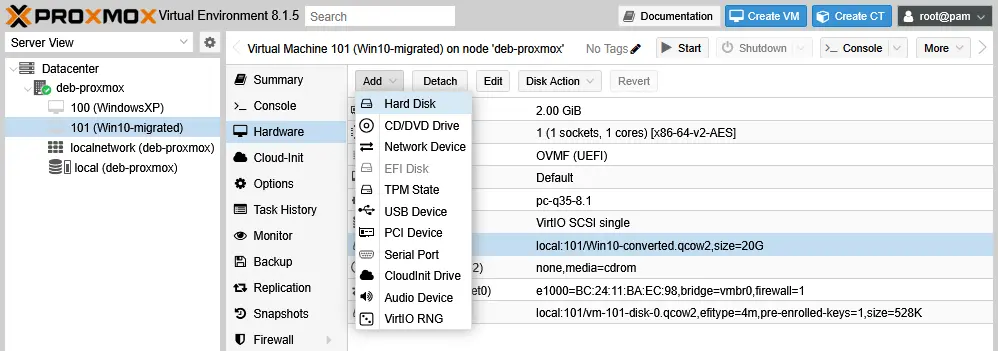
- Select the virtual disk parameters as previously explained, but with the SCSI bus/device this time.

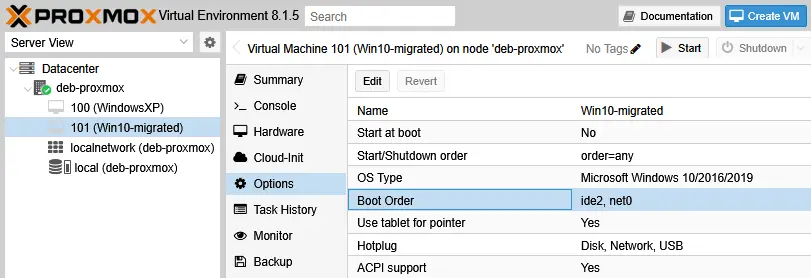
- Edit the boot order. Select your VM, go to Options > Boot order. Double-click Boot Order or select Boot Order and click Edit.
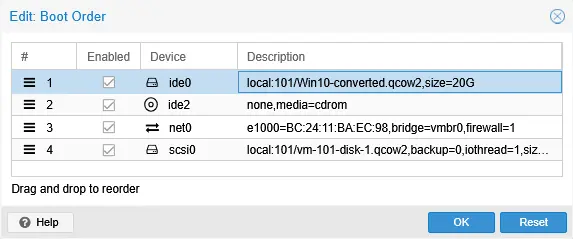
- Select the appropriate checkbox to enable the virtual disk that was converted, imported and attached to this VM. By default, the new disk is unselected in the boot order list.
- Move the imported and enabled disk to the top of the boot list.
- Power on the VM and connect to the VM console. Select the VM created for Hyper-V to Proxmox migration, click Start and then click Console. The guest operating system should boot now.

- Check the hardware in the Device Manager of the guest Windows OS. Right-click the My Computer or This PC icon, click Manage and select Device Manager. Alternatively, you can run the
devmgmt.mscsnap-in from the command line.You should see two disk drives: the converted/imported virtual disk (a 20-GB thin-provisioned disk attached to the IDE controller in our case) and the temp 1-GB SCSI virtual disk.
You should see a standard SATA/AHCI controller and a VirtIO SCSI controller. Once the SCSI controller is installed on the VM after booting Windows from the IDE or SATA disk, the drivers are installed to use the SCSI controller. These drivers allow us to boot the operating system from the disk attached to the SCSI controller. You may reboot the VM to ensure that everything is working properly.
- Shut down the migrated VM to Proxmox.
- Detach the virtual disk connected to the IDE controller. Select the virtual disk in the Hardware section of your migrated VM and click Detach. This is Hard Disk (ide0) in our example now (20 GB).
- Double-click this disk (now, our 20-GB disk is an unused disk – Unused Disk 0) to attach it.
- Attach this virtual disk to the SCSI controller (bus/device) and click Add.
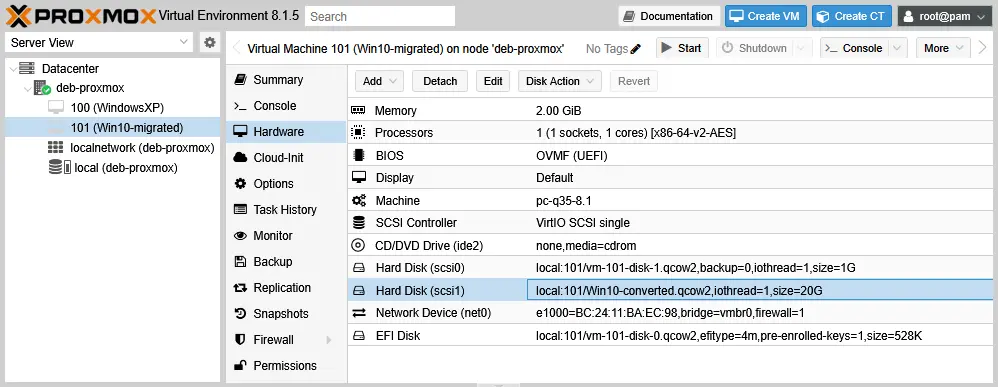
- Our 20-GB virtual disk is now Hard Disk (scsi1). We still keep the temporary 1-GB SCSI disk working in this VM.
- Edit the VM boot order. Go to VM Options and double-click Boot Order, as explained before.
- Select the virtual disk with Windows 10 that was recently attached to the SCSI controller (Win10-converted.qcow2 in this case).
- Edit the boot order – move this imported disk (from Hyper-V with Windows 10) to the top of the list.
- Start the VM. The Windows 10 guest OS should boot now from the SCSI virtual disk.
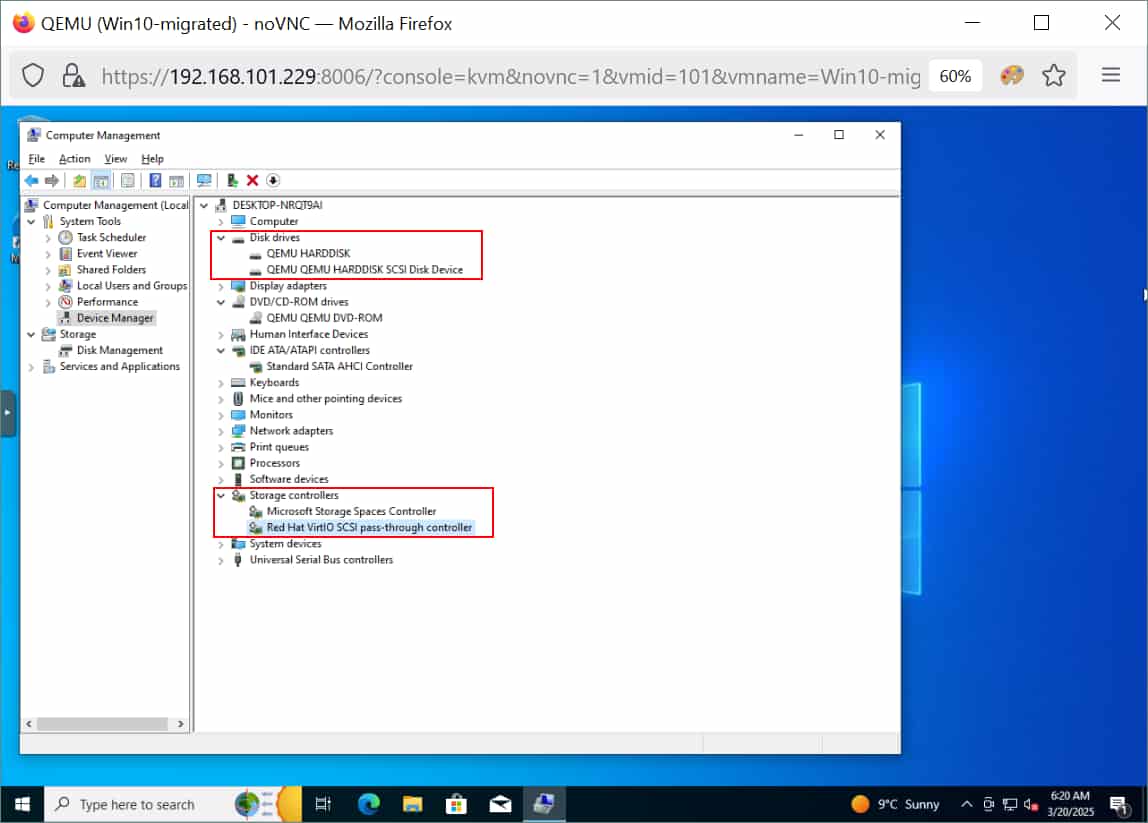
- Once the guest OS is booted, open the Device Manager and check the disks and storage controllers. Now, we see two SCSI disks and two SCSI controllers (see the screenshot below). Each SCSI disk is attached to its own SCSI controller in this case. The configuration displayed in the Device Manager is correct for us at this stage.

- If everything works fine, shut down the VM.
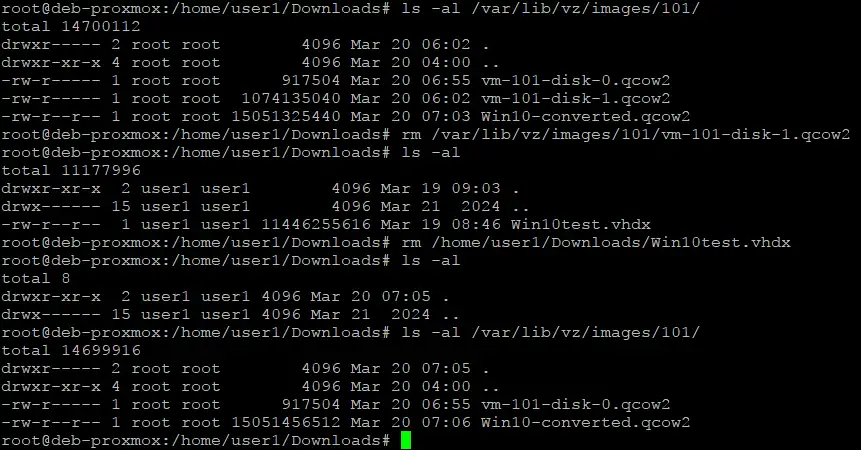
- Start the VM again. If the guest OS boots correctly and everything works properly, you can detach and delete the temporary 1-GB SCSI virtual disk from the Proxmox VM (rm /var/lib/vz/images/101/vm-101-disk1.qcow2) and delete the VHDX virtual disk copied from the source Hyper-V host (rm/home/user1/Downloads/Win10-test.vhdx).
Ensuring VM Protection After Migration with NAKIVO
After you have finished the migration from Hyper-V to Proxmox, don’t forget to protect your virtual machines in the Proxmox environment using a dedicated backup solution. If your source Hyper-V VMs were protected before the migration, the converted VMs will not be protected automatically in Proxmox VE.
NAKIVO Backup & Replication supports VM protection in Hyper-V, Proxmox, VMware vSphere and Nutanix virtual environments. The NAKIVO solution supports agentless backup for Proxmox VMs. The configuration is straightforward – just add Proxmox hosts or clusters to the inventory and create backup jobs.
You can recover full VMs or perform granular recovery to quickly restore individual files or objects. Data recovery is possible to the source or custom locations. You can also perform a backup export for virtual machines and recover them in another virtualization platform.
NAKIVO Backup & Replication supports:
- Incremental backups. Reduce storage space consumption by copying only the changed data since the last backup backup. Configuring incremental backups with periodic full backups increases the reliability of a backup chain.
- Application-aware backups. Ensure that backup data is crash-consistent and application-consistent. Back up VMs even if there are running applications and properly recover data when needed.
- Backup encryption. Encrypting backups in transit and at rest to ensure . Configure source-side, network and backup repository encryptions based on your needs.
- Backup immutability. Protect backups against ransomware by using immutability. This data cannot be modified, altered or deleted by ransomware.
- Multiple backup locations. Implement a flexible backup policy and follow the 3-2-1 backup rule. The NAKIVO solution supports storing backups on local disks, NAS devices, SMB and NFS shares, tape and in the cloud, including Azure Blob, AWS S3 and other S3-compatible object storage.
Conclusion
To migrate a Hyper-V VM to Proxmox, you need to prepare the source VM by installing VirtIO drivers, create a new Proxmox VM, convert the exported virtual disk and import the converted disk to the Proxmox VM. SCSI virtual disks provide higher performance, but additional configuration is required to make them work properly. You also need to boot from the virtual disk connected to the IDE or SATA virtual disk controller, add a temporary SCSI disk to install drivers and then you can attach the boot disk to the SCSI controller. Don’t forget to protect your data using an advanced backup solution like NAKIVO Backup & Replication.


