How to Install and Configure Hyper-V Manager
Microsoft provides a wide variety of tools for managing the Hyper-V environment: System Center Virtual Machine Manager (SCVMM), PowerShell, Server Configuration tool, etc. However, Hyper-V Manager stands out due to its simplicity and user-friendly interface. This blog post describes how to install and configure Hyper-V Manager and how it can improve the Hyper-V management process.
What Is Hyper-V Manager?
Microsoft Hyper-V Manager is an administrative tool used for creating, modifying and removing virtual machines (VMs) and hosts running in a Hyper-V virtual environment. Microsoft first released it with Windows Server 2008 and since then it has been available as part of the Windows OS, meaning that it doesn’t require any additional licensing.
System requirements
Before installing Hyper-V Manager, make sure that your computer meets the hardware requirements to host Hyper-V. Even though the management tool doesn’t have any particular hardware requirements, Hyper-V Manager should be deployed on the same Hyper-V host version to use the full feature set available for this specific operating system (OS) version. You can check the complete list of supported combinations of Hyper-V Manager and Hyper-V host versions here.
Features
Let’s examine all of Hyper-V Manager’s features to understand what makes it unique and how it can best be used.
- Hyper-V Manager interacts with each Hyper-V host and VM individually, which has been proven unfeasible when managing large Hyper-V environments with multiple VMs running simultaneously.
- You can manage only two infrastructure components with Hyper-V Manager: Hyper-V hosts and VMs, including their checkpoints, virtual switches and virtual hard disks.
- SCVMM allows you to set up templates based on which VMs can be automatically created, whereas VM creation in Hyper-V Manager is a completely manual process.
- Hyper-V Manager uses native Windows Management Instrumentation (WMI) for event detection and delivery. Thus, any change occurring in a Hyper-V host or a VM is almost immediately identified and reflected in a graphical user interface (GUI).
- Hyper-V Manager can be used to manage a small number of Hyper-V hosts both locally and remotely.
- Due to its intuitive and simple GUI, Hyper-V Manager is considered a useful management tool for beginners who don’t have a technical background but want to start working with a Hyper-V environment.
- It is a great management tool for small and medium-sized businesses whose virtualization demands can be satisfied even with the limited feature set of Hyper-V Manager.
Interface overview
In the left pane, you can see the name of a Hyper-V host. In the right pane, you can see the menu listing all the configuration options available for a Hyper-V host and a VM. Three sub-panes in the center (Virtual Machines, Checkpoints and Details) contain the main information about the VMs running on a host.

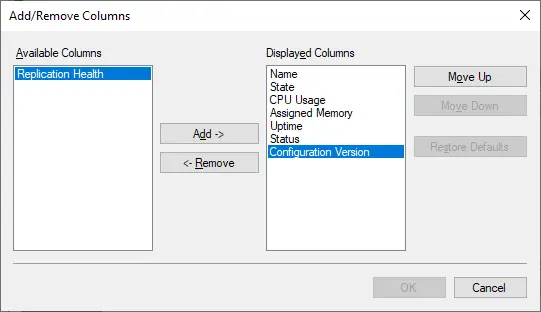
The Virtual Machines section lists all VMs, their name, state, CPU usage, assigned memory, uptime, status, and configuration version. To add or remove one of the columns, right-click any column and select which ones should be displayed or hidden.
The Checkpoints section below shows the number of checkpoints this particular VM has and when they were created. The last section provides the primary details about a Hyper-V VM, including the general summary, memory size and networking configurations.
How to Install Hyper-V Manager on Windows
Hyper-V Manager is automatically installed when you enable the Hyper-V role on your computer. Another option is to enable only Hyper-V Management Tools, which are mainly applied to computers that don’t meet Hyper-V system requirements. The process of Hyper-V installation may also vary depending on the OS installed on your computer. Below, we will provide guidelines on installing Hyper-V Management Tools, including Hyper-V Manager, on Windows and Windows Server.
- Open Control Panel.
- Click Programs and Features.
- Click Turn Windows features on or off.
- Expand the Hyper-V section.
- Check the Hyper-V Management Tools box to install Hyper-V Manager (If you want to enable the Hyper-V role as well, select Hyper-V Platform).
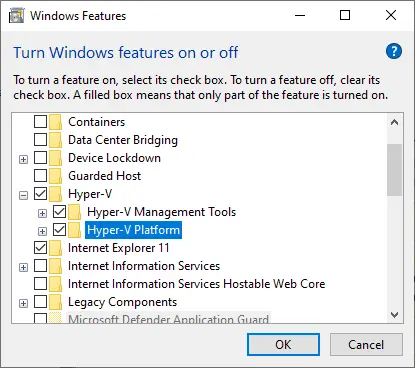
- Click OK. This action should start the installation operation.
- Click Restart Now to implement all required changes or click Don’t Restart to postpone restarting your computer.
Install Hyper-V Manager on Windows Server
- Open Server Manager.
- Click Manage.
- Select Add Roles and Features to open the Add Roles and Features Wizard.
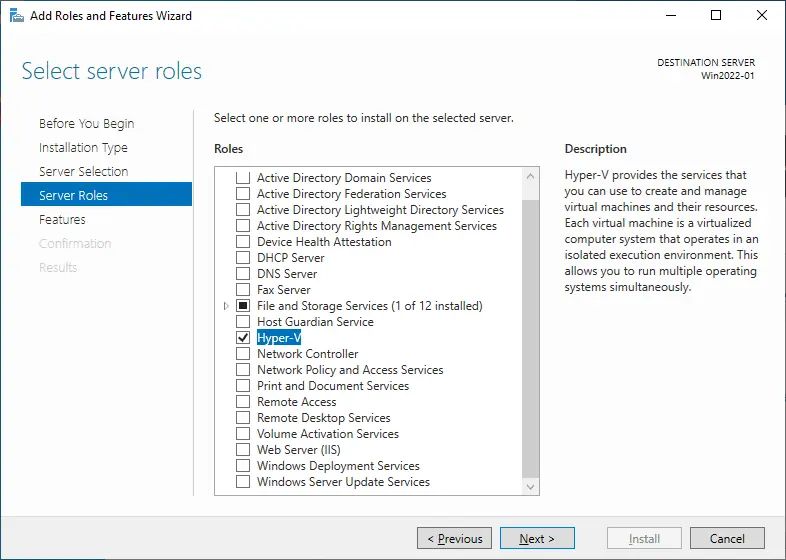
- Follow the wizard until you reach the Server Roles step. Select the Hyper-V checkbox if you want to install Hyper-V on the current machine and proceed to the next step.
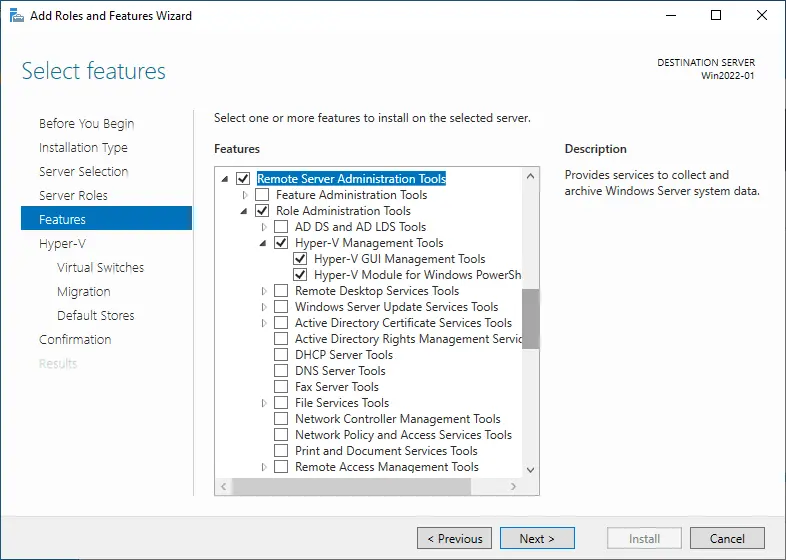
- At the Features step, expand Remote Server Administration Tools and then Role administration tools. Check the Hyper-V management tools box. This step is required to install Hyper-V Manager. Hit Next.
- Confirm the changes and hit Install.
Install Hyper-V Manager with PowerShell
At the same time, you can use PowerShell cmdlets to make the Hyper-V installation process even easier.
To enable Hyper-V Management Tools on Windows, open PowerShell as Administrator and run the following command.
Enable-WindowsOptionalFeature -Online -FeatureName Microsoft-Hyper-V -All
The process will start automatically. Don’t forget to reboot after the operation is complete.
To enable Hyper-V Management Tools on Windows Server, you should also open a PowerShell console as Administrator and run the following command:
Add-WindowsFeature rsat-Hyper-V-tools
After the installation, a system reboot is required to adopt all changes.
Operations Available in Hyper-V Manager
Some of our previous blog posts have covered how to manage a Hyper-V environment, including creating and configuring VMs, virtual switches, network adapters, and checkpoints, using Hyper-V Manager. In this blog post, we will discuss possible operations and tasks that can be performed in Hyper-V Manager.
For that purpose, open Hyper-V Manager and look at the right pane of the management console. Here, you can see a list of the actions that can be applied to a Hyper-V host and a particular VM running on that host.
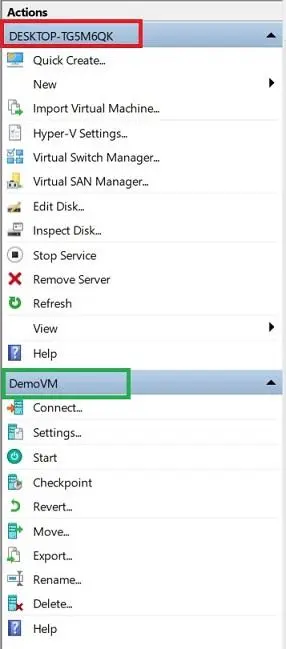
Now, let’s discuss which options are available for you to manage Hyper-V hosts:
- Quick Create is a Hyper-V installation wizard that makes VM creation easy and simple. You can select an OS, a VM name and a virtual switch to ensure communication with other VMs. Due to the small number of configuration options, you can quickly create a Hyper-V VM in just a few clicks.
- New allows you to create a Virtual Machine, Hard Disk, or Floppy Disk. If you choose to create a VM or a virtual hard disk, the corresponding wizard should open, providing you with a set of configuration options. As for the virtual floppy disk, after selecting this option, you will be asked to type the file name of a new floppy disk and specify the location where it will be stored.
- Import Virtual Machine. The Import Virtual Machine Wizard will open, which can be used to import a VM from a set of configuration files to a local server.
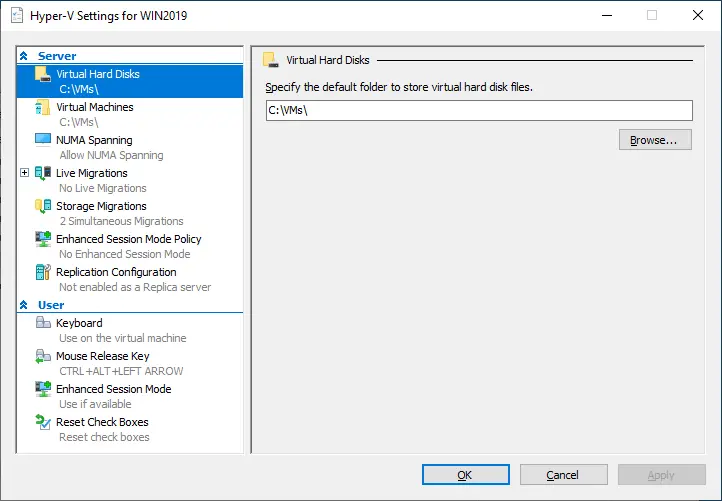
- Hyper-V Settings. By clicking Hyper-V Settings, you will get access to the settings of a Hyper-V host. Here, you can:
- Specify the default folder for storing virtual hard disk files and VM configuration files.
- Enable spanning NUMA nodes to run more VMs simultaneously.
- Specify the number of simultaneous storage migrations.
- Allow enhanced session mode.
Moreover, Hyper-V Manager allows you to configure user management options, including which key combinations should be applied when running VMConnect, the key combination to enable mouse release, the use of enhanced session mode and the option to reset all checkboxes that have already been checked in Hyper-V Manager.
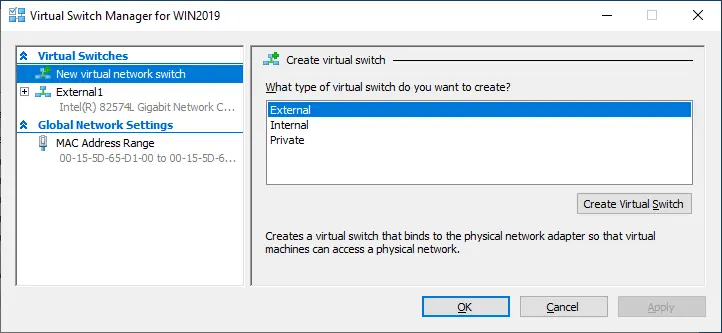
- Virtual Switch Manager can be used to create a virtual switch (external, internal, or private), set up or remove existing virtual switches and configure media access control (MAC) addresses.
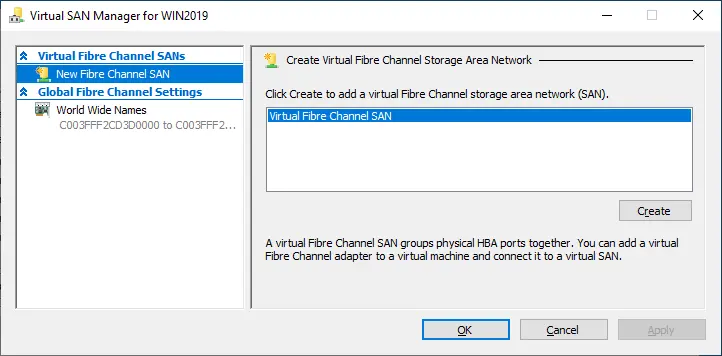
- Virtual SAN Manager allows you to create a new virtual Fibre Channel storage area network (SAN) and set up World Wide Port Name (WWPN) addresses to ensure smooth live migrations without losing connectivity to Fibre Channel storage.
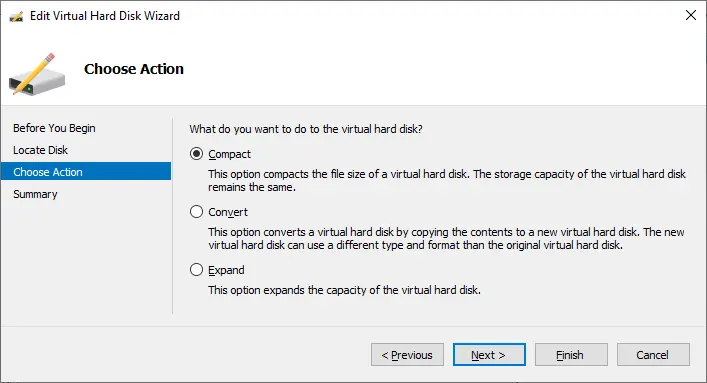
- Edit Disk opens the wizard for editing a virtual hard disk. To do so, specify the location of the required disk file. Depending on your disk type, the options for editing may vary. Generally, they include: Compact, Convert or Expand.
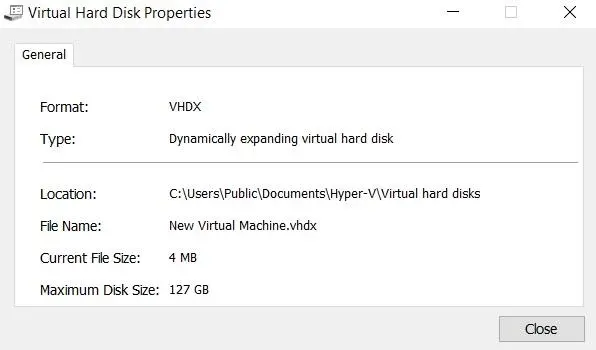
- Inspect Disk allows you to see the properties of a virtual hard disk, including its format, type, location, file name, current file size and maximum disk size.
- Stop Service can stop the VM Management service and its dependent services. If you stop the service, you can no longer manage the virtualization environment.
- Remove Server allows you to remove a Hyper-V host from the list of servers.
- Refresh reloads the list of VMs and their checkpoints.
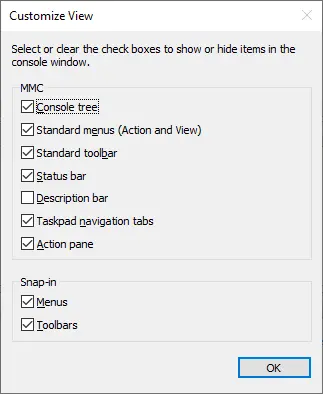
- View enables you to customize the console window by adding or removing items.
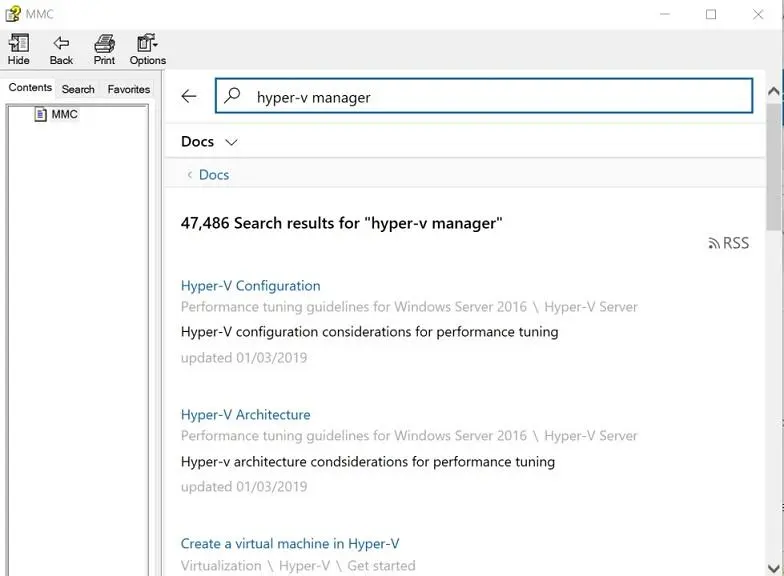
- Help opens the window where you can find information about Hyper-V configuration by typing your request in a search bar.
Another set of actions is used to manage Hyper-V VMs. Available operations may vary depending on the VM state (Running, Paused, Off). Let’s discuss them in detail:
- Connect launches the Virtual Machine Connection application and connects you to a Hyper-V host from Hyper-V Manager.
- Settings opens the VM settings user interface.
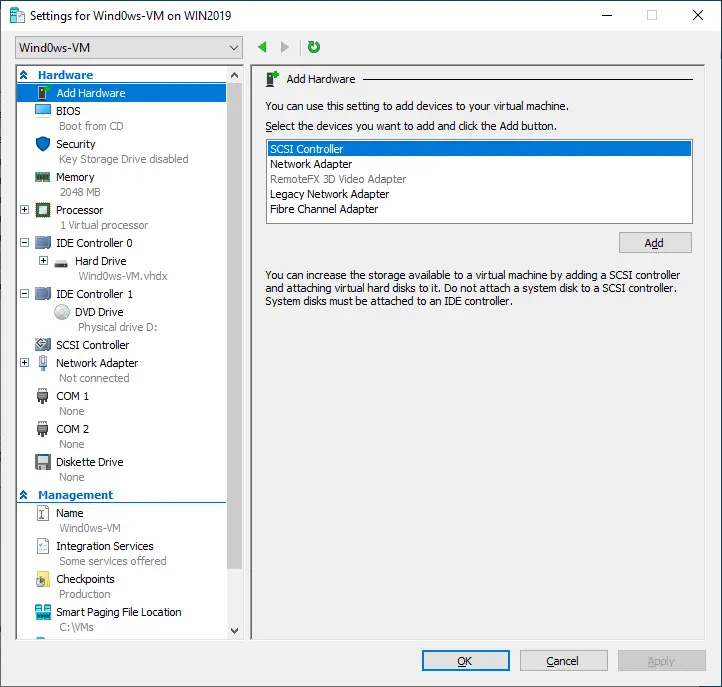
Here, you can perform several actions, such as adding hardware devices (e.g., SCSI Controller, Network Adapter, Fibre Channel Adapter) to your VM, defining the boot order, configuring security options (Secure Boot, Encryption Support, Security Policy), or specifying the memory metrics of a selected VM.
Moreover, you can modify the CPU settings, including resource control, processor compatibility and NUMA topology. You can also add hard drives, CD/DVD drives, or shared drives to the SCSI controller or remove the SCSI controller from the VM. In addition, you can configure the network adapter settings.
In the Management section, you can change the VM name, enable or disable Hyper-V Integration Services on a selected VM, modify the configurations for checkpoints, specify the location for storing the Smart Paging Files of this VM and set up Automatic Start Action and Automatic Action.
- Start button starts a selected VM.
- Turn Off allows you to turn off the selected VMs.
- Shut Down is used to shut down the OS within a selected VM.
- Save stops a VM and saves it in a given state. During this, the VM CPU resources and memory can be freely used by other VMs.
- Pause stops a VM and saves it in a given state. While paused, only the VM CPU resources can be used by other VMs.
- Resume enables you to unpause a VM and resume all operations.
- Reset initiates a system restart process without waiting for a VM to save the progress and gracefully close applications.
- Checkpoint creates a checkpoint of a selected VM.
- Revert allows you to revert a VM to its previous checkpoint.
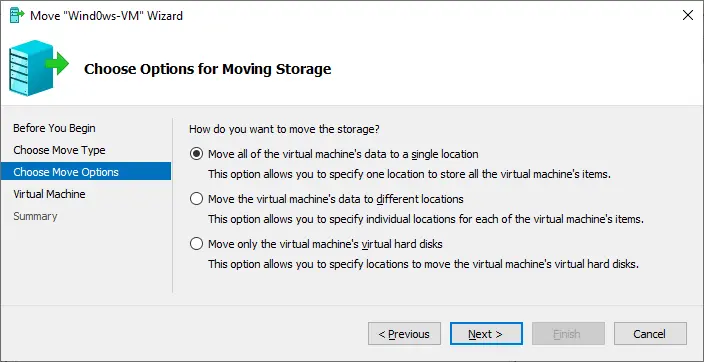
- Move opens the wizard in which you can configure how the virtual hard disks attached to a particular VM will be moved. Here, you can choose the move type and options and specify a new location for VM files.
- Export opens the menu in which you can specify an export location where a VM, including its virtual hard disk files, VM configuration files and checkpoints, will be stored.

- Rename helps to rename a VM.
- Help is also used to find information about Hyper-V configuration by typing your request in the search bar.
Even though Hyper-V Manager allows you to manage one VM at a time, it provides a wide set of actions and features in a simple and intuitive GUI, making the management process a pleasant experience.
Conclusion
Hyper-V Manager is a Microsoft application that is usually installed when the Hyper-V Role is enabled on Windows OS. Despite having a limited functionality to serve large virtual environments, Hyper-V Manager has attracted many users because it is user-friendly, intuitive and license-free. Hyper-V Manager has proven to be an efficient management console that allows you to create, modify and delete VMs locally or remotely when necessary.
Hyper-V Manager is a tool used for building Hyper-V environments, but it lacks the advanced security features needed to ensure total protection of your infrastructure. A dedicated data protection solution should be used instead since it can save you time, effort and resources. NAKIVO Backup & Replication is a reliable and efficient solution that ensures fast and successful system recovery and allows you to achieve even the most demanding RTO and RPO requirements.


