How to Back Up Microsoft 365 to AWS: A Comprehensive Guide
Microsoft 365 services are productive and reliable, but data loss can occur for various reasons. For example, a user may accidentally delete data or a ransomware infection may spread from local computers whose folders are synchronized with the cloud storage.
Thus, Microsoft 365 backup is important for data protection and business continuity. With backups, you can recover the needed data and ensure uninterrupted workflows. Amazon Web Services (AWS) is one of the cloud platforms that can be used to store Microsoft 365 backups.

Why Choose AWS for Microsoft 365 Backup?
Amazon S3 is the AWS object storage that provides attractive cloud storage options in terms of price, flexibility, and reliability. There are different tiers, including higher priced ones for quick access and low-cost tiers with slower access speeds used for long-term archival. The pricing model is flexible and suitable for different purposes. AWS ensures the strongest security standards, which are compliant with industry standards and regulations.
The advantages of using Amazon S3 for storing Microsoft 365 backups are:
- Enhanced redundancy and availability. AWS offers redundant infrastructures in their datacenters located in different regions in different countries. This cloud infrastructure provides better protection against service disruptions or power outages.
- High scalability. Cloud storage in AWS is scalable with virtually unlimited storage capacity. Amazon S3 buckets are increased when needed, and you don’t need to manually expand storage size or add new storage devices.
- Cost efficiency. The pay-as-you-go pricing model allows organizations to pay for storage and resources they use in AWS.
- Backup retention. Using AWS as cloud storage for Microsoft 365 backup allows you to use custom retention policies to ensure compliance with legal, regulatory, and business requirements.
Compliance considerations for Microsoft 365 backup to AWS include the following points:
- Data sovereignty and regional compliance depend on the location of your AWS data centers. You should ensure that backups comply with data sovereignty laws (for example, GDPR in the EU). AWS allows organizations to choose the region where their backup data is stored, ensuring compliance with specific regional requirements regarding data storage and processing.
- Regulatory acts often require setting specific retention policies for backups, especially for sensitive information. Organizations using AWS for Microsoft 365 backup can configure retention and data lifecycle policies (including automatic deletion of old unnecessary data). These capabilities allow organizations to comply with legal and regulatory retention requirements.
Preparing Your AWS Environment for Microsoft 365 Backup
Before starting a backup process and running Microsoft Office 365 backup to AWS, you have to prepare the AWS environment, your organization’s Microsoft 365 account and the backup solution you will be using.
You can use NAKIVO Backup & Replication as a data protection solution for Microsoft 365 backup. The NAKIVO solution supports backing up data of Microsoft 365 services, including Exchange Online, OneDrive for Business, SharePoint Online, and Microsoft Teams to AWS and other S3-compatible platforms, for example, backup to Wasabi for Microsoft 365 data.
Configuring permissions in AWS
Ensure that you created the IAM role in AWS and that it has the permissions required to create a bucket in Amazon S3. Generate the access keys in AWS for this purpose. The access keys are used to configure third-party applications, such as backup solutions, to access AWS resources for the appropriate account and IAM role. You can generate and download the access key in the AWS IAM dashboard.
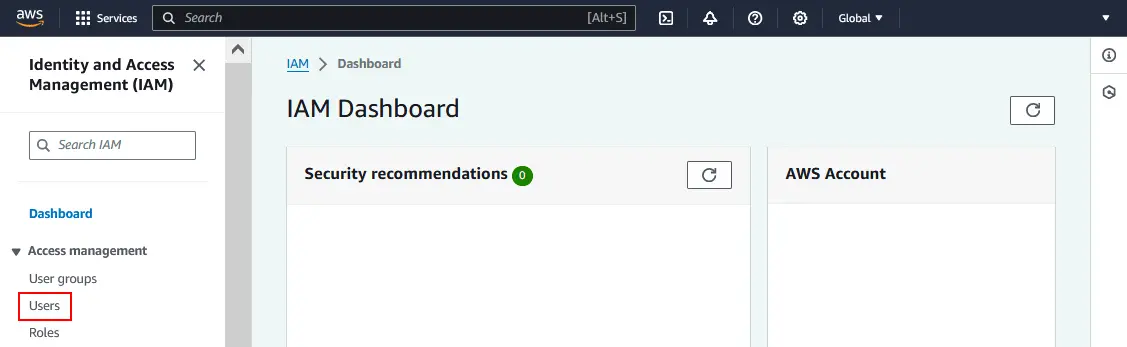
- Open the IAM dashboard in the AWS Console and in the left pane of the AWS web interface, click Users.
- Click the IAM user, which you want to use for configuring access and permissions.
- Go to the Security Credentials tab and hit Create Access Key.
- Click Download Credentials and save the credentials on your computer in a safe place.
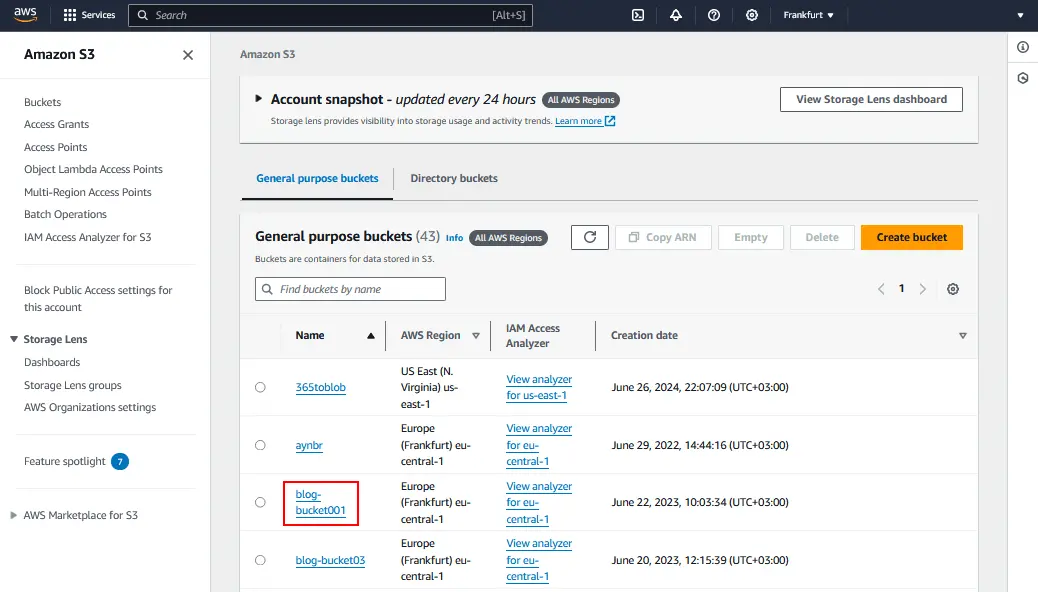
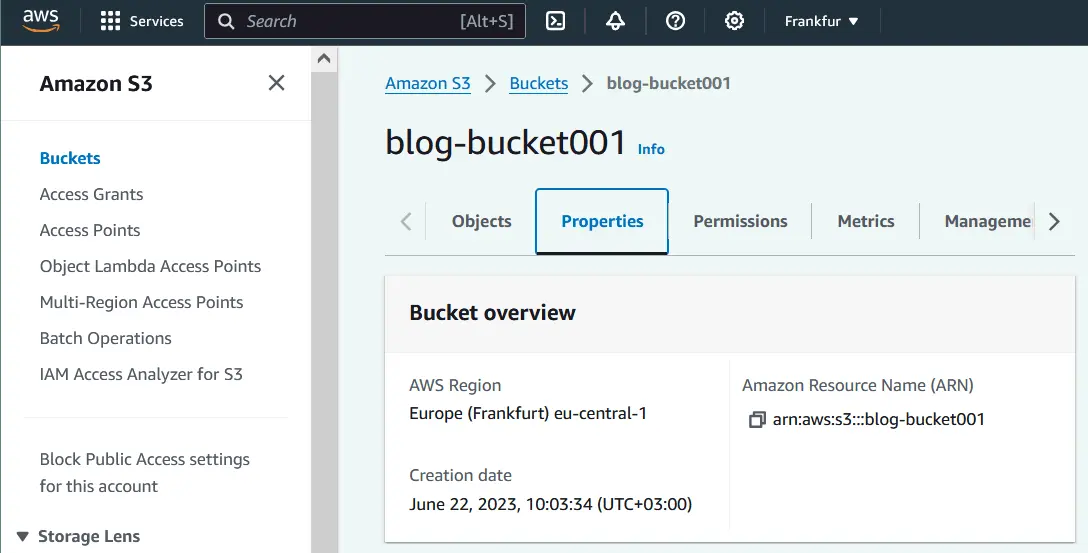
For the purpose of this workflow, we have created an Amazon S3 bucket called blog-bucket001 in AWS.
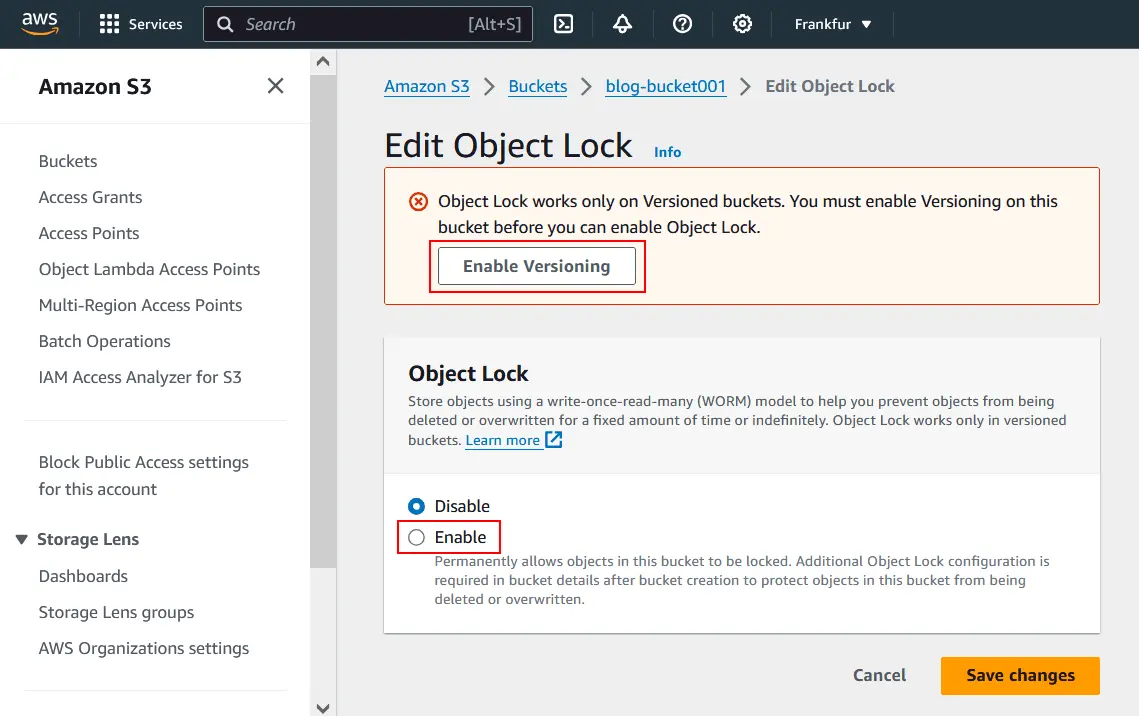
Enabling Object Lock
To use the immutability feature in NAKIVO Backup & Replication for Microsoft Office 365 backups (and other backups) stored in AWS, you should first enable Amazon S3 Object Lock for a bucket.
Select a bucket in the Amazon S3 console and proceed as follows:
- Go to the Properties tab for the selected bucket.
- Scroll down a page and locate the Object Lock section. Click Edit.

- On the Object Lock settings page, you see a warning that enabling versioning is required to enable Object Lock. Click Enable Versioning.
- Then, enable Object Lock by selecting the corresponding option. Click Save Changes.
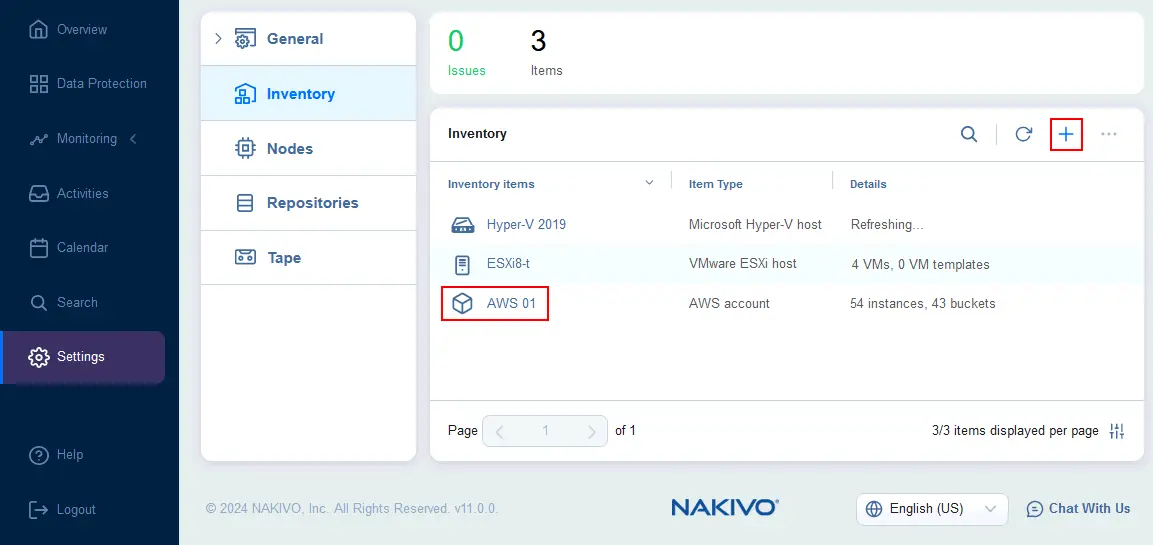
Adding AWS to the NAKIVO Backup & Replication Inventory
Once you have created an Amazon S3 bucket and configured permissions for the IAM account in AWS, you can add the AWS account to the Inventory of NAKIVO Backup & Replication. You need to add AWS and Microsoft 365 accounts to the Inventory before configuring Microsoft 365 backup jobs to AWS.
Follow the steps below to add the AWS account to the NAKIVO Backup & Replication Inventory:
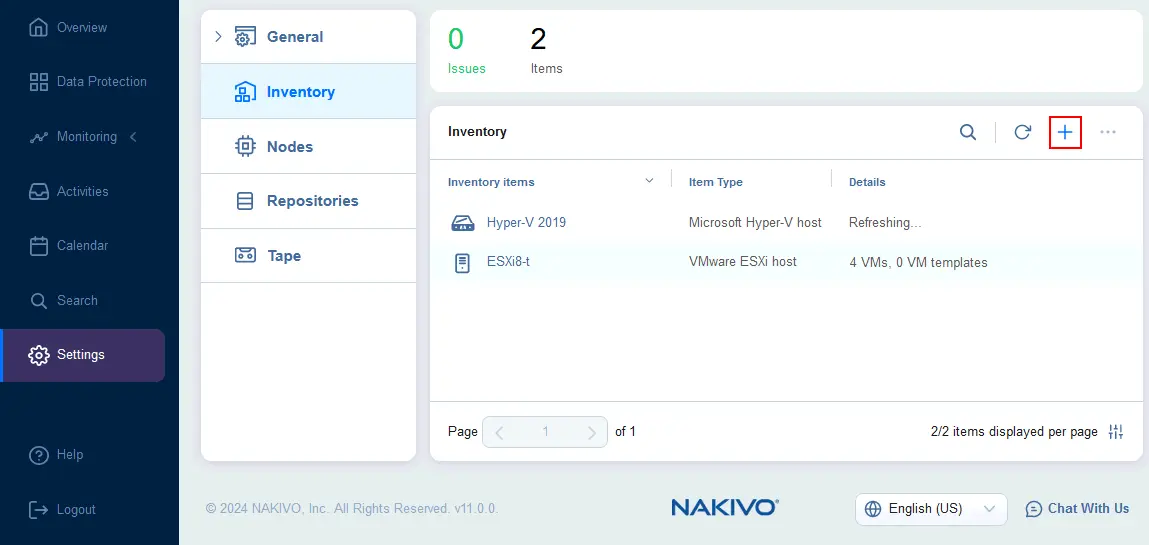
- Log in to the web interface of NAKIVO Backup & Replication.
- Click Settings in the left pane of the web interface and click + to add a new item to the Inventory.
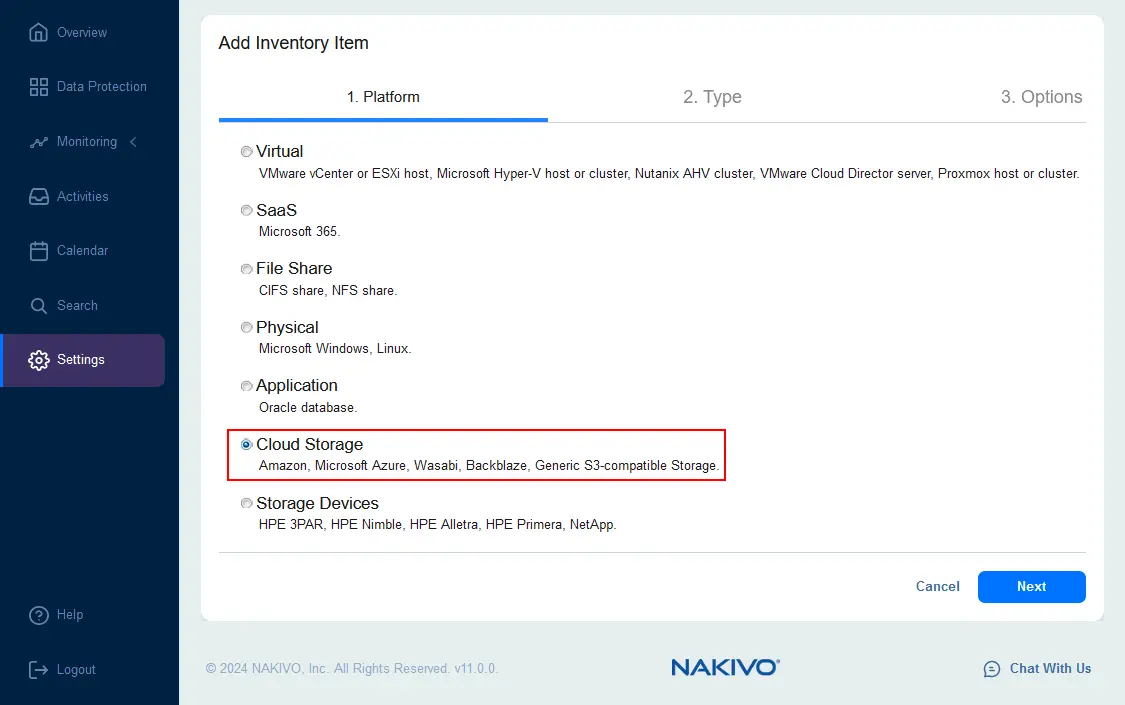
- At the first step of the Add Inventory Item wizard, select Cloud storage as a platform. Click Next at each step to continue.
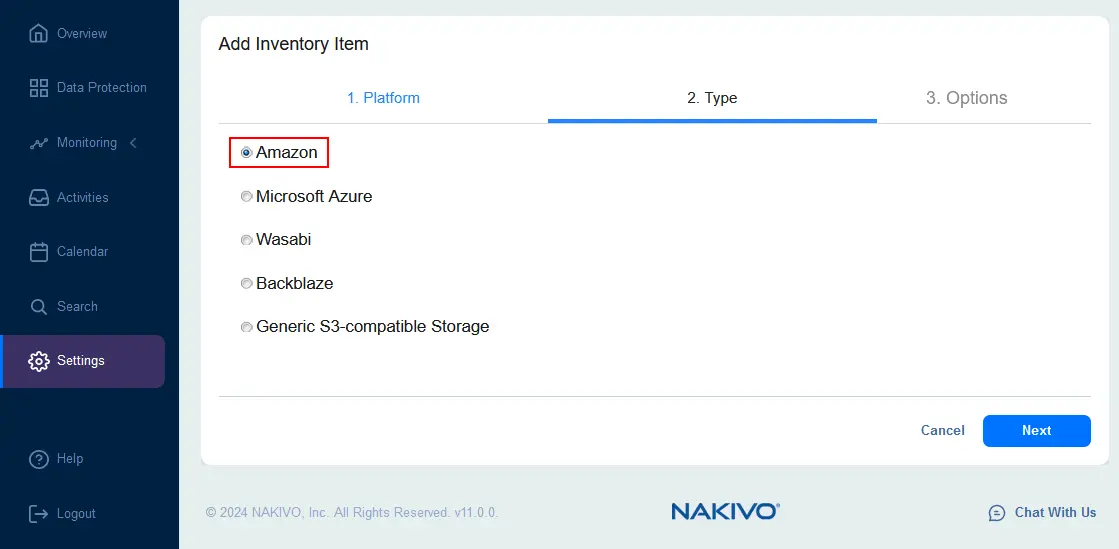
- Since we will be using an Amazon S3 bucket as storage for Microsoft 365 backups, we have to select Amazon at the Type step.
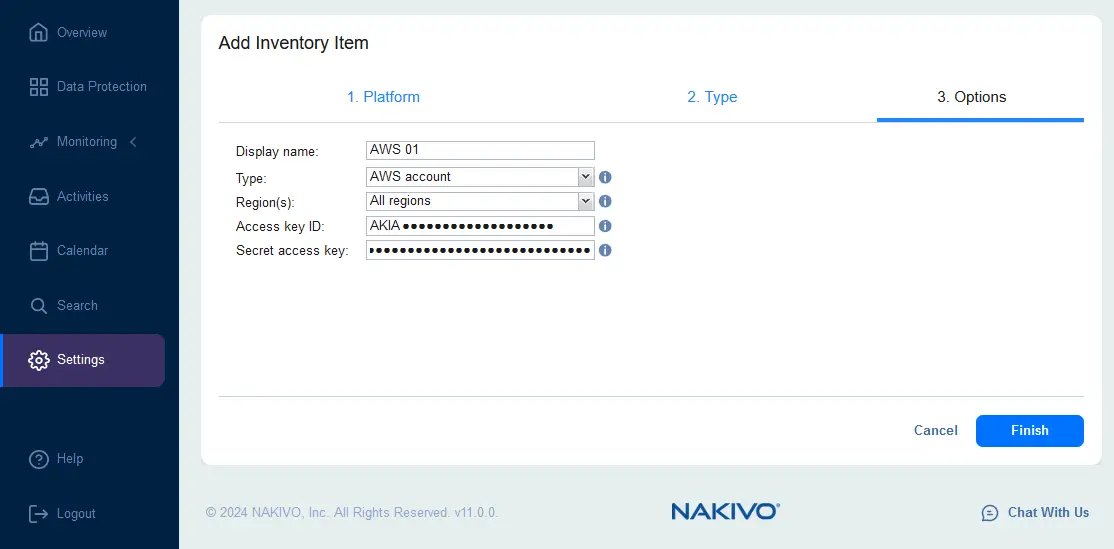
- Configure options to add the AWS inventory item. Enter the display name, select AWS account as the type and enter the credentials generated in the IAM console: the access key ID and secret access key. Click Finish to add the AWS account to the Inventory.
Adding your Microsoft 365 account to the Inventory
After adding the AWS account, we must add our Microsoft 365 account to the Inventory. Adding these accounts is required for Microsoft 365 backup with the NAKIVO solution.
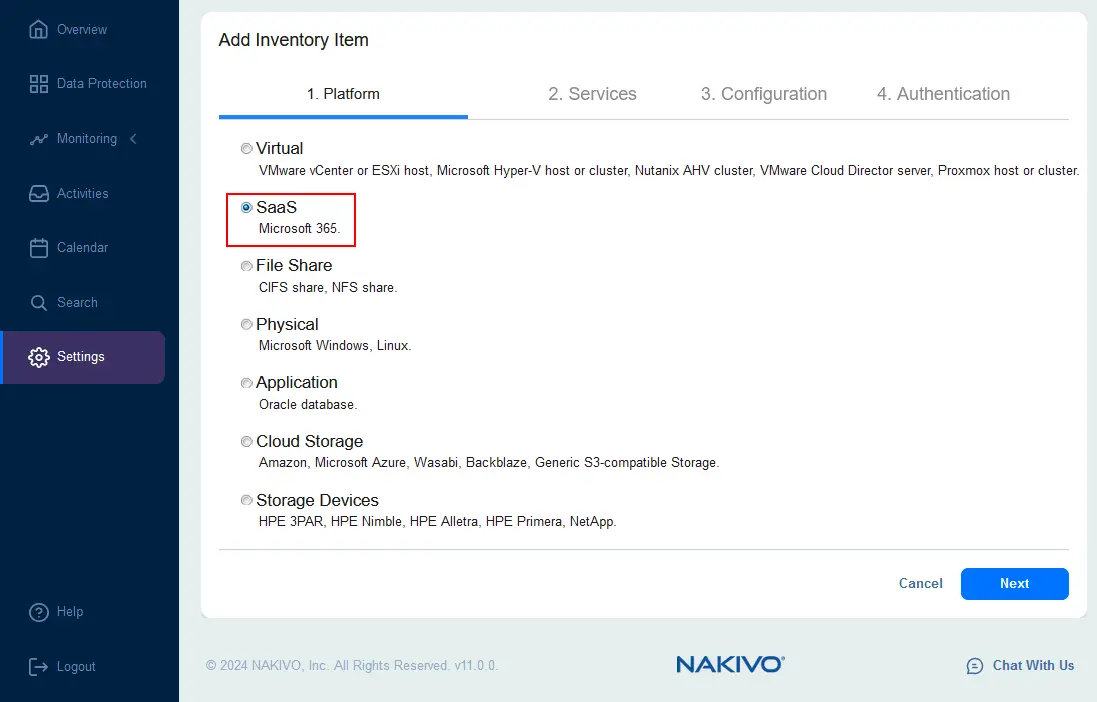
- Navigate to Settings > Inventory and click the plus (+) icon to add a new item to the Inventory.
- At the first step of the Add Inventory Item wizard, select SaaS as a platform to add your Microsoft 365 account.
- Select Microsoft 365 services, which data you want to backup. You can select specific services or select all services (Exchange Online Users, Exchange Online Groups, OneDrive for Business, SharePoint Online and Microsoft Teams).
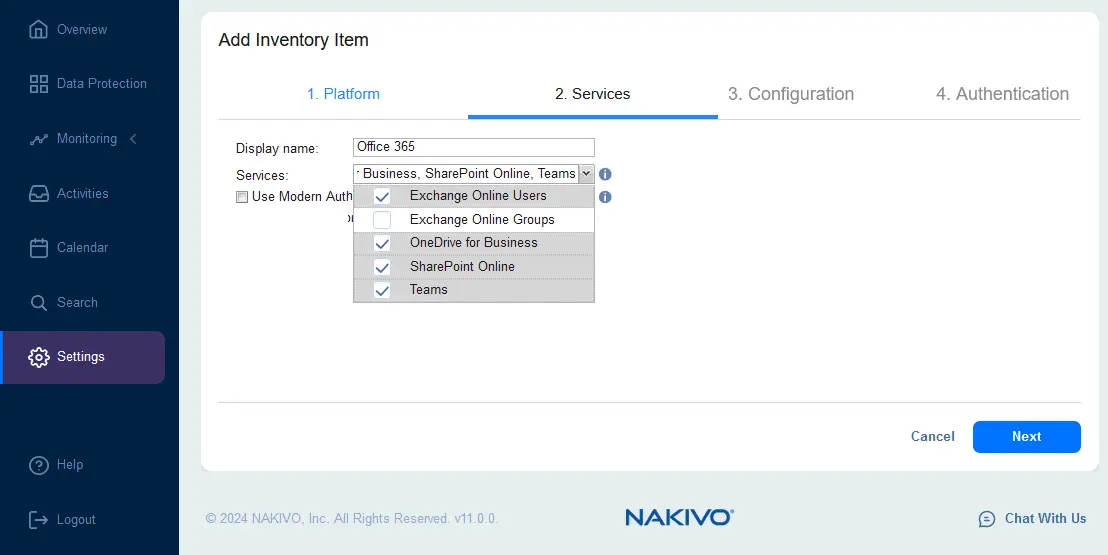
- Select the Use Modern Authentication with enabled MFA account if multi-factor authentication is enabled for your Microsoft 365 account.
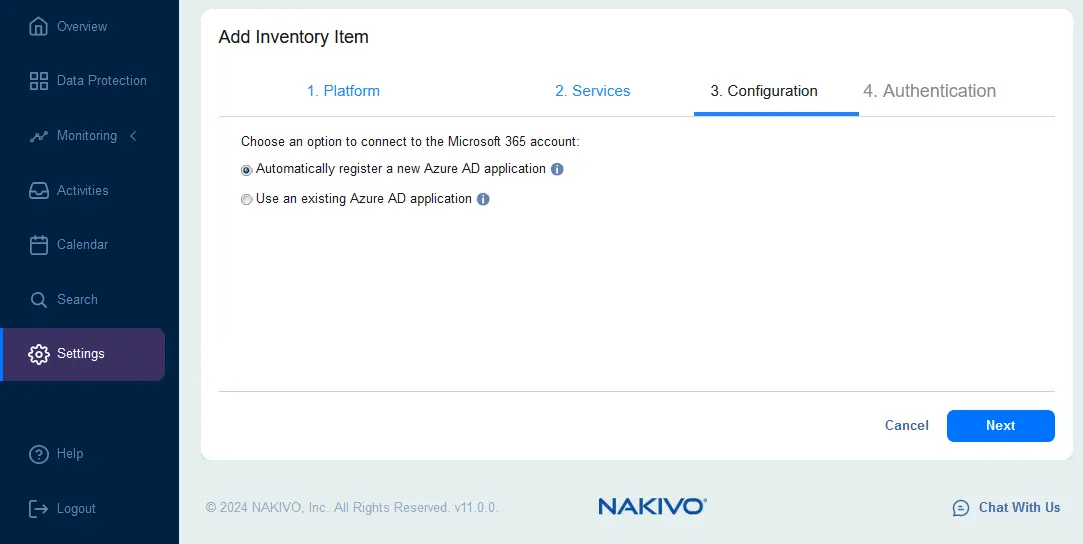
- At the Configuration step, choose an option to connect to the Microsoft 365 account. If you are configuring your environment for Microsoft 365 backup for the first time, select Automatically register a new Azure AD application. In this case access for Microsoft 365 services selected at the previous step will be configured in Microsoft Azure Active Directory for NAKIVO Backup & Replication.
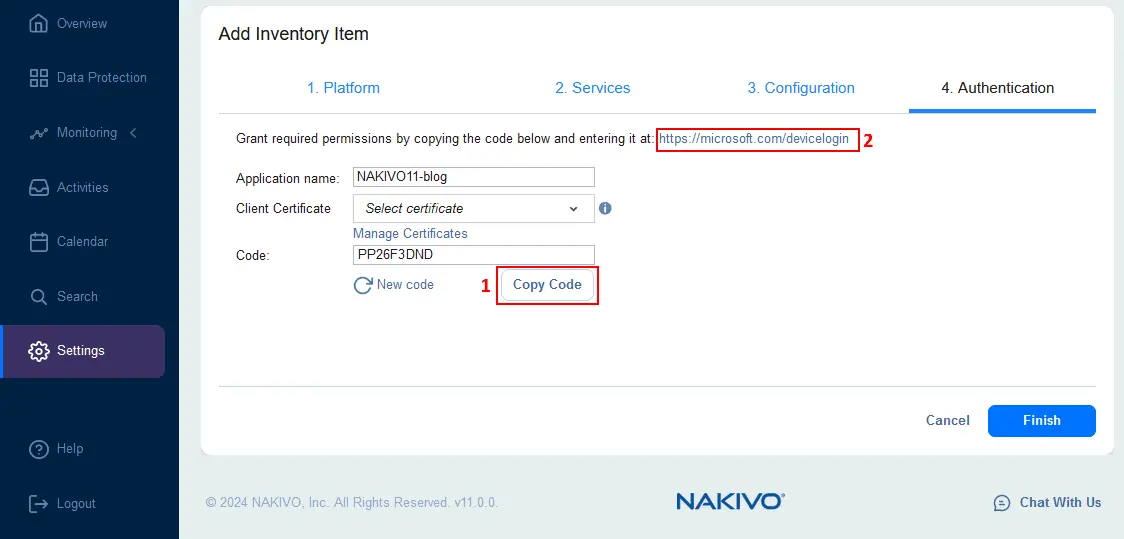
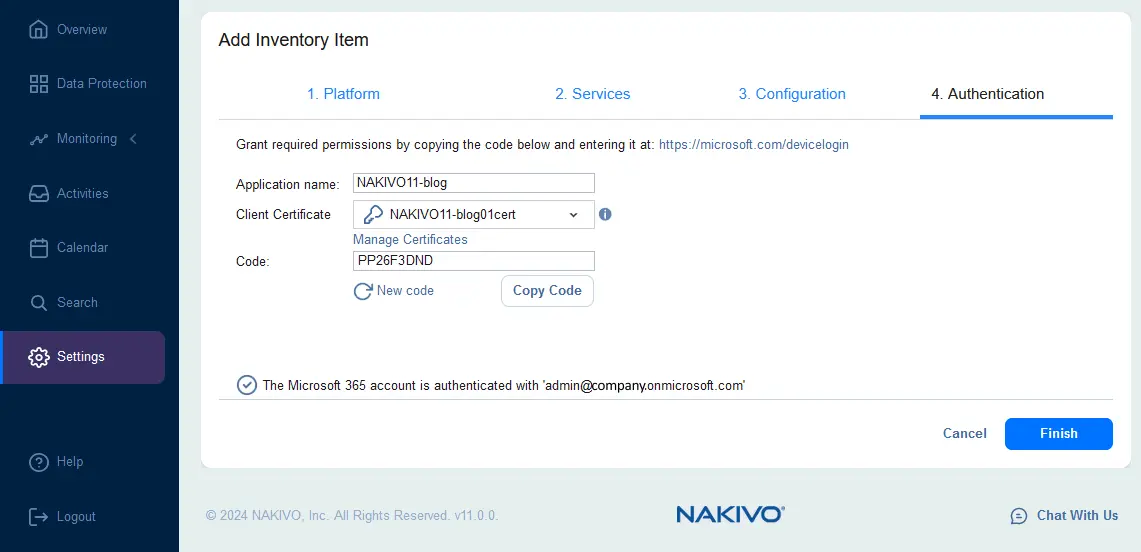
- Configure authentication for NAKIVO Backup & Replication at the Authentication step.
- Enter the application name. We use the NAKIVO11-blog name in this example.
- Click Copy code to copy the generated code. We will use this code to configure authentication for the NAKIVO solution on the Microsoft website.
- Click the https://microsoft.com/devicelogin link to grant the required permissions using this code.
- After opening the appropriate Microsoft page in a web browser, enter the code you have copied and click Next.
- When you see the question “Are you trying to sign in to Microsoft Azure CLI?”, click Continue.
- Once done, you should see the message:
You have signed in to the Microsoft Azure Cross-platform Command Line Interface application on your device. You may now close this window.

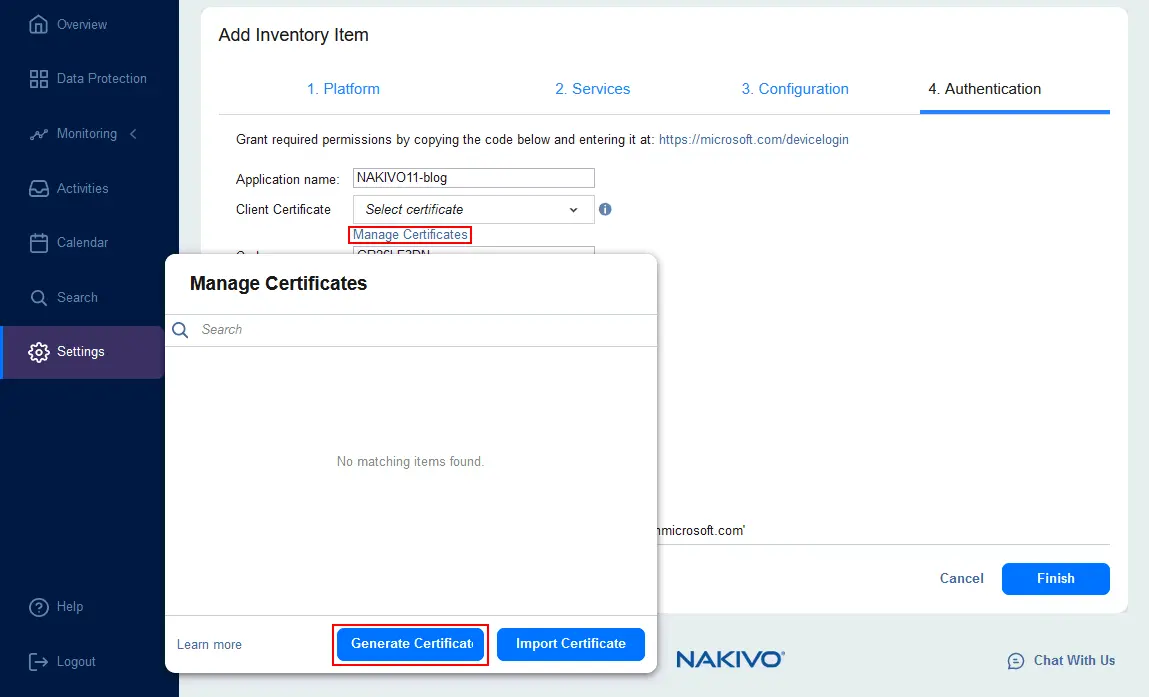
- Switch back to the tab with NAKIVO Backup & Replication in your web browser and click Manage Certificates at the Authentication step.
Click Generate Certificate in the Manage Certificates window.
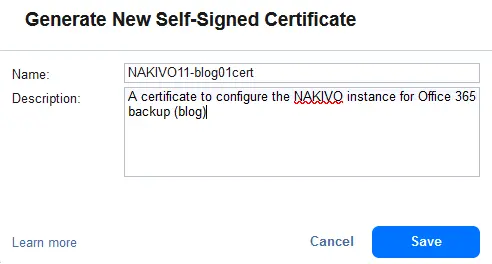
- Enter a name and description for the new certificate. Click Save.
- Now, select the recently created certificate in the drop-down list (Client Certificate). If everything is correct, you should see a message that confirms that the Microsoft 365 account is authenticated.
Hit Finish to save settings and finish adding a Microsoft 365 account to the inventory.
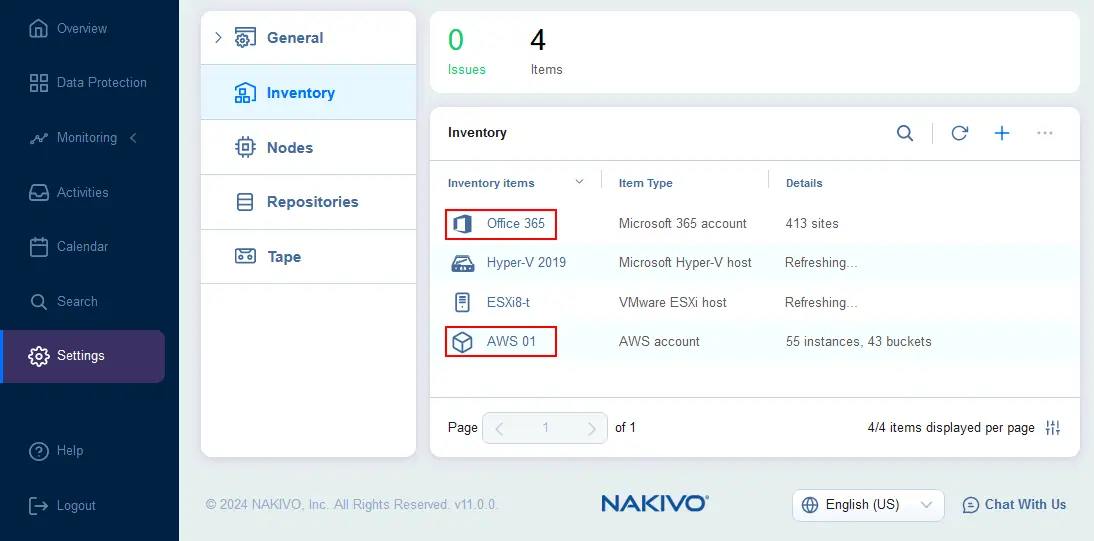
It may take a while until your Microsoft 365 account is added to the Inventory. The time depends on the number of added items (emails, OneDrive files, etc.) and their size. As a result, you should see the added inventory items, including AWS and Microsoft 365, as displayed in the screenshot below.
Installing a Transporter in AWS
Next, you should install a Transporter in AWS. The Transporter is a core component of NAKIVO Backup & Replication (categorized as a Node), and it is responsible for transferring data to/from backup repositories. When using backup storage in Amazon S3 or Amazon EC2, the AWS Transporter is used for processing backup data to/from AWS.
NOTE: Installing a Transporter in AWS is not a required step and you can use the Transporter located locally (not in AWS). A local Transporter can transfer data to AWS. However, installing the Transporter in AWS can provide additional benefits for data protection configurations.
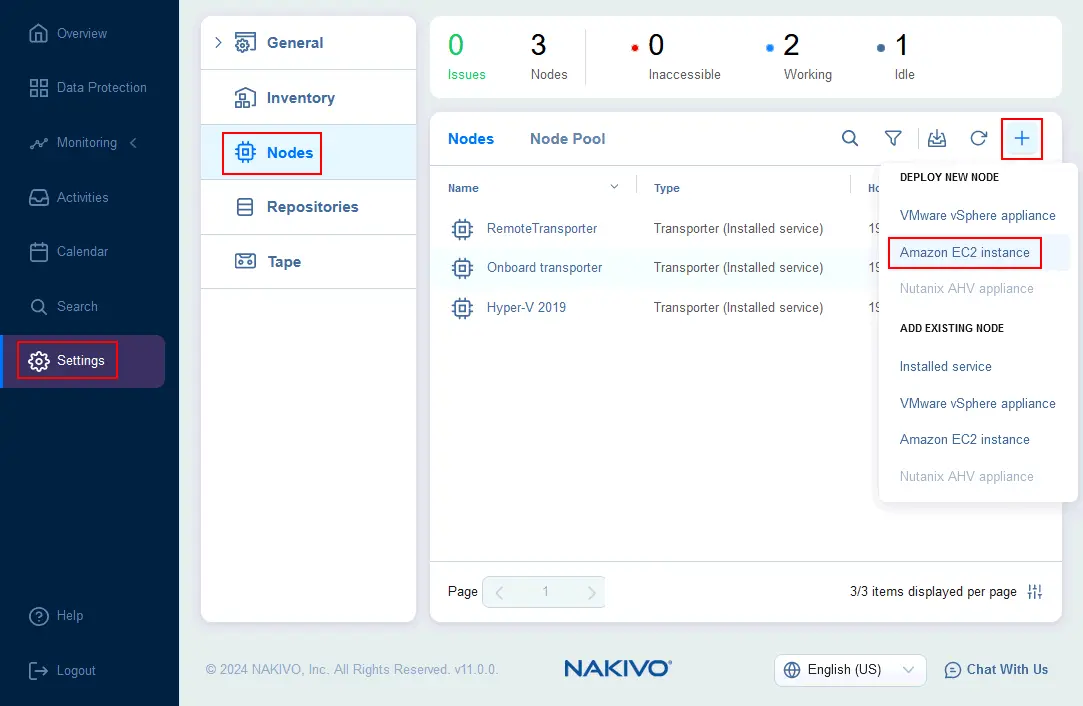
- Navigate to Settings > Nodes, then click the + icon and hit Amazon EC2 instance to deploy a Transporter on an EC2 instance in AWS.
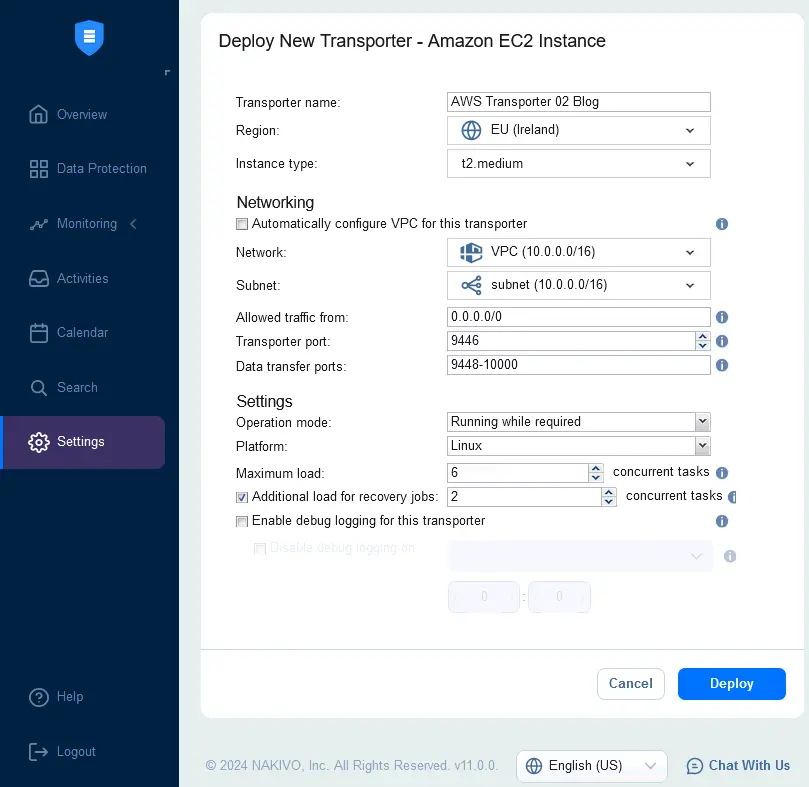
- Enter a Transporter name, select a region and specify the instance type, depending on the planned loads. In this example, we select t2.medium for our Transporter. Optionally, you can configure networking.
In the Settings section, configure the operation mode, select a platform (Linux is used in our case) and maximum load. If you select the “Running while required” operation mode, you can save costs spent on a running instance in AWS in contrast to the “Always running” mode. Click Deploy to finish deploying a Transporter in AWS.
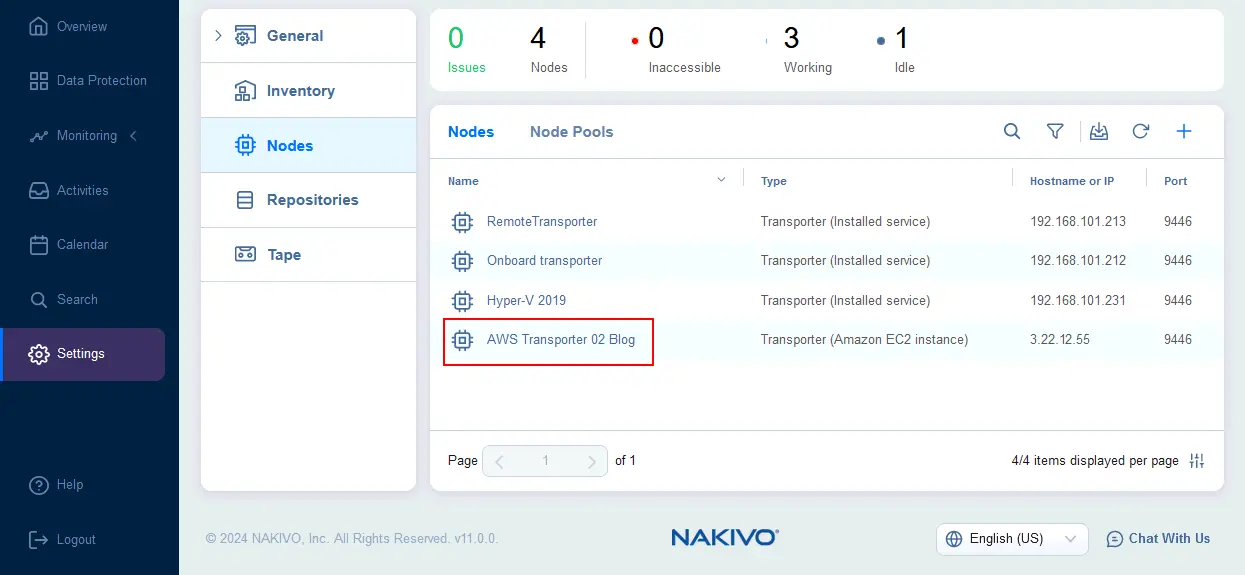
- Once the AWS Transporter is deployed, you should see a screen like the one displayed below.
Creating a backup repository in Amazon S3
Now, it’s time to create a backup repository in the Amazon S3 bucket. We will use this backup repository to store Microsoft 365 backups.
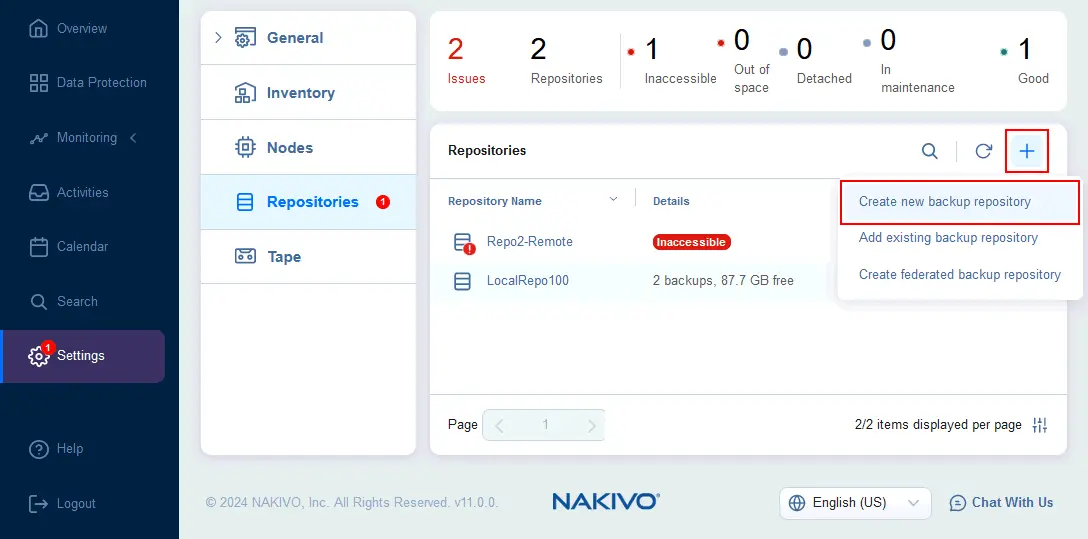
- In the NAKIVO Backup & Replication web interface, navigate to Settings > Repositories, click + and hit Create new backup repository.
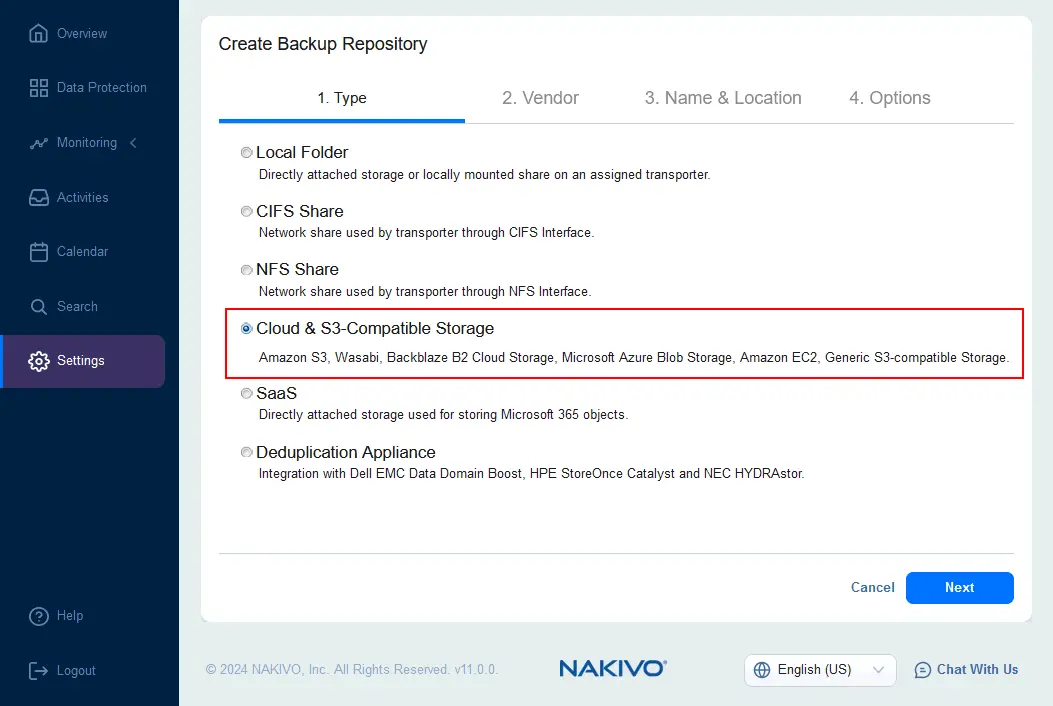
- At the Type screen of the Create Backup Repository wizard, select Cloud & S3-Compatible Storage and go to the next step.
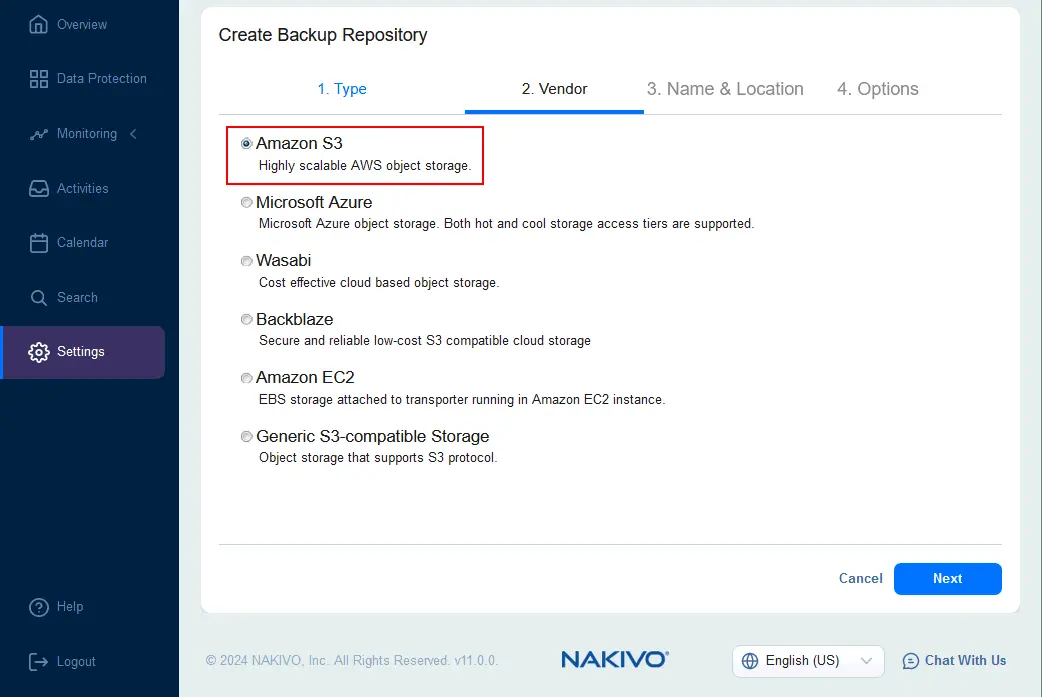
- At the Vendor screen, select Amazon S3.
- Specify the name and location of the backup repository.
- Enter a name to be displayed in the NAKIVO Backup & Replication web interface, for example, Amazon S3 Repo.
- Select the Transporter deployed in AWS or locally.
- Select the AWS account that was added to the NAKIVO Backup & Replication inventory.
- Select the AWS region with enough permissions to write data for your AWS account.
- Select the Amazon S3 bucket where a backup repository will be created. In our case, this is blog-bucket001.
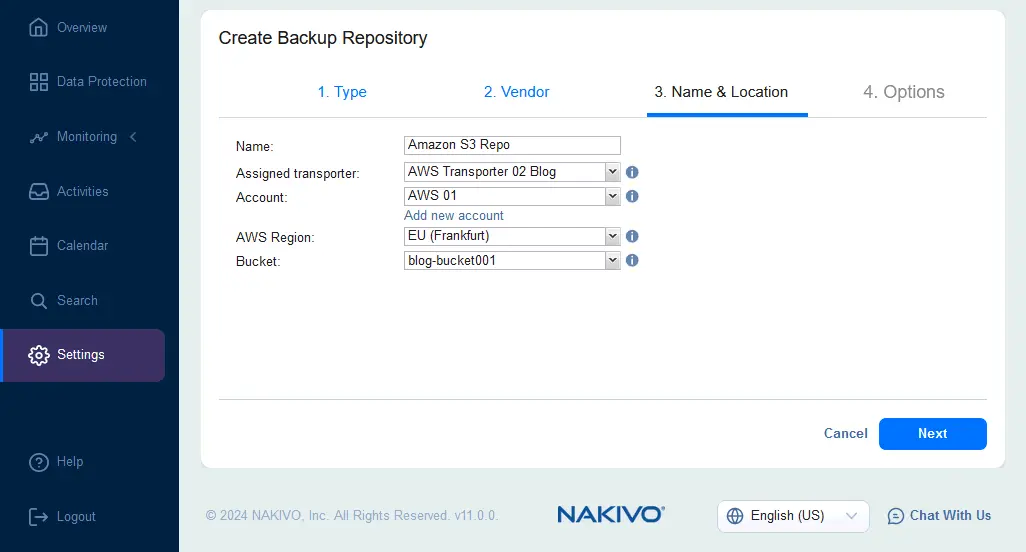
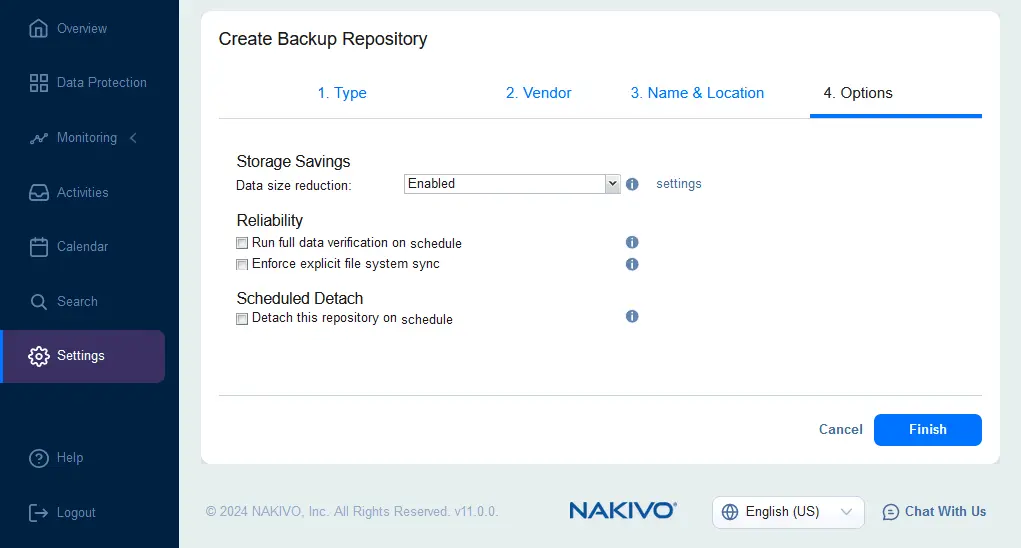
- Configure backup repository options. You can leave the default settings. Click Finish to create a backup repository in an Amazon S3 bucket.
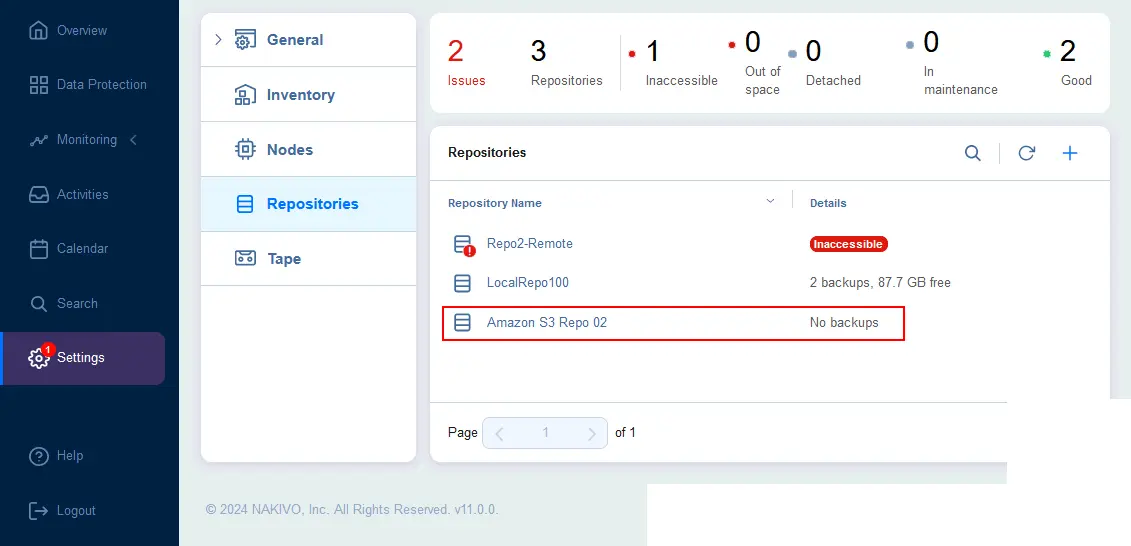
- You should see the added Amazon S3 backup repository in the list of repositories in Settings > Repositories.
Configuring a Microsoft 365 backup to AWS
The environment is ready to configure a Microsoft 365 backup job and store backups in Amazon S3.
There are two approaches to backing up Microsoft 365 data to AWS:
- Configuring a backup job and selecting a backup repository in Amazon S3 directly.
You can watch our video tutorial for this approach:
- Configuring a backup job to a local backup repository and then configuring a backup copy job to Amazon S3.
The advantages of using the approach with a backup copy are that a local backup can be created faster and this approach allows you to implement the 3-2-1 backup rule.
Learn more about the 3-2-1 strategy for Microsoft 365 backups in this video:
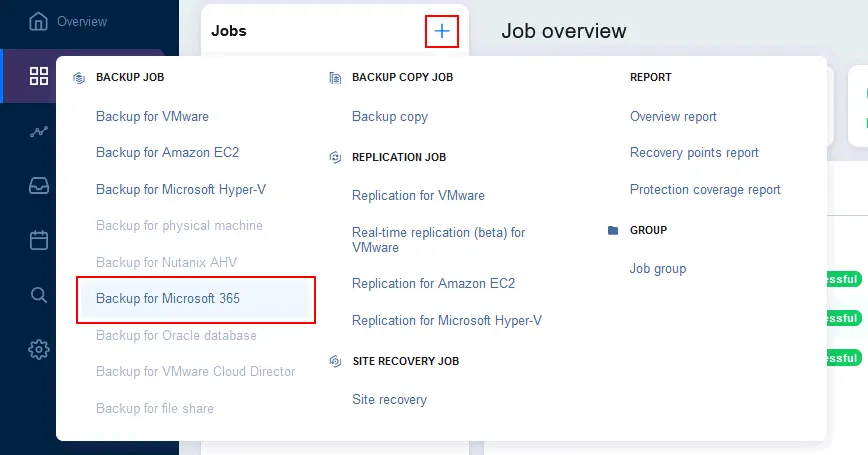
For demonstration purposes in this blog post, we are going to create a Microsoft 365 backup job to AWS S3 directly.
- Go to Data Protection, hit + and click Backup for Microsoft 365.
- Select source Microsoft 365 objects to back up. You can select Exchange Online mailboxes, user OneDrive instances, SharePoint Online sites and Microsoft Teams teams. Then, hit Next to continue.

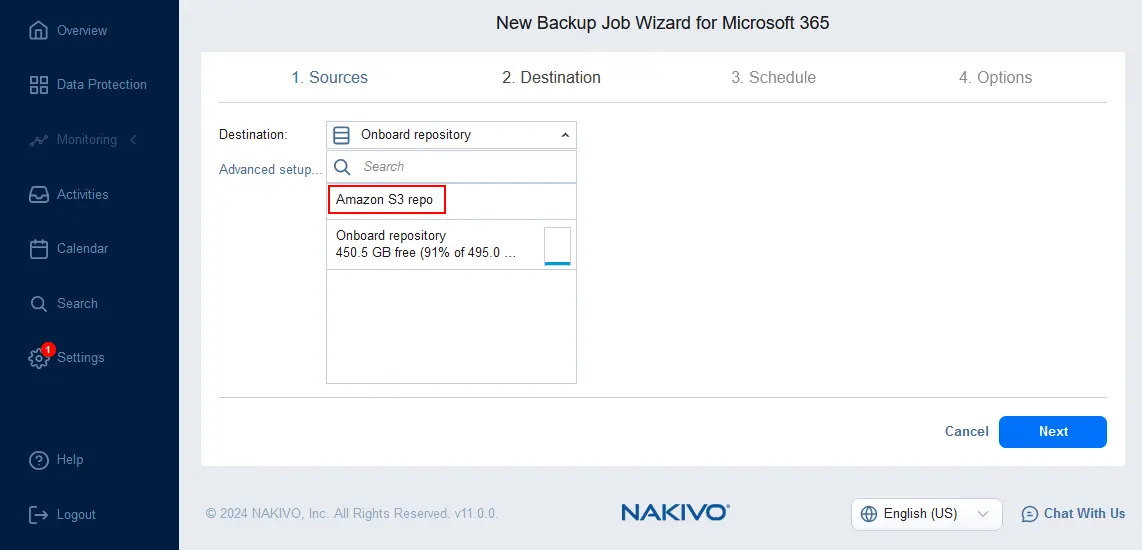
- Select a destination for a Microsoft 365 backup.
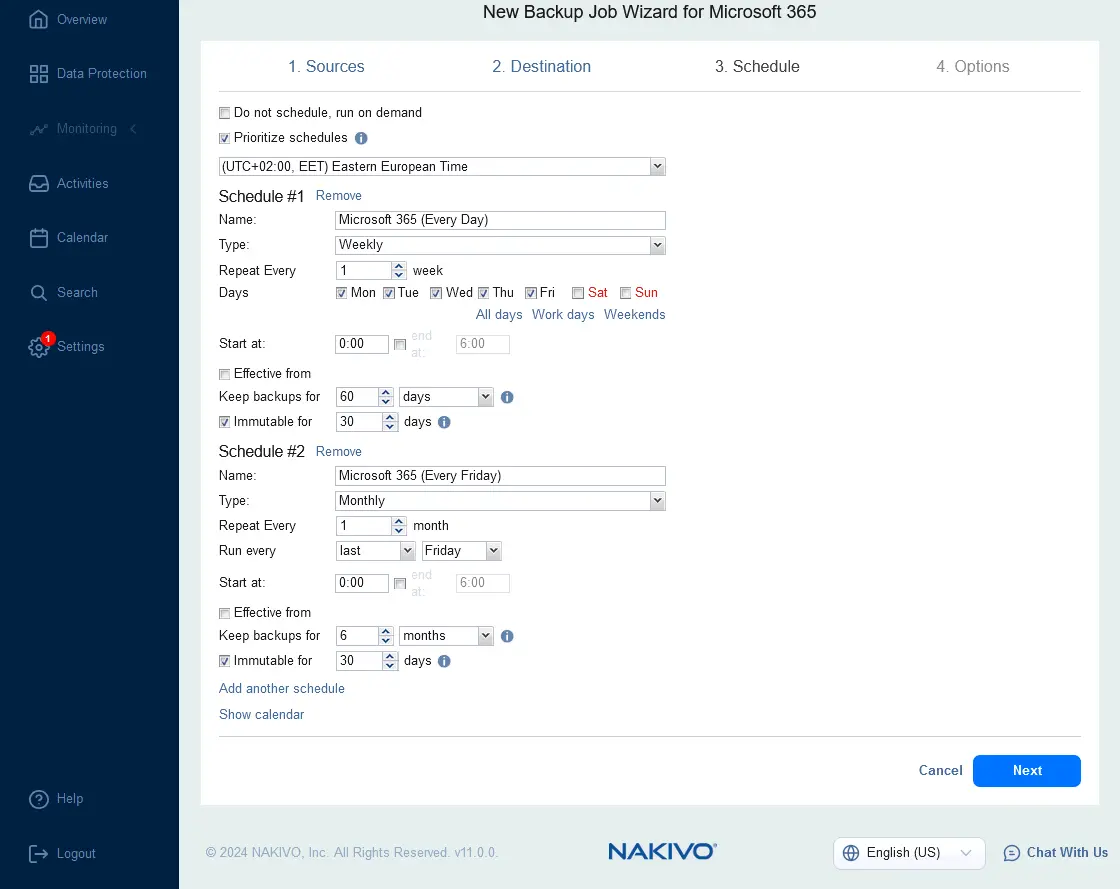
- Set up a schedule for Microsoft Office 365 backup to AWS. You can set up a flexible scheduling and retention policy. You can enable immutability for a Microsoft 365 backup in AWS at this step.
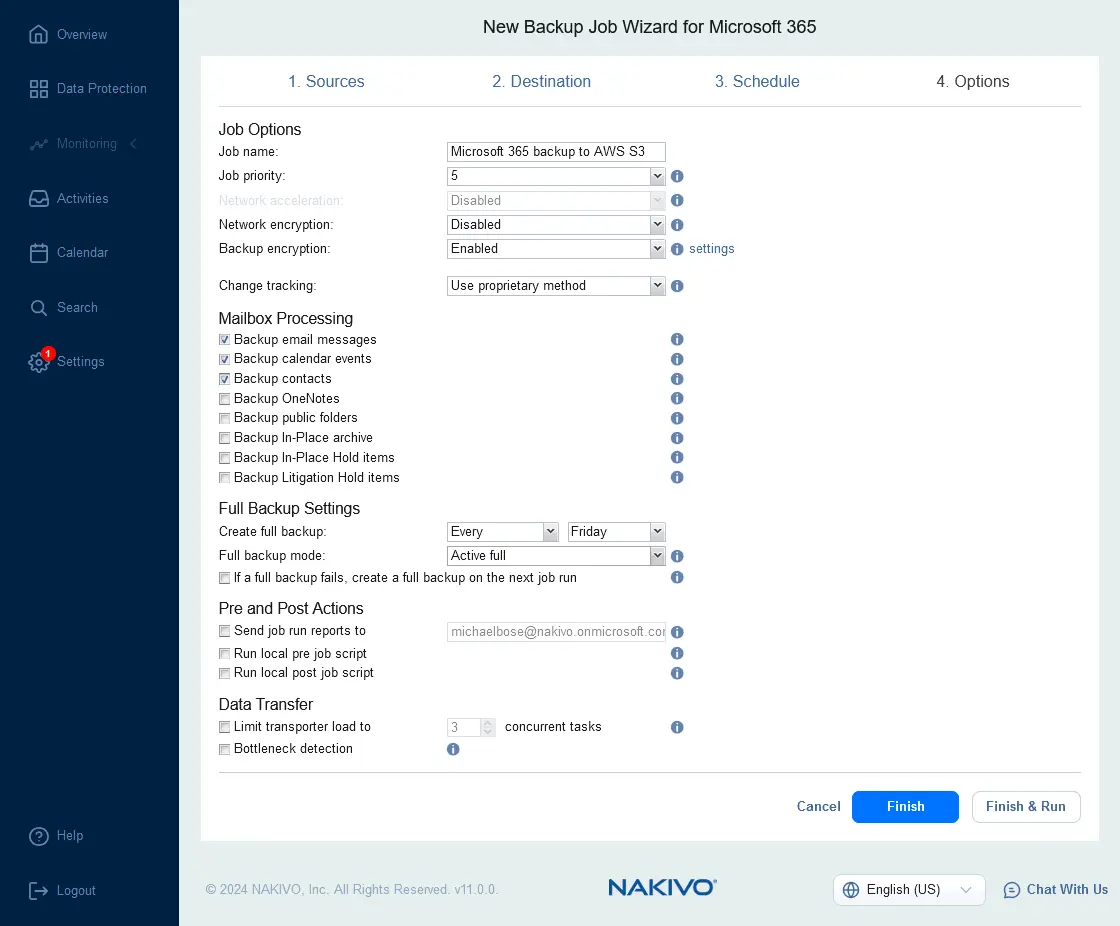
- Configure backup job options. Enter a job name, for example, Microsoft 365 backup to AWS S3. Enable backup encryption for even better security. Select a change tracking method for incremental backup, for example, use a proprietary method.
If you selected to back up Exchange Online contents, you can choose mailbox processing options, that is, which object types to back up.
Select full backup settings. There are two options: Active Full and Synthetic Full. When you back up data to Amazon S3, keep in mind the following statements: the number of read operations from S3 is higher with a synthetic full backup, which increases the costs of using AWS.
- Synthetic full backup requires simultaneous read/write operations, which reduce performance significantly, compared to active full backup.
- To create a synthetic full backup, the NAKIVO solution reads repository data, creates a full backup locally on the assigned Transporter and writes data to an Amazon S3 bucket.
After configuring all needed options, hit Finish & Run.
How to Restore Microsoft 365 Data from AWS
To restore Microsoft 365 data from a backup stored in AWS, perform the following steps:
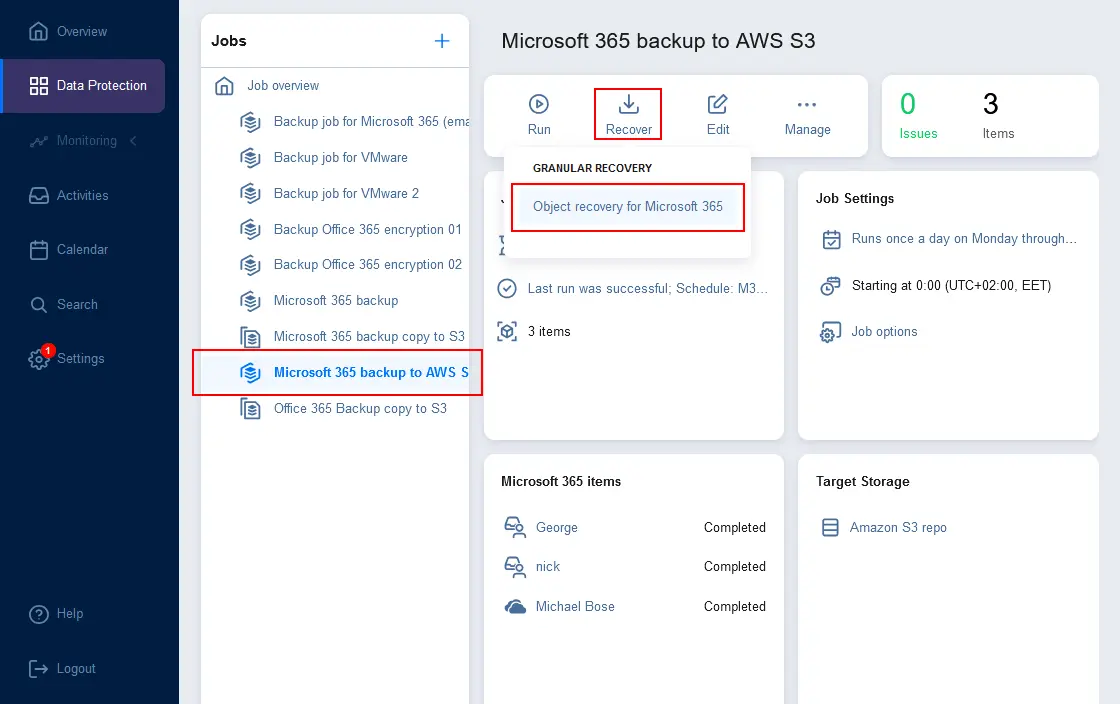
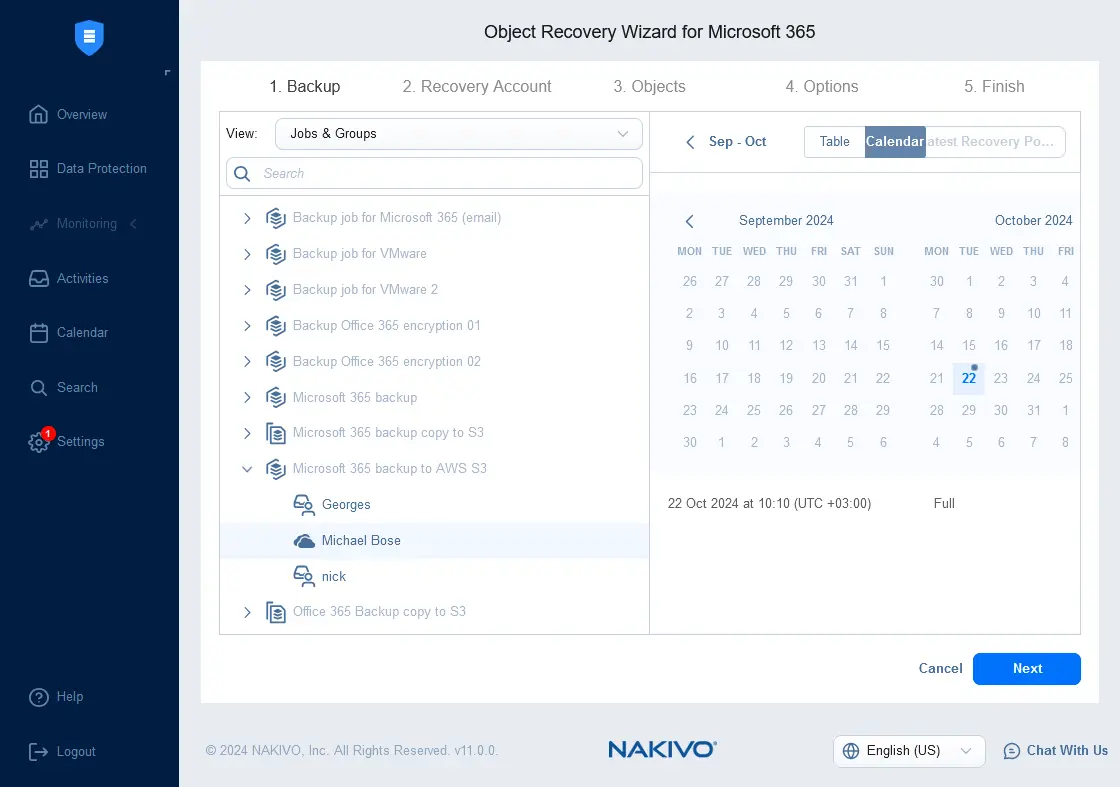
- Go to Data Protection, select your Microsoft 365 Backup job to AWS, click Recover and hit Object recovery for Microsoft 365.
- At the first step of the object recovery wizard, select Microsoft 365 user data to recover. You can select a backed-up mailbox, drive, site or team. Select a recovery point in the calendar or table on the right side of the screen.
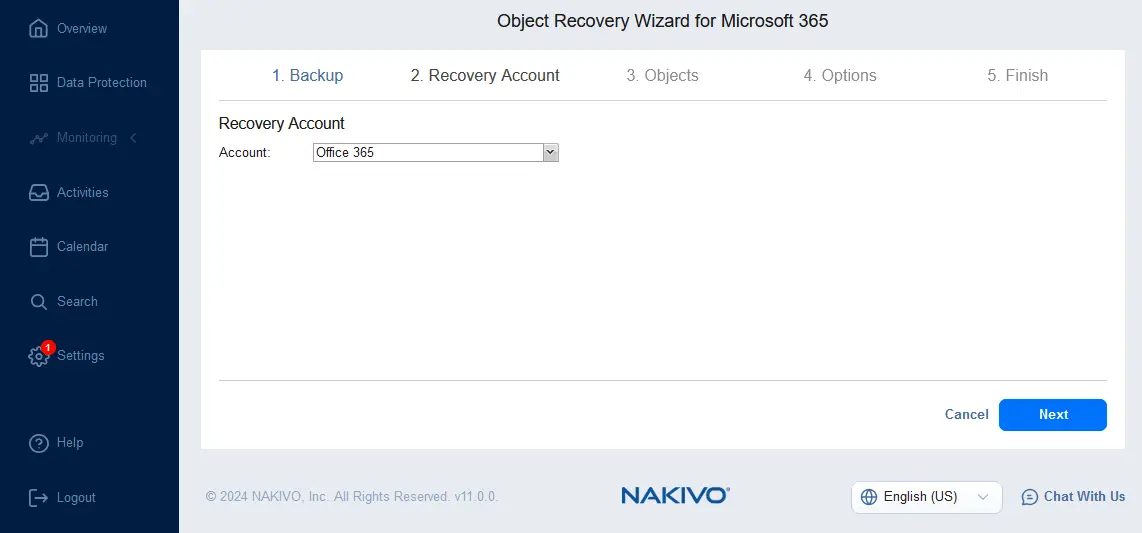
- Select a Microsoft 365 account where to recover data. This account was added to the NAKIVO inventory at the beginning of the configuration.
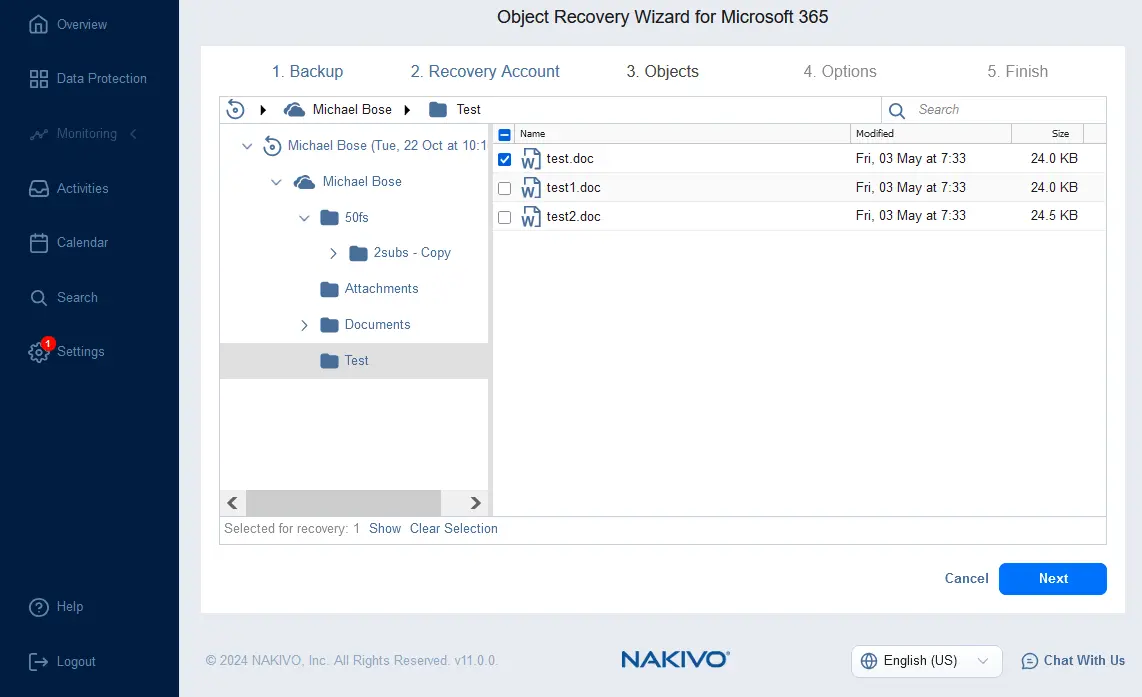
- Select objects to recover. Depending on the selected backup type, you can recover emails, contacts, calendar items, folders, files, chat messages, document libraries and more at this step.
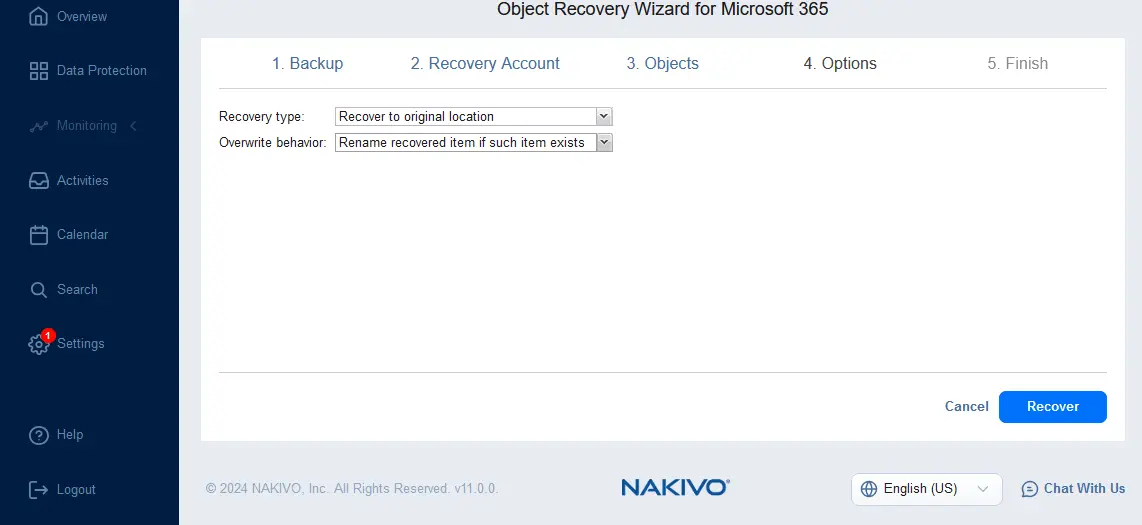
- Select recovery options, such as recovery type and overwrite behavior. Once you have selected the needed options, click Recover.
Conclusion
Microsoft 365 backup to Amazon S3 significantly improves a backup strategy and increases the probability of successful data recovery. AWS reliability, availability and data immutability in Amazon S3 ensure a high level of reliability for storing backups. Use NAKIVO Backup & Replication to back up Microsoft 365 to Amazon S3 with immutability support, flexible scheduling and retention settings, as well as advanced data recovery options.