The Most Effective Ways to Transfer Files from a VM to a Host
Virtual machines provide many advantages, such as flexibility, rational use of resources and running in isolated environments. A common task in virtual environments is copying files between VMs and hosts. Read to learn how to copy files to a virtual machine from a host, how to transfer files from a VM to host, and how to copy files between VMs.

The Components of Our Environment
Let’s start by going over the terminology:
- A host is a physical machine on which a hypervisor is installed.
- A hypervisor is virtualization software to run virtual machines on the host. There are two types of hypervisors:
- Type 1: Using an ESXi server, which is the host machine
- Type 2: Using VMware Workstation, and in this case Windows and Linux can be the OS of the host machine
In this walkthrough, the environment used to explain how to transfer files from VM to host is made up of the following components:
- ESXi host 1: 192.168.101.201
- ESXi host 2: 192.168.101.202
- Ubuntu Linux machine: 192.168.101.210
- Windows host with VMware Workstation installed
- Network: 192.168.101.0/24
- ESXi VMs and VMware Workstation VMs connected to the same network
We use the following technologies to copy files between VMs and hosts:
- Shared Folders
- Shared Clipboard and Drag & Drop
- USB Storage Device
- PowerCLI
- SSH and SCP
- NFS Share
- Download/Upload Files in a VMware web interface
- ISO Files
Using Shared Folders to Transfer a VM file to the Host
Shared Folders is a convenient feature in VMware Workstation to transfer files between a Windows or Linux physical host on which VMware Workstation is installed and VMs running on VMware Workstation. For macOS, VMware Fusion is the equivalent of VMware Workstation and supports similar features.
Let’s now go over the steps to transfer files from VM to host and vice versa using VMware shared folders.
Note: For this feature to work, VMware Tools must be installed on a VM. Data between a host and VM is transferred using interaction via VMware Tools between the host and guest OS without using a network.
- Select a VM for which you want to configure VMware file sharing. We select one of our Windows VMs.
- Click
VM > Settings(Edit virtual machine settings) in the VMware Workstation GUI. - In the
Virtual Machine Settingswindow, select theOptionstab and clickShared Folders. In theFolder sharingsection, selectAlways enabled. Optionally, you can map a shared folder as a network drive in Windows guests for more convenience by selecting the checkbox. - Click
Addto select a folder to be used as a shared folder.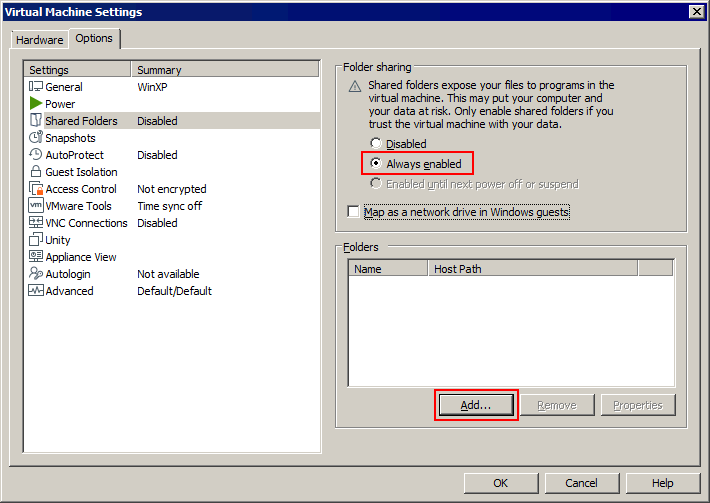
- Enter the path to the folder to share on the host or click
Browseand select the needed folder. We selectC:tempshare-VMEnter a name for the shared folder, for example,
share-VMClick
Next.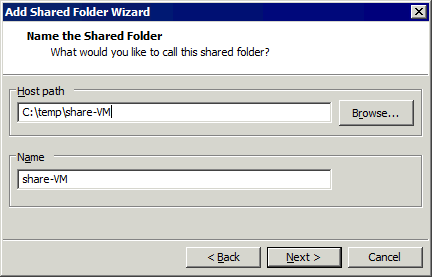
- Select
Enable this share. If you want VMs to access the shared folder in the read-only mode, select theRead-onlycheckbox. ClickFinish.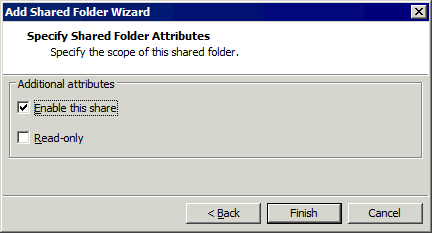
- The new shared folder is now displayed in the list of shared folders in the
Optionstab of theVirtual machine settingswindow. A shared folder is enabled if the corresponding checkbox is selected next to the file name.Click
OKto save the settings.
- Open the user interface of the Windows VM used to share the folder with the
Shared foldersfeature. - Click
Network(My Network Places) inMy Computer(This PC) or Windows Explorer to see computers available in the network. - Select
vmware-hostas the computer name on which the shared folder is configured. This name is set by default and is mapped to your physical machine (host) with the shared folder.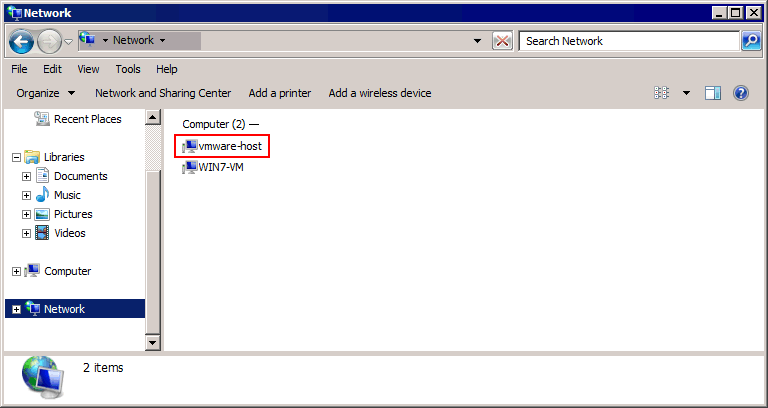
- Click
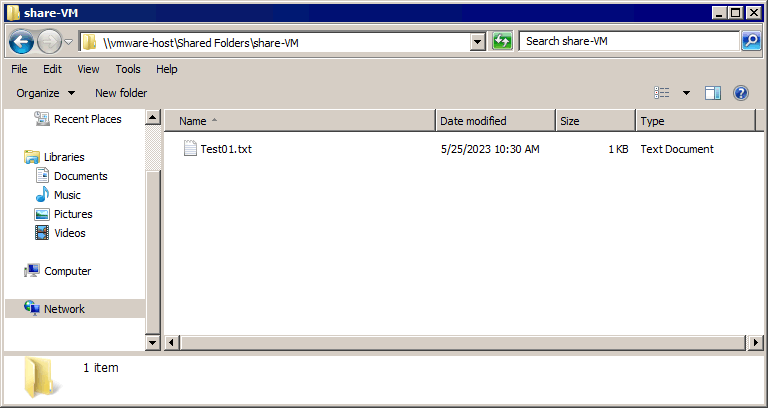
Shared Foldersand select the needed shared folder (share-VMin our example). The full path to the shared folder, in our case, isvmware-hostShared Foldersshare-VM
You can copy files to a virtual machine from a host and to a host from a VM. We have copied Test01.txt from a Windows host to a Windows guest in our example using VMware file sharing in VMware Workstation.
For Linux guests, you can mount all VMware shared folders with the command as shown below:
- In Linux with kernel prior to 4.0:
mount -t vmhgfs .host:/ /home/user1/shares - In Linux with kernel 4.0 or newer:
/usr/bin/vmhgfs-fuse .host:/ /home/user1/shares -o subtype=vmhgfs-fuse,allow_other
If you want to keep a shared folder mounted after VM reboot, add the appropriate lines with the comment and configuration in /etc/fstab , for example:
#
VMware sharing folder to transfer files between VMWare guest and host
.host:/ /mnt/hgfs/ fuse.vmhgfs-fuse defaults,allow_other,uid=1000 0 0
Before we move on to the next section, note that the shared folders feature is available only in VMware Workstation (and VMware Fusion on macOS), and it is not available for VMs running on ESXi hosts. For ESXi hosts, you can share a folder manually and use a network to copy files between Windows machines. To copy files from a VM to an ESXi host, you should use an additional tool or combine copying files from a manually shared folder with one of the methods explained below.
There are other methods for sharing a folder in Windows 10 and Windows Server 2019. You can also learn more about the SMB file sharing protocol.
If you have a Windows account with administrative rights and a security policy allows accessing hidden administrative shares available by default, you can access files on local disks of Windows machine using the path to the share like:
IP-Addressc$
Where:
IP-Address is an IP address or host name of a remote Windows machine.
C$ is the needed disk drive letter on a remote Windows machine which is a hidden system share.
Using Shared Clipboard to Transfer Files to VMs from a Host
Shared clipboard is a feature that allows you to copy and paste content like text and entire files from a virtual machine to a host machine on which VMware Workstation is installed. The process is similar to the process when you copy-paste content between different application windows in Windows or Linux with the GUI.
The full range of features is available in VMware Workstation, which allows you to transfer files to virtual machines from a host and to a host from a VM. You can drag and drop files as an alternative to copy-pasting.
Shared Clipboard in VMware Workstation
Let’s go over how to transfer files to VMware Workstation VMs using a shared clipboard and Drag & Drop. In our example, VMware Workstation is installed on a Windows host.
- Select your VM in the left pane where VMs are listed.
- Click
Edit virtual machine settings(VM > Settings).
- Select the
Optionstab and clickGuest Isolation.Select two checkboxes:
- Enable drag and drop
- Enable copy and paste
Click
OKto save settings and close the window.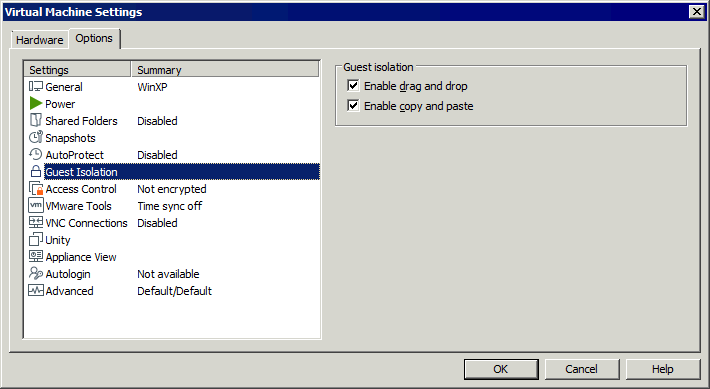
Shared Clipboard in VMware ESXi
As for VMs running on VMware ESXi, you cannot copy any file using drag & drop or via shared clipboard between a VM on an ESXi host and any other machine. The only option is to copy-paste text between a VM running on ESXi and your local machine (on which VMware Workstation or VMware Remote Console is installed). Copy-paste and drag & drop for files are not supported for security reasons.
However, if you cannot copy a configuration file, for example, you can copy the text content of the file using a shared clipboard. By default, the shared clipboard is disabled in the ESXi VM configuration. Do the following on an ESXi host to enable a shared clipboard to copy-paste text data:
- The VM must be powered off when editing the VM configuration. Shut down the VM if the VM is running.
- Open
VM settings. You can use VMware Host Client and VMware vSphere Client. Select a VM, clickEdit VM settingsand select theVM optionstab.Expand the
Advanced Settingssection and clickEdit Configuration.
- You need to add three configuration parameters to the VM configuration (that is written to the VM configuration VMX file). Click
Add parameter.
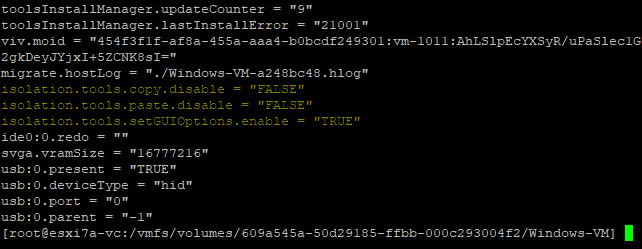
- Add these three parameters:
isolation.tools.copy.disable FALSEisolation.tools.paste.disable FALSEisolation.tools.setGUIOptions.enable TRUE - Click
OKand save settings.
As an alternative, you can manually edit a VMX file with VM configuration located on an ESXi datastore in the VM directory.
- Log in to the ESXi shell locally or via SSH.
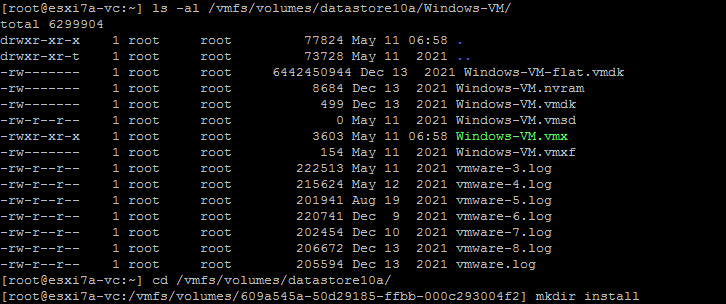
- Go to the VM directory (a directory where VM files are stored on a datastore). In our case, we go to this directory:
cd /vmfs/volumes/datastore10a/Windows-VM/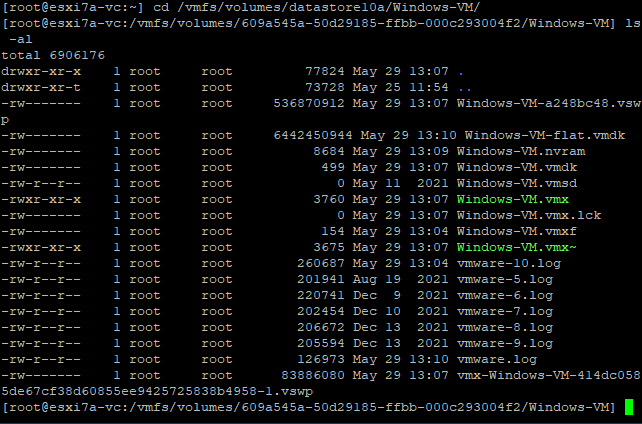
- Edit the VMX configuration file. In our case, the file is
Windows-VM.vmxvi Windows-VM.vmx - Add the three parameters shown above to the end of this configuration file.
- Save changes and close the file (exit the text editor).
Now we can copy and paste text between our local machine and remote VM running on an ESXi host by using VMware Remote Console and VMware Workstation to connect to a VM.
Using a USB Storage Device
VMware ESXi and VMware Workstation support the USB passthrough feature, which allows you to insert a USB device into a host machine and connect this USB device to a virtual machine running on this host. You can connect a USB storage device to a host machine and virtual machine sequentially to copy files between these machines in either direction.
Note: VMware Tools must be installed on the VM guest operating system (OS) to use the USB passthrough feature.
Copying files between VMware Workstation VMs and the host
Do the following to transfer files from VM to host in VMware Workstation installed on Windows and Linux hosts (the interface is unified):
- Power on the virtual machine.
- Insert a USB storage device, such as a USB HDD (Hard Disk Drive) or USB flash drive, into a physical computer that is a host machine.
- The
New USB Device Detectedwindow opens in VMware Workstation. Choose where you would like to connect your USB device:- Connect to the host
- Connect to a virtual machine
Let’s select the second option and connect our USB flash drive to the virtual machine. We are running a Windows VM in this example. If multiple VMs are running on VMware Workstation, you must select the needed VM in the list. A USB device can be connected only to one VM at time. Click
OKto proceed.
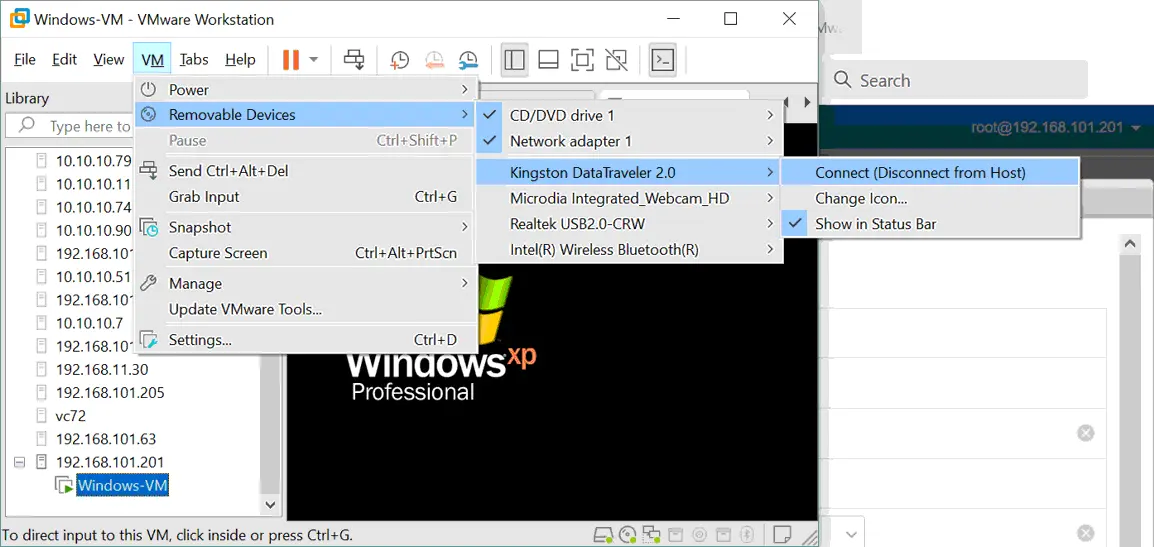
If your USB storage device has already been inserted into the USB port of the physical host machine on which VMware Workstation is installed, the pop-up Window with USB passthrough options won’t be displayed automatically. You can connect a USB device to a VM (disconnect from a host) in the menu:
Go to
VM > Removable Devices > Your USB Storage Device Name > Connect (Disconnect from host).In our example, the USB flash drive name is Kingston DataTraveler 2.0.
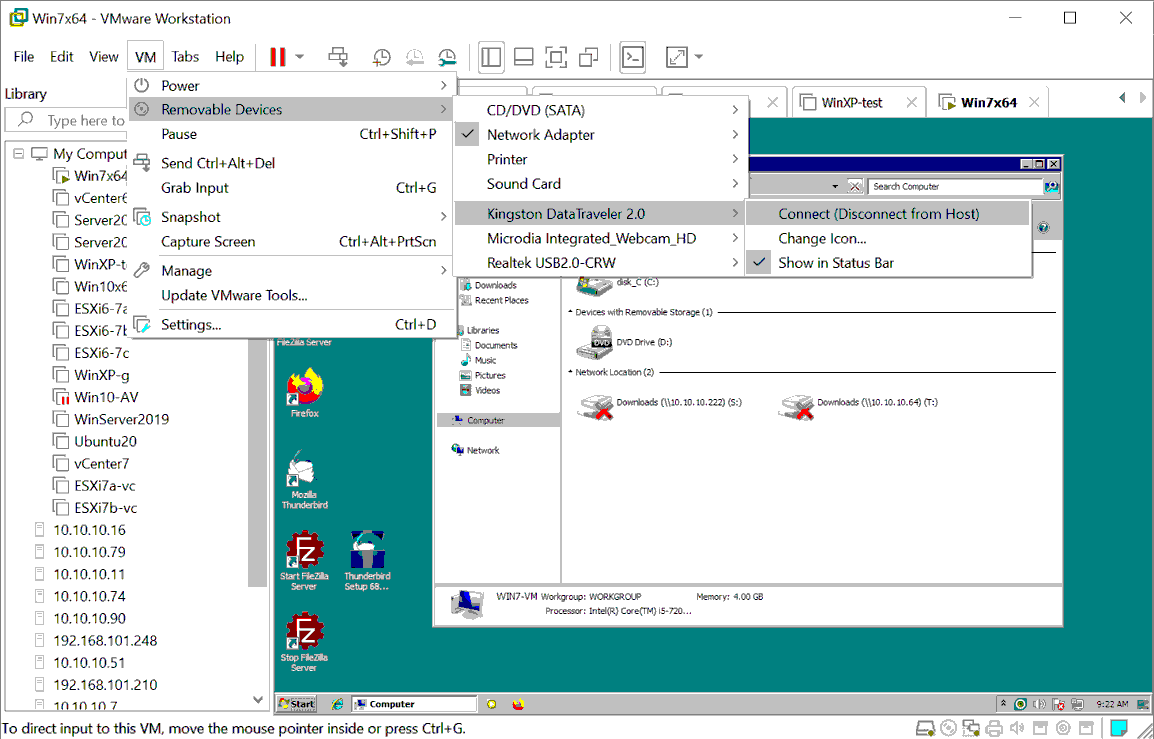
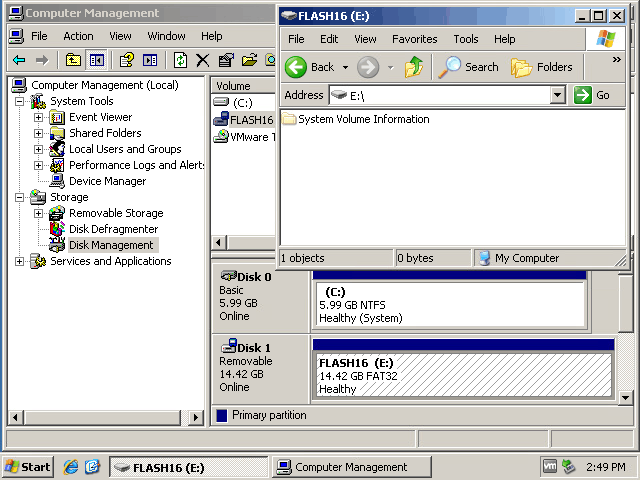
- Now we can see the USB flash drive connected to the Windows 7 VM in the list of disk drives of My Computer (Windows Explorer). To check the USB storage device:
- Right-click
My Computerand hitManage. - Go to
Computer Management > Device Manager and Computer Management > Disk Managementin the appropriate snap-in after you right-click.
If a drive letter is not assigned automatically, assign the letter manually in the
Disk Managementsnap-in.The workflow for Linux guests is identical. In some Linux distributions, you may need to mount a connected USB storage device like a flash drive manually in the Linux operating system.
- Right-click
- Once the USB storage device has been mounted to the VM and recognized by the guest OS, copy the needed files from the VM to a USB storage device. Copying files from the USB storage device to a VM also works now.

- After copying all needed files from the VM to the USB flash drive, disconnect the USB flash drive from the VM and connect this USB device to the host:
Click
VM > Removable Devices > Your USB Storage Device Name > Disconnect (Connect to host).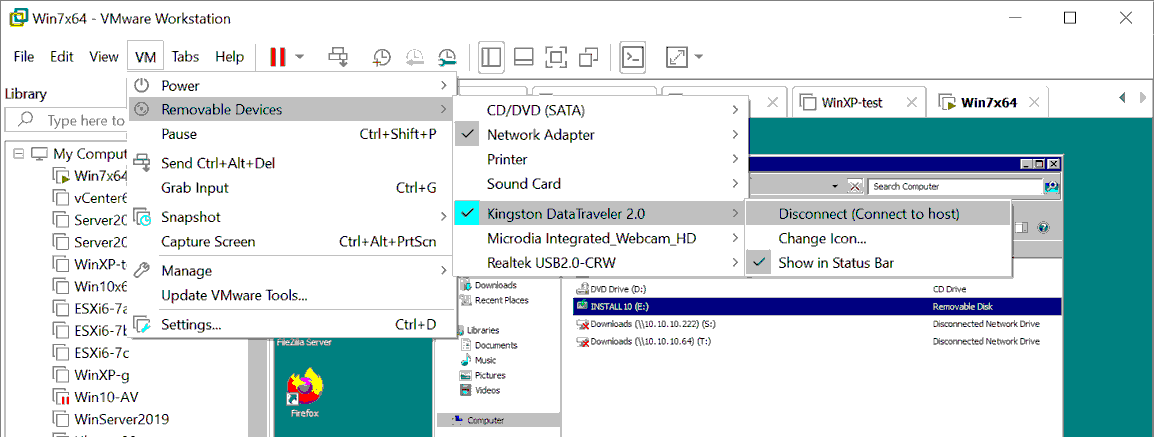
- A USB storage device is now connected to a host machine (a Windows machine on which VMware Workstation is running in our case). We can transfer the files that were copied from the VM to the USB flash drive to your host machine.
USB passthrough from VMware Workstation to ESXi VMs
You can use a USB flash drive inserted into an ESXi server and inserted into your local Windows or Linux machine (with VMware Workstation or VMware Remote Console (VMRC) installed) that you’re using to manage an ESXi host remotely to connect this USB flash drive to an ESXi VM. In the first case, the host-connected USB passthrough is used and in the second case, the client-connected USB passthrough is used.
Let’s connect a USB flash drive inserted into our local physical Windows 10 machine to a Windows XP VM running on an ESXi host v7.0 (using the client-connected USB passthrough feature). VMware Workstation is installed on our physical Windows machine and connected to the ESXi host via the network (192.168.101.0/24).
To do this:
- A VM must be powered off to edit the VM settings.
- Ensure that a
USB controlleris present in the list of virtual hardware of the VM. You can check VM configuration in VMware Host Client. Select your VM (Windows-VMin our case), clickEdit Settingsand select theVirtual Hardwaretab.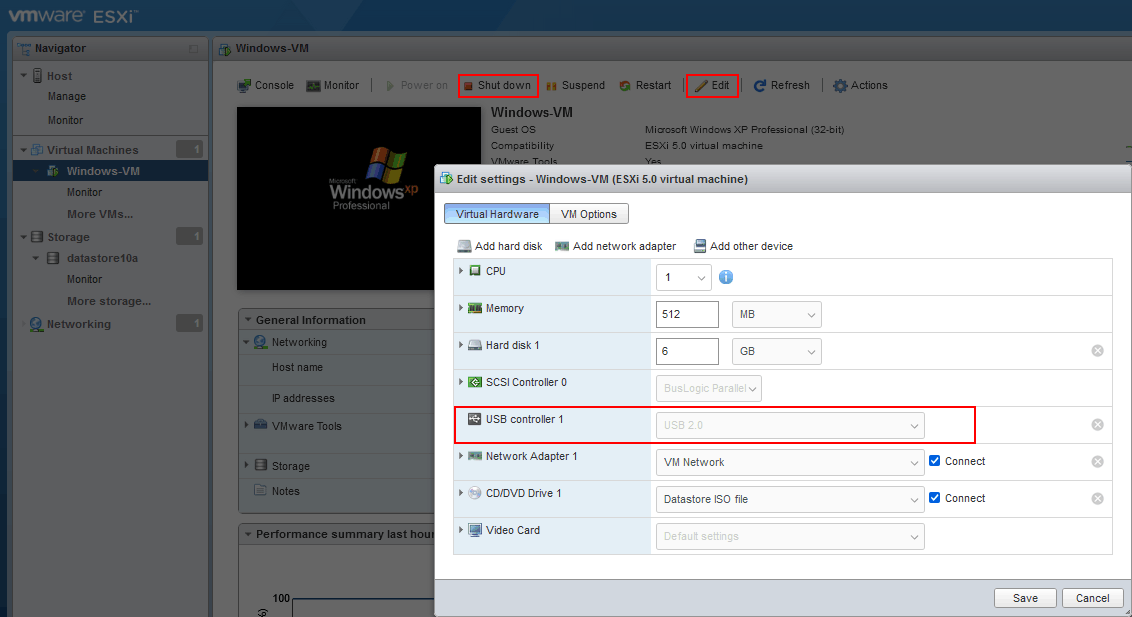
- Let’s go back to VMware Workstation installed on our local (physical) Windows 10 machine. Click
File > Connect to a serverin VMware Workstation for connecting to a remote ESXi host.
- Enter the ESXi server name or IP address, username and password. Click
Connect.
- Expand the ESXi host in the left pane of VMware Workstation where remote hosts, remote VMs on these hosts, and local VMware Workstation VMs are displayed.
- Select a VM running on a remote ESXi host. We select
Windows-VMrunning on 192.168.101.201. We can see a user interface of a guest OS of the selected VM after that. - Click
VM > Removable Devices > Your USB Storage Device Name > Connect (Disconnect from Host).Note that we select a USB device connected to our physical Windows machine on which VMware Workstation is installed. This USB device is not a device connected to a physical ESXi host to which we have connected remotely.
- Now we can see our USB flash drive connected to the Windows XP VM running on the remote ESXi host:
Start > CMD > compmgmt.msc > Device Manager.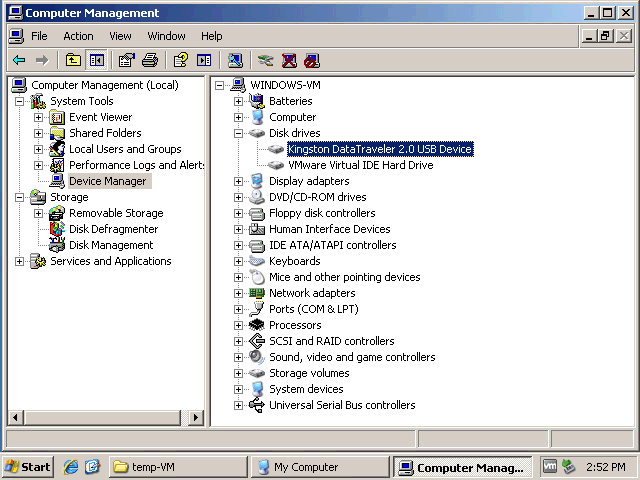
- Assign a disk drive letter to the partition of the connected USB flash drive if a drive letter has not been assigned. Copy the needed files between the VM and the USB flash drive. You can transfer files to a VM and from a VM.
- After copying files, you can disconnect the USB storage device from the VM and connect this device back to the local physical Windows 10 machine on which VMware Workstation is running. In the VMware Workstation GUI, click
VM > Removable Devices > Your USB Storage Device Name > Disconnect (Connect to host).
Connecting a USB Flash Drive on ESXi
This method is extremely useful in some cases, for example, if you need to update a network driver on an ESXi host and you cannot use the network. Connecting a USB flash drive to ESXi is more complicated than connecting to a host machine running VMware Workstation.
There are limitations on ESXi regarding supported file systems that can be mounted to ESXi. USB flash drives or USB HDD with FAT32 and NTFS file systems are not supported. For this reason, we need to create a partition on our USB flash drive and format this partition with VFAT (which is recognized in Windows as FAT12). VFAT has limitations, such as the maximum partition size and the maximum file size. Hence, this method is not applicable for large files such as virtual disks or ISO images larger than 4 GB. However, these limits are enough to transfer configuration files, drivers, etc.
Creating a partition on a USB flash drive
First of all, let’s create a new partition on our USB flash drive and format this partition in VFAT. We can do that by attaching a USB flash drive inserted into the ESXi server to a VM (using the host-connected USB passthrough feature). Alternatively, we can insert a USB flash drive into a physical Windows or Linux machine.
In this example, we use a Windows 7 machine to prepare a USB flash drive for ESXi. Commands for Windows Server 2008R2, Windows 10 and other newer Windows versions are the same.
- To ensure that a USB flash drive is connected to your Windows machine, right-click
My ComputerorThis PC(or rundiskmgmt.mscfrom CMD) to openDisk Management. - Open the Windows command line:
Start > Run > cmd - Type
diskpartin the command line and pressEnter.You see a diskpart prompt:
Diskpart - List the disks connected to your Windows machine:
list diskFind your USB flash drive in the output list and remember the disk number. In our case,
Disk 1is the number of our USB flash drive (see the screenshot below). - Select your USB flash drive by defining the appropriate disk number you got from the above command’s output (
disk 1in our case).select disk 1 - List partitions on the selected USB flash drive:
list partitionWe have one partition (
Partition 1) on our USB flash drive (see the screenshot below). Having one partition on a USB flash drive is the most popular case.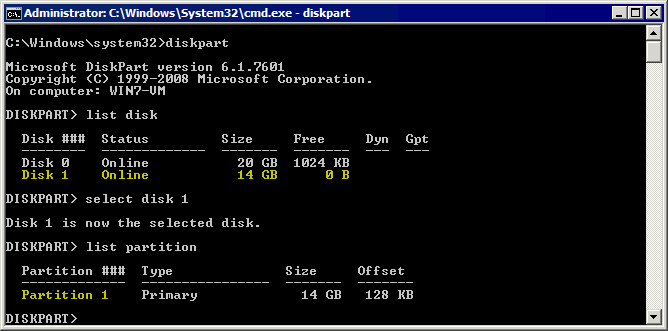
Next, we need to delete partitions on the USB flash drive.
Important: All data on the USB flash drive will be deleted. You can copy data from the flash drive if needed before going to the next steps.
- Select a partition on the USB flash drive that is about to be deleted:
select partition 1 - Run the command to delete the selected partition:
delete partition - Select a disk which is your USB flash drive again:
select disk 1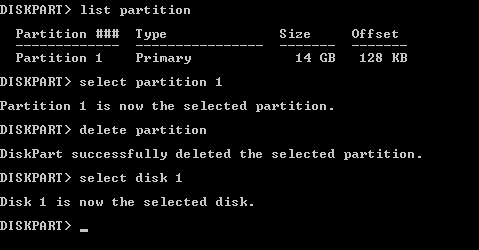
- Create a new partition with a VFAT file system. In this example, we create a 4-GB partition on our USB flash drive. Keep in mind that you cannot store files larger than 4 GB on VFAT. Note that VFAT supports only the 8.3 filename format.
create partition primary size=4000 id=6 - Format the created partition in this way for compatibility with ESXi:
format fs=fat quick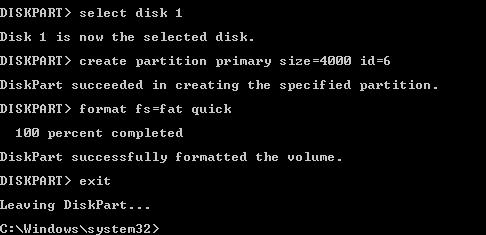
- Exit the diskpart utility (run the
exitcommand).
A USB flash drive is ready to be recognized by ESXi and copy files. After some additional ESXi configuration steps, you can attach a USB flash drive to a VM and copy the needed file(s) to the USB flash drive.
Let’s suppose that we need to copy a ZIP archive with drivers. We have copied net-tulip.zip to a USB flash drive in our example. Next, we need to mount a partition of a USB flash drive inserted in an ESXi server in the ESXi command line.
Configuring an ESXi host to use a USB flash drive
Suppose we need to copy a ZIP archive with a driver from a USB flash drive to an ESXi datastore and then copy a VM configuration file from an ESXi datastore to a USB flash drive. The file name is net-tulip.zip in our example. Do the following on the ESXi host to transfer files to VMware ESXi from a USB flash drive and the other way:
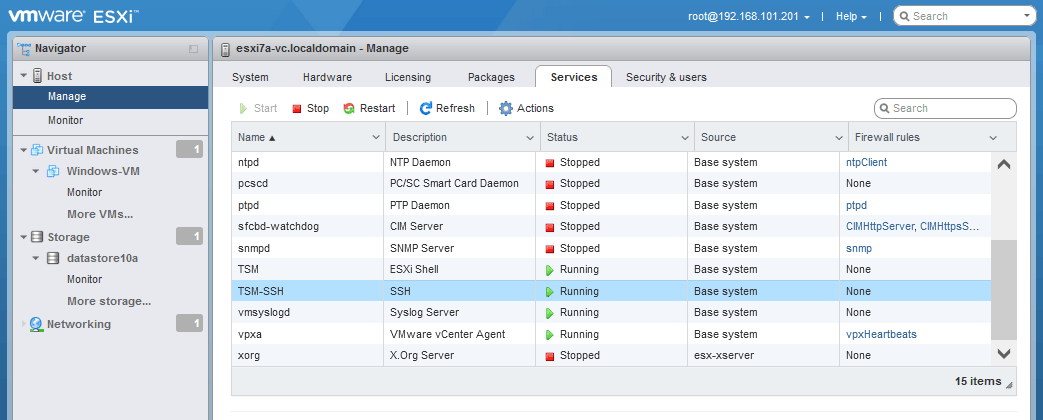
- Configuration is made in the command line interface. For this reason, you must enable SSH access on an ESXi host.
- To enable remote SSH access in DCUI, go to
Troubleshooting options > Enable SSH. - To enable remote SSH access and SSH server on ESXi in VMware Host Client, go to
Host > Manageand select theServicestab. Right-clickTSM-SSHand clickStartto start the service. You can enable this service permanently.
- To enable remote SSH access in DCUI, go to
- Connect to the ESXi host via SSH to use the command line. You can use your favorite SSH client.
- Stop the USB arbitrator service:
/etc/init.d/usbarbitrator stopUSB arbitrator automatically enables the USB passthrough feature for virtual machines residing on an ESXi host (you just need to select a USB flash drive in VM settings of the appropriate VM to use this feature).
- If you want to disable the USB arbitrator service after ESXi reboot (permanently), you can use the command:
chkconfig usbarbitrator offTo enable the USB arbitrator service use the appropriate command:
/etc/init.d/usbarbitrator startchkconfig usbarbitrator on
- Optional commands to check the USB devices connected to an ESXi host:
lsusbesxcli storage core device list | grep -i usbesxcli storage filesystem listYou can see
/var/log/usb.logto check the status of a USB device. - You may need to disconnect and connect a USB storage device after stopping the USB arbitrator service.
- List the block disk devices to find/identify the connected USB flash drive (or USB HDD).
ls -ltrh /vmfs/devices/disks/Our USB flash drive is
mpx.vmhba32:C0:T0:L0:(see the screenshot below).Thus, the full disk address/location is:
/dev/disks/mpx.vmhba32:C0:T0:L0: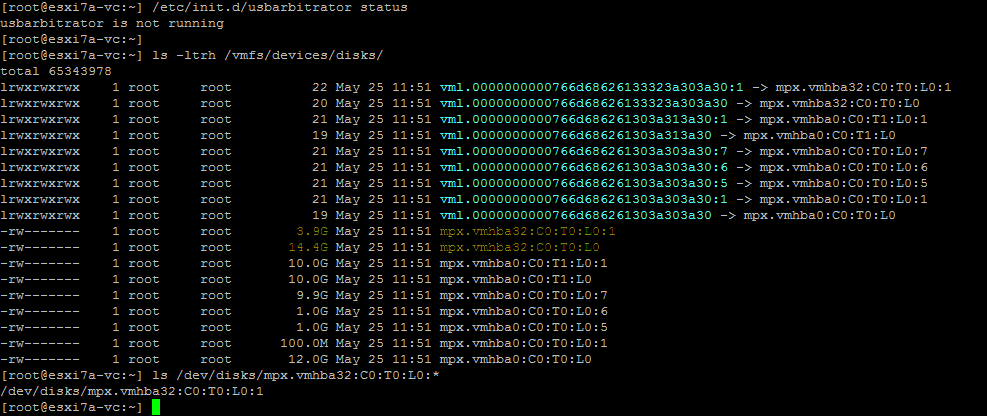
- Check the partition number of the USB device to ensure that you have identified the right disk device:
ls /dev/disks/mpx.vmhba32:C0:T0:L0:*According to the output, the full device ID, taking into account the partition number in our case, is:
/dev/disks/mpx.vmhba32:C0:T0:L0:1 - Locate the root folder of a USB flash drive to define the source/destination path to copy files. Run the following command and press
Tabto see the available items in the volumes directory. The/volumes/directory of the ESXi file system is a directory to which partitions with file systems are mounted.ls -al /vmfs/volumes/ [press Tab]The volume on a USB flash drive is called
NO NAME
- Check the contents of the USB flash drive root directory
ls -al /vmfs/volumes/NO NAME/Our ZIP archive is present on the USB flash drive volume.

- We have created the
installfolder on the ESXi datastore (datastore10a) with the commands:cd /vmfs/volumes/datastore10amkdir installIn the screenshot below, you can also see the directory of the VM whose configuration file we are going to copy from the ESXi datastore to a USB flash drive later.
- Copy the ZIP archive from the USB flash drive to the install folder on our ESXi host (on
datastore10a).cp /vmfs/volumes/NO NAME/net-tulip.zip /vmfs/volumes/datastore10a/install/ - Check whether the file has been copied:
ls -al /vmfs/volumes/datastore10a/install/The file has been copied successfully.

Similarly, you can copy files in the opposite direction – copy files from ESXi to a USB flash drive and then copy the needed file to a VM or to another machine from this USB flash drive.
- Check the contents of the VM folder:
ls -al /vmfs/volumes/datastore10a/Windows-VM/ - Copy the
Windows-VM.vmxconfiguration file from an ESXi datastore to a USB flash drive:cp /vmfs/volumes/datastore10a/Windows-VM/Windows-VM.vmx /vmfs/volumes/NO NAME/ - Check whether the file was copied to the USB flash drive:
ls -al /vmfs/volumes/NO NAME/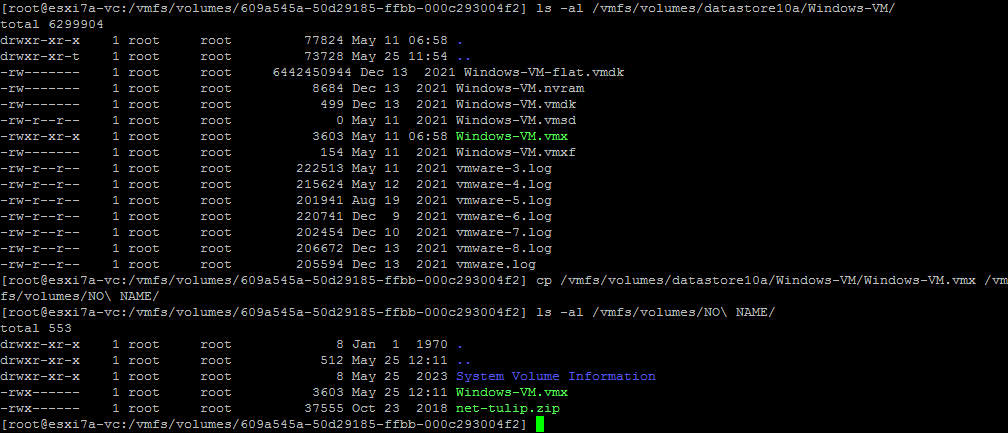
After finishing copying files on the ESXi host, you can eject the USB flash drive and start the USB arbitrator service on the ESXi host. Then you can insert the USB flash drive and use the host-connected USB passthrough feature to attach the USB flash drive to the virtual machine.
Read more about USB passthrough for ESXi and connecting a USB storage device inserted into an ESXi host to a VM residing on the ESXi host.
Using PowerCLI to Transfer Files to VMware VMs
Another method to transfer files from VM to host is using PowerCLI commands (cmdlets). VMware Tools must be installed in a guest operating system inside a VM. These PowerShell cmdlets use VMware Tools to copy files to/from VMs residing on an ESXi host. Thus, you don’t need the network if you run commands inside a VM residing on the source/destination ESXi host.
To copy files between VMs, you can use a Copy-VMGuestFile cmdlet and other cmdlets in vSphere PowerCLI.
- Connect to an ESXi host or vCenter Server. We connect to an ESXi host in this example.
Connect-VIServer 192.168.101.201
- To avoid the certificate warning, run the command:
Set-PowerCLIConfiguration -InvalidCertificateAction Ignore -Confirm:$false
Copy-VMGuestFile (Local > ESXi VM)
Use the following command to copy a file from a local machine (a machine where PowerCLI is running to a remote VM on an ESXi host):
Copy-VMGuestFile -Source "c:temptest.txt" -LocalToGuest -VM Windows-VM -Destination "c:temp-VM" -GuestUser user1 -GuestPassword Password
Where:
c:temptest.txt is the source file that we want to copy from the local machine
-LocalToGuest is the direction (from local machine to guest OS on a destination VM running on ESXi)
-VM Windows-VM is the definition of the destination VM name
c:temp-VM is the destination folder on the destination VM (where we want to store a file copy)
user1 is the user name in the guest operating system (OS) on the destination VM. This user must have access to the defined destination folder.
Password is the password for this user.
We ignore the warning about the VMware Tools version and check whether our text.txt file has been copied.

We can see that our test.txt file, whose size is 29 bytes, was copied successfully to the Windows XP VM running on an ESXi host.

Copy-VMGuestFile (ESXi VM > Local)
Now, let’s copy a file from the guest OS of the VM to a local directory of the machine where the command is executed:
Copy-VMGuestFile -Source "c:temp-VMtest2.txt" -GuestToLocal -Destination "c:temp" -VM Windows-VM -GuestUser user1 -GuestPassword Password
Where:
-Source "c:temp-VMtest2.txt" is the path to the source file on the VM running on ESXi
-GuestToLocal is the direction (from a guest OS of the ESXi VM to the local machine where the command is executed)
"c:temp" is the path to the destination folder on a local machine
user1 is the user name in the guest operating system on the destination VM. This user must have access to the defined destination folder.
Password is the password for this user in the guest OS

You can see examples of using the Copy-VMGuestFile cmdlet with the command:
get-help Copy-VMGuestFile -examples
Using Copy-DatastoreItem
The Copy-DatastoreItem PowerShell cmdlet is used to copy files to/from an ESXi datastore. There are 2 approaches for using this cmdlet to copy file to VMware ESXi datastore:
- If PowerCLI is installed on a Windows guest inside the VM, you can run a command to copy a file directly from an ESXi datastore to a VM and vice versa.
- If you cannot install PowerCLI on a virtual machine residing on an ESXi host, you can run PowerCLI commands from your local Windows machine, copy files from an ESXi datastore to your local machine with the
Copy-VMGuestFilecommand, and then copy these files from your local machine to a VM with theCopy-VMGuestFile.
You must be connected to an ESXi server or vCenter Server. You can do this with the command:
ViConnect
We are connected directly to the ESXi host.
Let’s copy a VM configuration file from the datastore to the current Windows machine (the machine on which we run these commands – it can also be a VM on an ESXi host):
- Get the information about the datastore:
Get-Datastore "datastore10a" - Get an ESXi datastore object:
$datastore = Get-Datastore "datastore10a" - Create a new PowerShell drive, named as
ds:that maps to$datastore:New-PSDrive -Location $datastore -Name ds -PSProvider VimDatastore -Root "" - Set your datastore as the current location:
Set-Location ds: - To list files and directories in the selected directory, use the command:
Get-ChildItem
- You can set the VM directory as a new location. In our case, this directory is
Windows-VMSet-Location "Windows-VM" - The command to copy the VM file, that is, the VM configuration VMX file, from the defined ESXi datastore to the temp folder on the current machine:
Copy-DatastoreItem -Item ds:Windows-VMWindows-VM.vmx -Destination c:tempWhere:
ds:Windows-VMWindows-VM.vmxis the path to a file that must be copied andds:is the defined shortcut to a datastore (datstore10ain this case).
- If you have connected to vCenter (not to a particular ESXi host as we did in this example), you can use the following command with defining a datastore in the vCenter datacenter to copy a file from the ESXi datastore to a folder on a local machine:
Copy-DatastoreItem vmstore:Datacenter1datastore10aWindows-VMWindows-VM.vmx c:temp - To copy a file in the opposite direction (by connecting to an ESXi host), use the command:
Copy-DatastoreItem -Item c:tempdarwin.iso -Destination ds:installWe copy
darwin.iso(that is an image with VMware Tools for macOS) from a Windows machine to the install directory on an ESXi datastore.
- If you are connected to vCenter, you can use this command to copy a file from a local Windows machine to datastore on a remote ESXi host:
Copy-DatastoreItem c:tempdarwin.iso -Destination vmstore:Datacenter1datastore10ainstall
You can use these PowerCLI cmdlets and create PowerShell scripts to transfer files from VM to host and vice versa.
Commands to copy files from a VM to a host in VMware Workstation
If you use VMware Workstation (which is a type-2 hypervisor) on your Windows or Linux host (or VMware Fusion on macOS), you can also use the command line interface to copy files from VM to host and vice versa. You can use the vmrun command line tool to operate with virtual machines. The syntax of commands is the same for Windows, Linux and macOS (VMware Fusion). We use VMware Workstation 15 on Windows 10 in this tutorial.
- Go to the VMware Workstation directory:
cd "C:Program Files (x86)VMwareVMware Workstation" - Use the command as follows to copy a file from the guest OS inside the VM to the local Windows host:
CopyFileFromHostToGuestIn our case, the exact command is:
vmrun copyFileFromGuestToHost d:virtualWinServer2019WinServer2019.vmx "c:temptest.txt" "c:tempcopied" - Enter a username and the password for this user when prompted (the user must have enough privileges to access the defined file).
Where:
d:virtualWinServer2019WinServer2019.vmxis a virtual disk of the VM from which we copy the file.c:temptest.txtis a file stored on the virtual disk of a VM; this is a file that we copy.c:tempcopiedis a directory where to store a file copy on a host machine.Make sure you use the backslash character when setting a path. We have copied test.txt that is a text file from a VM to host.
Alternatively, you can run a command by defining credentials in the command:
vmrun -T ws -gu Administrator -gp Password000 copyFileFromGuestToHost d:virtualWinServer2019WinServer2019.vmx "c:temptest.txt" "c:tempcopied"
To copy a file in a reverse direction (from a host machine to a VM), use the command like this:
CopyFileFromHostToGuest
Our particular command in this example is:
vmrun copyFileFromHostToGuest d:virtualWinServer2019WinServer2019.vmx "c:temptest3.txt" "c:temptest3-copy.txt"

How to Transfer Files Using SSH and SCP
SSH (Secure Shell) is a common protocol for securely managing remote hosts relying on encryption. SCP is a protocol that relies on SSH for securely copying files over the network. You can use SCP to transfer files from VM to host, especially if Linux runs on the VM. An SCP and SSH server can be enabled on Linux machines and ESXi in a few steps.
How to enable an SSH server in ESXi
An SSH server service must be enabled on an ESXi host to use this method and transfer files to VMware ESXi and from ESXi.
- To enable an SSH server in VMware Host Client, go to
Host > Manage > Servicesand startTSM-SSHservice. - SSH must be allowed in the ESXi firewall to allow SCP traffic for transferring files from an ESXi host as well as connecting to other machines using SCP from this ESXi host:
- Go to
Networkingin theNavigatorpane, select theFirewall rulestab and selectSSH Client. - Click
Actions > Enableto enable the firewall rule.

- Go to
- To check the SSH connection between hosts, you can run this command on an ESXi host:
nc -z 192.168.101.202 22Where:
192.168.101.202is an IP address of a remote host.22 is the port number for SSH connection (22 is the default port number).
The general syntax of the scp command to copy files via SCP over the network:
scp [OPTION] [user]@[SRC_HOST]:path_to_file1 [user]@[DEST_HOST]:path_to_file2
[user]@[SRC_HOST]:path_to_file1 – a source file
[user]@[DEST_HOST]:path_to_file2 – a destination file
-P specifies a port number for SSH connection (use this flag if the port number is not 22).
Below, we explain the particular examples in practice.
How to copy a local file to a remote machine via SCP
To copy a local file to a remote machine via SCP, use the command like:
scp file.txt remote_username@remote_host_ip:/remote/directory
From Linux
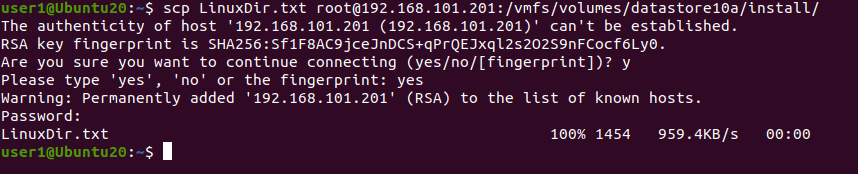
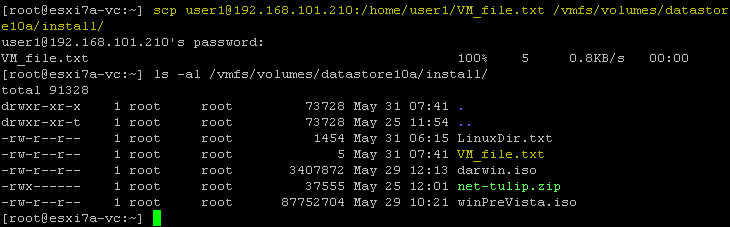
Let’s copy the LinuxDir.txt file from a local Ubuntu Linux machine (which can also be a VM) to an ESXi host over the network using SCP. The destination location on the remote ESXi host is the install directory on the datastore10a datastore. The IP address of the remote ESXi host is 192.168.101.201.
The command to copy the file from the local Linux machine to the remote ESXi host in our case is:
scp LinuxDir.txt root@192.168.101.201:/vmfs/volumes/datastore10a/install/
You can store the copied file on the destination machine with a new file name:
scp LinuxDir.txt root@192.168.101.201:/vmfs/volumes/datastore10a/install/LinuxDir-copy.txt
Use the -r flag to copy a directory with all included files:
scp -r /local/directory remote_username@192.168.101.201:/remote/directory
From ESXi
You can use scp commands on an ESXi host. The scp syntax in the command line is the same for Linux and ESXi. An SSH server must be configured on the remote machine.
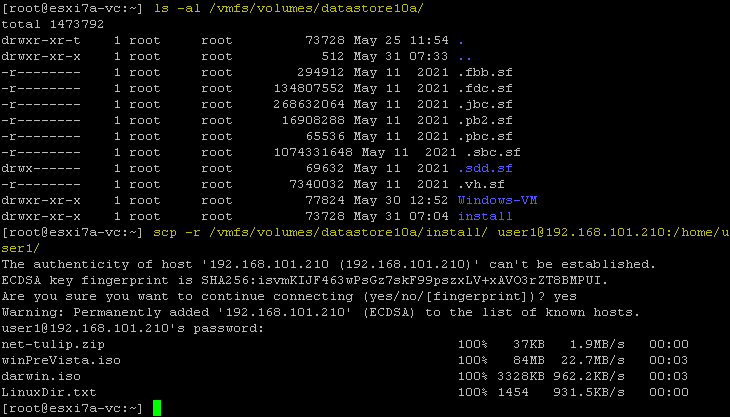
Let’s log in to the ESXi host (192.168.101.201) and copy the install directory with all contained files to the home directory of user1 on the remote Linux machine (192.168.101.210).
scp -r /vmfs/volumes/datastore10a/install/ user1@192.168.101.210:/home/user1/
If the SSH server listens to a port other than 22, use the -P parameter; for example, if the SSH port number is 8022, the command is:
scp -P 8022 -r /vmfs/volumes/datastore10a/install/ user1@192.168.101.210:/home/user1/
How to copy a file from a remote to local machine via SCP
SCP is convenient for copying files from a remote machine to the local machine, which allows you also to transfer files from VM to host. Below we explain how to run the appropriate commands in Linux and ESXi.
Copying files to a local Linux machine
We are going to copy a file from the remote ESXi host to the current Linux machine using SCP. To do this, use the command like:
scp remote_username@remote_ip_address:/remote/file.txt /local/directory
Let’s copy a darwin.iso file from the remote ESXi server to the defined home directory on the Linux machine:
scp root@192.168.101.201:/vmfs/volumes/datastore10a/install/winPreVista.iso /home/user1/

Copying files to a local ESXi host
If we log in to an ESXi host, we can run the command to copy a VM file from a remote Linux machine to a datastore on the local ESXi host. Let’s copy VM_file.txt from the Linux machine to the directory of the ESXi datastore via the network using SCP:
scp user1@192.168.101.210:/home/user1/VM_file.txt /vmfs/volumes/datastore10a/install/
How to copy files between two remote machines
There are SCP commands to copy files from one remote machine to another remote machine with and without copying data through the current local machine. The command syntax is as follows:
scp user1@remote-host1.com://directory/file.txt user2@remote-host2.com://directory/
The data is transferred directly from one remote host to another (without being copied to our current local machine) with the above command. If you want to route traffic through your local machine on which you are running the command, use the -3 flag.
Note: Use this command if credentials on both remote hosts are the same.
An example of the command to run on a local Linux machine to copy a file (vim.v00) from a remote ESXi host (192.168.101.202) to a local ESXi host (192.168.101.201):
scp root@192.168.101.202://vmfs/volumes/BOOTBANK1/vim.v00 root@192.168.101.201://vmfs/volumes/datastore10a/install/
If you see the Host key verification failed error, it means that the host key is not stored on one of the hosts. If the error is caused by changing the host key on the remote server, delete the old host key for the current remote host stored in ~/.ssh/known_hosts
The command to delete an old host key is:
ssh-keygen -R hostname_or_IP_address
For example, run the command on 192.168.101.202 to remove the old host key for the remote host 192.168.101.201:
ssh-keygen -R 192.168.101.201
An example of using -3 in the command to copy files through the local machine:
scp -3 root@192.168.101.202://vmfs/volumes/BOOTBANK1/vim.v00 root@192.168.101.201://vmfs/volumes/datastore10a/install/
The alternative command for this purpose is:
scp -o "ForwardAgent yes" root@192.168.101.202://vmfs/volumes/BOOTBANK1/vim.v00 root@192.168.101.201://vmfs/volumes/datastore10a/install/
How to copy files via SCP from Windows
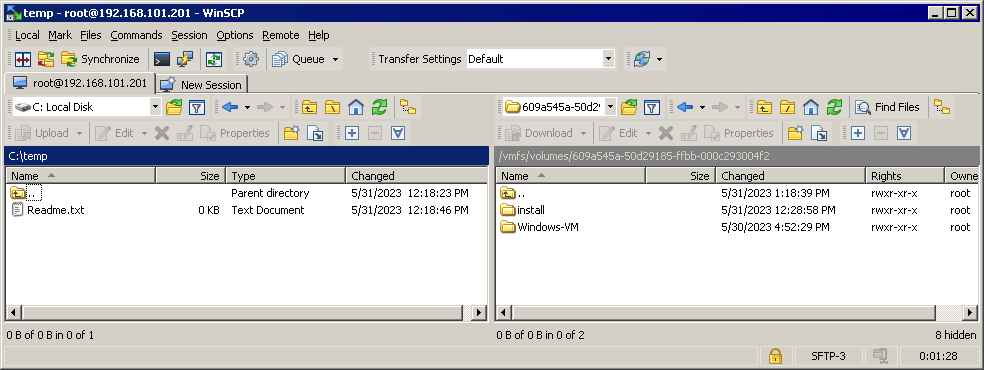
You can also copy files to virtual machines or ESXi hosts in Windows. For this, you need to use an SCP client such as WinSCP, which is a user-friendly and convenient graphical interface. You can download WinSCP for free.
- Run WinSCP.
- Select a protocol, for example,
SFTP. - Enter a host name and port number of a remote host, such as an ESXi host or a Linux machine.
- Enter a username and password of a remote machine.
- Click
Login.
In this example, we are connecting to a remote ESXi host.

- Select a protocol, for example,
- A notification message is displayed:
Continue connecting to unknown server and add its host key to a cache?Click
Yesto continue. - Once connected, you see the commander-style window with two panels. One panel represents the directory on the local machine and another panel represents the directory on the remote machine. You can copy files between the local host and the remote host by copying files between these two panels.
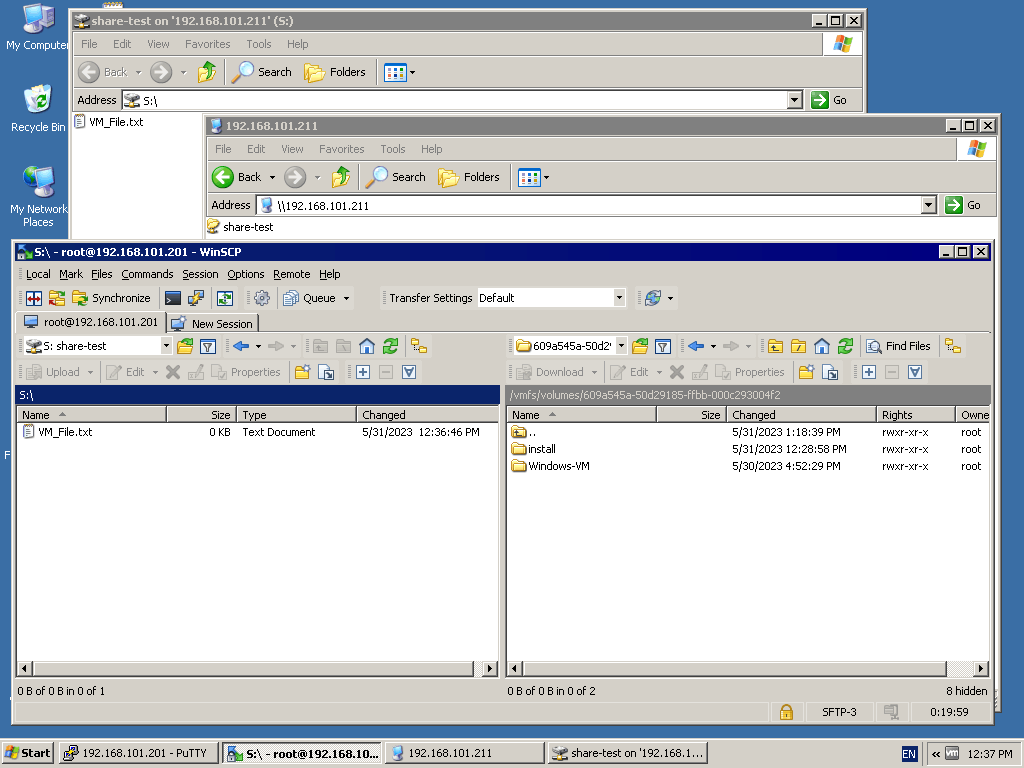
You can copy files from a datastore of a remote ESXi host to which you are connected in WinSCP to a remote Windows VM or physical machine using an SMB share on that Windows machine.
However, you cannot enter the direct share path in a WinSCP panel (for example, 192.168.101.117c$). You can only select a disk drive letter. To bypass this limitation, connect to the file share in Windows Explorer and map this file share as a network drive. Assign a drive letter, for example, S: as we did in this example, to connect the shared folder on 192.168.101.211.
Now we can select S: as a network drive in the drop-down menu in the left pane of WinSCP, select the needed files or directories on the datastore of the remote ESXi server and copy files to both directions.
Using an NFS Share
You can use an NFS share to transfer files to VMs from an ESXi datastore and the other way. ESXi doesn’t support SMB shares (native for Windows). It supports NFS shares (native for Linux) and attaching an NFS share as a datastore. Using this feature, you can use one of these approaches to transfer files between ESXi and Linux machines:
Approach 1:
- Configure an NFS server and NFS share on a Linux VM
- Attach the NFS share as a datastore on ESXi
- Copy files from a VM to an ESXi datastore and vice versa
Approach 2:
- Configure an NFS server on a physical Linux machine or NAS
- Attach the NFS share as a datastore on ESXi
- Connect to the NFS share on a Linux VM
- Copy files from a Linux VM to an NFS share and then copy these files to an ESXi host. Copy files from the ESXi host to the NFS share and copy these files from the NFS share to the Linux VM.
Read the NFS vs SMB comparison to learn more about these file-sharing protocols.
Configuring an NFS share on Linux
We use Linux Ubuntu 20.04 in this tutorial. We logged in to Linux as a regular user and use sudo when root privileges are needed to run the command. Perform the following steps to install an NFS server and configure an NFS share.
- Update the repository tree in Linux:
sudo apt-get update - Install the NFS server package on Linux:
sudo apt-get install nfs-kernel-server -y - Create a directory (the export directory) that will be shared on the NFS server:
sudo mkdir -p /srv/nfs/share1/ - Set the owner and permissions for the created directory:
sudo chown -R nobody:nogroup /srv/nfs/share1/sudo chmod 0777 /srv/nfs/share1/The
nobodyis a pseudo user to represent the user with the least permissions with no shell access. The purpose of thenogroupgroup is similar to thenobodyuser.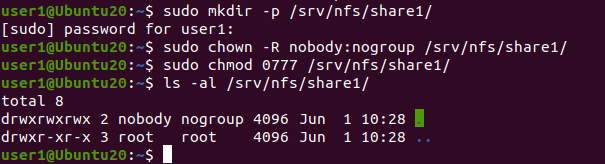
- Configure the exports file to share the created directory.
sudo nano /etc/exportsor
sudo vim /etc/exports - Add the line in the bottom of the configuration file:
/srv/nfs/share1/ CLIENT_IP(rw,sync,no_subtree_check)In our case, the line with the allowed IP address of our ESXi host is:
/srv/nfs/share1/ 192.168.101.201(rw,sync,no_subtree_check)You can allow access for all hosts of the subnet by adding the line:
/srv/nfs/share1/ 192.168.101.0/24(rw,sync,no_subtree_check)You can add the next line to allow access for another host (IP address).
Save changes to the configuration file and quit the text editor.
- To check whether the data was written to the file, you can use the command:
cat /etc/exports - Apply the new configuration with the command:
sudo exportfs -a - Make sure that the firewall on the Linux machine with the NFS server allows access. You can grant access to the particular IP address with the command like:
sudo ufw allow from IP to any port nfsIn our case:
sudo ufw allow from 192.168.101.201 to any port nfsTo allow access to hosts from the entire subnet:
sudo ufw allow from SUBNET to any port nfsIn our case, the command would be:
sudo ufw allow from 192.168.101.0/24 to any port nfs - You can check the firewall status with the command:
sudo ufw status - Restart the NFS server to make the configuration changes take effect:
sudo systemctl restart nfs-kernel-server - The NFS share has been configured in Linux.
- Copy a file from any directory of the Linux machine to the directory shared via NFS. We copy
VM_file.txtto our NFS share and check the contents of the directory after that:cp VM_file.txt /srv/nfs/share1/ls -al /srv/nfs/share1/
Mounting an NFS datastore in ESXi
You need to add the NFS datastore in ESXi after configuring the NFS share. We use VMware Host Client in this example to do this.
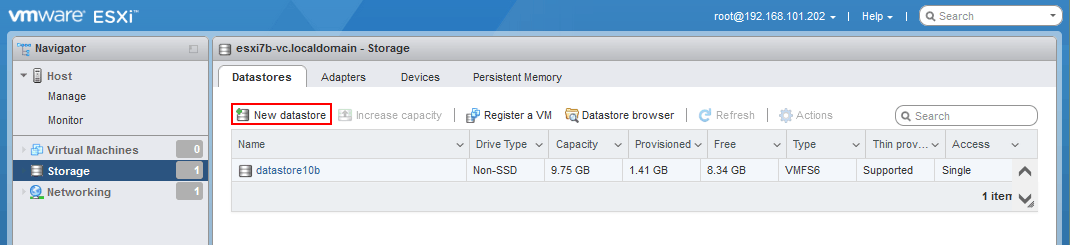
Go to Storage > Datastores and click New datastore.
The New datastore wizard is open.
- Select
Mount NFS datastore. ClickNextto continue.
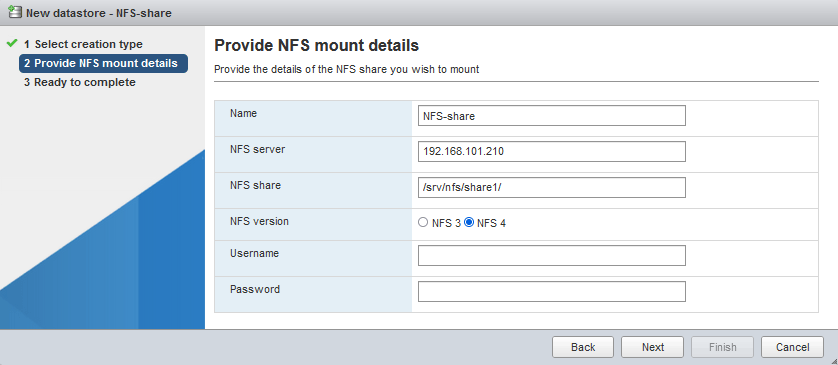
- Provide NFS mount details:
- Name:
NFS-share(the name that will be displayed as the datastore name) - NFS server: 192.168.101.210
- NFS share:
/srv/nfs/share1/ - NFS version:
NFS4
A username and password are optional for NFS4. We leave these two fields empty.
- Name:
- Ready to complete. Check your configuration and click
Finishif everything is correct.
Copying files from a VM to host
The NFS datastore is successfully mounted. You can check this in Storage > Datastores.
Now we can copy files from the VM stored on the NFS share to a local ESXi datastore (transfer files from VM to host).
- Click
Datastore Browser.
- Select your NFS datastore in the datastore browser (
NFS-sharein our case). Browse the needed file in the NFS datastore. Select the needed file and clickCopy.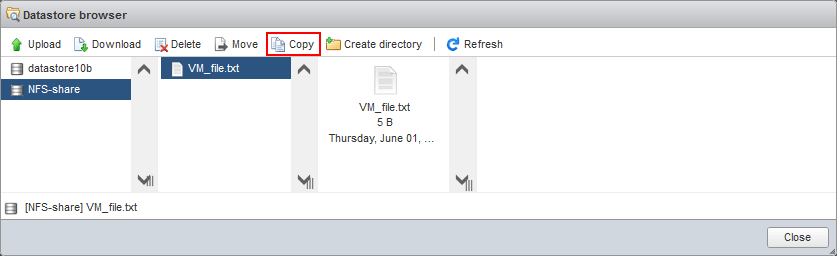
- Select destination. Select the needed location in the target datastore where you want to store the copied file (
datastore10bin our case). ClickCopy.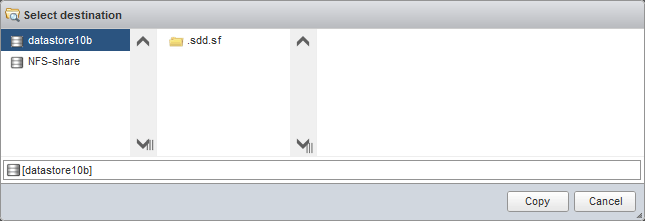
Alternatively, you can copy the needed file in the command line on the ESXi server:
cp /vmfs/volumes/NFS-share/VM_file.txt /vmfs/volumes/datastore10b/VM_file-copy.txt
Using the VMware Web Interface to Download/Upload Files
You can use a web interface of VMware Host Client or VMware vSphere Client to upload/download files to/from an ESXi datastore. The web interface is available from any physical or virtual machine where a web browser is installed and the network connection to an ESXi host is available. Thus, you can open this web interface directly from a VM if a guest OS has the GUI or use any local machine as the intermediate machine to transfer files from VM to host and vice versa.

There is an alternative but more complex way to transfer files to VMware ESXi from VMs:
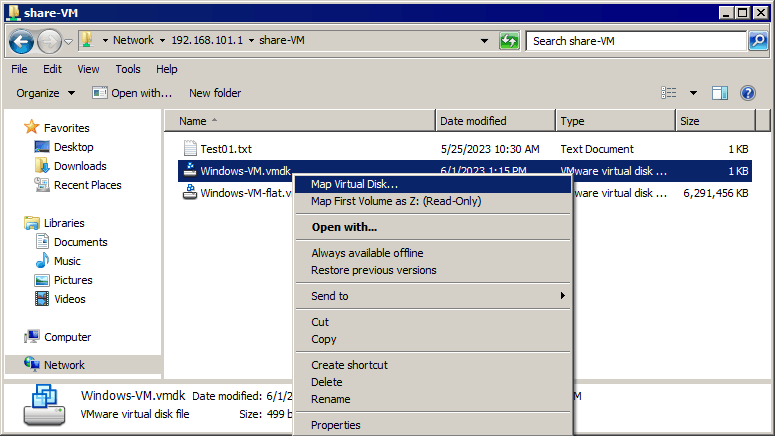
- Download a virtual disk of the VM to your local machine or another machine.
- Extract the needed files from this VM virtual disk (
.vmdkand-flat.vmdk) to a local machine. Alternatively, you can mount a virtual disk to a virtual drive if VMware Workstation is installed. - Upload the extracted files or files from the mounted virtual disk to the datastore of the ESXi host using one of the methods explained above (in VMware Host Client, vSphere Client, or SCP client, etc.).
Read the detailed blog post about how to extract files from VMDK virtual disks.
Using ISO Files for Data Transferring to a VM
If the network connection is unavailable for a VM, you can transfer files to VMware VMs using ISO image files:
- Create an ISO image with software like Ultra ISO for Windows.
- Write the needed files to the ISO image on your local machine or another machine. You can copy files from ESXi using one of the methods above and write them to the ISO image.
- Mount the ISO image file to the VM using a virtual CD/DVD drive of the VM (you can mount the ISO file directly from your local machine or upload the ISO file to an ESXi datastore before doing this). Use VMware Host Client, VMware vSphere Client, VMware Workstation, or VMware Remote Console to mount the ISO file to the ESXi VM.
This method cannot be used to transfer files from VM to host because a VM works with a virtual CD/DVD disk in the read-only mode.
Conclusion
There are multiple methods to copy files to virtual machines from a host and vice versa. Some of them require a network connection and some of them work even if the network is unavailable. You can use the method that is suitable for you in your scenario and combine these methods. Remember to back up your VMs to avoid data loss. With NAKIVO Backup and Replication, you can protect your VMs in VMware vSphere and recover individual files directly from a VM backup.