How to Migrate VMware VMs to Nutanix
Nutanix is a hyper-converged virtualization platform for running virtual machines. It can be used as an additional infrastructure or an alternative to VMware vSphere and Microsoft Hyper-V.For more information, you can read this VMware vs Nutanix comparison. You can migrate VMware virtual machines (VMs) from ESXi hosts and clusters to a Nutanix cluster. Read this VMware to Nutanix migration guide to learn how to configure the migration properly.

Planning VMware to Nutanix Migration
Nutanix provides Nutanix Move, a special VMware migration tool that allows you to migrate virtual machines more smoothly and avoid a high number of manual manipulations for transferring data, as well as VM pre-configuration and post-configuration. Nutanix Move is provided as a virtual disk file to deploy a virtual appliance (a virtual appliance is a partially configured virtual machine for a specific purpose) in a Nutanix cluster. This tool helps administrators perform VMware migration to Nutanix with minimal downtime, which is especially important for business workloads.The requirements:
- VMware Tools must be installed on the source VMware virtual machine.
- The network connection must be available between the VMware ESXi host (cluster) with the source VM and the Nutanix cluster with the Nutanix Move VM.
Installing Nutanix Move for VMware VM Migration
First, you need to download and install Nutanix Move to perform VMware to Nutanix migration.
- Download Nutanix Move from a Nutanix website:
https://portal.nutanix.com/page/downloads?product=move
The download links are available only for Nutanix customers with an account on the Nutanix website.
Navigate to Move QCOW2 file for AHV (a newer version can be displayed in your case because Nutanix developers regularly update their products, including Nutanix Move) and click
Download. Save the downloaded QCOW2 file, which is a virtual disk file of the Nutanix Move virtual appliance.NOTE: QCOW2 (copy on write) is a virtual disk image format widely used on QEMU/KVM, Proxmox, and Nutanix hypervisors.

- Upload the downloaded Nutanix Move image (such as move-5.3.0.qcow2) to a Nutanix datastore. Click the
Settingsicon in the top right corner of the Nutanix Prism central web interface, clickImage configurationin the left pane, and hit theUpload Imagebutton.
- Specify the name, annotation, and image type for the uploaded QCOW2 image of the Nutanix Move virtual appliance. Select the storage container where you want to upload the file.
Click
Upload a file, clickBrowse, and select a file you have downloaded before, such asmove-5.3.0.qcow2on your computer.Hit
Save. Wait until the file is uploaded and the image is created on Nutanix storage.
- Go to
VMin the menu of a Nutanix Prism web interface. We need to create a virtual machine based on the image based on the downloaded QCOW2 image.
- Click
Create VMin the top right corner of the web interface.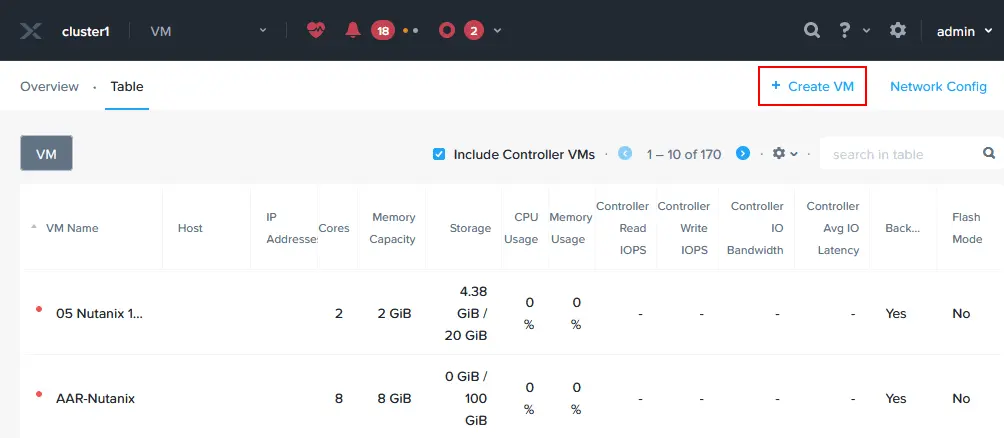
- Define the VM settings for the Nutanix Move virtual appliance you are deploying now:
Name: Specify a clear name, such as Nutanix Move.Description: Enter the VM description, for example, VMware to Nutanix migration.Timezone: Set your time zone.vCPU(s): Set the number of virtual processors based on the planned load of the Nutanix Move VM. The more VMs you migrate simultaneously, the more virtual processors/CPU cores you may need to add. In this example, we select 2 vCPUs.Number of Cores per vCPU: Set the number of CPU cores to use for a virtual appliance. We select 2 cores per vCPU.Memory: Specify the amount of RAM based on the planned load. We set 8 GB of memory.Boot Configuration: Select BIOS or UEFI for VM boot. We select BIOS.

- Click
Add New Diskto add a virtual disk image downloaded from the Nutanix site and uploaded to Nutanix cluster storage before. Select your Nutanix Move image in the Add Disk window:- Type: Disk
- Operation: Clone from Image Service
- Bus Type: SCSI
- Image: Select the image you imported to a Nutanix cluster before (Nutanix Move 5-3-0 in our example).
Hit
Add. - Once a virtual disk has been added, click
Add New NICin the Network Adapters (NIC) section because a network connection is required for VMware to Nutanix migration.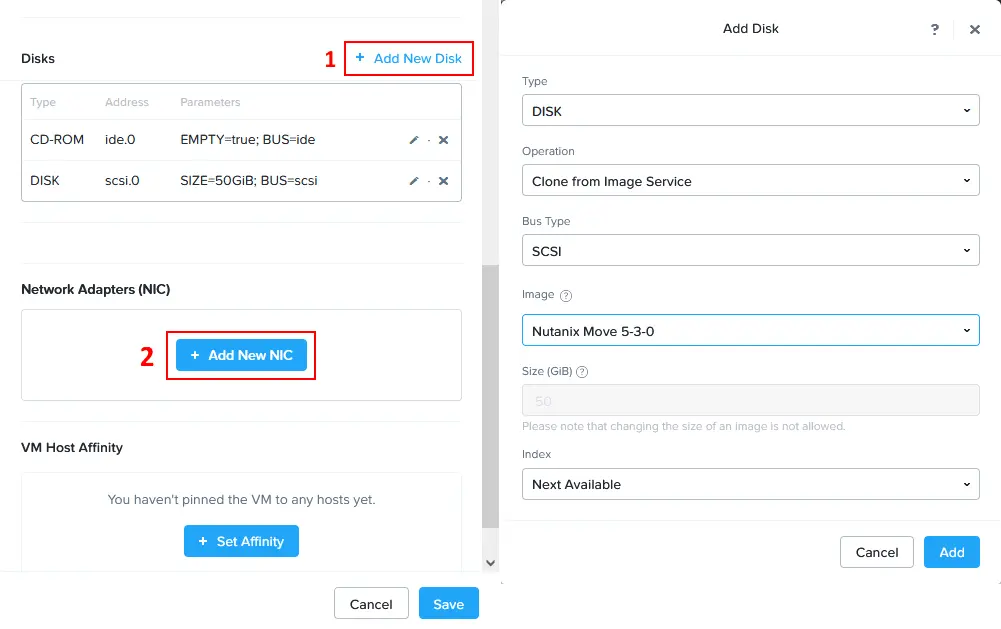
- In the Create NIC window, select a subnet name from the drop-down list and select the network connection state (Connected in this case). Hit
Add.NOTE: If you want an IP address to be obtained automatically for a Nutanix Move virtual appliance, you must have a configured DHCP server in the appropriate network.

- Now, the added virtual disk image and network adapter are displayed in the Create VM window. When all needed VM options are set, hit
Save.
- Once a Nutanix Move virtual appliance has been deployed as a VM, right-click this
Nutanix MoveVM in the list of virtual machines and clickPower Onin the context menu.
- To monitor the VM boot process, right-click the
Nutanix MoveVM and hitLaunch Console.
- The Nutanix Move virtual appliance is based on Linux. Wait until the VM is booted.

Configuring Nutanix Move for VMware Migration
Once the Nutanix VM is booted, check the assigned IP address for this VM (especially if the IP address is obtained via DHCP). You can find the IP address of the VM by opening the VM list in the Nutanix Prism web interface in the IP addresses column. In our case, the IP address of the Nutanix Move VM is 10.10.24.81.
- Open a web browser and enter the IP address of your Nutanix Move virtual machine (virtual appliance). In our case, we go to https://10.10.24.81 in a web browser.
- Read the Nutanix End User License Agreement carefully, select the
I have read and agree to terms and conditionscheckbox, then hitContinue.
- Click
OKwhen a notification message about the Nutanix Customer Experience Program is displayed. - Enter a new password and re-enter this password to set the new password for the web interface of Nutanix Move.

- Enter the previously set password to log in to the Nutanix Move web interface.

- Select a
VMas a migration type and hitContinue.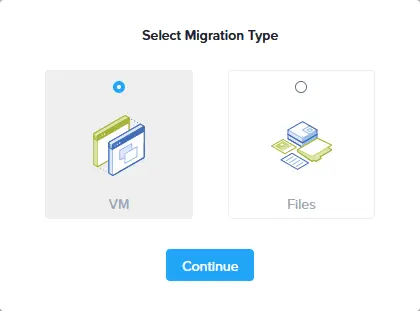
- Select
VMware ESXiin the Select Environment Type drop-down list in the Add Environment window to configure VMware migration to Nutanix. As you can see, Nutanix Move is not only a VMware migration tool – it is also possible to migrate from Microsoft Hyper-V, Azure, and AWS environments.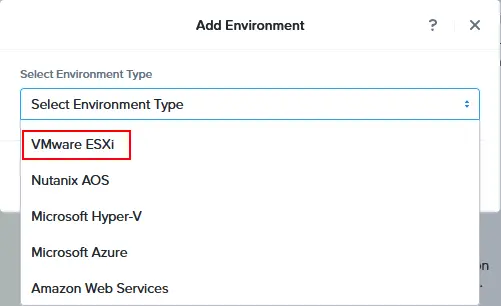
- Enter the environment name that will be displayed in the web interface of Nutanix Move. For example, VMware vCenter 70.
- Enter the IP address of the ESXi host or vCenter Server you use in VMware vSphere to run the source (original) VM(s).
- Enter the administrative username and password for the ESXi host or vCenter Server set in the previous field.
Hit
Add.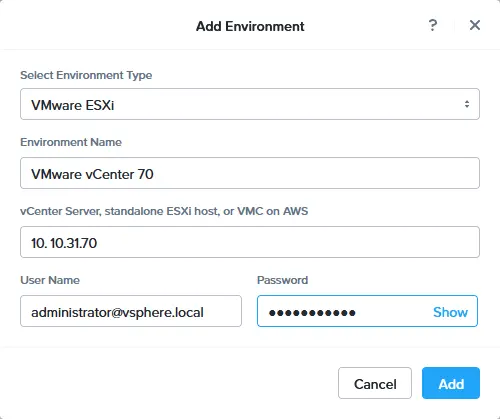
- After adding the source VMware vSphere environment, you have to add the destination Nutanix environment for VMware migration. Click
Add Environmentin the top left corner of the Nutanix Move web interface. - In the Select Environment type drop-down list of the Add Environment window, select
Nutanix AOS.
- Specify the Environment name that will be displayed in the interface, for example, Nutanix 2024.
- Enter the IP address of the Nutanix environment (10.10.24.11 in our case).
- Enter the username and password of the Nutanix administrative account.
Click
Add.
VMware vCenter with ESXi hosts and Nutanix are added as the source and destination environments accordingly. You can also check the number of VMs in each virtual environment.
A VDDK library is required to copy virtual disks from ESXi hosts. Virtual Disk Development Kit (VDDK) is a collection of C libraries, utilities and code samples to access VMware virtual disk storage. VDDK allows developers to create applications that can manipulate virtual disks and this is what we need to perform VMware to Nutanix migration. This is also the reason why VDDK is required by Nutanix Move.
- Click
Upload VDDKunder the VMware environment added to the Nutanix Move environments.
- You can see the VDDK version required. Download the appropriate VDDK version from the VMware/Broadcom website and save the file on your computer. The download link is available only for users registered on the VMware/Broadcom website.
In this example, we download VMware-vix-disklib-7.0.3-19513565.x86_64.tar.gz because Nutanix Move requires VDDK-7.0.3.1 (see the screenshot below). Once you have downloaded the required VDDK package, click
Upload, browse the file, and hitOpen.
- The VDDK-7.0.3.1 package has been uploaded. We can go
Back to Dashboardof Nutanix Move.
Running VMware Migration to Nutanix
The source and destination environments are configured for a VMware to Nutanix migration and all requirements are met.
- Click
Create a Migration Planto configure the VMware migration.
- Enter the plan name in the New Migration Plan window. For example,
VMware migration to Nutanix01. Then, hitProceed.
- The configuration wizard for VMware migration to Nutanix opens:
Source & TargetSelect a source. Select a VMware vSphere environment added to the environments for Nutanix Move before as the source. We select VMware vCenter 70 in this example.Select a target. Select a Nutanix environment added before as the destination environment. In our example, the name of this environment is Nutanix 2024.Target container. Select a target container in your Nutanix cluster. In our case, this container is test.
Click
Nextto continue and go to the next step of the wizard for VMware migration to Nutanix.
Select VMs. Select a VM (VMs) you want to migrate from VMware vSphere to Nutanix. It is recommended that the VM is in a running state and VMware Tools are installed in the guest operating system of the VM. In this example, we select Ubuntu22-temp01.
Network configuration. Check the source and target networks for the migrated VM(s). Optionally, you can select a test network, but we bypass selecting one.
VM Preparation. VMware Tools are uninstalled during VMware to Nutanix migration of the VM. You can select a manual or automatic preparation mode. If using the automatic mode, Nutanix Move will do most operations automatically, including uninstalling VMware Tools from the VM, installing Nutanix VirtIO drivers on the destination VM, and configuring networking (you just need to provide the guest OS credentials). The Linux user must be in the sudoers group to run commands as root if you are migrating a Linux VM. An SSH server must be installed on the source Linux VM. Enter the username and password of such a Linux user.As for Windows VMs, you need to provide the credentials of a user with administrative privileges.

VM settings. Define the VM settings for the destination VM in a Nutanix cluster. You can set the VMs priority, timezone, and other settings, including:- Retain MAC addresses from the source VMs
- Skip CD-ROM addition on target VMs
- Enable memory overcommit
VM migration type. You can configure target VM properties or retain source VM properties.

Summary. Check the VMware migration configuration summary and if everything is correct, clickSave and Start.
- A migration plan is in progress. Wait until all the needed stages of the VMware to Nutanix migration are completed. You can click
In Progressto display more information.
- After all virtual disk data is transferred to the destination Nutanix VM, periodic data synchronization is performed until you cutover the VM. When you cutover a VM, the source VM is stopped on the VMware ESXi host or cluster, and the destination VM is started in the Nutanix cluster. Select the
Ready to Cutovertab, select the needed VM(s), and clickCutoverwhen ready.
- The confirmation window opens: Are you sure you want to cutover selected VMs?
Once you proceed:
Source VM(s) will shut down
Virtual NICs of Source VMs will be disconnected
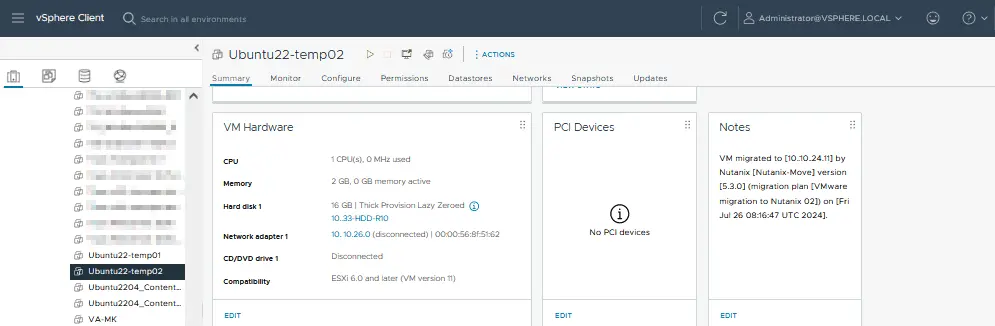
Each source VM will have a note added with details of the migration
A note is added to the source VM in the corresponding note field to inform you about VMware VM migration to Nutanix. Click
Continueto proceed.
- The next stages of the VMware migration to Nutanix are:
- Ready to cutover
- Quiesce source VM
- Source VM Cleanup
Wait until these stages finish and the entire migration process is completed. You should see the
Completedstatus for the VM migration when done.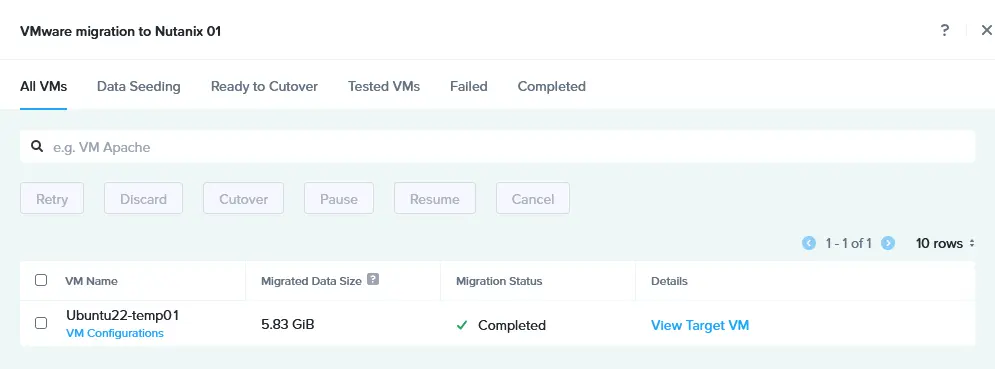
- The destination VM is started after migration from VMware vSphere to Nutanix AHV. You can check the destination VM in the Nutanix Prism web interface on the VM page after finishing the VM migration.

- You can right-click the destination Nutanix VM and hit
Launch consoleto open the user interface of the guest operating system running on the VM.The original VM is powered off on the source ESXi host and a note is displayed (see the screenshot below).
NOTE: If, for any reason, the guest operating system cannot boot on the destination VM, try changing the virtual disk controller in VM settings.
You can check out the video below to see how to migrate VMware VMs to Nutanix AHV:
Post-Migration Best Practices for VMware on Nutanix
After migrating virtual machines (VMs) from VMware vSphere (ESXi) to Nutanix, it’s essential to follow the best practices to ensure that the VMs operate efficiently and securely in the new environment. These post-migration steps help validate the success of the migration, optimize performance, and protect the new setup.
Verify migration success
VM functionality. Ensure that all VMs are running correctly on the Nutanix platform. Check that services and applications within the VMs are functioning as expected.Data integrity. Validate that all data has been migrated accurately. Compare critical data points, files, and databases between the source and target environments to confirm consistency.Network configuration. Verify that the network settings, including the IP address configuration, VLANs, and firewall rules, are correctly configured on the Nutanix environment.
Performance tuning
Resource allocation. Review and adjust the CPU, memory and storage resources allocated to each VM. Nutanix uses a different resource management mechanism compared to vSphere and it is crucial to optimize resources for the new platform.Storage optimization. Nutanix uses a distributed storage architecture. Ensure that storage policies, including deduplication, compression and data locality, are appropriately configured to take full advantage of Nutanix capabilities.Networking optimization. Fine-tune network settings, including load balancing, virtual network interfaces and QoS settings, to optimize performance.
Backup and disaster recovery
Implement backup solutions. Configure a backup solution compatible with Nutanix to protect the VMs in the new environment. Ensure that backup schedules, retention policies, and recovery processes are in place.Create a disaster recovery plan. Adjust your disaster recovery plan according to the changes in your virtual infrastructure after the VMware to Nutanix migration.Test recovery procedures. Conduct a disaster recovery test to ensure that VMs can be successfully restored from backups. Verify that the recovery point objectives and recovery time objectives (PROs and RTOs) meet business requirements.
NAKIVO Backup & Replication is a universal data protection solution that supports VMware vSphere backup and Nutanix backup with advanced VM data protection features. With the NAKIVO solution, you can configure VM backup and a comprehensive ransomware-resilient data protection strategy.