Azure VM Backup with NAKIVO: A Comprehensive Guide
Microsoft Azure is a reliable public cloud platform widely used to run different services, including virtual machines. While the risk of service unavailability is low, the risks of accidental data deletion by users or data loss caused by ransomware infection or other viruses that can spread via the network are a constant threat. You need to back up Azure virtual machines (VMs) to counter these risks. This blog post explains Azure virtual machine backup and how it can be performed effectively.

Native vs. Third-Party Backup
Microsoft is responsible for the physical infrastructure in its datacenters, including data redundancy, physical servers, and networks. Microsoft’s internal redundancy schemes and data backups are intended to prevent failures of the underlying components of the Azure infrastructure, which are invisible to customers. According to Azure’s shared responsibility model, which covers security and data protection, customers are responsible for protecting their data stored in Azure against factors like human error, configuration errors, external hackers, etc.
Additionally, Microsoft provides native tools that allow customers and organizations to back up Azure VMs and other data stored on this public cloud platform. These tools are tightly integrated with the Azure infrastructure and can be convenient for those who are familiar with the Azure ecosystem.
Native Azure Backup
Azure Backup is the native Microsoft solution to back up Azure VMs and other data stored in the Azure cloud. The Azure Backup service can be configured in the Azure Portal to back up VMs. Microsoft also offers Azure Site Recovery (ASR), which is used for disaster recovery by replicating VMs to different regions, which supplements Azure Backup to create a comprehensive data protection infrastructure.
Azure Backup is made up of multiple parts:
- System Center Data Protection Manager
- Azure Backup Server
- Azure IaaS VM Backup
- Microsoft Azure Recovery Services agent
Some of the features and advantages of this native solution include:
- The use of the MARS agent (Microsoft Azure Recovery Services) to back up on-premises VMs as well as Azure VMs.
- Data is encrypted both in transit and at rest using Azure’s security protocols. Azure Backup also integrates with Azure Active Directory for access control.
- Geo-redundant recovery vaults can be used for backup storage.
- An attractive licensing scheme for customers already using other Microsoft services.
- High level of integration with Azure and other Microsoft services and applications, including Active Directory services.
On the other hand, keep in mind the following challenges when considering native Azure Backup tools:
- It can be difficult to set backup policies across multiple Azure accounts when configuring a backup.
- Protecting a multi-cloud architecture can be challenging.
- Issues relating to calculating the price and estimating a budget for a backup as a result of variable per-incident charges.
- Users may require additional or more advanced features for Azure VM backup.
- Being a native tool, Azure Backup is tied to the Azure ecosystem, which can be a limitation if you need multi-cloud or hybrid-cloud support.
Third-party solutions
Third-party solutions can be a great alternative to native tools for Azure VM backup, offering additional functionality for a custom Azure VM backup strategy. Third-party Azure VM backup solutions can include the following capabilities:
- Multi-account management and protection in Azure with centralized visibility.
- Backup of multi-cloud environments and various destination options for recovery.
- Additional features with support for different platforms, allowing customers to configure backup and disaster recovery in multi-cloud and hybrid environments.
- A large number of customizable options.
- Can simplify configuration and administration.
- More possibilities to choose a storage tier to store backups, allowing you to avoid storing backups in expensive hot storage tiers.
Keep in mind that third-party Azure backup solutions support different features and may differ in terms of functionality. Some backup solutions that support Azure VMs as a backup type don’t necessarily support Azure storage as the destination type and vice versa. Other solutions support both source and destination in Azure for a backup.
What to Look for in an Azure Backup Vendor
When choosing a backup vendor to back up Azure VMs, it’s important to ensure that the solution meets your specific needs and provides robust protection for your data. Look for Azure VM backup solutions that offer the following:
- User experience. A user-friendly interface for managing protected items in different environments from a single pane of glass.
- Seamless integration. Look for a vendor that offers seamless integration with Azure, including support for Azure Resource Manager and the ability to leverage Azure’s native APIs. Ensure compatibility with Azure VM types, storage accounts, and other Azure services you use.
- Multi-cloud support. Support for VM backup from multiple accounts, multiple clouds, and on-premises environments. A good addition is support for Office 365 backup if you’re using Microsoft 365 services in addition to Azure VMs. Support for VMware vSphere or Microsoft Hyper-V VM backup is also important if you’re using those platforms.
- Backup and recovery options. Top-level Azure VM backup solutions should support incremental backups to cut down backup windows and optimize storage usage. Granular recovery makes the recovery of individual files and objects faster without the need to restore the entire Azure VM from a backup. Other options that are good to have include the ability to restore data to different regions, accounts, or even different cloud providers.
- Backup destination. Support for multiple backup destination types, including on-premises storage, public cloud storage platforms, tape backup, and immutable backup storage. This way, you can implement the 3-2-1 backup rule, which is also one of the Azure backup best practices.
- Backup automation. The ability to achieve the needed RTO and RPO metrics with a backup solution for effective data recovery with support for flexible scheduling and retention settings.
- Cost efficiency and clear pricing policy. Consider a backup solution whose pricing policy is flexible and allows you to estimate spent costs for Azure VM backups. Consider the overall cost, including initial setup, licensing, and ongoing maintenance.
- Application-aware backup. This feature allows a backup solution to back up powered-on VMs with running applications while ensuring app data consistency. As a result, recovery of application data from such backups is simpler and faster.
- Encryption and security. For security purposes, select a solution that supports data encryption in transit and at rest. Such options help you prevent data breaches by unauthorized third parties.
- Backup testing. A high-grade application must support backup testing to ensure that data is successfully backed up and can be recovered as soon as it is needed.
- Documentation. Detailed and clear documentation is an advantage of any backup solution and can be a deciding factor in choosing one solution over another. Check for the availability of comprehensive documentation, tutorials, and training resources.
- Support and maintenance. A backup vendor should provide access to robust technical support, including 24×7 support options as well as regular updates and patches to ensure compatibility and optimal security.
NAKIVO Backup & Replication is a universal data protection solution that supports backup of VMs in Azure and Amazon EC2 in the cloud as well as backup of physical machines, Microsoft Hyper-V VMs, and VMware vSphere VMs on-premises. Different storage types can be used to store backups, including Azure Blob Storage, AWS EC2, Amazon S3, other S3-compatible storage, local storage, and tape.
The NAKIVO solution meets the criteria listed above for effective and reliable Azure VM backups, including incremental backup, granular recovery, backup compression, encryption, Active Directory integration, application-aware backup, backup immutability for ransomware protection, attractive pricing models, etc. Check the full list of features on the NAKIVO feature page.
Step-by-Step Guide to Back up Azure VMs with NAKIVO
Let’s look at how to back up Azure VMs in practice. There are two approaches to back up Azure VMs with NAKIVO Backup & Replication:
- By using a public IP address for an Azure VM in the Azure cloud. You can back up your VM data over the wide area network (WAN).
- By using a VPN connection or the Direct Connect feature in NAKIVO Backup & Replication (no need for a public IP address on the Azure VM instance).
We cover the second approach in this tutorial.
NOTE: The Azure VMs are backed up via Direct Connect because, even if they can have a public IPv4 address, the solution accesses them via the LAN address so as not to expose them over WAN. This is done to enhance security. We will expose only the direct connect VM over WAN, which is usually a dedicated or a less critical VM.
Requirements
The NAKIVO Backup & Replication Transporter component must be installed on an Azure VM. If you don’t want to have a dedicated VM with the Transporter, you can install the Transporter on any VM that you don’t need to back up. This can be an unused VM without heavy workloads.
Our environment
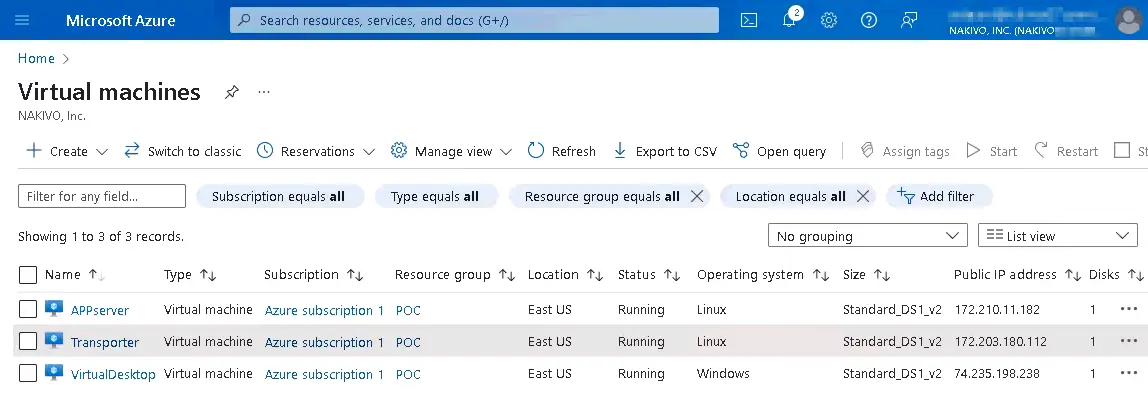
We have a simple infrastructure configuration in Azure. There are three VMs:
- APPserver on Linux
- Transporter – a VM running Ubuntu Linux with the NAKIVO Transporter installed
- VirtualDesktop on Windows
Each VM has its own IP address – whether a public IP address or not. For security purposes, you can assign a public IP address for the VM with the Transporter and use private IP addresses (for a virtual local network in Azure) for the other VMs that you want to back up. The private IP addresses can be reached via VPN or with the Direct Connect feature via the Transporter.
Adding the NAKIVO Solution Transporter to the inventory
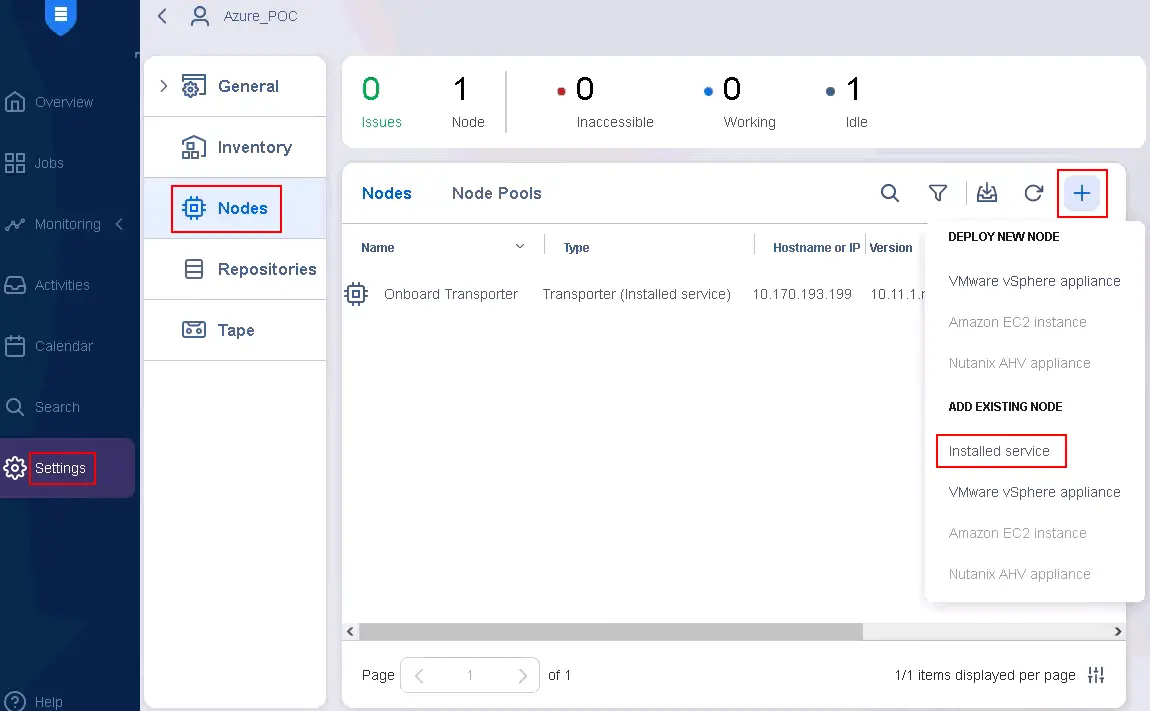
If you have the Transporter component installed on an Azure VM, you need to add this Transporter to the Nodes on the NAKIVO Director. To do this:
- In the web interface of NAKIVO Backup & Replication, go to Settings > Nodes.
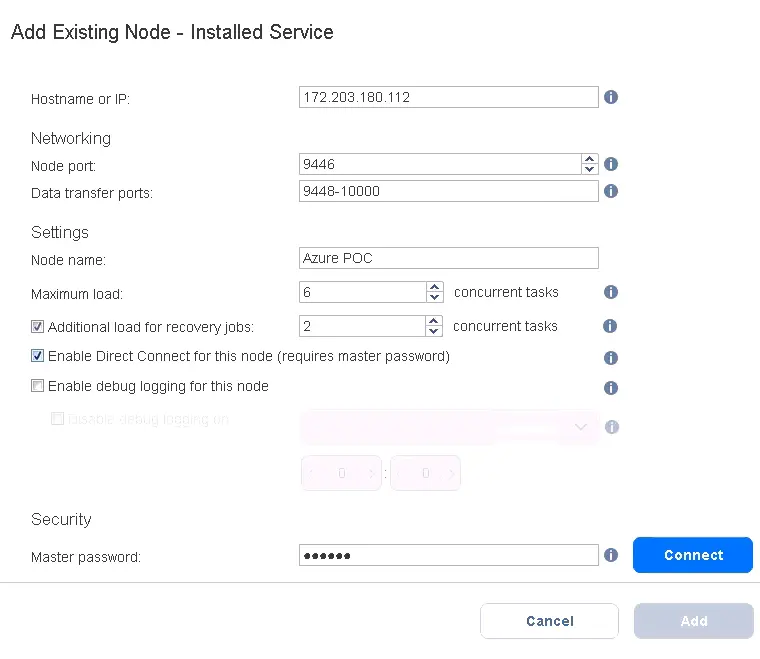
- Click the + (plus icon) and in the Add Existing Node section of the menu that opens, hit Installed service.
- Specify the required information:
- Type the public IP address of the Transporter installed on the Azure VM.
- Type the master password that you created while installing the Transporter service on the VM.
Hit More options to display additional parameters.
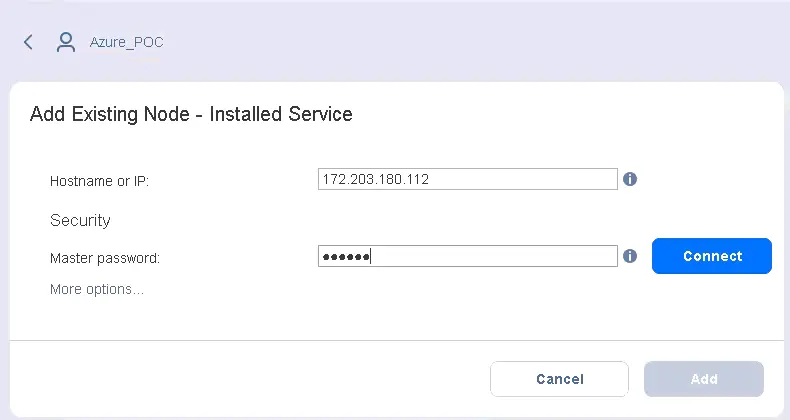
- Enter the IP address of the Azure VM where the Transporter is installed. This is a public IP address, which is 172.203.180.112 in our case.
- Enter a node name to be for the added Transporter. In our case the name is Azure POC (POC is related to Proof of Concept).
- Select the checkbox Enable Direct Connect for this node (requires master password).
Hit Connect.
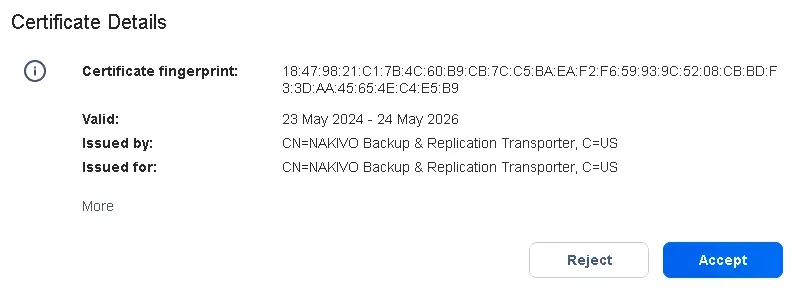
A notification message about the certificate fingerprint is displayed. Hit Accept to accept the fingerprint and continue. Then click Add to finish adding the Transporter.
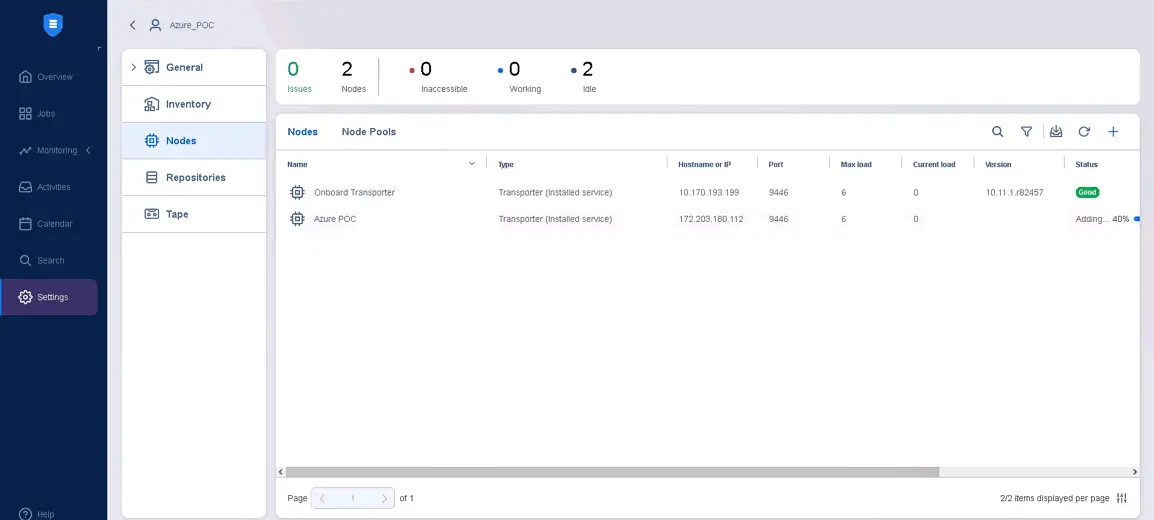
- Wait until the Transporter is added.
Adding Azure VMs to the Inventory
Now we need to add the Azure machines we want to back up to the NAKIVO Inventory (the APPserver VM based on Linux and the VirtualDesktop VM based on Linux).
There are two approaches to how to proceed:
- You can let NAKIVO install the Transporter agent from the Inventory page from the Director.
- Or you can install the Transporter agent in advance and then add this item to the inventory. The NAKIVO solution doesn’t have to inject the Transporter via WAN in this case.
Approach 1: Automatic Transporter injection
Let’s first cover how NAKIVO Backup & Replication can inject the Transporter into the Azure VM automatically using our APPserver VM:
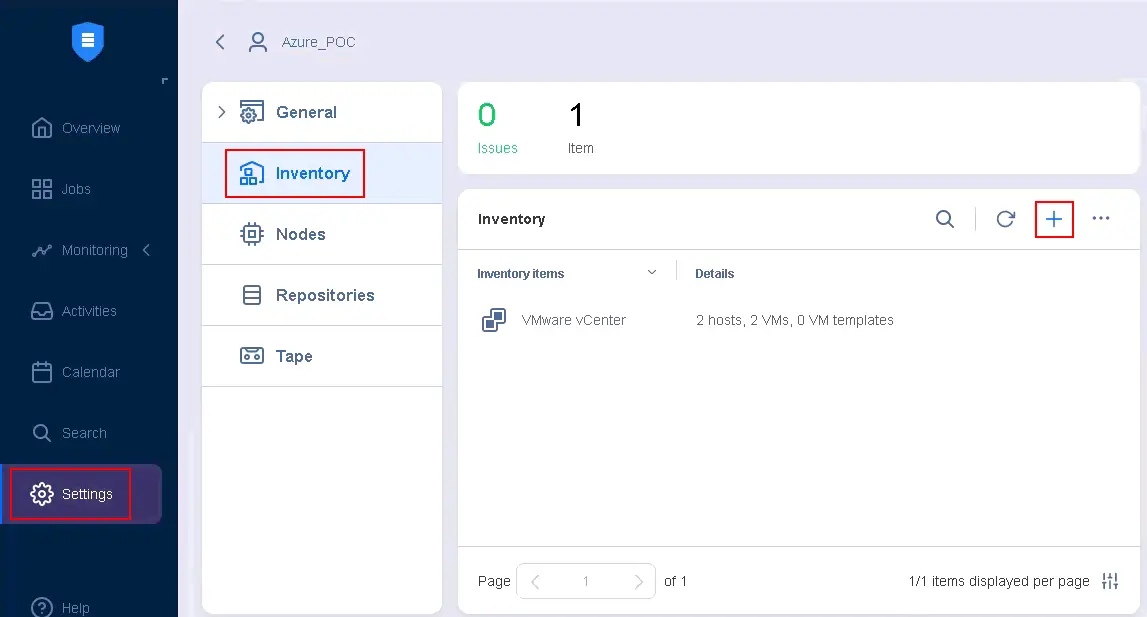
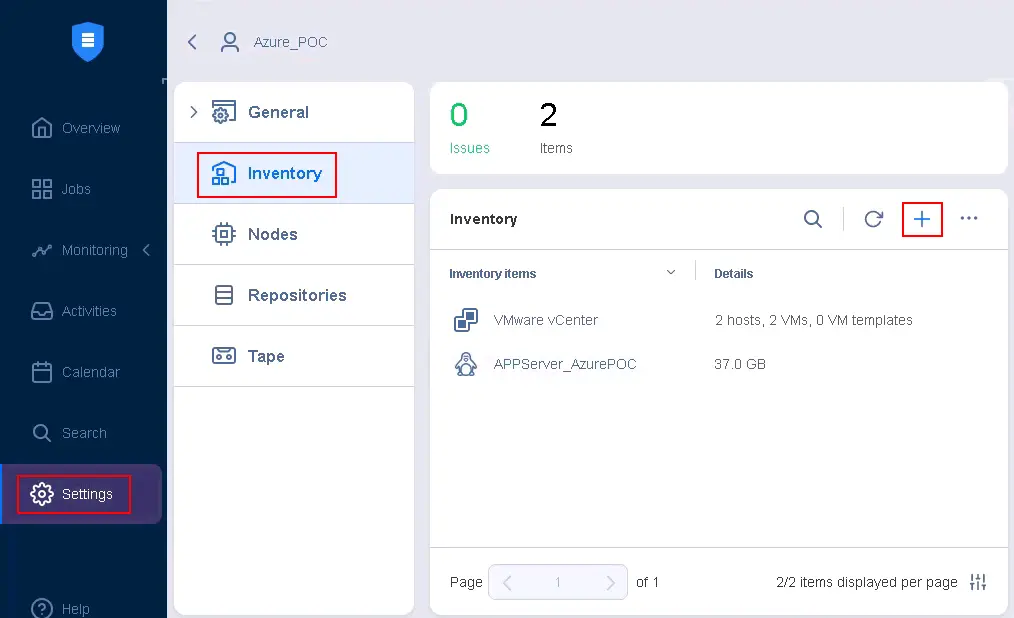
- Go to Settings > Inventory and click the + (plus) button in the web interface of NAKIVO Backup & Replication.
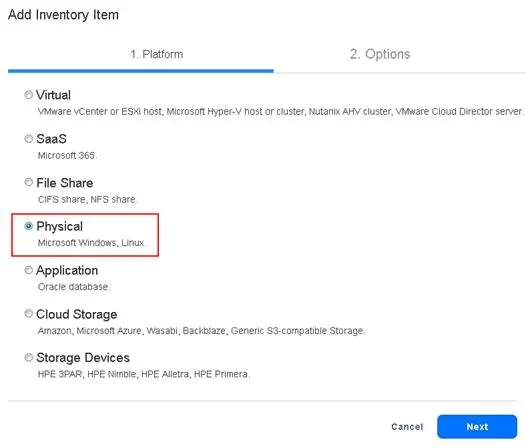
- Select Physical at the platform selection step. Hit Next to continue.

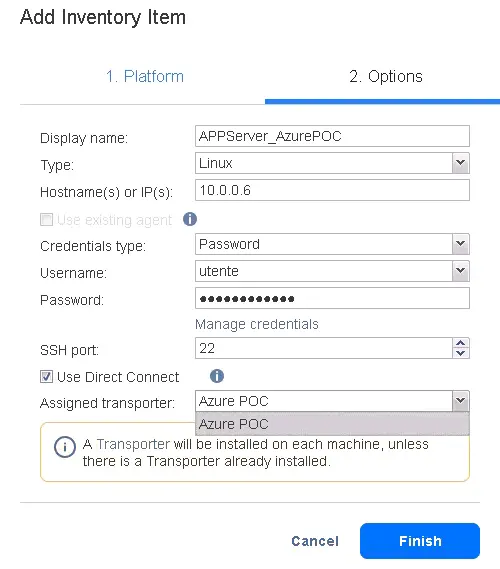
- Specify the needed options:
- Enter the display name for the added machine (this name is displayed in the NAKIVO inventory).
- Select the operating system of the machine (Linux).
- Enter a private IP address for the current Azure VM (the IP address used in a private Azure network, not the public one). In this example, the private IP address is 10.0.0.6, while the public one is 172.210.11.82.
- Enter administrator or root credentials for the Password credentials type.
- Select the Use Direct Connect checkbox. This is one of the most important options in this configuration.
- Select the Transporter previously installed in the Azure cloud infrastructure in the drop-down menu. In our case, the Transporter name is Azure POC. As a result, the connectivity will go from our Director, which will query the Transporter in Azure from our local infrastructure. The calls will go to the Transporter in Azure, which will act as a middle point to reach every endpoint in your Azure cloud infrastructure. This approach secures a connection, whereby you don’t have to use a VPN or to pass-through a wide area network if a VM doesn’t have a public IP address for security purposes.
- Hit Finish.
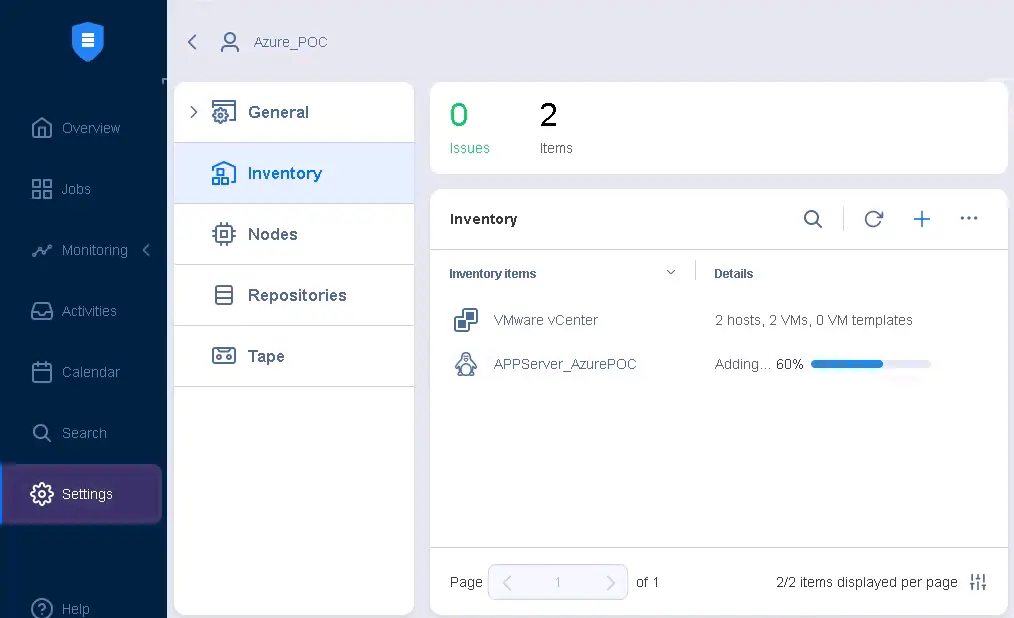
- Wait until the machine is added to the NAKIVO inventory. The NAKIVO solution is installing the Transporter agent.
Approach 2: Manual Transporter installation
Alternatively, we can add a machine by using the manual Transporter installation. We need to connect to a remote Azure VM via remote desktop (usually for Windows or SSH for Linux) and install the Transporter on that machine. The NAKIVO master password should be used.
- Install the Transporter on the needed machine manually on the Azure VM (the VirtualDesktop Windows VM in our case).
- In the web interface of NAKIVO Backup & Replication, go to Settings > Inventory and hit the + (plus) button.
- Select Physical at the platform selection step. Hit Next.
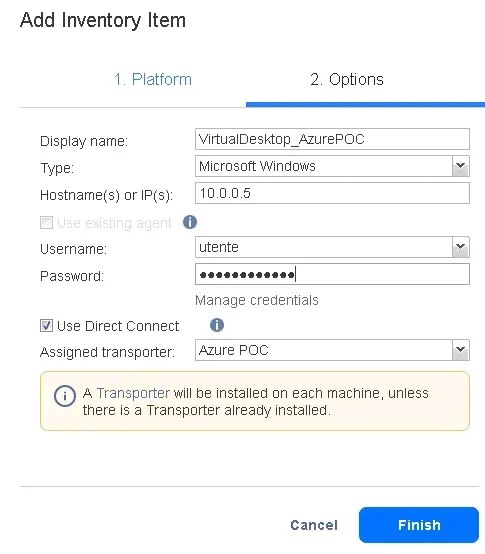
- At the Options step, set the following parameters:
- Display name: VirtualDesktop_AzurePOC
- Type: Microsoft Windows
- Hostname(s) or IP(s): 10.0.0.5 (internal)
- Enter a username and password for the administrative account of a guest OS.
- Select the Use Direct Connect checkbox.
- Select the Transporter installed on the dedicated VM in Azure (Azure POC is the Transporter name in the NAKIVO inventory in our case).
- Hit Finish.
- Wait for a moment. In a few seconds, you should see an error.
Hover the name of the item with the error and click the … button at the right side of the line. In the menu that opens, click Show error.
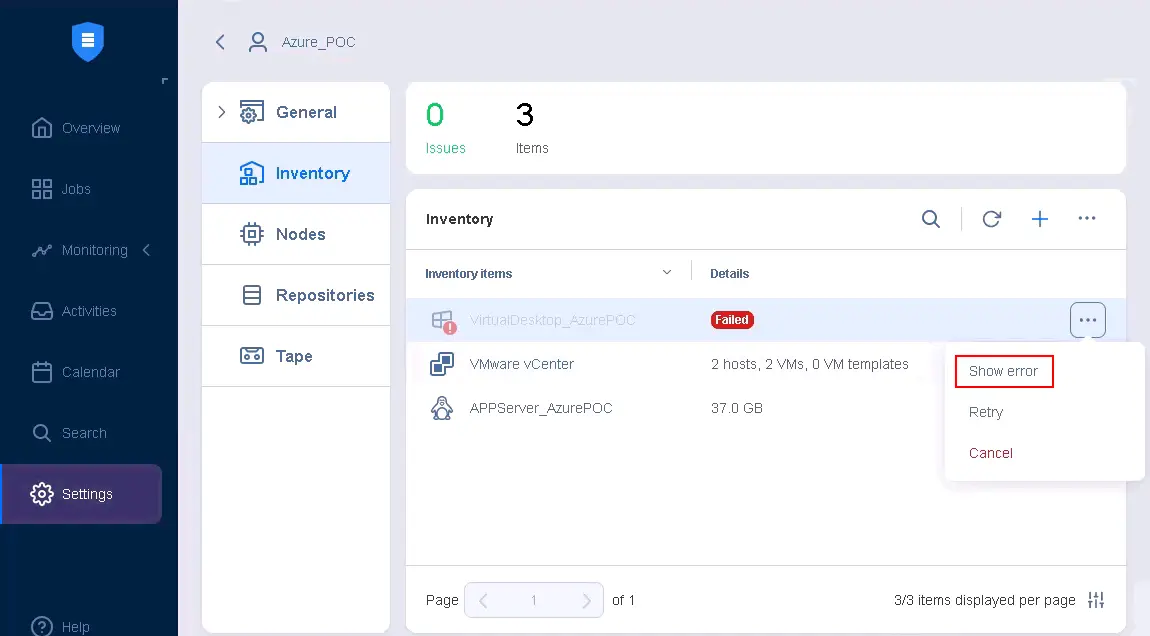
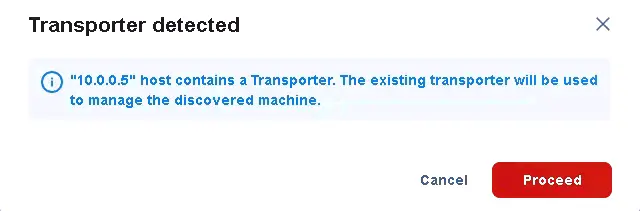
- This is not an error related to a failure. The NAKIVO solution notifies us that the Transporter has already been installed on this machine (because previously, we installed the Transporter manually). The installed Transporter is a so-called Universal Transporter. The message is:
“10.0.0.5” host contains a Transporter. The existing transporter will be used to manage the discovered machine.
The existing Transporter will be used rather than injecting a dedicated physical machine Transporter agent.
Click Proceed.
- Wait for a few moments.
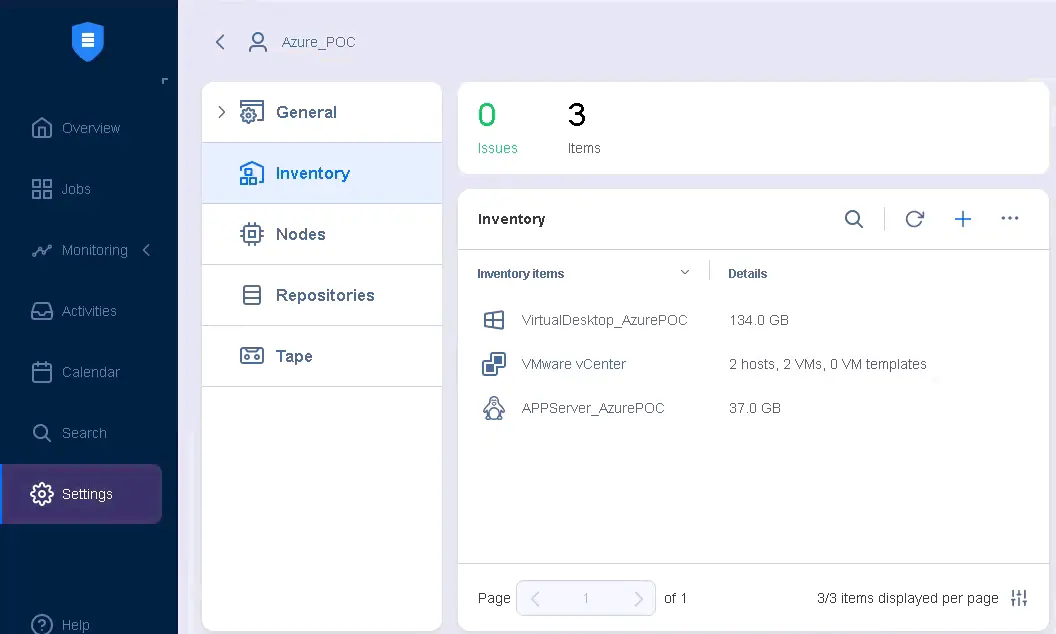
As you can see, the machine running in Azure has been added successfully to the inventory.
Two Azure VMs that we want to back up have been added to the NAKIVO Backup & Replication inventory. Similarly, you can add more Azure VMs to the inventory as needed.
In Settings > Nodes, you can also see the list of Transporters. There is one Onboard Transporter, the Transporter installed on a dedicated VM in Azure, the Transporter agent installed on the Linux VM (AppServer_AzurePOC), and the Universal Transporter installed on the Windows VM (VirtualDesktopAzurePOC).
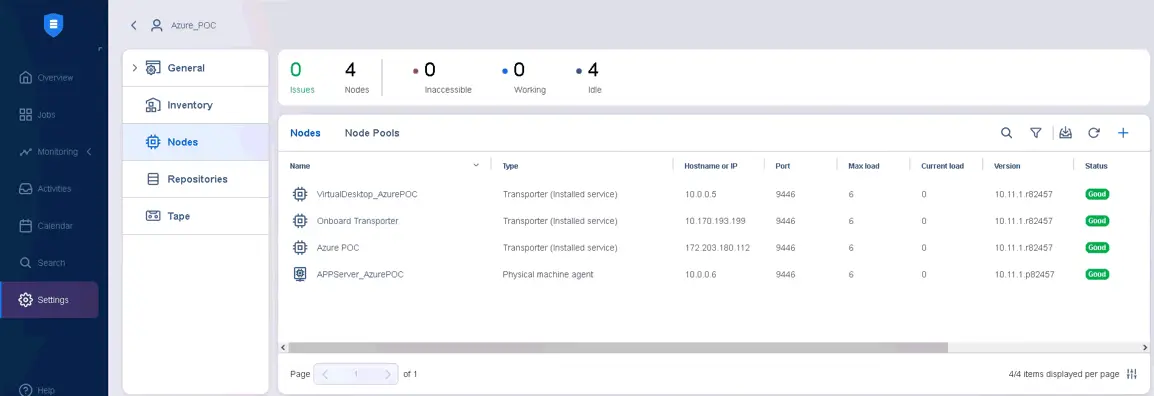
Let’s look at the differences between the first and second approach of the Transporter installation on Azure VMs:
- Using an automatically injected agent doesn’t allow you to use that agent to write backups directly to block-level storage in the local infrastructure or in the cloud.
- Using the manually installed Transporter, which is defined as Universal Transporter, allows you to use the agent that runs on your VM instance as the destination for your backups as well. For example, you can upload a backup directly from your VM to a bucket in the cloud or block storage in the cloud rather than passing from the third Transporter. Keep this point in mind when planning the data flow for your infrastructure.
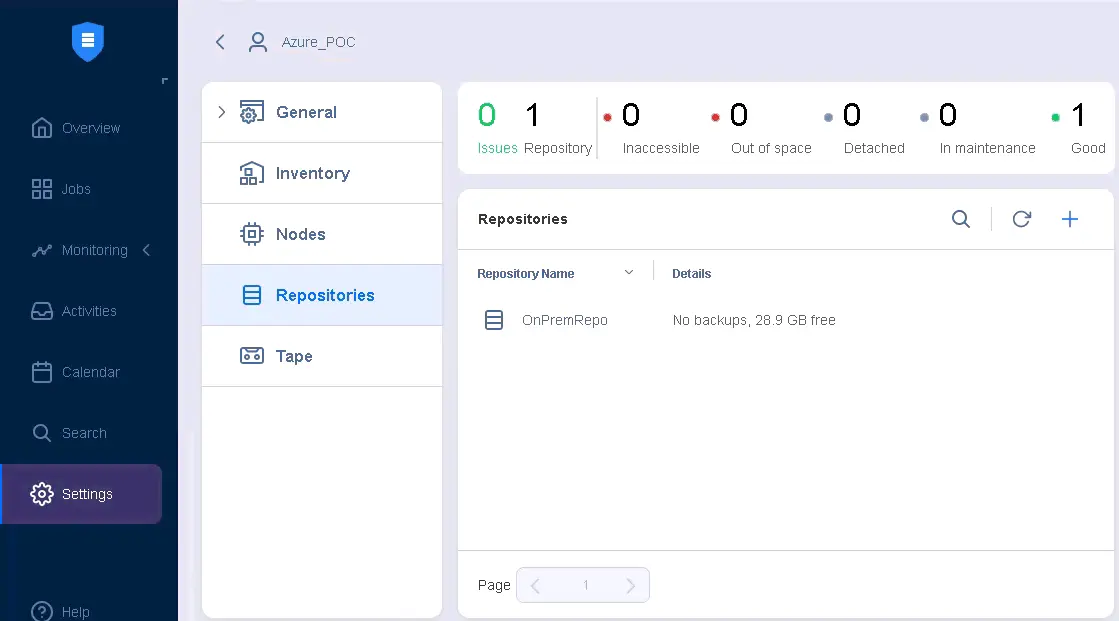
For the purposes of this demo or proof of concept about Azure VM backup, we use an on-premises backup repository. You can view, edit, and add backup repositories in Settings > Repositories.
Creating a backup job for an Azure VM
Once Transporters are installed, machines added to the inventory, and a backup repository configured, you can configure a backup job for Azure VM data in NAKIVO Backup & Replication.
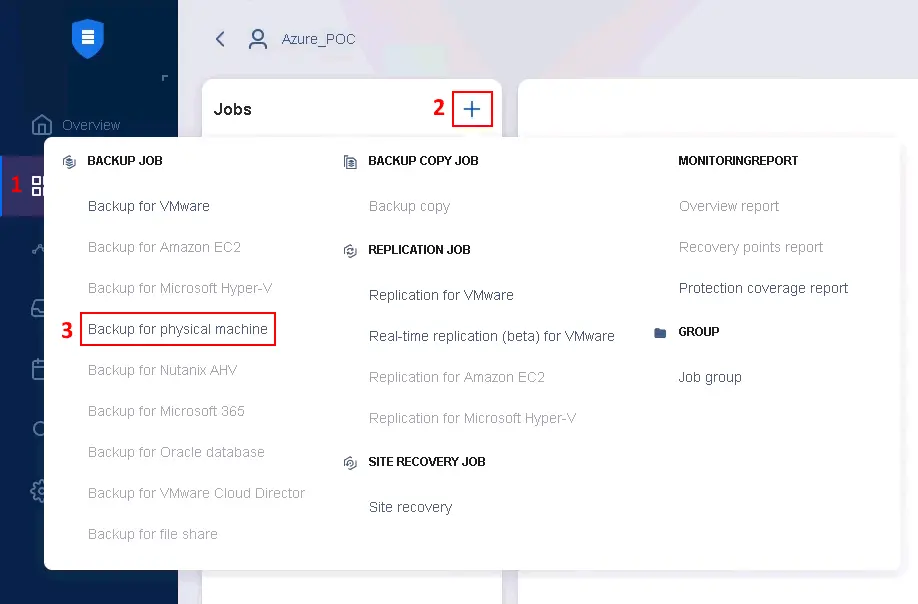
Go to Jobs, click + and hit Backupfor physical machine in the menu that opens. We select the physical machine approach because the job will be performed through an agent installed inside a VM.
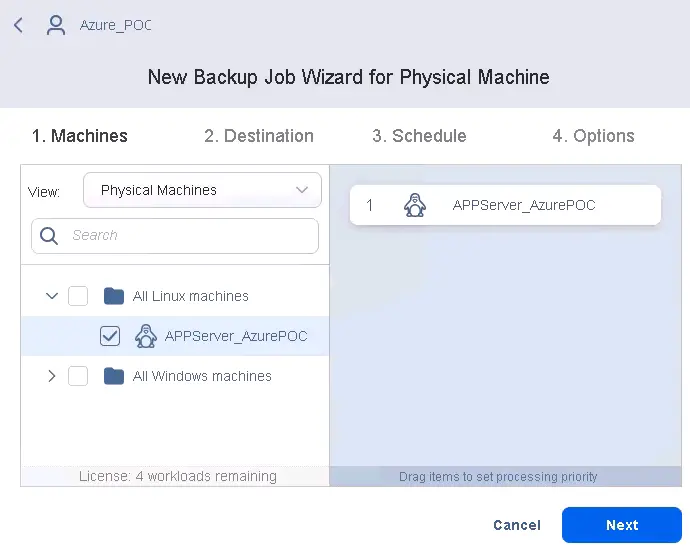
The New Backup Job Wizard for Physical Machine opens. Complete all the steps of the wizard:
- Select the machine on which you have installed the Transporter agent and which you want to back up. In our example, we select AppServer_AzurePC, which is a Linux VM running in Azure. Hit Next at each step of the backup job wizard to continue.
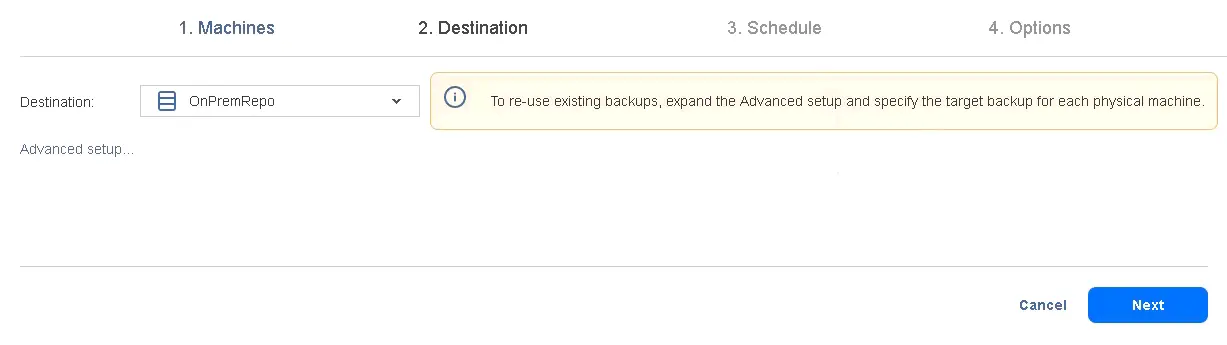
- Select a backup repository to store a backup of the selected machine(s). In our case, this is OnPremRepo.
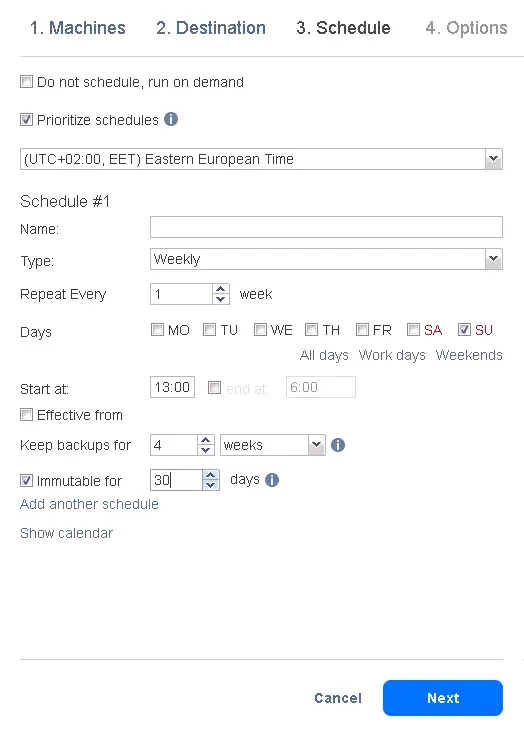
- Configure scheduling and retention settings. You can configure the grandfather-father-son retention policy or any other settings you want. Select the Immutable checkbox to set the backup immutability, which improves backup protection against ransomware and other scenarios of unwanted deletion and corruption. The period of immutability can be up to 30 days since backup creation (for the current recovery point).
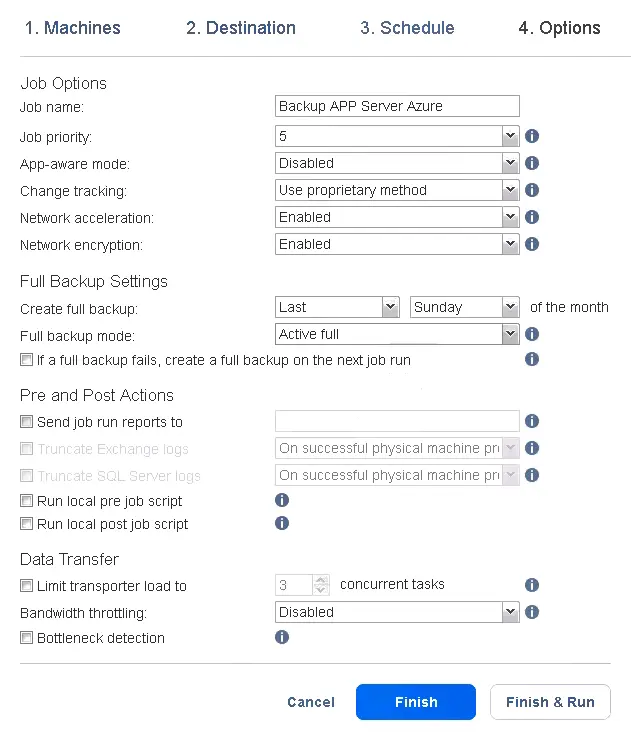
- Enter a job name that will be displayed in the list of jobs in the web interface of the NAKIVO solution. Set up advanced options, such as Application-aware mode, Network acceleration, and Network Encryption. You can set how often to create a full backup between the chains of incremental backup and the full backup type (Active Full or Synthetic Full).
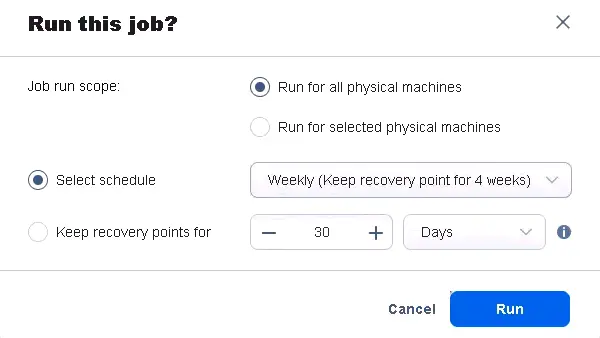
Hit Finish & Run.
- Confirm running the backup job with the appropriate options and hit Run.
Wait until a backup job is finished.