Die effektivsten Methoden zum Übertragen von Dateien von einer VM auf einen Host
Virtuelle Maschinen bieten viele Vorteile, wie Flexibilität, rationelle Ressourcennutzung und den Betrieb in isolierten Umgebungen. Eine häufige Aufgabe in virtuellen Umgebungen ist das Kopieren von Dateien zwischen VMs und Hosts. Lesen Sie weiter, um zu erfahren, wie Sie Dateien von einem Host auf eine virtuelle Maschine kopieren, wie Sie Dateien von einer VM auf einen Host übertragen und wie Sie Dateien zwischen VMs kopieren.
Die Komponenten unserer Umwelt
Beginnen wir mit einer Erläuterung der Fachbegriffe:
- A Snapshot ist ein physischer Rechner, auf dem ein Hypervisor installiert ist.
- A Hypervisor ist eine Virtualisierungssoftware zum Ausführen virtueller Maschinen auf dem Host. Es gibt zwei Arten von Hypervisoren:
- Typ 1: Verwendung eines ESXi-Servers als Host-Maschine
- Typ 2: Verwendung von VMware Workstation, wobei in diesem Fall Windows und Linux als Betriebssystem des Host-Rechners verwendet werden können.
In dieser Anleitung besteht die Umgebung, die zur Erläuterung der Übertragung von Dateien von der VM zum Host verwendet wird, aus den folgenden Komponenten:
- ESXi-Host 1: 192.168.101.201
- ESXi-Host 2: 192.168.101.202
- Ubuntu-Linux-Rechner: 192.168.101.210
- Windows-Host mit installierter VMware Workstation
- Netzwerk: 192.168.101.0/24
- ESXi-VMs und VMware Workstation-VMs, die mit demselben Netzwerk verbunden sind
Wir verwenden die folgenden Technologien, um Dateien zwischen VMs und Hosts zu kopieren:
- Gemeinsam geteilte Ordner
- Gemeinsame Zwischenablage und Drag & Tropfen
- USB-Speichergerät
- PowerCLI
- SSH und SCP
- NFS-Freigabe
- Dateien in einer VMware-Webschnittstelle herunterladen/hochladen
- ISO-Dateien
Verwenden von freigegebenen Ordnern zum Übertragen einer VM-Datei auf den Host
Gemeinsam geteilte Ordner ist eine praktische Funktion in VMware Workstation zum Übertragen von Dateien zwischen einem physischen Windows- oder Linux-Host, auf dem VMware Workstation installiert ist, und VMs, die auf VMware Workstation ausgeführt werden. Für macOS ist VMware Fusion das Äquivalent zu VMware Workstation und unterstützt ähnliche Funktionen.Sehen wir uns nun die Schritte zum Übertragen von Dateien von der VM zum Host und umgekehrt mithilfe von VMware Shared Folders an.Hinweis: Damit diese Funktion arbeitet, VMware-Tools muss auf einer VM installiert sein. Die Daten zwischen einem Host und einer VM werden über VMware Tools zwischen dem Host- und dem Gastbetriebssystem ohne Verwendung eines Netzwerks übertragen.
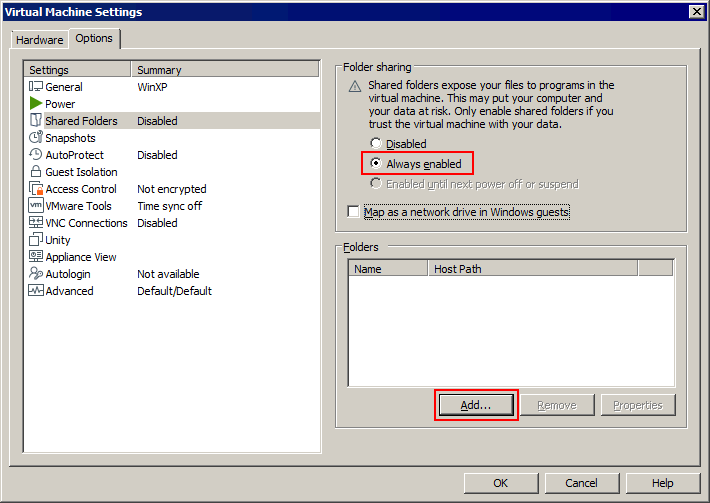
- Wählen Sie eine VM aus, für die Sie die VMware-Dateifreigabe konfigurieren möchten. Wir wählen eine unserer Windows-VMs aus.
- Klicken VM > Einstellungen (Einstellungen der virtuellen Maschine bearbeiten) in der VMware Workstation-Benutzeroberfläche.
- In der Einstellungen für virtuelle Maschinen Fenster, wählen Sie die Optionen Registerkarte und klicken Sie Gemeinsam geteilte Ordner. In der Ordnerteilen Abschnitt, auswählen Immer aktiviertOptional können Sie einen freigegebenen Ordner als Netzlaufwerk in Windows-Gästen zuordnen, um den Komfort zu erhöhen, indem Sie das Kontrollkästchen aktivieren.
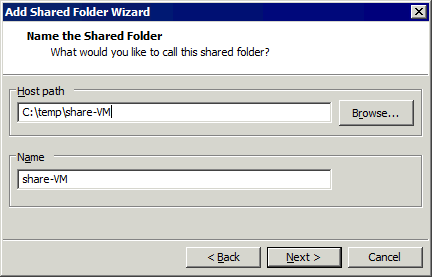
- Klicken Hinzufügen einen Ordner auswählen, der als freigegebener Ordner geteilt werden soll.
- Geben Sie den Pfad zu dem Ordner ein, den Sie auf dem Host teilen möchten, oder klicken Sie auf Durchsuchen und wählen Sie den gewünschten Ordner aus. Wir wählen C:tempshare-VM
Geben Sie einen Namen für den geteilen Ordner ein, zum Beispiel Shared VM
Klicken Weiter.
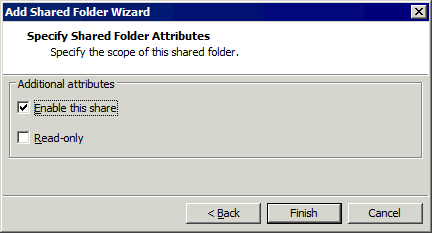
- Wählen Diese Freigabe aktivierenWenn Sie möchten, dass VMs im schreibgeschützten Modus auf den freigegebenen Ordner zugreifen können, wählen Sie die Option Nur-Lese Kontrollkästchen. Klicken Sie auf Fertigstellen.
- Die Anzeige des neuen freigegebenen Ordners erfolgt nun in der Liste der freigegebenen Ordner im Optionen Registerkarte der Einstellungen der virtuellen Maschine Fenster. Ein freigegebener Ordner ist aktiviert, wenn das entsprechende Kontrollkästchen neben dem Dateinamen ausgewählt ist.
Klicken OK um die Einstellungen zu speichern.

- Öffnen Sie die Benutzeroberfläche der Windows-VM, die den Ordner teilt, mit dem Gemeinsam geteilte Ordner Funktion.
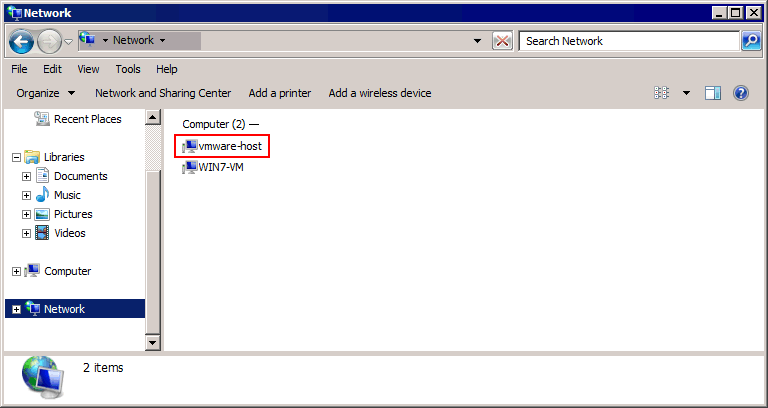
- Klicken Netzwerk (Meine Netzwerkumgebung) in Mein Computer (Dieser PC) oder Windows Explorer, um die im Netzwerk verfügbaren Computer anzuzeigen.
- Wählen VMware-Host als Computername, auf dem der freigegebene Ordner konfiguriert ist. Dieser Name ist standardmäßig festgelegt und wird Ihrer physischen Maschine (Host) mit dem freigegebenen Ordner zugeordnet.
- Klicken Gemeinsam geteilte Ordner und wählen Sie den gewünschten freigegebenen Ordner aus, der geteilt wird (Shared VM in unserem Beispiel). Der vollständige Pfad zum freigegebenen Ordner lautet in unserem Fall
\\vmware-host\Shared Folders\share-VM\
Sie können Dateien von einem Host auf eine Virtuelle Maschine und von einer VM auf einen Host kopieren. Wir haben kopiert Test01.txt in unserem Beispiel von einem Windows-Host zu einem Windows-Gast unter Verwendung der VMware-Dateifreigabe in VMware Workstation.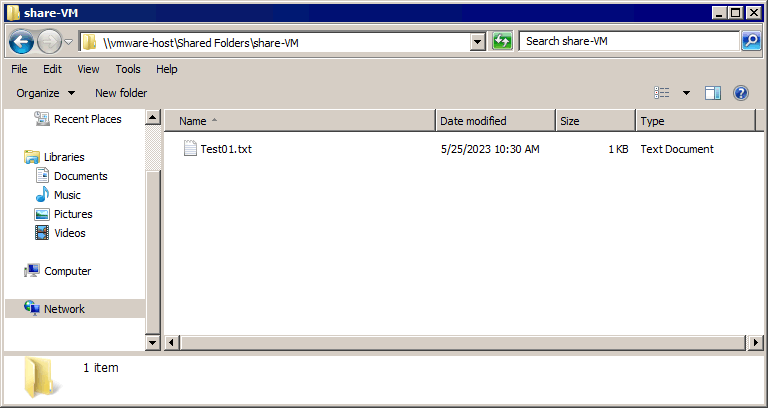 Für Linux-Gäste können Sie alle Ordner, die mit VMware geteilt werden, mit dem unten angegebenen Befehl mounten:
- Unter Linux mit einem Kernel vor 4.0:
mount -t vmhgfs .host:/ /home/user1/shares - Unter Linux mit Kernel 4.0 oder neuer:
/usr/bin/vmhgfs-fuse .host:/ /home/user1/shares -o subtype=vmhgfs-fuse,allow_other
Wenn Sie möchten, dass ein freigegebener Ordner nach dem Neustart der VM behalten wird, fügen Sie die entsprechenden Zeilen mit dem Kommentar und der Konfiguration in /etc/fstab , zum Beispiel:#VMware-Freigabeordner zum Übertragen von Dateien zwischen VMWare-Gast und Host.host:/ /mnt/hgfs/ fuse.vmhgfs-fuse defaults,allow_other,uid=1000 0 0Bevor wir zum weiteren Abschnitt übergehen, beachten Sie bitte, dass die Funktion für freigegebene Ordner nur in VMware Workstation verfügbar ist (und VMware Fusion unter macOS) und ist für VMs, die auf ESXi-Hosts ausgeführt werden, nicht verfügbar. Bei ESXi-Hosts können Sie einen Ordner manuell teilen und ein Netzwerk verwenden, um Dateien zwischen Windows-Computern zu kopieren. Um Dateien von einer VM auf einen ESXi-Host zu kopieren, sollten Sie ein zusätzliches Tool verwenden oder das Kopieren von Dateien aus einem manuell geteilten Ordner mit einer der unten beschriebenen Methoden kombinieren.Es gibt noch andere Methoden für Teilen eines Ordners in Windows 10 und Windows Server 2019. Sie können auch mehr über die SMB-Dateifreigabe Protokoll.Wenn Sie über ein Windows-Konto mit Administratorrechten verfügen und eine Sicherheitsrichtlinie den Zugriff auf standardmäßig verfügbare versteckte administrative Freigaben zulässt, können Sie auf Dateien auf lokalen Festplatten von Windows-Computern zugreifen, indem Sie den Pfad zur Freigabe wie folgt verwenden:\\IP-Address\c$Wo:IP-Adresse ist eine IP-Adresse oder ein Host-Name eines entfernten Windows-Computers.C$ ist der erforderliche Laufwerksbuchstabe auf einem Remote-Windows-Computer, bei dem es sich um eine versteckte Systemfestplatte handelt.
Verwenden der gemeinsamen Zwischenablage zum Übertragen von Dateien von einem Host auf VMs
Die gemeinsame Zwischenablage ist eine Funktion, mit der Sie Inhalte wie Text und ganze Dateien von einer virtuellen Maschine auf einen Host-Computer kopieren und einfügen können, auf dem VMware Workstation installiert ist. Der Vorgang ähnelt dem Kopieren und Einfügen von Inhalten zwischen verschiedenen Anwendungsfenstern in Windows oder Linux mit der GUI.Der gesamte Bereich der Funktionen ist verfügbar in VMware Workstation, mit dem Sie Dateien von einem Host auf Virtuelle Maschinen und von einer VM auf einen Host übertragen können. Als Alternative zum Kopieren und Einfügen können Sie Dateien per Drag & Drop verschieben.
Gemeinsame Zwischenablage in VMware Workstation
Sehen wir uns an, wie Sie Dateien mithilfe einer freigegebenen Zwischenablage und Drag & Drop auf VMware Workstation-VMs übertragen können. & Löschen. In unserem Beispiel ist VMware Workstation auf einem Windows-Host installiert.
- Wählen Sie Ihre VM im linken Fensterbereich aus, in dem die VMs aufgelistet sind.
- Klicken Einstellungen der virtuellen Maschine bearbeiten (VM > Einstellungen).

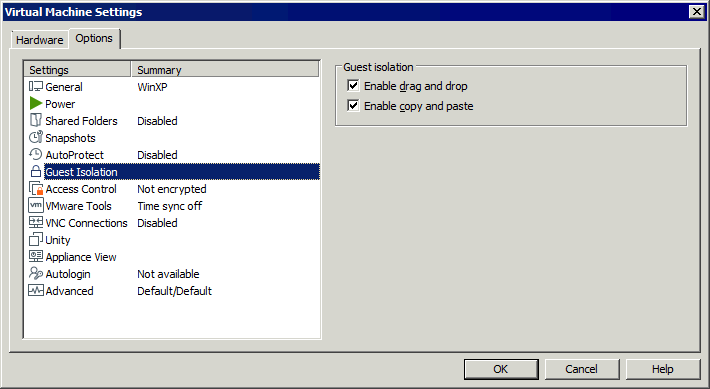
- Wählen Sie die Optionen Registerkarte und klicken Sie Gast Isolation.
Zwei Kontrollkästchen auswählen:
- Drag & Drop aktivieren
- Kopieren und Einfügen aktivieren
Klicken OK Um die Einstellungen zu speichern und das Fenster zu schließen.
Gemeinsame Zwischenablage in VMware ESXi
Bei VMs, die auf VMware ESXi laufen, können Sie keine Dateien per Drag & Drop kopieren. & oder über die gemeinsame Zwischenablage zwischen einer VM auf einem VMware ESXi-Host und einem anderen Rechner. Die einzige Option besteht darin, Text zwischen einer auf ESXi laufenden VM und Ihrem lokalen Rechner (auf dem VMware Workstation oder VMware Remote-Konsole ist installiert). Kopieren und einfügen und ziehen & Aus Sicherheitsgründen werden Drop-Dateien nicht unterstützt.Wenn Sie jedoch beispielsweise eine Konfigurationsdatei nicht kopieren können, können Sie den Textinhalt der Datei über eine gemeinsame Zwischenablage kopieren. Standardmäßig ist die gemeinsame Zwischenablage in der ESXi-VM-Konfiguration deaktiviert. Führen Sie auf einem ESXi-Host die folgenden Schritte aus, um eine gemeinsame Zwischenablage zum Kopieren und Einfügen von Textdaten zu aktivieren:
- Die VM muss beim Bearbeiten der VM-Konfiguration ausgeschaltet sein. Fahren Sie die VM herunter, wenn sie ausgeführt wird.
- Öffnen VM-EinstellungenSie können VMware Host Client und VMware vSphere Client verwenden. Wählen Sie eine VM aus und klicken Sie auf VM-Einstellungen bearbeiten und wählen Sie die VM-Optionen Registerkarte.
Erweitern Sie die Erweiterte Einstellungen Abschnitt und klicken Sie auf Konfiguration bearbeiten.

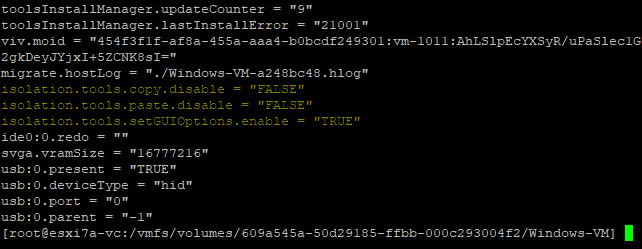
- Sie müssen drei Konfigurationsparameter zur VM-Konfiguration hinzufügen (die in die VM-Konfigurationsdatei VMX geschrieben werden). Klicken Sie auf Parameter hinzufügen.

- Fügen Sie diese drei Parameter hinzu:
isolation.tools.copy.disable FALSEisolation.tools.paste.disable FALSEisolation.tools.setGUIOptions.enable TRUE - Klicken OK und Einstellungen speichern.

Alternativ können Sie eine VMX-Datei mit der VM-Konfiguration manuell bearbeiten, die sich auf einem ESXi-Datenspeicher im VM-Verzeichnis befindet.
- Melden Sie sich lokal oder über SSH bei der ESXi-Shell an.
- Wechseln Sie zum VM-Verzeichnis (ein Verzeichnis, in dem VM-Dateien auf einem Datenspeicher gespeichert sind). In unserem Fall wechseln wir zu diesem Verzeichnis:
cd /vmfs/volumes/datastore10a/Windows-VM/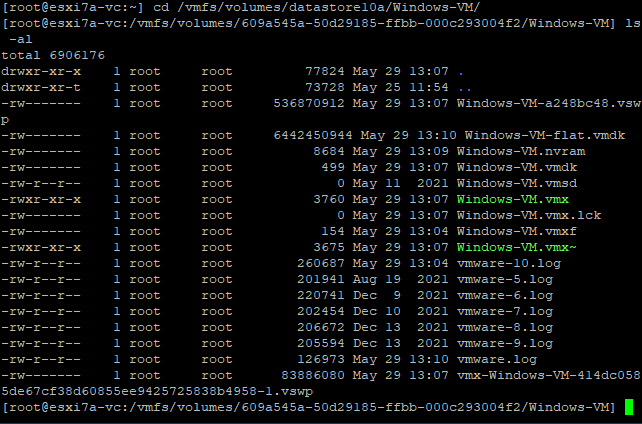
- Bearbeiten Sie die VMX-Konfigurationsdatei. In unserem Fall lautet die Datei Windows-VM.vmx
vi Windows-VM.vmx - Fügen Sie die drei oben angezeigten Parameter am Ende dieser Konfigurationsdatei hinzu.
- Änderungen speichern und Datei schließen (Texteditor beenden).
Jetzt können wir Text zwischen unserem lokalen Rechner und einer Remote-VM, die auf einem VMware ESXi-Host läuft, kopieren und einfügen, indem wir VMware Remote Console und VMware Workstation verwenden, um eine Verbindung zu einer VM herzustellen.
Verwendung eines USB-Speichergeräts
VMware ESXi und VMware Workstation unterstützen die USB-Passthrough-Funktion, mit der Sie ein USB-Gerät an einen Host-Computer anschließen und dieses USB-Gerät mit einer auf diesem Host ausgeführten virtuellen Maschine verbinden können. Sie können ein USB-Speichergerät nacheinander an einen Host-Computer und eine virtuelle Maschine anschließen, um Dateien zwischen diesen Computern in beide Richtungen zu kopieren.Hinweis: VMware Tools muss auf dem Gastbetriebssystem (OS) der VM installiert sein, um die USB-Passthrough-Funktion nutzen zu können.
Kopieren von Dateien zwischen VMware Workstation-VMs und dem Host
Gehen Sie wie folgt vor, um Dateien von einer VM auf einen Host in VMware Workstation zu übertragen, das auf Windows- und Linux-Hosts installiert ist (die Benutzeroberfläche ist einheitlich):
- Schalten Sie die virtuelle Maschine ein.
- Stecken Sie ein USB-Speichergerät, z. B. eine USB-Festplatte (Hard Disk Drive) oder einen USB-Stick, in einen physischen Computer, der als Host-Rechner fungiert.
- Das Neues USB-Gerät erkannt Ein Fenster wird in VMware Workstation geöffnet. Wählen Sie aus, wo Sie Ihr USB-Gerät verbinden möchten:
- Mit dem Host verbinden
- Mit einer virtuellen Maschine verbinden
Wählen wir die zweite Option und verbinden wir unseren USB-Stick mit der virtuellen Maschine. In diesem Beispiel verwenden wir eine Windows-VM. Wenn mehrere VMs auf VMware Workstation laufen, müssen Sie die gewünschte VM aus der Liste auswählen. Ein USB-Gerät kann jeweils nur an eine VM verbunden werden. Klicken Sie auf OK fortfahren.

Wenn Ihr USB-Speichergerät bereits in den USB-Anschluss des physischen Host-Computers eingesteckt ist, auf dem VMware Workstation installiert ist, wird das Popup-Fenster mit den USB-Passthrough-Optionen nicht automatisch angezeigt. Sie können ein USB-Gerät über das Menü mit einer VM verbinden (vom Host trennen):
Gehen Sie zu VM > Removable Geräte > Name Ihres USB-Speichergeräts > Verbinden (Trennung vom Host).
In unserem Beispiel lautet der Name des USB-Sticks „Kingston DataTraveler 2.0“.
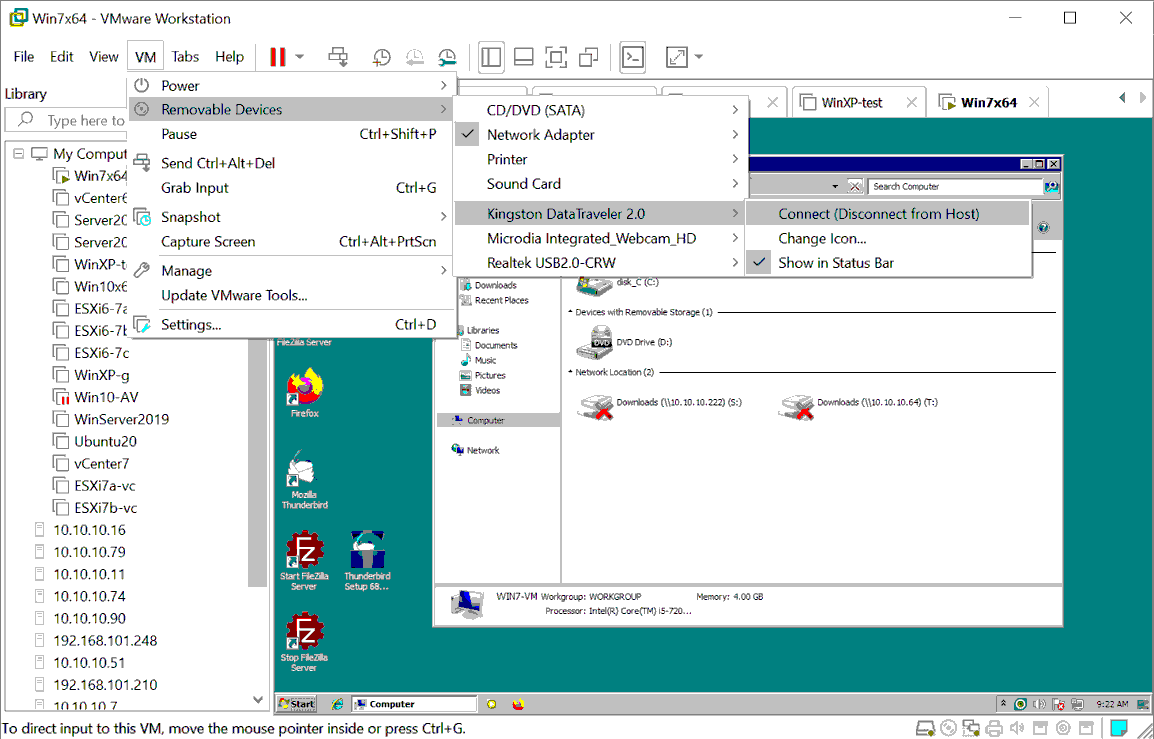
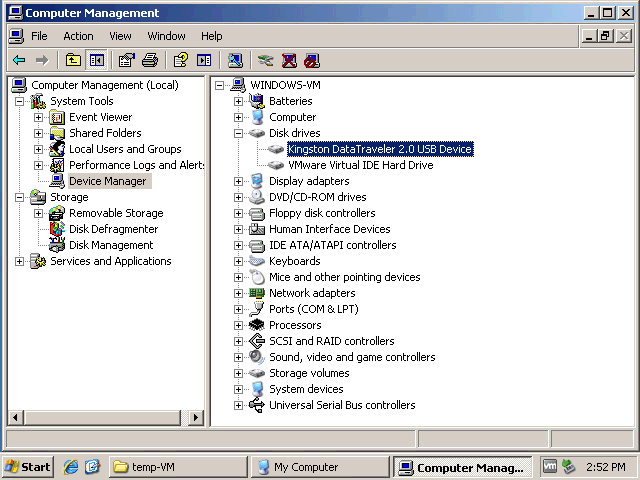
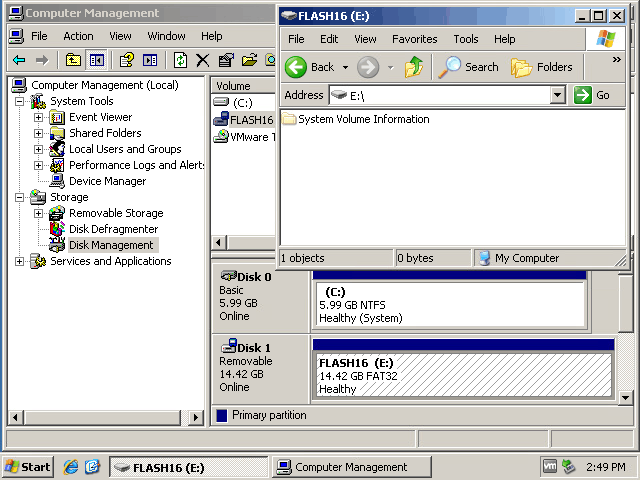
- Jetzt können wir den an die Windows 7-VM verbundenen USB-Stick in der Liste der Festplatten unter „Arbeitsplatz“ (Windows Explorer) sehen. So überprüfen Sie das USB-Speichergerät:
- Rechtsklick Mein Computer und getroffen Verwalten.
- Gehen Sie zu Computerverwaltung > Geräte-Manager und Computermanagement > Festplatten-Management im entsprechenden Snap-In, nach dem Sie mit der rechten Maustaste geklickt haben.
Wenn ein Laufwerksbuchstabe nicht automatisch zugewiesen wird, weisen Sie den Buchstaben manuell in der Festplattenverwaltung einstecken.
Der Arbeitsablauf für Linux-Gäste ist identisch. Bei einigen Linux-Distributionen müssen Sie möglicherweise ein verbundenes USB-Speichergerät wie einen Flash-Speicher manuell im Linux-Betriebssystem mounten.
- Sobald das USB-Speichergerät an die VM angeschlossen und vom Gastbetriebssystem erkannt wurde, kopieren Sie die benötigten Dateien von der VM auf ein USB-Speichergerät. Das Kopieren von Dateien vom USB-Speichergerät auf eine VM funktioniert nun ebenfalls.

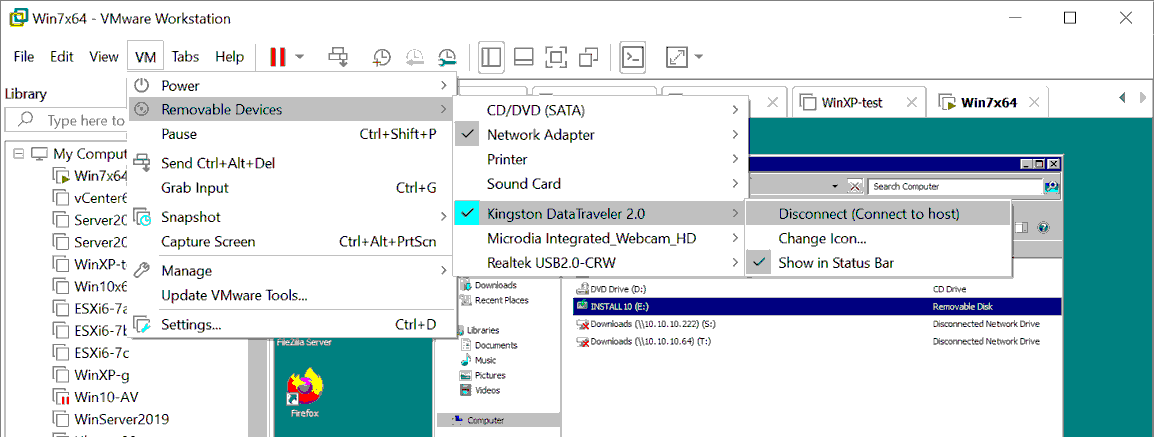
- Nach dem Kopieren aller erforderlichen Dateien von der VM auf den USB-Stick trennen Sie den USB-Stick von der VM und verbinden Sie dieses Gerät mit dem Host:
Klicken VM > Removable Devices > Name Ihres USB-Speichergeräts > Trennen (Mit Host verbinden).
- Ein USB-Speichergerät ist nun mit einem Host-Computer verbunden (in unserem Fall ein Windows-Computer, auf dem VMware Workstation ausgeführt wird). Wir können die Dateien, die von der VM auf den USB-Stick kopiert wurden, auf Ihren Host-Computer übertragen.
USB-Passthrough von VMware Workstation zu ESXi-VMs
Sie können einen USB-Stick verwenden, der in einen ESXi-Server und in Ihren lokalen Windows- oder Linux-Rechner (mit installierter VMware Workstation oder VMware Remote Console (VMRC)) eingesteckt ist, den Sie zum Verwalten eines VMware ESXi-Hosts verwenden, um diesen USB-Stick mit einer ESXi-VM zu verbinden. Im ersten Fall ist die mit dem Host verbunden USB-Passthrough wird verwendet, und im zweiten Fall wird das mit dem Kunden verbunden USB-Passthrough wird verwendet.Verbinden wir einen USB-Stick, der in unseren lokalen physischen Windows 10-Rechner eingesteckt ist, mit einer Windows XP-VM, die auf einem VMware ESXi-Host v7.0 läuft (unter Verwendung der Client-verbundenen USB-Passthrough-Funktion). VMware Workstation ist auf unserem physischen Windows-Rechner installiert und über das Netzwerk (192.168.101.0/24) mit dem VMware ESXi-Host verbunden.Dazu gehen Sie wie folgt vor:
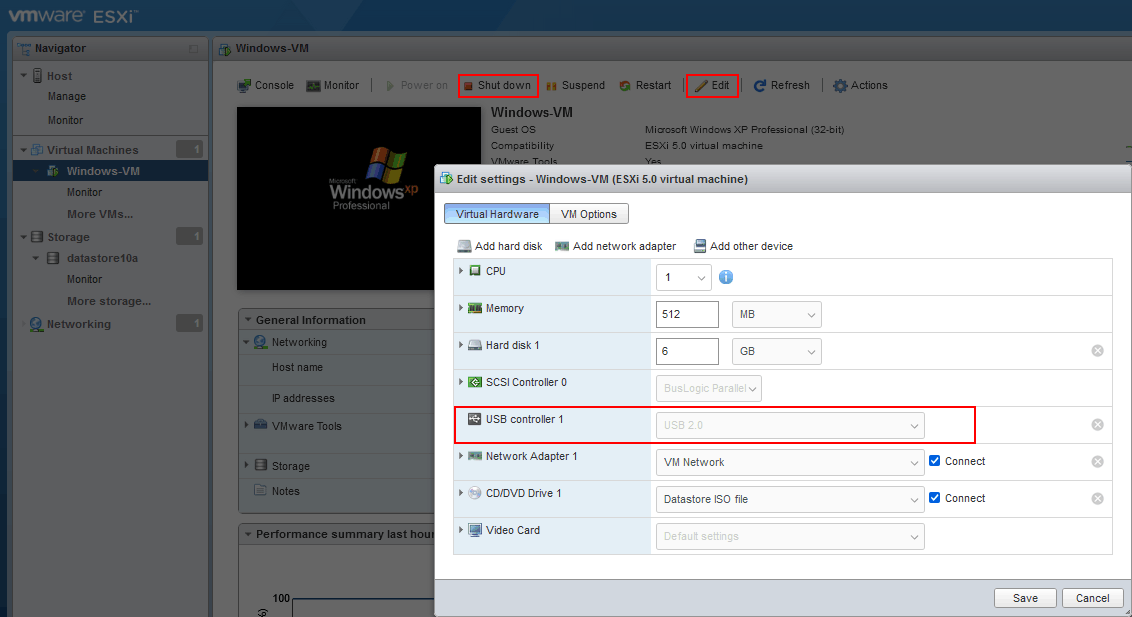
- Eine VM muss ausgeschaltet sein, um die VM-Einstellungen zu bearbeiten.
- Stellen Sie sicher, dass ein USB-Controller ist in der Liste der virtuellen Hardware der VM enthalten. Sie können die VM-Konfiguration im VMware Host Client überprüfen. Wählen Sie Ihre VM aus (Windows-VM in unserem Fall), klicken Sie auf Einstellungen bearbeiten und wählen Sie die Virtuelle Hardware Registerkarte.
- Kehren wir zurück zu VMware Workstation, das auf unserem lokalen (physischen) Windows 10-Rechner installiert ist. Klicken Sie auf Datei > Mit einem Server verbinden in VMware Workstation für die Verbindung mit einem Remote-ESXi-Host.

- Geben Sie den Namen oder die IP-Adresse des ESXi-Servers, den Benutzernamen und das Passwort ein. Klicken Sie auf Verbinden .

- Erweitern Sie den VMware ESXi-Host im linken Bereich von VMware Workstation, wo Remote-Hosts, Remote-VMs auf diesen Hosts und lokale VMware Workstation-VMs angezeigt werden.
- Wählen Sie eine VM aus, die auf einem Remote-ESXi-Host ausgeführt wird. Wir wählen Windows-VM auf 192.168.101.201Nach dem Auswahlprozess sehen wir die Benutzeroberfläche eines Gastbetriebssystems der ausgewählten VM.
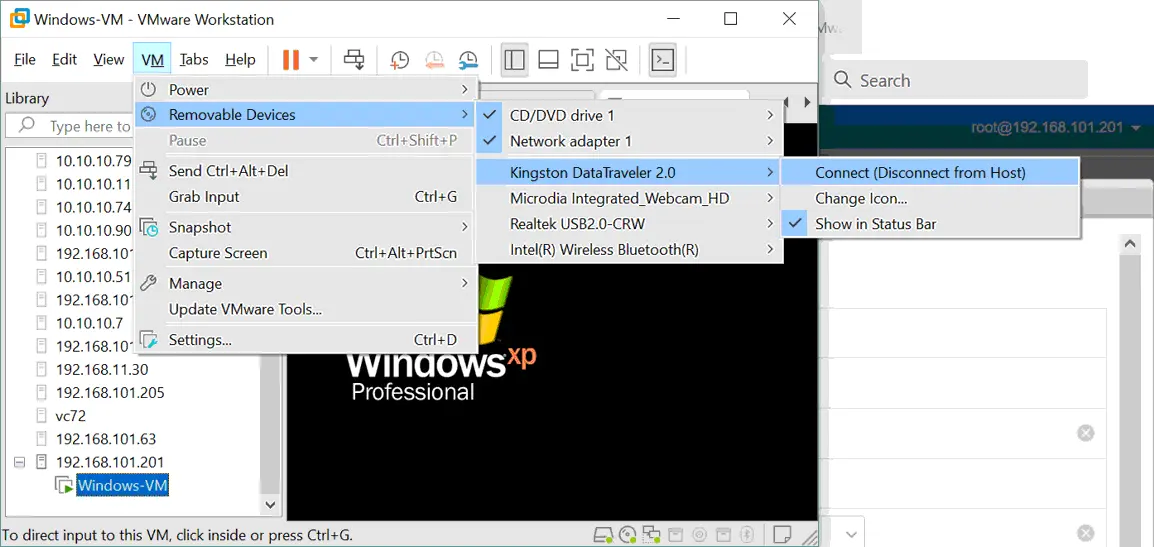
- Klicken VM > Removable Devices > Name Ihres USB-Speichergeräts > Verbinden (Trennung vom Host).
Beachten Sie, dass wir ein USB-Gerät auswählen, das an unseren physischen Windows-Rechner angeschlossen ist, auf dem VMware Workstation installiert ist. Dieses USB-Gerät ist kein Gerät, das an einen physischen VMware ESXi-Host verbunden ist, mit dem wir eine Remote-Verbindung hergestellt haben.
- Jetzt können wir sehen, dass unser USB-Stick mit der Windows XP-VM verbunden ist, die auf dem Remote-ESXi-Host ausgeführt wird: Starten > CMD > compmgmt.msc > Geräte-Manager.
- Weisen Sie der Partition des verbundenen USB-Sticks einen Laufwerksbuchstaben zu, falls noch kein Laufwerksbuchstabe zugewiesen wurde. Kopieren Sie die benötigten Dateien zwischen der VM und dem USB-Stick. Sie können Dateien auf eine VM übertragen und von einer VM übertragen.
- Nach dem Kopieren der Dateien können Sie das USB-Speichergerät von der VM trennen und dieses Gerät wieder an den lokalen physischen Windows 10-Rechner verbinden, auf dem VMware Workstation ausgeführt wird. Klicken Sie in der VMware Workstation-Benutzeroberfläche auf VM > Removable Geräte > Name Ihres USB-Speichergeräts > Trennen (Mit Host verbinden).
Verbinden eines USB-Sticks mit ESXi
Diese Methode ist in einigen Verwendungsfällen äußerst nützlich, beispielsweise wenn Sie einen Netzwerktreiber auf einem VMware ESXi-Host aktualisieren müssen und das Netzwerk nicht verwenden können. Das Verbinden eines USB-Flash-Laufwerks mit ESXi ist komplizierter als das Verbinden mit einem Host-Computer, auf dem VMware Workstation ausgeführt wird.Bei VMware ESXi gibt es Einschränkungen hinsichtlich der unterstützten Dateisysteme, die auf VMware ESXi gemountet werden können. USB-Flash-Laufwerke oder USB-Festplatten mit FAT32- und NTFS-Dateisystemen werden nicht unterstützt. Aus diesem Grund müssen wir eine Partition auf unserem USB-Flash-Laufwerk erstellen und diese Partition mit VFAT (das in Windows als FAT12 erkannt wird) formatieren. VFAT hat Einschränkungen, wie z. B. die maximale Partitionsgröße und die maximale Dateigröße. Daher ist diese Methode nicht für große Dateien wie virtuelle Festplatten oder ISO-Images mit einer Größe von mehr als 4 GB geeignet. Diese Grenzen sind jedoch ausreichend, um Konfigurationsdateien, Treiber usw. zu übertragen.
Erstellen einer Partition auf einem USB-Stick
Zunächst erstellen wir eine neue Partition auf unserem USB-Stick und formatieren diese Partition in VFAT. Dazu verbinden wir einen in den ESXi-Server eingesteckten USB-Stick mit einer VM (mithilfe der Host-Connected USB Passthrough-Funktion). Alternativ können wir einen USB-Stick in einen physischen Windows- oder Linux-Rechner einstecken.In diesem Beispiel verwenden wir einen Windows 7-Rechner, um einen USB-Stick für ESXi vorzubereiten. Die Befehle für Windows Server 2008R2, Windows 10 und andere neuere Windows-Versionen sind identisch.
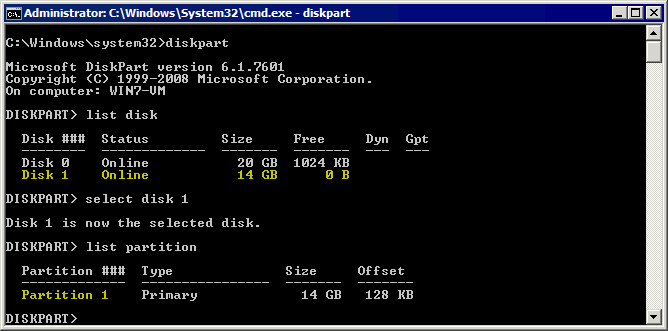
- Um sicherzustellen, dass ein USB-Stick an Ihren Windows-Computer verbunden ist, klicken Sie mit der rechten Maustaste Mein Computer oder Dieser PC (oder ausführen diskmgmt.msc von CMD) öffnen Datenträgerverwaltung.
- Öffnen Sie die Windows-Befehlszeile:
Start > Run > cmd - Passwort
diskpartin der Befehlszeile und drücken Sie Eingeben.Sie sehen eine diskpart-Eingabeaufforderung:
Diskpart - Listen Sie die an Ihren Windows-Rechner verbundenen Festplatten auf:
list diskSuchen Sie Ihren USB-Stick in der Ausgabeliste und merken Sie sich die Nummer der Festplatte. In unserem Fall ist dies Festplatte 1 ist die Nummer unseres USB-Sticks (siehe Screenshot unten).
- Wählen Sie Ihren USB-Stick von der entsprechenden Festplattennummer aus, die Sie aus der Ausgabe des obigen Befehls erhalten (in unserem Fall Festplatte 1).
select disk 1 - Partitionen auf dem ausgewählten USB-Stick auflisten:
list partitionWir haben eine Partition (Partition 1) auf unserem USB-Stick (siehe Screenshot unten). Eine Partition auf einem USB-Stick ist die gängigste Variante.
Weiter müssen wir die Partitionen auf dem USB-Stick löschen.
Wichtig: Alle Daten auf dem USB-Stick werden gelöscht. Bei Bedarf können Sie vor dem Weiterfahren mit den weiteren Schritten Daten vom USB-Stick kopieren.
- Wählen Sie eine Partition auf dem USB-Stick aus, die gelöscht werden soll:
select partition 1 - Führen Sie den Befehl aus, um die ausgewählte Partition zu löschen:
delete partition - Wählen Sie erneut eine Festplatte aus, bei der es sich um Ihren USB-Stick handelt:
select disk 1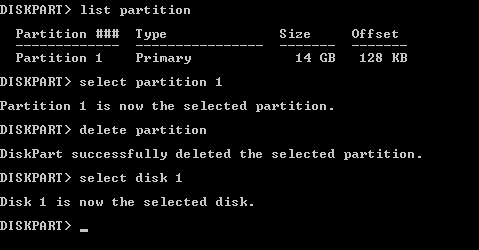
- Erstellen Sie eine neue Partition mit einem VFAT-Dateisystem. In diesem Beispiel erstellen wir eine 4-GB-Partition auf unserem USB-Stick. Beachten Sie, dass Sie keine Dateien speichern können, die größer als 4 GB sind. Beachten Sie, dass VFAT nur das 8.3-Dateinamenformat unterstützt.
create partition primary size=4000 id=6 - Formatieren Sie die erstellte Partition auf diese Weise, um die Kompatibilität mit ESXi sicherzustellen:
format fs=fat quick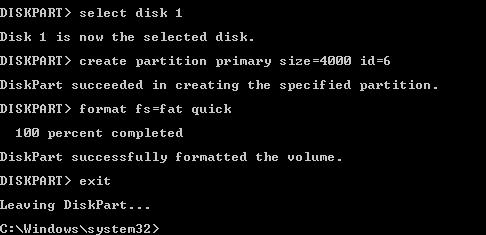
- Beenden Sie das Dienstprogramm „diskpart“ (führen Sie den Befehl Ausgang Befehl).
Ein USB-Stick kann nun von ESXi erkannt werden und Dateien kopiert werden. Nach einigen zusätzlichen ESXi-Konfigurationsschritten können Sie einen USB-Stick an eine VM anschließen und die benötigten Dateien auf den USB-Stick kopieren.Nehmen wir an, wir müssen ein ZIP-Archiv mit Treibern kopieren. In unserem Beispiel haben wir net-tulip.zip auf einen USB-Stick kopiert. Weiter müssen wir eine Partition eines in einen ESXi-Server eingesteckten USB-Sticks in der ESXi-Befehlszeile mounten.
Konfigurieren eines ESXi-Hosts für die Verwendung eines USB-Flash-Laufwerks
Angenommen, wir müssen ein ZIP-Archiv mit einem Treiber von einem USB-Stick auf einen ESXi-Datenspeicher kopieren und anschließend eine VM-Konfigurationsdatei von einem ESXi-Datenspeicher auf einen USB-Stick kopieren. Der Dateiname lautet net-tulip.zip in unserem Beispiel. Führen Sie die folgenden Schritte auf dem VMware ESXi-Host aus, um Dateien von einem USB-Flash-Laufwerk auf VMware ESXi und umgekehrt zu übertragen:
- Die Konfiguration erfolgt in der BefehlszeilenschnittstelleAus diesem Grund müssen Sie den SSH-Zugang auf einem ESXi-Host.
- Um den Remote-SSH-Zugriff in DCUI zu aktivieren, gehen Sie zu Optionen zur Fehlerbehebung > SSH aktivieren.
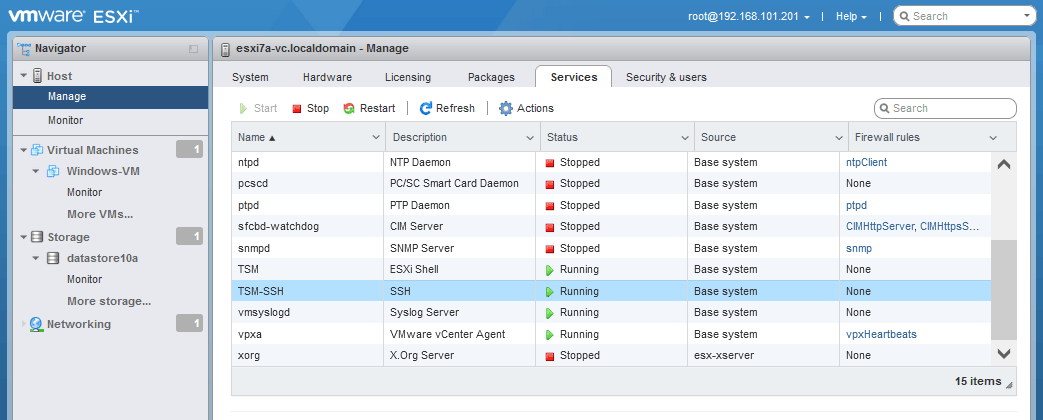
- Um den Remote-SSH-Zugriff und den SSH-Server auf ESXi im VMware Host Client zu aktivieren, gehen Sie zu Host > Verwalten und wählen Sie die Dienste Registerkarte. Rechtsklick TSM-SSH und klicken Sie Starten um den Dienst zu starten. Sie können diesen Dienst dauerhaft aktivieren.
- Verbinden Sie sich über SSH mit dem ESXi-Host, um die Befehlszeile zu verwenden. Sie können Ihren bevorzugten SSH-Client verwenden.
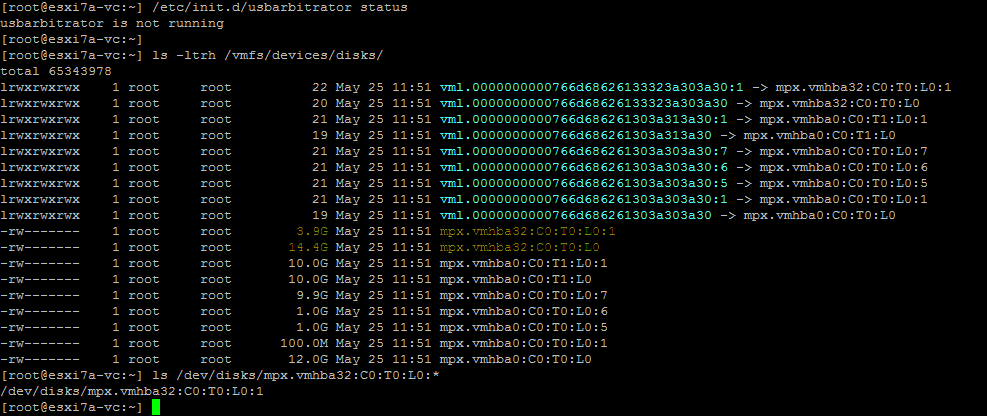
- Beenden Sie den USB-Arbitrator-Dienst:
/etc/init.d/usbarbitrator stopDer USB-Arbitrator aktiviert automatisch die USB-Passthrough-Funktion für virtuelle Maschinen, die sich auf einem ESXi-Host befinden (Sie müssen lediglich ein USB-Flash-Laufwerk in den VM-Einstellungen der entsprechenden VM auswählen, um diese Funktion zu nutzen).
- Wenn Sie den USB-Arbitrator-Dienst nach dem Neustart von ESXi (dauerhaft) deaktivieren möchten, können Sie den folgenden Befehl verwenden:
chkconfig usbarbitrator offUm den USB-Arbitrator-Dienst zu aktivieren, verwenden Sie den entsprechenden Befehl:
/etc/init.d/usbarbitrator startchkconfig usbarbitrator on
- Optionale Befehle zum Überprüfen der an einen ESXi-Host verbundenen USB-Geräte:
lsusbesxcli storage core device list | grep -i usbesxcli storage filesystem listSie können sehen /var/log/usb.log den Status eines USB-Geräts überprüfen.
- Möglicherweise müssen Sie ein USB-Speichergerät trennen und erneut verbinden, nach dem Beenden des USB-Arbitrator-Dienstes.
- Listen Sie die Block-Festplatten-Geräte auf, um das verbundene USB-Flash-Laufwerk (oder die USB-Festplatte) zu finden/identifizieren.
ls -ltrh /vmfs/devices/disks/Unser USB-Stick ist mpx.vmhba32:C0:T0:L0: (siehe Screenshot unten).
Die vollständige Adresse der Festplatte lautet somit:
/dev/disks/mpx.vmhba32:C0:T0:L0:
- Überprüfen Sie die Partitionsnummer des USB-Geräts, um sicherzustellen, dass Sie das richtige Gerät für die Festplatte identifiziert haben:
ls /dev/disks/mpx.vmhba32:C0:T0:L0:*Gemäß der Ausgabe lautet die vollständige Geräte-ID unter Berücksichtigung der Partitionsnummer in unserem Fall:
/dev/disks/mpx.vmhba32:C0:T0:L0:1 - Suchen Sie den Stammordner eines USB-Sticks, um den Pfad zur Quelle und zum Ziel für das Kopieren von Dateien festzulegen. Führen Sie den folgenden Befehl aus und drücken Sie Registerkarte um die verfügbaren Elemente im Verzeichnis „volumes“ anzuzeigen. Die /Volumes/ Das Verzeichnis des ESXi-Dateisystems ist ein Verzeichnis, in dem Partitionen mit Dateisystemen gemountet werden.
ls -al /vmfs/volumes/ [press Tab]Das Volume auf einem USB-Stick wird als KEIN NAME

- Überprüfen Sie den Inhalt des Stammverzeichnisses des USB-Sticks.
ls -al /vmfs/volumes/NO\ NAME/Unser ZIP-Archiv befindet sich auf dem USB-Stick.

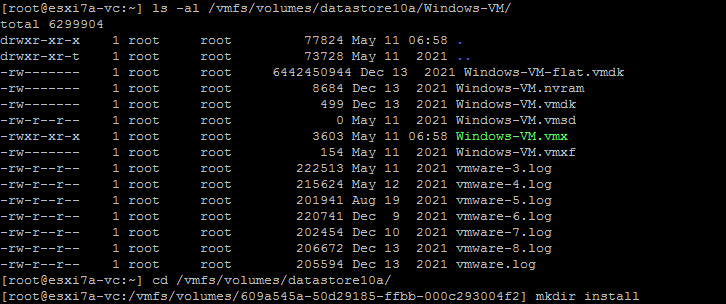
- Wir haben das installieren Ordner auf dem ESXi-Datenspeicher (Datenspeicher10a) mit den Befehlen:
cd /vmfs/volumes/datastore10amkdir installIm folgenden Screenshot sehen Sie auch das Verzeichnis der VM, deren Konfigurationsdatei wir später vom ESXi-Datenspeicher auf einen USB-Stick kopieren werden.
- Kopieren Sie das ZIP-Archiv vom USB-Stick auf den installieren Ordner auf unserem ESXi-Host (auf Datenspeicher10a).
cp /vmfs/volumes/NO\ NAME/net-tulip.zip /vmfs/volumes/datastore10a/install/ - Überprüfen Sie, ob die Datei kopiert wurde:
ls -al /vmfs/volumes/datastore10a/install/Die Datei wurde erfolgreich kopiert.

Ebenso können Sie Dateien in die entgegengesetzte Richtung kopieren – kopieren Sie Dateien von ESXi auf einen USB-Stick und kopieren Sie dann die benötigte Datei von diesem USB-Stick auf eine VM oder einen anderen Rechner.
- Überprüfen Sie den Inhalt des VM-Ordners:
ls -al /vmfs/volumes/datastore10a/Windows-VM/ - Kopieren Sie die Windows-VM.vmx Konfigurationsdatei von einem ESXi-Datenspeicher auf einen USB-Stick:
cp /vmfs/volumes/datastore10a/Windows-VM/Windows-VM.vmx /vmfs/volumes/NO\ NAME/ - Überprüfen Sie, ob die Dateien auf den USB-Stick kopiert wurden:
ls -al /vmfs/volumes/NO\ NAME/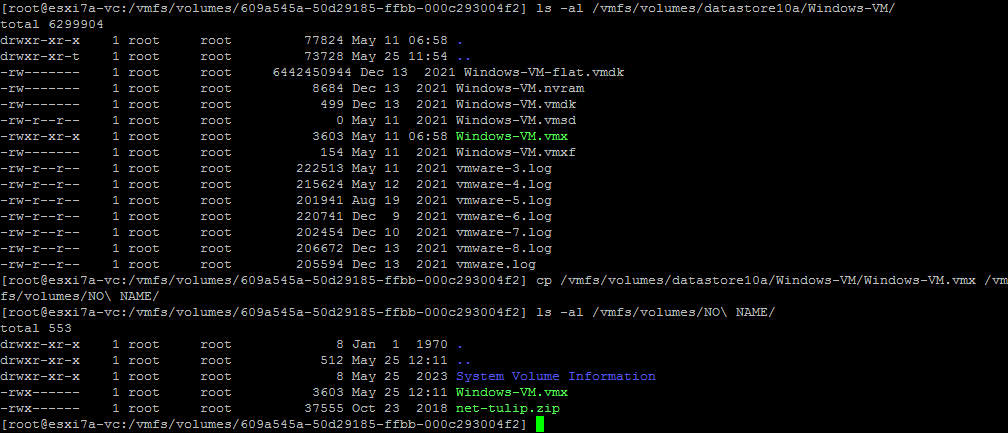
Nachdem Sie das Kopieren der Dateien auf dem ESXi-Host fertiggestellt haben, können Sie den USB-Stick auswerfen und den USB-Arbitrator-Dienst auf dem ESXi-Host starten. Anschließend können Sie den USB-Stick einstecken und die Host-verbundene USB-Passthrough-Funktion verwenden, um den USB-Stick an die Virtuelle Maschine anzuschließen.Weitere Informationen finden Sie unter USB-Passthrough für ESXi und das Verbinden eines in einen ESXi-Host eingesteckten USB-Speichergeräts mit einer VM, die sich auf dem ESXi-Host befindet.
Verwenden von PowerCLI zum Übertragen von Dateien auf VMware-VMs
Eine weitere Methode zum Übertragen von Dateien von der VM zum Host ist die Verwendung von PowerCLI Befehle (Cmdlets). VMware Tools muss in einem Gastbetriebssystem innerhalb einer VM installiert sein. Diese PowerShell-Cmdlets verwenden VMware Tools, um Dateien auf/von VMs zu kopieren, die sich auf einem VMware ESXi-Host befinden. Daher benötigen Sie kein Netzwerk, wenn Sie Befehle innerhalb einer VM ausführen, die sich auf dem Quell-/Ziel-VMware ESXi-Host befindet.Um Dateien zwischen VMs zu kopieren, können Sie einen Copy-VMGuestFile Cmdlet und andere Cmdlets in vSphere PowerCLI.
- Verbinden Sie sich mit einem ESXi-Host oder vCenter Server. In diesem Beispiel verbinden wir uns mit einem ESXi-Host.
Connect-VIServer 192.168.101.201
- Um die Zertifikatswarnung zu vermeiden, führen Sie den folgenden Befehl aus:
Set-PowerCLIConfiguration -InvalidCertificateAction Ignore -Confirm:$false
Copy-VMGuestFile (Lokal) > ESXi-VM)
Verwenden Sie den folgenden Befehl, um eine Datei von einem lokalen Computer (einem Computer, auf dem PowerCLI ausgeführt wird) auf eine Remote-VM auf einem ESXi-Host zu kopieren:Copy-VMGuestFile -Source \"c:\temp\test.txt\" -LocalToGuest -VM Windows-VM -Destination \"c:\temp-VM\" -GuestUser user1 -GuestPassword PasswordWo:c:temptest.txt ist die Quelle, die wir vom lokalen Rechner kopieren möchten.-LocalToGuest ist die Richtung (vom lokalen Rechner zum Gastbetriebssystem auf einer Ziel-VM, die auf ESXi läuft)-VM Windows-VM ist der VM-Name der Ziel-VMc:temp-VM ist der Zielordner auf der Ziel-VM (wo wir eine Kopie der Datei speichern möchten)Benutzer1 ist der Benutzername im Gastbetriebssystem (OS) auf der Ziel-VM. Dieser Benutzer muss Zugriff auf den definierten Zielordner haben.Passwort ist das Passwort für diesen Benutzer.Wir ignorieren die Warnung bezüglich der VMware Tools-Version und überprüfen, ob unsere text.txt Die Dateien wurden kopiert. Wir können sehen, dass unsere test.txt Die Datei mit einer Größe von 29 Byte wurde erfolgreich auf die Windows XP-VM kopiert, die auf einem ESXi-Host ausgeführt wird.
Copy-VMGuestFile (ESXi VM) > Lokal)
Kopieren wir nun eine Datei vom Gastbetriebssystem der VM in ein lokales Verzeichnis des Rechners, auf dem der Befehl ausgeführt wird:Copy-VMGuestFile -Source \"c:\temp-VM\test2.txt\" -GuestToLocal -Destination \"c:\temp\" -VM Windows-VM -GuestUser user1 -GuestPassword PasswordWo:-Quelle „c:temp-VMtest2.txt” ist der Pfad zur Quelle der Datei auf der VM, die auf ESXi ausgeführt wird.-Gast an Einheimischen ist die Richtung (von einem Gastbetriebssystem der ESXi-VM zum lokalen Rechner, auf dem der Befehl ausgeführt wird)„c:temp” ist der Pfad zum Zielordner auf einem lokalen RechnerBenutzer1 ist der Benutzername im Gastbetriebssystem auf der Ziel-VM. Dieser Benutzer muss Zugriff auf den definierten Zielordner haben.Passwort ist das Passwort für diesen Benutzer im Gastbetriebssystem Beispiele für die Verwendung des
 Copy-VMGuestFile Cmdlet mit dem Befehl:get-help Copy-VMGuestFile -examples
Verwendung von Copy-DatastoreItem
Das Kopieren-Datenspeicherelement Das PowerShell-Cmdlet wird zum Kopieren von Dateien in einen/aus einem ESXi-Datenspeicher verwendet. Es gibt zwei Ansätze für die Verwendung dieses Cmdlets zum Kopieren von Dateien in einen VMware ESXi-Datenspeicher:
- Wenn PowerCLI auf einem Windows-Gast innerhalb der VM installiert ist, können Sie einen Befehl ausführen, um eine Datei direkt von einem ESXi-Datenspeicher auf eine VM zu kopieren und umgekehrt.
- Wenn Sie PowerCLI nicht auf einer virtuellen Maschine installieren können, die sich auf einem ESXi-Host befindet, können Sie PowerCLI-Befehle von Ihrem lokalen Windows-Rechner aus ausführen und Dateien aus einem ESXi-Datenspeicher mit dem Befehl
Copy-VMGuestFileBefehl und kopieren Sie diese Dateien dann von Ihrem lokalen Rechner auf eine VM mit demCopy-VMGuestFile.
Sie müssen mit einem ESXi-Server oder vCenter Server verbunden sein. Dies können Sie mit dem folgenden Befehl tun:ViConnect Wir sind direkt mit dem ESXi-Host verbunden.Kopieren wir eine VM-Konfigurationsdatei aus dem Datenspeicher auf den aktuellen Windows-Rechner (den Rechner, auf dem wir diese Befehle ausführen – es kann sich auch um eine VM auf einem ESXi-Host handeln):
- Informationen zum Datenspeicher abrufen:
Get-Datastore \"datastore10a\" - Ein ESXi-Datenspeicherobjekt abrufen:
$datastore = Get-Datastore \"datastore10a\" - Erstellen Sie ein neues PowerShell-Laufwerk mit dem Namen ds: das zugeordnet ist zu $datastore :
New-PSDrive -Location $datastore -Name ds -PSProvider VimDatastore -Root \"" - Legen Sie Ihren Datenspeicher als aktuellen Standort fest:
Set-Location ds:\ - Um Dateien und Verzeichnisse im ausgewählten Verzeichnis aufzulisten, verwenden Sie den Befehl:
Get-ChildItem
- Sie können das VM-Verzeichnis als neuen Standort festlegen. In unserem Fall ist dieses Verzeichnis Windows-VM
Set-Location \"Windows-VM\" - Der Befehl zum Kopieren der VM-Datei, d. h. der VM-Konfigurationsdatei VMX, vom definierten ESXi-Datenspeicher in den temporären Ordner auf dem aktuellen Computer:
Copy-DatastoreItem -Item ds:\Windows-VM\Windows-VM.vmx -Destination c:\tempWo:
ds:Windows-VMWindows-VM.vmx ist der Pfad zu einer Datei, die kopiert werden muss, und ds: ist die definierte Verknüpfung zu einem Datenspeicher (Datenspeicher10a in diesem Fall).

- Wenn Sie eine Verbindung zu vCenter hergestellt haben (nicht zu einem bestimmten ESXi-Host, wie in diesem Beispiel), können Sie den folgenden Befehl mit Definition eines Datenspeichers im vCenter-Rechenzentrum verwenden, um eine Datei aus dem ESXi-Datenspeicher in einen Ordner auf einem lokalen Computer zu kopieren:
Copy-DatastoreItem vmstore:\Datacenter1\datastore10a\Windows-VM\Windows-VM.vmx c:\temp\ - Um eine Datei in die entgegengesetzte Richtung zu kopieren (von einem ESXi-Host), verwenden Sie den folgenden Befehl:
Copy-DatastoreItem -Item c:\temp\darwin.iso -Destination ds:\install\Wir kopieren darwin.iso (das ist ein Bild mit VMware Tools für macOS) von einem Windows-Rechner in das Installationsverzeichnis auf einem ESXi-Datenspeicher.

- Wenn Sie mit vCenter verbunden sind, können Sie diesen Befehl verwenden, um eine Datei von einem lokalen Windows-Rechner in einen Datenspeicher auf einem Remote-ESXi-Host zu kopieren:
Copy-DatastoreItem c:\temp\darwin.iso -Destination vmstore:\Datacenter1\datastore10a\install\
Sie können diese PowerCLI-Cmdlets verwenden und PowerShell-Skripte erstellen, um Dateien von der VM auf den Host und umgekehrt zu übertragen.
Befehle zum Kopieren von Dateien von einer VM auf einen Host in VMware Workstation
Wenn Sie VMware Workstation (ein Typ-2-Hypervisor) auf Ihrem Windows- oder Linux-Host (oder VMware Fusion auf macOS) verwenden, können Sie auch die Befehlszeilenschnittstelle verwenden, um Dateien von der VM auf den Host und umgekehrt zu kopieren. Sie können den Befehl vmrun Befehlszeilentool für die Arbeit mit Virtuellen Maschinen. Die Syntax der Befehle ist unter Windows, Linux und macOS (VMware Fusion) identisch. In diesem Tutorial verwenden wir VMware Workstation 15 unter Windows 10.
- Gehen Sie zum VMware-Arbeitsstation-Verzeichnis:
cd \"C:\Program Files (x86)\VMware\VMware Workstation" - Verwenden Sie den folgenden Befehl, um eine Datei vom Gastbetriebssystem innerhalb der VM auf den lokalen Windows-Host zu kopieren:
CopyFileFromHostToGuestIn unserem Fall lautet der genaue Befehl:
vmrun copyFileFromGuestToHost d:\virtual\WinServer2019\WinServer2019.vmx \"c:\temp\test.txt\" \"c:\temp\copied" - Geben Sie einen Benutzernamen und das Passwort für diesen Benutzer ein, wenn Sie dazu aufgefordert werden (der Benutzer muss über ausreichende Berechtigungen verfügen, um auf die definierte Datei zugreifen zu können).
Wo:
d:virtuellWinServer2019WinServer2019.vmx ist eine virtuelle Festplatte der VM, von der wir die Datei kopieren.
c:temptest.txt ist eine Datei, die auf der virtuellen Festplatte einer VM gespeichert ist; dies ist eine Datei, die wir kopieren.
c:tempcopied ist ein Verzeichnis, in dem eine Kopie einer Datei auf einem Host-Rechner gespeichert werden kann.
Achten Sie darauf, den Backslash zu verwenden. Zeichen beim Festlegen eines Pfades. Wir haben kopiert test.txt Das ist eine Textdatei von einer VM zum Host.
Alternativ können Sie einen Befehl ausführen, indem Sie Anmeldeinformationen im Befehl definieren:
vmrun -T ws -gu Administrator -gp Password000 copyFileFromGuestToHost d:\virtual\WinServer2019\WinServer2019.vmx \"c:\temp\test.txt\" \"c:\temp\copied"
Um eine Datei in umgekehrter Richtung (von einem Host-Rechner auf eine VM) zu kopieren, verwenden Sie folgenden Befehl:CopyFileFromHostToGuest Unser spezieller Befehl in diesem Beispiel lautet:vmrun copyFileFromHostToGuest d:\virtual\WinServer2019\WinServer2019.vmx \"c:\temp\test3.txt\" \"c:\temp\test3-copy.txt\"
So übertragen Sie Dateien mit SSH und SCP
SSH (Secure Shell) ist ein gängiges Protokoll für das sichere Management von Remote-Hosts, das auf Verschlüsselung basiert. SCP ist ein Protokoll, das auf SSH basiert und zum sicheren Kopieren von Dateien über das Netzwerk dient. Sie können SCP verwenden, um Dateien von der VM auf den Host zu übertragen, insbesondere wenn auf der VM Linux ausgeführt wird. Ein SCP- und SSH-Server kann auf Linux-Rechnern und ESXi in wenigen Schritten aktiviert werden.
So aktivieren Sie einen SSH-Server in ESXi
Um diese Methode nutzen und Dateien zu VMware ESXi-Hosts und von ESXi-Hosts übertragen zu können, muss auf einem ESXi-Host ein SSH-Serverdienst aktiviert sein.
- Um einen SSH-Server in VMware Host Client zu aktivieren, gehen Sie zu Host > Verwalten > Dienste und beginnen TSM-SSH Dienstleistung.
- SSH muss in der ESXi-Firewall zugelassen sein, um SCP-Datenverkehr für die Übertragung von Dateien von einem ESXi-Host sowie das Verbinden mit anderen Rechnern über SCP von diesem ESXi-Host aus zu ermöglichen:
- Gehen Sie zu Netzwerk im Navigator Fenster, wählen Sie die Firewall-Regeln Registerkarte und auswählen SSH-Client.
- Klicken Aktionen > Aktivieren um die Firewall-Regel zu aktivieren.

- Um die SSH-Verbindung zwischen Hosts zu überprüfen, können Sie diesen Befehl auf einem ESXi-Host ausführen:
nc -z 192.168.101.202 22Wo:
192.168.101.202 ist eine IP-Adresse eines Remote-Hosts.
22 ist die Portnummer für die SSH-Verbindung (22 ist die Standard-Portnummer).
Die allgemeine Syntax der scp Befehl zum Kopieren von Dateien über SCP über das Netzwerk:scp [OPTION] [user]@[SRC_HOST]:path_to_file1 [user]@[DEST_HOST]:path_to_file2[user]@[SRC_HOST]:path_to_file1 – eine Quelldatei[user]@[DEST_HOST]:path_to_file2 – eine Zieldatei-P Gibt eine Portnummer für die SSH-Verbindung an (verwenden Sie dieses Flag, wenn die Portnummer nicht 22 ist).Im Folgenden erläutern wir die einzelnen Beispiele in der Praxis.
So kopieren Sie eine lokale Datei über SCP auf einen Remote-Computer
Um eine lokale Datei über SCP auf einen Remote-Rechner zu kopieren, verwenden Sie folgenden Befehl:scp file.txt remote_username@remote_host_ip:/remote/directory
Von Linux
Kopieren wir das LinuxVerzeichnis.txt Dateien von einem lokalen Ubuntu-Linux-Rechner (der auch eine VM sein kann) über das Netzwerk mit SCP auf einen ESXi-Host übertragen. Der Ziel-Standort auf dem Remote-ESXi-Host ist der installieren Verzeichnis auf der Datenspeicher10a Datenspeicher. Die IP-Adresse des Remote-ESXi-Hosts lautet 192.168.101.201.Der Befehl zum Kopieren der Datei vom lokalen Linux-Rechner auf den Remote-ESXi-Host lautet in unserem Fall:scp LinuxDir.txt root@192.168.101.201:/vmfs/volumes/datastore10a/install/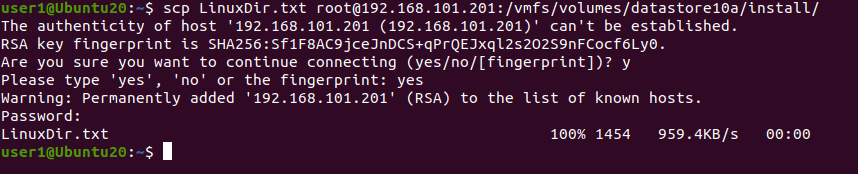 Sie können die kopierte Datei auf dem Zielcomputer unter einem neuen Namen speichern:
scp LinuxDir.txt root@192.168.101.201:/vmfs/volumes/datastore10a/install/LinuxDir-copy.txtVerwenden Sie die -r Flag zum Kopieren eines Verzeichnisses mit allen darin enthaltenen Dateien:scp -r /local/directory remote_username@192.168.101.201:/remote/directory
Von ESXi
Sie können verwenden scp Befehle auf einem ESXi-Host. Der scp Die Syntax in der Befehlszeile ist für Linux und ESXi identisch. Auf dem Remote-Rechner muss ein SSH-Server konfiguriert sein.Melden wir uns beim ESXi-Host an (192.168.101.201) und kopieren Sie die installieren Verzeichnis mit allen enthaltenen Dateien in das Home-Verzeichnis von Benutzer1 auf dem entfernten Linux-Rechner (192.168.101.210).scp -r /vmfs/volumes/datastore10a/install/ user1@192.168.101.210:/home/user1/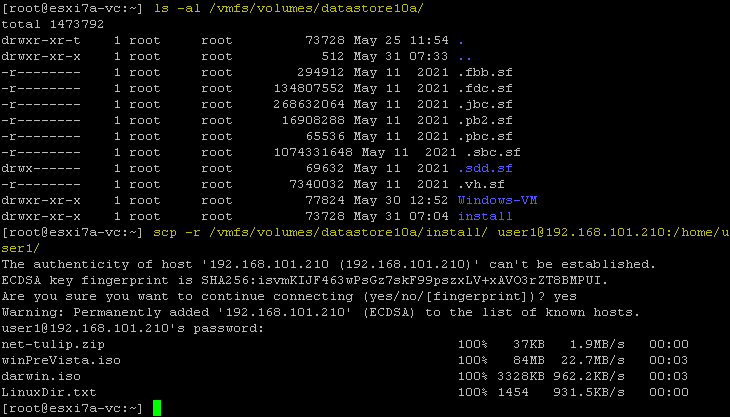 Wenn der SSH-Server auf einem anderen Port als 22 lauscht, verwenden Sie den
 -P Parameter; wenn beispielsweise die SSH-Portnummer 8022Der Befehl lautet:scp -P 8022 -r /vmfs/volumes/datastore10a/install/ user1@192.168.101.210:/home/user1/
So kopieren Sie eine Datei über SCP von einem Remote-Rechner auf einen lokalen Rechner
SCP eignet sich zum Kopieren von Dateien von einem Remote-Rechner auf den lokalen Rechner, wodurch Sie auch Dateien von der VM auf den Host übertragen können. Im Folgenden erklären wir, wie Sie die entsprechenden Befehle unter Linux und ESXi ausführen.
Kopieren von Dateien auf einen lokalen Linux-Rechner
Wir werden eine Datei vom Remote-ESXi-Host auf den aktuellen Linux-Rechner mit SCP kopieren. Verwenden Sie dazu folgenden Befehl:scp remote_username@remote_ip_address:/remote/file.txt /local/directoryKopieren wir ein darwin.iso Dateien vom Remote-ESXi-Server in das definierte Home-Verzeichnis auf dem Linux-Rechner:scp root@192.168.101.201:/vmfs/volumes/datastore10a/install/winPreVista.iso /home/user1/
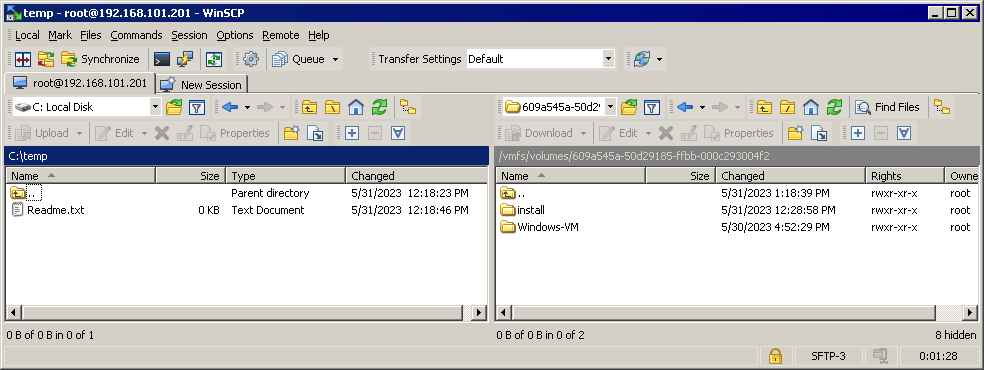
Kopieren von Dateien auf einen lokalen ESXi-Host
Wenn wir uns bei einem ESXi-Host anmelden, können wir den Befehl ausführen, um eine VM-Datei von einem Remote-Linux-Rechner in einen Datenspeicher auf dem lokalen ESXi-Host zu kopieren. Kopieren wir VM_Datei.txt vom Linux-Rechner über das Netzwerk mithilfe von SCP in das Verzeichnis des ESXi-Datenspeichers:scp user1@192.168.101.210:/home/user1/VM_file.txt /vmfs/volumes/datastore10a/install/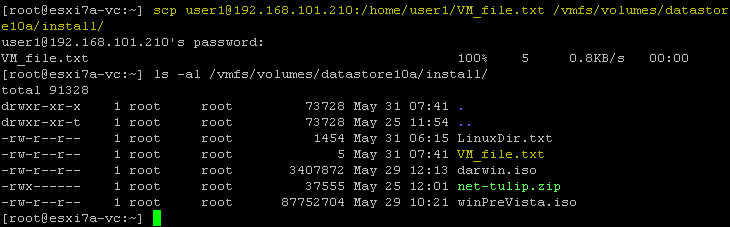
So kopieren Sie Dateien zwischen zwei Remote-Computern
Es gibt SCP-Befehle, um Dateien von einem Remote-Rechner auf einen anderen Remote-Rechner zu kopieren, wobei die Daten über den aktuellen lokalen Rechner kopiert werden können oder nicht. Die Befehlssyntax lautet wie folgt:scp user1@remote-host1.com://directory/file.txt user2@remote-host2.com://directory/Die Daten werden mit dem oben genannten Befehl direkt von einem Remote-Host zu einem anderen übertragen (ohne auf unseren aktuellen lokalen Rechner kopiert zu werden). Wenn Sie den Datenverkehr über Ihren lokalen Rechner leiten möchten, auf dem Sie den Befehl ausführen, verwenden Sie den Befehl -3 Flagge.Hinweis: Verwenden Sie diesen Befehl, wenn die Anmeldeinformationen auf beiden Remote-Hosts identisch sind.Ein Beispiel für den Befehl, der auf einem lokalen Linux-Rechner ausgeführt wird, um eine Datei (vim.v00) von einem Remote-ESXi-Host (192.168.101.202) auf einen lokalen ESXi-Host (192.168.101.201) zu kopieren:scp root@192.168.101.202://vmfs/volumes/BOOTBANK1/vim.v00 root@192.168.101.201://vmfs/volumes/datastore10a/install/Wenn Sie das sehen Hostschlüsselüberprüfung fehlgeschlagen Fehler bedeutet, dass der Hostschlüssel nicht auf einem der Hosts gespeichert ist. Wenn der Fehler von einer Änderung des Hostschlüssels auf dem Remote-Server verursacht wurde, löschen Sie den alten Hostschlüssel für den aktuellen Remote-Host, der in ~/.ssh/known_hosts gespeichert istDer Befehl zum Löschen eines alten Hostschlüssels lautet:ssh-keygen -R hostname_or_IP_addressFühren Sie beispielsweise den Befehl auf 192.168.101.202 aus, um den alten Host-Schlüssel für den Remote-Host 192.168.101.201 zu entfernen:ssh-keygen -R 192.168.101.201Ein Beispiel für die Verwendung -3 im Befehl zum Kopieren von Dateien über den lokalen Rechner:scp -3 root@192.168.101.202://vmfs/volumes/BOOTBANK1/vim.v00 root@192.168.101.201://vmfs/volumes/datastore10a/install/Der alternative Befehl für diesen Zweck lautet:scp -o \"ForwardAgent yes\" root@192.168.101.202://vmfs/volumes/BOOTBANK1/vim.v00 root@192.168.101.201://vmfs/volumes/datastore10a/install/
So kopieren Sie Dateien über SCP von Windows
Sie können Dateien auch auf Virtuelle Maschinen oder ESXi-Hosts in Windows kopieren. Dazu benötigen Sie einen SCP-Client wie WinSCP, der über eine benutzerfreundliche und praktische grafische Oberfläche verfügt. Sie können WinSCP herunterladen kostenlos.
- WinSCP ausführen.
- Wählen Sie ein Protokoll aus, zum Beispiel SFTP.
- Geben Sie einen Hostnamen und eine Portnummer eines Remote-Hosts ein, z. B. eines ESXi-Hosts oder eines Linux-Rechners.
- Geben Sie einen Benutzernamen und ein Passwort für einen Remote-Computer ein.
- Klicken Anmeldung.
In diesem Beispiel verbinden wir uns mit einem Remote-ESXi-Host.

- Es wird eine Benachrichtigung angezeigt:
Weiter mit dem Verbinden mit einem unbekannten Server fortfahren und dessen Host-Schlüssel zum Cache hinzufügen?
Klicken Ja weitermachen.
- Sobald die Verbindung hergestellt ist, sehen Sie das Fenster im Commander-Stil mit zwei Bereichen. Ein Bereich stellt das Verzeichnis auf dem lokalen Rechner dar, der andere Bereich das Verzeichnis auf dem Remote-Rechner. Sie können Dateien zwischen dem lokalen Host und dem Remote-Host kopieren, indem Sie Dateien zwischen diesen beiden Bereichen kopieren.
Sie können Dateien aus einem Datenspeicher eines Remote-ESXi-Hosts, mit dem Sie in WinSCP verbunden sind, auf eine Remote-Windows-VM oder einen physischen Computer kopieren, indem Sie eine SMB-Freigabe auf diesem Windows-Computer verwenden.Sie können jedoch den direkten Freigabepfad nicht in ein WinSCP-Fenster eingeben (z. B. 192.168.101.117c$). Sie können nur einen Laufwerksbuchstaben auswählen. Um diese Einschränkung zu umgehen, verbinden Sie sich in Windows Explorer mit der Dateifreigabe und ordnen Sie diese Dateifreigabe einem Netzlaufwerk zu. Weisen Sie einen Laufwerksbuchstaben zu, zum Beispiel S: wie wir es in diesem Beispiel getan haben, um den freigegebenen Ordner mit dem teilten Netzwerkordner zu verbinden 192.168.101.211Jetzt können wir auswählen S: Wählen Sie im Dropdown-Menü im linken Bereich von WinSCP als Netzlaufwerk die erforderlichen Dateien oder Verzeichnisse auf dem Datenspeicher des Remote-ESXi-Servers aus und kopieren Sie die Dateien in beide Richtungen.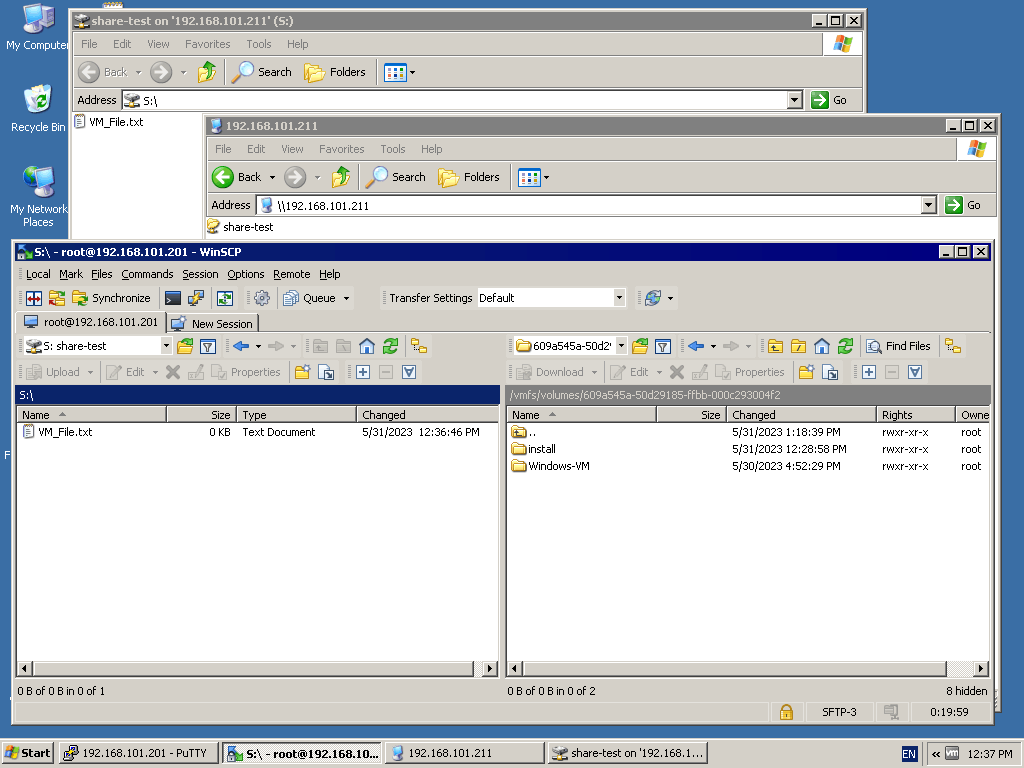
Verwendung einer NFS-Freigabe
Sie können eine NFS-Freigabe verwenden, um Dateien von einem ESXi-Datenspeicher auf VMs zu übertragen und umgekehrt. ESXi unterstützt keine SMB-Freigaben (nativ für Windows). Es unterstützt NFS-Freigaben (nativ für Linux) und das Hinzufügen einer NFS-Freigabe als Datenspeicher. Mit dieser Funktion können Sie eine der folgenden Methoden verwenden, um Dateien zwischen ESXi- und Linux-Maschinen zu übertragen:Ansatz 1:
- Konfigurieren Sie einen NFS-Server und eine NFS-Freigabe auf einer Linux-VM.
- NFS-Freigabe als Datenspeicher auf ESXi anhängen
- Kopieren Sie Dateien von einer VM in einen ESXi-Datenspeicher und umgekehrt.
Ansatz 2:
- Konfigurieren Sie einen NFS-Server auf einem physischen Linux-Rechner oder NAS-Ge
- NFS-Freigabe als Datenspeicher auf ESXi hinzufügen
- Verbinden Sie sich mit der NFS-Freigabe auf einer Linux-VM.
- Kopieren Sie Dateien von einer Linux-VM auf eine NFS-Freigabe und kopieren Sie diese Dateien anschließend auf einen ESXi-Host. Kopieren Sie Dateien vom ESXi-Host auf die NFS-Freigabe und kopieren Sie diese Dateien von der NFS-Freigabe auf die Linux-VM.
Lesen Sie die NFS vs. SMB Vergleich, um mehr über diese Filesharing-Protokolle zu erfahren.
Konfigurieren einer NFS-Freigabe unter Linux
In diesem Tutorial verwenden wir Linux Ubuntu 20.04. Wir haben uns als normaler Benutzer bei Linux angemeldet und verwenden sudo wenn Root-Rechte erforderlich sind, um den Befehl auszuführen. Führen Sie die folgenden Schritte aus, um einen NFS-Server zu installieren und eine NFS-Freigabe zu konfigurieren.
- Aktualisieren Sie den Repository-Baum unter Linux:
sudo apt-get update - Installieren Sie das NFS-Serverpaket unter Linux:
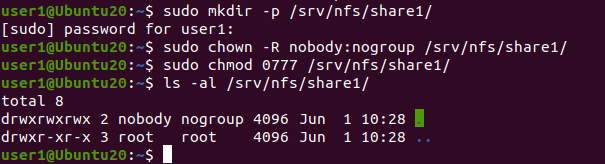
sudo apt-get install nfs-kernel-server -y - Erstellen Sie ein Verzeichnis (das Exportverzeichnis), das auf dem NFS-Server geteilt wird:
sudo mkdir -p /srv/nfs/share1/ - Legen Sie den Eigentümer und die Berechtigungen für das erstellte Verzeichnis fest:
sudo chown -R nobody:nogroup /srv/nfs/share1/sudo chmod 0777 /srv/nfs/share1/Das niemand ist ein Pseudobenutzer, der den Benutzer mit den geringsten Berechtigungen ohne Shell-Zugriff repräsentiert. Der Zweck des keine Gruppe Gruppe ähnelt der niemand Benutzer.
- Konfigurieren Sie die Exportdatei, um das erstellte Verzeichnis zu teilen.
sudo nano /etc/exportsoder
sudo vim /etc/exports - Fügen Sie die Zeile am Ende der Konfigurationsdatei hinzu:
/srv/nfs/share1/ CLIENT_IP(rw,sync,no_subtree_check)In unserem Fall lautet die Zeile mit der zulässigen IP-Adresse unseres ESXi-Hosts:
/srv/nfs/share1/ 192.168.101.201(rw,sync,no_subtree_check)Sie können allen Hosts des Subnetzes Zugriff gewähren, indem Sie folgende Zeile hinzufügen:
/srv/nfs/share1/ 192.168.101.0/24(rw,sync,no_subtree_check)Sie können die weitere Zeile hinzufügen, um den Zugriff für einen anderen Host (IP-Adresse) zuzulassen.
Speichern Sie die Änderungen an der Konfigurationsdatei und beenden Sie den Texteditor.
- Um zu überprüfen, ob die Daten in die Datei geschrieben wurden, können Sie den folgenden Befehl verwenden:
cat /etc/exports - Wenden Sie die neue Konfiguration mit dem folgenden Befehl an:
sudo exportfs -a - Stellen Sie sicher, dass die Firewall auf dem Linux-Rechner mit dem NFS-Server den Zugriff zulässt. Sie können den Zugriff auf die bestimmte IP-Adresse mit dem folgenden Befehl gewähren:
sudo ufw allow from IP to any port nfsIn unserem Fall:
sudo ufw allow from 192.168.101.201 to any port nfsUm den Zugriff auf Hosts aus dem gesamten Subnetz zu ermöglichen:
sudo ufw allow from SUBNET to any port nfsIn unserem Fall würde der Befehl lauten:
sudo ufw allow from 192.168.101.0/24 to any port nfs - Sie können den Firewall-Status mit dem folgenden Befehl überprüfen:
sudo ufw status - Starten Sie den NFS-Server neu, damit die Konfigurationsänderungen wirksam werden:
sudo systemctl restart nfs-kernel-server - Die NFS-Freigabe wurde unter Linux konfiguriert.
- Kopieren Sie eine Datei aus einem beliebigen Verzeichnis des Linux-Rechners in das über NFS freigegebene Verzeichnis. Wir kopieren VM_Datei.txt auf unsere NFS-Freigabe und überprüfen Sie nach dem Öffnen des Verzeichnisses ihren Inhalt:
cp VM_file.txt /srv/nfs/share1/ls -al /srv/nfs/share1/
Einrichten eines NFS-Datenspeichers in ESXi
Sie müssen den NFS-Datenspeicher in ESXi hinzufügen, nach der Konfiguration der NFS-Freigabe. In diesem Beispiel verwenden wir dazu VMware Host Client.Gehen Sie zu Speicherorte > Datenspeicher und klicken Sie Neuer Datenspeicher.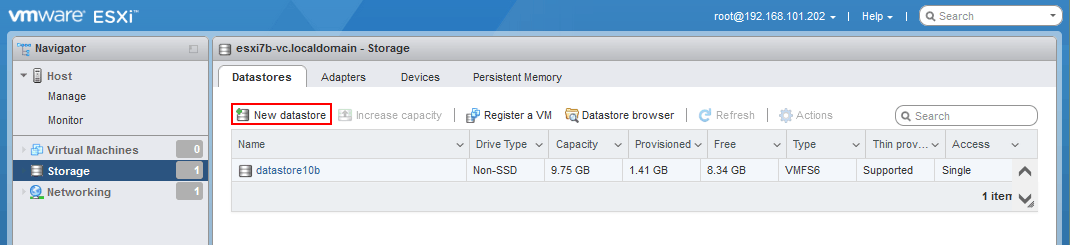 Das Neuer Datenspeicher Der Assistent ist geöffnet.
- Wählen NFS-Datenspeicher mountenKlicken Sie auf Weiter weitermachen.

- NFS-Mount-Details angeben:
- Name: NFS-Freigabe (der Name, der als Name des Datenspeichers angezeigt wird)
- NFS-Server: 192.168.101.210
- NFS-Freigabe: /srv/nfs/freigabe1/
- NFS-Version: NFS4<>/li
Benutzername und Passwort sind für NFS4 optional. Wir lassen diese beiden Felder leer.
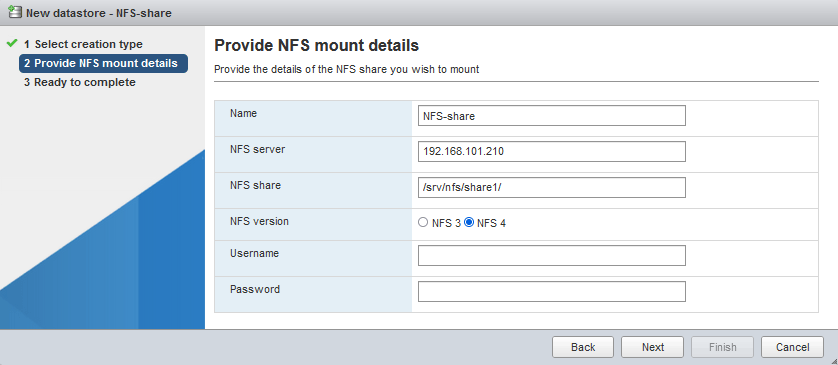
- Bereit zum Abschließen. Überprüfen Sie Ihre Konfiguration und klicken Sie auf Fertigstellen wenn alles korrekt ist.
Kopieren von Dateien von einer VM auf den Host
Der NFS-Datenspeicher wurde erfolgreich eingebunden. Sie können dies überprüfen unter Speicherorte > DatenspeicherJetzt können wir Dateien aus der VM, die auf der NFS-Freigabe gespeichert sind, in einen lokalen ESXi-Datenspeicher kopieren (Dateien von der VM auf den Host übertragen).
- Klicken Datenspeicher-Browser.

- Wählen Sie Ihren NFS-Datenspeicher im Datenspeicher-Browser aus (NFS-Freigabe in unserem Fall). Durchsuchen Sie die benötigte Datei im NFS-Datenspeicher. Wählen Sie die benötigte Datei aus und klicken Sie auf Kopie.
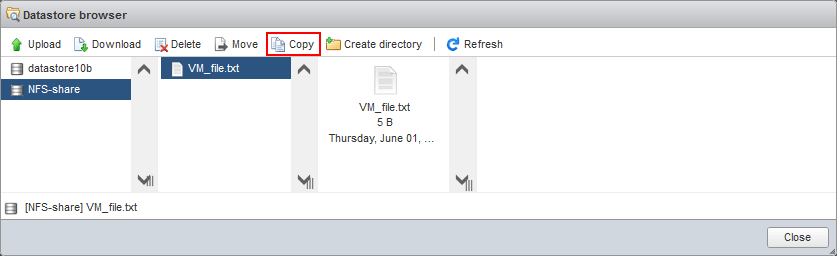
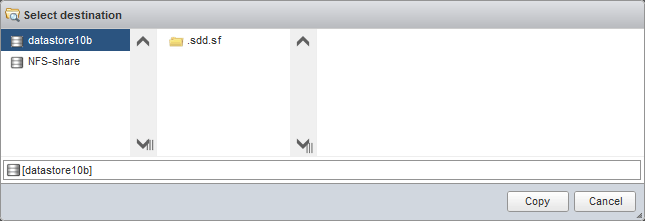
- Ziel auswählen. Wählen Sie den gewünschten Standort im Ziel-Datenspeicher aus, an dem Sie die kopierte Datei speichern möchten (Datenspeicher10b in unserem Fall). Klicken Sie auf Kopie.
Alternativ können Sie die benötigte Datei in der Befehlszeile auf dem ESXi-Server kopieren:
cp /vmfs/volumes/NFS-share/VM_file.txt /vmfs/volumes/datastore10b/VM_file-copy.txt
Verwenden der VMware-Webschnittstelle zum Herunterladen/Hochladen von Dateien
Sie können eine Webschnittstelle von VMware Host Client oder VMware vSphere-Client zum Hochladen/Herunterladen von Dateien auf/von einem ESXi-Datenspeicher. Die Webschnittstelle ist von jedem physischen oder virtuellen Rechner aus verfügbar, auf dem ein Webbrowser installiert ist und eine Netzwerkverbindung zu einem ESXi-Host besteht. So können Sie diese Webschnittstelle direkt von einer VM aus öffnen, wenn ein Gastbetriebssystem über die GUI verfügt, oder einen beliebigen lokalen Rechner als Zwischenrechner verwenden, um Dateien von der VM zum Host und umgekehrt zu übertragen. Es gibt eine alternative, aber komplexere Möglichkeit, Dateien von VMs auf VMware ESXi zu übertragen:
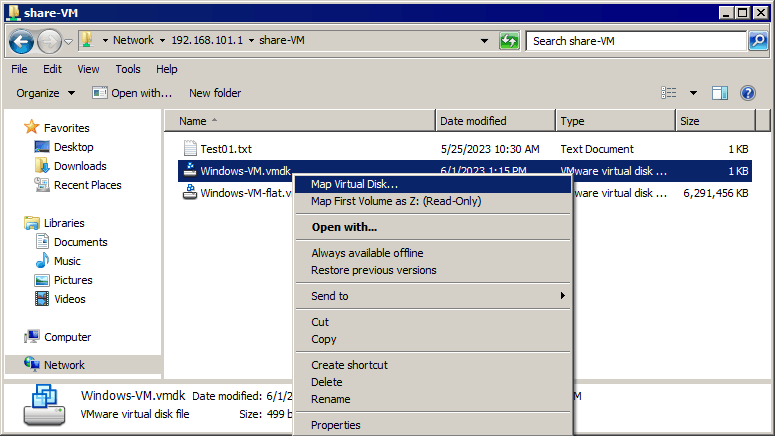
- Herunterladen Sie eine virtuelle Festplatte der Virtuellen Maschine auf Ihren lokalen Rechner oder einen anderen Rechner.
- Extrahieren Sie die benötigten Dateien aus dieser virtuellen VM-Festplatte (.vmdk und –flat.vmdk) auf einen lokalen Rechner. Alternativ können Sie eine virtuelle Festplatte auf einem virtuellen Laufwerk mounten, wenn VMware Workstation installiert ist.
- Laden Sie die extrahierten Dateien oder Dateien von der gemounteten virtuellen Festplatte mit einer der oben beschriebenen Methoden (in VMware Host Client, vSphere Client oder SCP-Client usw.) in den Datenspeicher des VMware ESXi-Hosts hoch.
Lesen Sie den ausführlichen Blogbeitrag über So extrahieren Sie Dateien aus virtuellen VMDK-Festplatten.
Verwendung von ISO-Dateien für die Datenübertragung auf eine VM
Wenn für eine VM keine Netzwerkverbindung verfügbar ist, können Sie Dateien mithilfe von ISO-Image-Dateien auf VMware-VMs übertragen:
- Erstellen Sie ein ISO-Image mit einer Software wie Ultra ISO für Windows.
- Schreiben Sie die erforderlichen Dateien auf den ISO-Image auf Ihrem lokalen Rechner oder einem anderen Rechner. Sie können Dateien aus ESXi mit einer der oben genannten Methoden kopieren und auf den ISO-Image schreiben.
- Hängen Sie die ISO-Image-Datei mithilfe eines virtuellen CD/DVD-Laufwerks der VM in die VM ein (Sie können die ISO-Datei direkt von Ihrem lokalen Computer einhängen oder die ISO-Datei zuvor in einen ESXi-Datenspeicher hochladen). Verwenden Sie VMware Host Client, VMware vSphere Client, VMware Workstation oder VMware Remote Console, um die ISO-Datei in die ESXi-VM einzuhängen.
Diese Methode kann nicht zum Übertragen von Dateien von der VM auf den Host verwendet werden, da eine VM mit einer virtuellen CD/DVD-Festplatte im schreibgeschützten Modus arbeitet.
Schlussfolgerung
Es gibt mehrere Methoden, um Dateien von einem Host auf virtuelle Maschinen zu kopieren und umgekehrt. Einige davon erfordern eine Netzwerkverbindung, andere funktionieren auch, wenn das Netzwerk nicht verfügbar ist. Sie können die für Ihr Szenario geeignete Methode verwenden und diese Methoden kombinieren. Denken Sie daran, Ihre VMs zu sichern, um Datenverluste zu vermeiden. Mit NAKIVO Backup & Replication können Sie Ihre VMs in VMware vSphere schützen und Einzelne Dateien wiederherstellen direkt aus einem VM-Backup.

