如何在 Windows 中停用 Hyper-V
Microsoft Hyper-V 是一種第 1 類虛擬化程式,可安裝於 Windows 系統上——包括 Windows 10 以及 Windows Server 2019. 在某些情況下,您可能需要從 Windows 電腦上解除安裝 Hyper-V。例如, VMware 工作站與 Hyper-V 並不相容 當安裝在同一台機器上時。其他第 2 類虛擬化平台(如 VirtualBox)也會出現相同的問題。
無論您遇到何種情況,請學習如何透過兩種方法在 Windows 中解除安裝 Hyper-V:透過 GUI(圖形使用者介面)以及透過 CLI(命令列介面)。
註: 針對 Windows 10 所說明的操作步驟,同樣適用於 Windows 11。針對 Windows Server 2019 所說明的操作步驟,同樣適用於 Windows Server 2022 和 2016。

如何在 Windows 10 和 11 的”控制台”中停用 Hyper-V
透過”控制台”解除安裝 Hyper-V 是最方便的方法,也是大多數 Windows 10 或 11 使用者首選的方式。如此一來,Hyper-V 特點便會被完全解除安裝。
若要解除安裝 Hyper-V,請依照以下步驟操作:
- 點擊
Start, 類型Control Panel,並開啟它。按下Win+R. 在 執行 欄位、類型appwiz.cpl然後按下Enter. - 在 控制面板 視窗,點擊
Turn Windows features on or off. - 在 Windows 特點 在彈出的視窗中,取消選取
Hyper-V核取方塊。請確保 Hyper-V 子資料夾中的核取方塊均未被選中。
- 位置並取消選取
Virtual Machine Platform和Windows Hypervisor Platform. - 點擊
OK以儲存設定並開始 Hyper-V 的解除安裝程序。 - 點擊
Restart now請重新啟動電腦以完成此程序,並解除安裝 Hyper-V。
如何在 Windows 10 和 11 中使用命令提示字元解除安裝 Hyper-V
您可以在命令列介面 (CLI) 中解除安裝 Hyper-V,方法與先前在圖形使用者介面 (GUI) 中所述的方式相同。此工作流程在 Windows 10 和 Windows 11 上皆適用。
在開始解除安裝 Hyper-V 之前,請先在命令列中檢查 Hyper-V 的安裝狀態,並確保在解除安裝 Hyper-V 後,此虛擬化程式已從您的 Windows 系統中移除。
- 以系統管理員身分開啟命令提示字元(CMD)。開啟 Windows”開始”選單,輸入
cmd, 右鍵點擊該 cmd 項目,然後點擊Run as administrator. - 執行
systeminfo以檢查 Hyper-V 是否已安裝。- 若未安裝 Hyper-V,則在 Hyper-V 系統需求 在該區段中,您可以看到安裝 Hyper-V 所需的技術名稱,以及這些技術在該電腦上的可用狀態。
- 若已安裝 Hyper-V,您應會在”Hyper-V 需求”一行中看到以下訊息:
已偵測到虛擬化程式。Hyper-V 的特點將不會顯示.
- 此外,您也可以執行
msinfo32.exe在圖形化使用者介面中檢查 Hyper-V 是否已解除安裝。所需資訊的位置位於 系統摘要 項目清單底部的區塊。
現在,一旦確認已安裝 Hyper-V,您就可以透過命令列在 Windows 10 中解除安裝 Hyper-V。
- 以系統管理員權限開啟 PowerShell(輸入
PowerShell在”開始”選單中,右鍵點擊”PowerShell”,然後點擊Run as administrator(就像你執行 CMD 時那樣)。 - 執行以下指令,以從 Windows 10 中移除 Hyper-V 特點:
Disable-WindowsOptionalFeature -Online -FeatureName Microsoft-Hyper-V-All
- 您現在要重新啟動電腦以完成此操作嗎?
類型
Y並點擊Enter. - 執行此指令後,必須重新啟動系統。您可以輸入
N(否),並手動重新啟動 Windows。
使用 DISM 移除 Hyper-V
DISM(部署映像服務與管理)是一項用於處理 Windows 映像(.wim 檔案)以及安裝/解除安裝 Windows 驅動程式、特點和套件的工具。
以系統管理員權限開啟 PowerShell,並執行以下指令以停用 Hyper-V:
DISM /Online /Disable-Feature:Microsoft-Hyper-V

您可能需要於電腦的 UEFI/BIOS 設定中停用”安全開機”(Secure Boot),才能完成解除安裝程序並移除 Hyper-V。停用”安全開機”的操作步驟取決於您的硬體供應商,且因主機板供應商及型號不同而有所差異。
如何在 BCDEDIT 中停用 Hyper-V
您可以在 Windows 啟動時變更 Hyper-V 的啟動選項,而無需完全解除安裝 Hyper-V。在此情況下,Hyper-V 雖已安裝,但處於停用狀態。若您透過命令列停用 Hyper-V,則在 Windows 啟動之前,Hyper-V 不會被啟動 bcdedit 工具。 Bcdedit 這是一個用於管理開機配置資料(Boot Configuration Data,簡稱 BCD)的命令列工具。BCD 儲存庫用於描述應用程式的開機參數、新增開機選單項目等。
若您使用 BCD 停用 Hyper-V,Hyper-V 特點雖會被停用,但並不會從 Windows 中完全解除安裝。如您所知,Hyper-V 是一種在 Windows 啟動前便會先啟動的第一類虛擬化平台。 採用此方法的目的是在啟動配置中停用 Hyper-V。
若要使用此方法停用 Hyper-V,請以系統管理員身分執行命令提示字元 (CMD),並執行以下命令:
bcdedit /set hypervisorlaunchtype off

註: 若需再次啟用 Hyper-V,請執行 bcdedit /set hypervisorlaunchtype on
為了更方便起見,您可以為您的 Windows 電腦建立兩個開機項目。其中一個開機項目用於啟動包含 Hyper-V 的作業系統,另一個則用於啟動不包含 Hyper-V 的作業系統。
- 執行以下指令,將預設的開機設定複製到新項目中。”停用 Hyper-V“”是我這邊新增加的開機項目名稱。
bcdedit /copy {default} /d "Hyper-V disable" - 螢幕上顯示以下輸出訊息:
The entry was successfully copied to {xxxxxxxx-xxxx-xxxx-xxxx-xxxxxxxxxxxx}. - 執行此指令,以編輯您所建立的新開機項目的 Hyper-V 開機選項。請將上述輸出訊息中括號 {} 內的值複製,並貼上至此指令中:
bcdedit /set {xxxxxxxx-xxxx-xxxx-xxxx-xxxxxxxxxxxx} hypervisorlaunchtype off
- 您應該會看到以下訊息: 操作已成功完成.
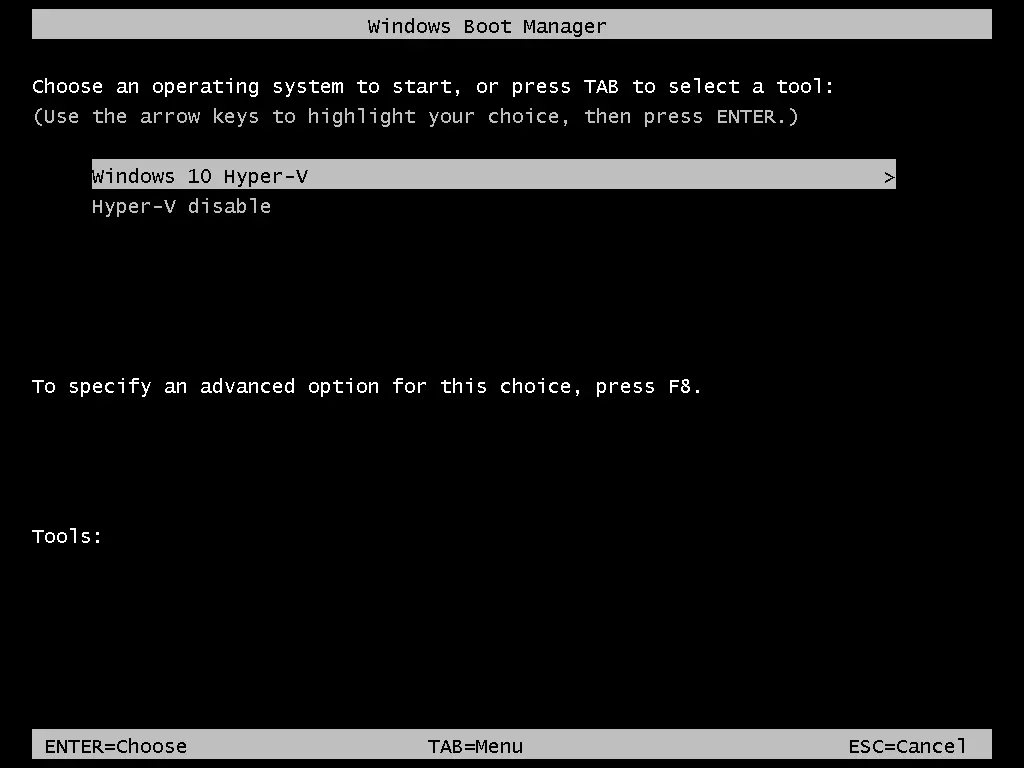
- 使用 Hyper-V 將預設開機項的名稱編輯為”Windows 10 Hyper-V” 以增加便利性:
bcdedit /set {default} description "Windows 10 Hyper-V" - 請重新啟動您的電腦。
現在您有兩個開機選單項目。請選擇”停用 Hyper-V” 以在不啟用 Hyper-V 的情況下啟動 Windows,或選擇 “Windows 10 Hyper-V” 以透過 Hyper-V 啟動 Windows。
您也可以透過這段影片了解如何在 Windows 中解除安裝 Hyper-V:
如何在 Windows Server 2019 上解除安裝 Hyper-V
在 Windows Server 2019 中移除 Hyper-V 的流程與 Windows 10 略有不同。本節將說明如何在 Windows Server 2019 中解除安裝 Hyper-V。在 Windows Server 2022 和 2016 上解除安裝 Hyper-V 的操作流程完全相同。
使用圖形使用者介面 (GUI)
如果您的 Windows Server 已安裝圖形化環境並具備圖形使用者介面 (GUI),那麼解除安裝 Hyper-V 的最簡單方法是使用 伺服器管理員 以及 移除角色與特點 精靈。
- 開啟”伺服器管理員”(
Start>Server Manager),然後點擊Manage>Remove Roles and Features.
該 移除角色與特點 精靈視窗開啟。
Before You Begin. 此步驟無需進行任何設定,但您可以選擇Skip this page by default若要避免日後再顯示此頁面,請點選Next繼續。Server Selection. 選擇a server from the server pool並從清單中選取您的伺服器。伺服器名稱是 Hyper-V-Repl.test.net 就我而言。點擊Next請在精靈的每個步驟中點擊”繼續”。
Server Roles. 在角色清單中取消勾選”Hyper-V”核取方塊,以解除安裝 Hyper-V。
- 彈出視窗隨即開啟。請確認您即將移除的特點。選擇
Remove management tools (if applicable)若要移除 Hyper-V 管理員 Windows 工具,請按一下Remove Features.
Features. 解除安裝 Hyper-V 時,無需移除自訂特點。請將特點設定維持原狀。
Confirmation. 勾選所有要移除的項目。若希望在移除 Hyper-V 角色後,伺服器能自動重新啟動,請勾選此核取方塊。否則,您需要手動重新啟動 Windows,才能使變更生效並完成 Hyper-V 的解除安裝。按一下Remove以完成並解除安裝 Hyper-V。
使用 PowerShell
在 Windows Server 2016、2019 和 2022 中,用於解除安裝 Hyper-V 的 PowerShell 指令與 Windows 10 中的不同。
- 以系統管理員身分開啟 PowerShell。
- 請執行以下指令,以在 Windows Server 2016 上解除安裝 Hyper-V:
Remove-WindowsFeature -Name Hyper-V
- 重新啟動伺服器以完成移除程序。
可能發生的問題
在 Windows 10 以及 Windows Server 2016、2019 或 2022 中嘗試解除安裝 Hyper-V 時,有時可能會遇到問題。以下將說明一些常見問題,並提供建議以協助解決這些問題。
案例 1
若您看到 Windows 無法解除安裝 Hyper-V 元件的訊息,請嘗試檢查系統檔案及其儲存位置。系統可能會顯示不同的錯誤代碼,例如 0x800F0831、0x80073701 等。請使用命令列工具來解決此問題。以系統管理員權限開啟命令列 (CMD),並執行以下指令。
Dism /Online /Cleanup-Image /RestoreHealth
Dism.exe /online /Cleanup-Image /StartComponentCleanup
sfc /scannow
Disable-WindowsOptionalFeature -Online -FeatureName Microsoft-Hyper-V-All
執行這些指令後,日誌會寫入 CBS.log 和 dism.log. 日誌對於疑難排解很有幫助。
案例 2
由於主機 Windows 系統中仍存在由 Hyper-V 建立的虛擬網路介面卡或虛擬交換器,因此無法解除安裝 Hyper-V。請移除虛擬的 Hyper-V 網路介面卡,然後再次嘗試解除安裝 Hyper-V。以下是一些關於 Hyper-V 的貼文 網路介面卡 和 虛擬交換器 摘自我們的部落格。
案例 3
您已停用 Hyper-V,但在重新開機後,Hyper-V 卻又重新啟用。可能的原因之一是,群組原則設定為在每次開機後,於登入時自動啟用 Hyper-V。系統管理員應編輯群組原則設定以解決此問題。請注意,Device Guard 和 Credential Guard 是兩項在 Windows 中運作時會使用 Hyper-V 的特點。請檢查 Computer Configuration -> Administrative Templates -> System -> Device Guard 在”群組原則編輯器”中,請確認沒有任何設定會強制在 Windows 電腦上執行 Device Guard。
結論
在 Windows 10、Windows 11 以及 Windows Server 2016/2019/2022 中,可透過圖形使用者介面或命令列介面解除安裝 Hyper-V。Windows 10 與 Windows Server 作業系統的操作流程有所不同。若您已解除安裝 Hyper-V,可使用其他虛擬化平台來執行虛擬機器。請記得備份您的虛擬機器,以保護您的資料。 NAKIVO Backup & Replication 支援 VMware 虛擬機器的備份 以及 Hyper-V 虛擬機器。


